> ## Documentation Index
> Fetch the complete documentation index at: https://translations.mintlify.site/llms.txt
> Use this file to discover all available pages before exploring further.
# My Account API リファレンス
> Auth0 の My Account API に関するドキュメント
バージョン: 1.0 (現行)
Auth0 の My Account API は、ユーザーが自身のアカウント情報を管理するための専用エンドポイントを提供します。お客様はこれらの API を使用して、アプリケーション内にセルフサービス機能を構築したり、ユーザーアカウントの詳細情報を段階的に追加したりできます。
My Account API は、現在ログインしているユーザーのコンテキストで動作し、ユーザー向けアプリケーション内で直接使用できます。
Auth0 ドメインとカスタムドメインの使い分け
My Account API では、正規の Auth0 ドメインまたはカスタムドメインを使用できますが、次の項目を含むプロセス全体で、同じものを使用する必要があります。
* アクセストークンの取得
* audience 値の設定
* My Account API エンドポイントの呼び出し
詳しくは、[Custom Domains](https://auth0.com/docs/customize/custom-domains) を参照してください。
## My Account API を有効化する
Auth0 Dashboard で、テナントの My Account API を有効化できます。
1. **Authentication > APIs** に移動します。
2. My Account API のバナーを見つけます。
3. **Activate** を選択します。
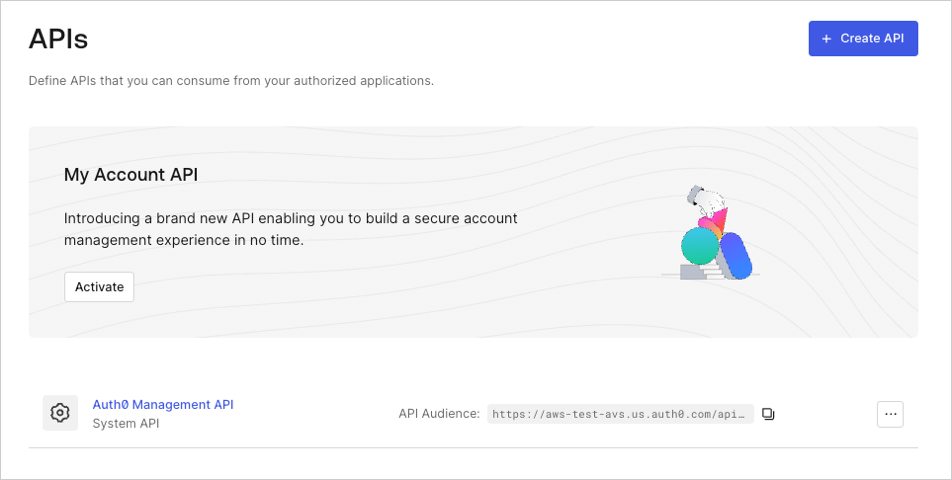 デフォルトでは、My Account API は次のアプリケーション API アクセスポリシーで作成されます。
`require_client_grant` (ユーザーフロー用)
`deny_all` (クライアント (machine-to-machine) フロー用)
アプリケーションがユーザーに代わって My Account API にアクセスするには、そのアプリケーションに対してクライアントグラントを明示的に作成する必要があります。これにより、そのアプリケーションがリクエストできる最大のスコープを定義できます。あるいは、ユーザーアクセスフローのポリシーを `allow_all` に変更することもできます。これにより、テナント内の任意のアプリケーションが My Account API に対して任意のスコープをリクエストできるようになります。
My Account API は機微な情報や操作を公開するため、Auth0 はユーザーアクセスフローで `allow_all` を使用することを推奨していません。アプリケーションが本当に必要なものにのみアクセスできるようにし、潜在的なセキュリティリスクを最小限に抑えるため、My Account API では最小権限の原則に従う必要があります。
アプリケーションに最終的に付与される権限は、アプリケーション API アクセスポリシーで許可されたスコープ、エンドユーザーに割り当てられたロールベースのアクセス制御 (RBAC) の権限、およびユーザーの同意 (該当する場合) の積集合によって決まります。
デフォルトでは、My Account API は次のアプリケーション API アクセスポリシーで作成されます。
`require_client_grant` (ユーザーフロー用)
`deny_all` (クライアント (machine-to-machine) フロー用)
アプリケーションがユーザーに代わって My Account API にアクセスするには、そのアプリケーションに対してクライアントグラントを明示的に作成する必要があります。これにより、そのアプリケーションがリクエストできる最大のスコープを定義できます。あるいは、ユーザーアクセスフローのポリシーを `allow_all` に変更することもできます。これにより、テナント内の任意のアプリケーションが My Account API に対して任意のスコープをリクエストできるようになります。
My Account API は機微な情報や操作を公開するため、Auth0 はユーザーアクセスフローで `allow_all` を使用することを推奨していません。アプリケーションが本当に必要なものにのみアクセスできるようにし、潜在的なセキュリティリスクを最小限に抑えるため、My Account API では最小権限の原則に従う必要があります。
アプリケーションに最終的に付与される権限は、アプリケーション API アクセスポリシーで許可されたスコープ、エンドユーザーに割り当てられたロールベースのアクセス制御 (RBAC) の権限、およびユーザーの同意 (該当する場合) の積集合によって決まります。
サポート対象フロー
My Account API へのクライアントアクセス用のアプリケーション API ポリシーは更新できません。つまり、クライアント認証情報フローを使用して My Account API にアクセスすることはできません。
アプリケーション API アクセスポリシーと、それに関連付けられたクライアントグラントの管理方法について詳しくは、[Application Access to APIs: Client Grants](https://auth0.com/docs/get-started/applications/application-access-to-apis-client-grants) を参照してください。
## アクセストークンを取得する
My Account API のアクセストークンは、ご自身の API のいずれかに対するアクセストークンを取得するのと同じ方法で取得できます。
機密性の高い操作
My Account API に機密性の高い操作 (認証方法の登録など) を許可する場合は、[多要素認証 (MFA)](https://auth0.com/docs/secure/multi-factor-authentication) によって追加のセキュリティポリシーを適用するため、[ステップアップ認証](https://auth0.com/docs/secure/multi-factor-authentication/step-up-authentication) を使用することを強く推奨します。
Universal Login を使用している場合は、以下の記事を参照してください。
* [認可コードフローを使用して API を呼び出す](https://auth0.com/docs/get-started/authentication-and-authorization-flow/authorization-code-flow/call-your-api-using-the-authorization-code-flow)
* [PKCE を使用した Authorization Code フローを使用して API を呼び出す](https://auth0.com/docs/get-started/authentication-and-authorization-flow/authorization-code-flow-with-pkce/call-your-api-using-the-authorization-code-flow-with-pkce)
組み込みログインを使用している場合は、以下の記事を参照してください。
* [Resource Owner Password Flow を使用して API を呼び出す](https://auth0.com/docs/get-started/authentication-and-authorization-flow/resource-owner-password-flow/call-your-api-using-resource-owner-password-flow)
* [Native Passkeys API を使用したログインフロー](https://auth0.com/docs/native-passkeys-api#login-flow)
## 例
### 認可コードフローを使用するUniversal Login
**ステップ 1: 認可コードをリクエストする**
```bash lines theme={null}
curl --request GET \
--url 'https://{yourDomain}/authorize?response_type=code&client_id={yourClientId}&redirect_uri=%7ByourRedirectUri%7D&scope=create%3Ame%3Aauthentication_methods&offline_access=&audience=https%3A%2F%2F{yourDomain}%2Fme%2F'
```
**ステップ 2: code を access token に交換**
```bash lines theme={null}
curl --request POST \
--url 'https://{yourDomain}/oauth/token' \
--header 'content-type: application/json' \
--data '{"grant_type": "authorization_code","client_id": "{yourClientId}","client_secret": "{yourClientId}","code": "{yourAuthorizationCode}","redirect_uri": "{yourRedirectUri}","audience": "{yourAudience}","scope": "create:me:authentication_methods","offline_access": ""}'
```
### Nativeパスキーを使用した組み込みログイン
**ステップ 1: ログインチャレンジをリクエストする**
```bash lines theme={null}
curl --request POST \
--url 'https://{yourDomain}/passkey/challenge' \
--header 'content-type: application/json' \
--data '{"client_id": "{yourDomain}"}'
```
**ステップ 2: 既存ユーザーを認証する**
```bash lines theme={null}
curl --request POST \
--url 'https://{yourDomain}/oauth/token' \
--header 'content-type: application/json' \
--data '{ "grant_type": "urn:okta:params:oauth:grant-type:webauthn", "client_id": "{yourClientId}", "scope": "create:me:authentication_methods offline_access", "audience": "https://{yourDomain}/me/" "auth_session": "{sessionIdFromTheFirstRequest}", "authn_response": "{authenticatorResponse}"}'
```
### 認証
API の設定に応じて、Bearer トークンと DPoP トークンを利用できます
| | |
| -------------- | ------ |
| セキュリティスキームの種類: | http |
| HTTP 認証スキーム: | bearer |