> ## Documentation Index
> Fetch the complete documentation index at: https://translations.mintlify.site/llms.txt
> Use this file to discover all available pages before exploring further.
> カスタムトークンプロファイルにActionを関連付けて、カスタムトークン交換を設定する方法を説明します。
# カスタムトークン交換を設定する
export const ReleaseStageNotice = ({feature, stage, plans, contact, terms}) => {
const stageTextMap = {
"beta": "Beta",
"ea": "早期アクセス"
};
const stageText = stageTextMap[stage] || "製品リリース段階";
const prsLink = "/docs/troubleshoot/product-lifecycle/product-release-stages";
const linkify = (text, url) => {
return {text};
};
const includeDetails = (plans, contact, terms) => {
const hasDetails = terms || plans || contact;
if (!hasDetails) return null;
return
{plans && <>この機能は{linkify(`${plans}プラン`, "https://auth0.com/pricing")}でご利用いただけます。 }
{contact && "参加をご希望の場合は、" + contact + "までお問い合わせください。 "}
{terms && <>この機能を使用することにより、Oktaの該当する無料トライアル規約および{linkify("Master Subscription Agreement", "https://www.okta.com/legal")}に同意したものとみなされます。}
;
};
return
{feature}機能は現在、{linkify(stageText, prsLink)}です。
{includeDetails(plans, contact, terms)}
;
};
アプリケーションのカスタムトークン交換を設定するには、次の操作が必要です。
* [前提条件を満たす](#prerequisites)
* [アプリケーションでカスタムトークン交換を有効にする](#enable-custom-token-exchange-for-your-application)
* カスタムトークン交換プロファイルを[設定](#configure-custom-token-exchange-profile)し、[管理](#manage-custom-token-exchange-profile)する
## 前提条件
カスタムトークン交換を設定する前に、アプリケーションが以下の前提条件を満たしていることを確認してください。
* ファーストパーティ クライアントである
* OIDC 準拠である
アプリケーションを設定するには、Auth0 Dashboard で **[アプリケーション > 詳細設定 > OAuth](https://auth0.com/docs/get-started/applications/application-settings#oauth)** に移動してください。
## アプリケーションでカスタムトークン交換を有効にする
カスタムトークン交換を有効にするには、[新しいアプリケーションを作成](/docs/ja-jp/get-started/auth0-overview/create-applications)するか、Auth0 Dashboard または Management API を使用して既存のアプリケーションを更新します。カスタムトークン交換で使用するために、複数のアプリケーションを作成できます。
新しいアプリケーションを作成する場合:
1. デフォルトでは、カスタムトークン交換は無効になっています。カスタムトークン交換を有効にするには、Management API を使用して [Create a Client](https://auth0.com/docs/api/management/v2/clients/post-clients) に `POST` リクエストを送信するか、[Update a Client](https://auth0.com/docs/api/management/v2/clients/patch-clients-by-id) に `PATCH` リクエストを送信します。`token_exchange` 配下の `allow_any_profile_of_type` 属性を `["custom_authentication"]` に設定します:
```json lines theme={null}
{
"token_exchange": {
"allow_any_profile_of_type": ["custom_authentication"]
}
}
```
2. アプリケーションで、カスタムトークン交換に使用する接続を有効にします。
3. ご使用のアプリケーションが[ファーストパーティ](/docs/ja-jp/get-started/applications/first-party-and-third-party-applications)として設定され、**[Auth0 Dashboard > アプリケーション > 詳細設定 > OAuth](/docs/ja-jp/get-started/applications/application-settings#oauth)** で OIDC 準拠として構成されていることを確認します。
import mode が `ON` のカスタム DB は、`setUserById()` 操作でのみサポート対象です。
アプリケーションを作成したら、後で `/oauth/token` エンドポイントを呼び出すときに使用する `client_id` と `client_secret` を控えておきます。
## カスタムトークン交換プロファイルを設定する
各カスタムトークン交換プロファイルでは、`subject_token_type` と Action が1対1でマッピングされ、Action には特定のユースケースに対応するコードロジックが含まれます。
特定の `subject_token_type` 値を指定して `/oauth/token` エンドポイントに送信されたカスタムトークン交換リクエストは、対応するカスタムトークンプロファイルにマッピングされ、関連付けられた Action にルーティングされて処理されます。
カスタムトークン交換プロファイルを作成するには、次の手順を行います。
1. [プロファイル用のActionを作成する](#create-action-for-the-profile)
2. [カスタムトークン交換プロファイルを作成する](#create-custom-token-exchange-profile)
3. [カスタムトークン交換プロファイルを管理する](#manage-custom-token-exchange-profile)
### プロファイル用のActionを作成する
Custom Token Exchange の Event オブジェクトと API オブジェクトを使用して、次の処理を行う Action を作成します。
* `subject_token_type` に基づいて `subject_token` をデコードし、検証します。これにより、トランザクションにおけるユーザー情報を取得できます。
* トランザクションに適用する必要がある認可ポリシーを適用します。
トランザクションを続行できることを確認したら、ユーザーを設定します。すると Auth0 は、このユーザーに対してユーザー認証の一環として、アクセストークン、ID トークン、リフレッシュトークンを発行します。
Custom Token Exchange の Action の例については、[Example Use Cases and Code Samples](/docs/ja-jp/authenticate/custom-token-exchange/cte-example-use-cases) を参照してください。
Action を作成したら、Auth0 Dashboard で追加してデプロイします。
1. **Actions > Library** に移動します。
2. **Create Action > Build from Scratch** を選択します。
3. **Create Action** ダイアログで名前を入力し、ドロップダウンから **カスタムトークン交換** トリガーを選択します。
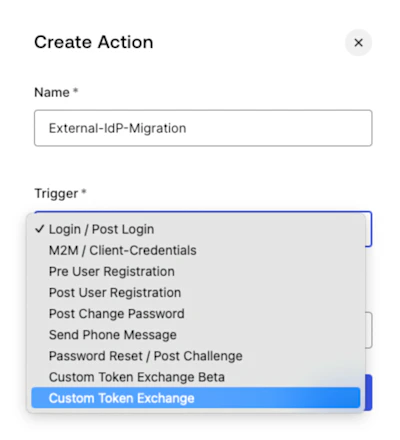 4. **Create** を選択します。
5. Action を **Deploy** します。
4. **Create** を選択します。
5. Action を **Deploy** します。
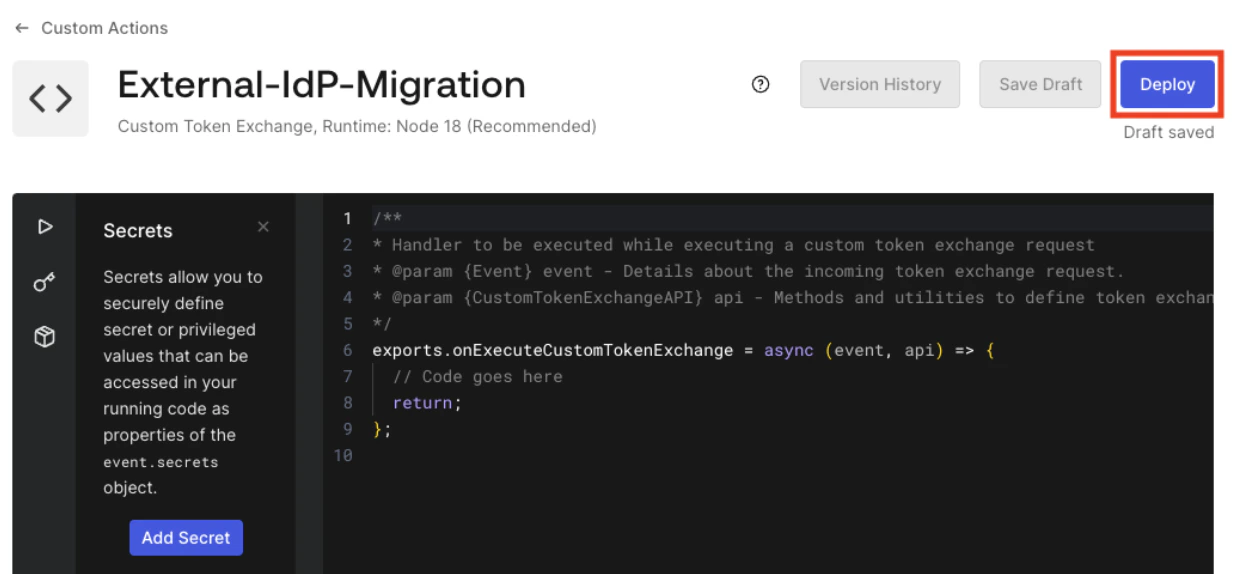 Action をデプロイしたら、Auth0 によって割り当てられた Action ID をコピーします。Action にはまだカスタムロジックを追加する必要があります。まず、カスタムトークン交換プロファイル を作成するために Action ID を取得します。
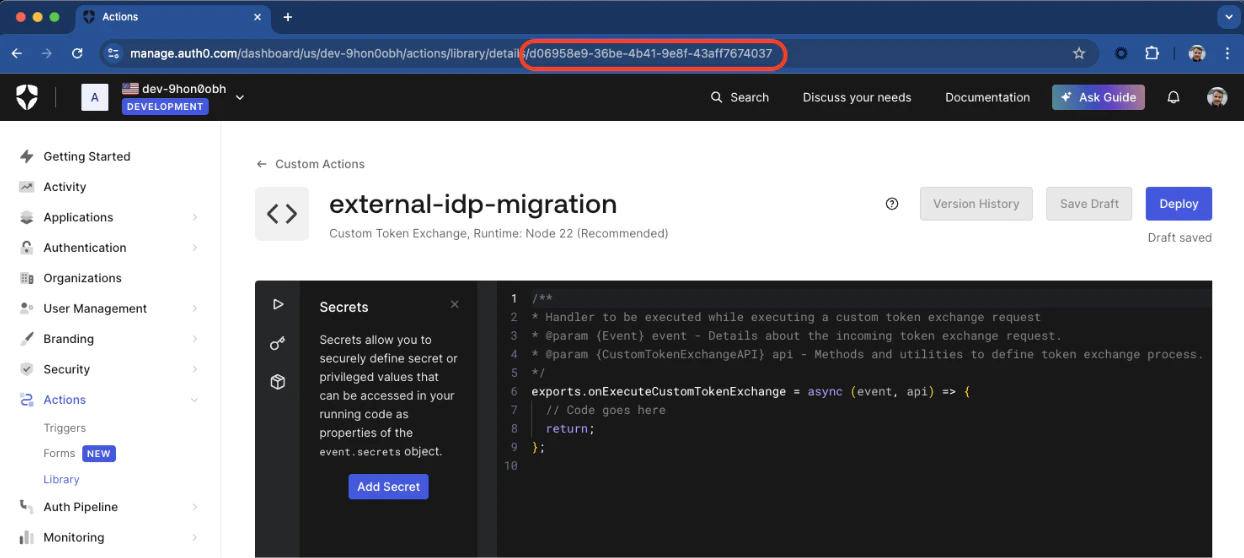
6. Auth0 Dashboard で Action ID を取得するには、ブラウザーウィンドウの URL を確認します。次の画像に示すように、Action ID は URL の最後の部分です。
Action をデプロイしたら、Auth0 によって割り当てられた Action ID をコピーします。Action にはまだカスタムロジックを追加する必要があります。まず、カスタムトークン交換プロファイル を作成するために Action ID を取得します。
6. Auth0 Dashboard で Action ID を取得するには、ブラウザーウィンドウの URL を確認します。次の画像に示すように、Action ID は URL の最後の部分です。
 Management API から Action ID を取得することもできます。まず、API を利用するための Management API トークンを取得します。次に、`/actions` エンドポイントに対して次の `GET` リクエストを実行します。
```bash lines theme={null}
curl --location 'https://{yourDomain}/api/v2/actions/actions?actionName={yourActionName}' \
--header 'Authorization: Bearer ' \
```
レスポンス本文の `actions[0].id.` に Action ID が含まれているはずです。カスタムトークン交換プロファイル を作成するには、Action ID が必要です。
Management API から Action ID を取得することもできます。まず、API を利用するための Management API トークンを取得します。次に、`/actions` エンドポイントに対して次の `GET` リクエストを実行します。
```bash lines theme={null}
curl --location 'https://{yourDomain}/api/v2/actions/actions?actionName={yourActionName}' \
--header 'Authorization: Bearer ' \
```
レスポンス本文の `actions[0].id.` に Action ID が含まれているはずです。カスタムトークン交換プロファイル を作成するには、Action ID が必要です。
### カスタムトークン交換プロファイルを作成
カスタムトークン交換プロファイルを作成するには、Management API を使用して、次のパラメータを指定した `POST` リクエストを `/token-exchange-profiles` エンドポイントに送信します。
```bash lines theme={null}
curl --location 'https://{yourDomain}/api/v2/token-exchange-profiles' \
--header 'Content-Type: application/json' \
--header 'Authorization: Bearer ' \
--data '{
"name": "",
"subject_token_type": "",
"action_id": "",
"type": "custom_authentication"
}'
```
| パラメータ | 説明 |
| -------------------- | ------------------------------------------------------------------------------------------------------------------------------------------------------------------------------------------------------------------------------------------------------------------------------ |
| `subject_token_type` | `https://` または `urn` で始まる、一意のプロファイルトークンタイプ URI
次の名前空間は予約されているため、使用できません。
- `http://auth0.com`
- `https://auth0.com`
- `http://okta.com`
- `https://okta.com`
- `urn:ietf`
- `urn:auth0`
- `urn:okta`
|
| `action_id` | カスタムトークンプロファイル に関連付けられた Action の Action ID。 |
| `type` | `custom_authentication` に設定する必要があります。 |
カスタムトークン交換プロファイル の作成に成功すると、次のようなレスポンスが返されます。
```json lines theme={null}
{
"id":"tep_9xqewuejpa2RTltf",
"name":"",
"type":"custom_authentication",
"subject_token_type":"",
"action_id":"",
"created_at":"2025-01-30T13:19:00.616Z",
"updated_at":"2025-01-30T13:19:00.616Z"
}
```
### カスタムトークン交換プロファイルを管理する
カスタムトークン交換プロファイルを管理するには、Management API を使用して `/token-exchange-profiles` エンドポイントにリクエストを送信します。
すべてのカスタムトークン交換プロファイルを取得するには、`/token-exchange-profiles` エンドポイントに対して次の `GET` リクエストを送信します。プロファイルが複数ある場合、`/token-exchange-profiles` エンドポイントではチェックポイントベースのページネーションを利用できます。
```bash lines theme={null}
curl --location 'https://{yourDomain}/api/v2/token-exchange-profiles' \
--header 'Authorization: Bearer ' \
```
既存のプロファイルの名前または `subject_token_type` を更新するには、`/token-exchange-profiles` エンドポイントに対して次の `PATCH` リクエストを実行します。
Action を作成すると、Action ID は変更できません。
```bash lines theme={null}
curl --location --request PATCH 'https://{yourDomain}/api/v2/token-exchange-profiles/{yourProfileId}' \
--header 'Content-Type: application/json' \
--header 'Authorization: Bearer ' \
--data '{
"name": "external-idp-migration",
"subject_token_type": "urn:partner0:external-idp-migration"
}'
```
カスタムトークン交換プロファイル を削除するには、`/token-exchange-profiles` エンドポイントに次の `DELETE` リクエストを送信します。
```bash lines theme={null}
curl --location --request DELETE 'https://{yourDomain}/api/v2/token-exchange-profiles/{yourProfileId}' \
--header 'Authorization: Bearer ' \
--data ''
```