> ## Documentation Index
> Fetch the complete documentation index at: https://translations.mintlify.site/llms.txt
> Use this file to discover all available pages before exploring further.
> エンタープライズ接続を介して、Lightweight Directory Access Protocol (LDAP) を使用してアプリを Active Directory (AD) に接続する方法を説明します。
# LDAP を使用してアプリを Active Directory に接続する
Auth0 は、ネットワーク内にインストールする **Active Directory/LDAP Connector** を介して、Lightweight Directory Access Protocol (LDAP) を使用して Active Directory (AD) と連携します。
**AD/LDAP Connector** (1) は、**Active Directory/LDAP** (2) と **Auth0 Service** (3) をつなぐブリッジです。これが必要になるのは、AD/LDAP が通常は社内ネットワーク内に制限されているのに対し、Auth0 はまったく異なる環境で動作するクラウドサービスだからです。
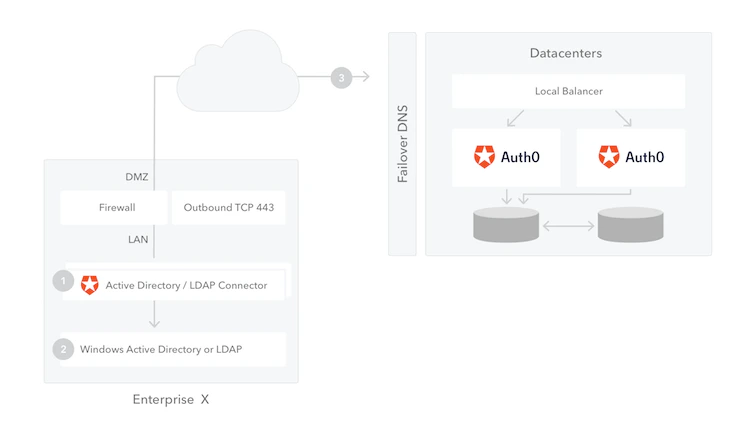 [高可用性と負荷分散](/docs/ja-jp/authenticate/identity-providers/enterprise-identity-providers/active-directory-ldap/ad-ldap-connector/ad-ldap-high-availability) のために、コネクタのインスタンスを複数インストールできます。接続はすべてコネクタから Auth0 Server へのアウトバウンド接続であるため、通常はファイアウォールを変更する必要はありません。
## 前提条件
開始する前に:
* [Auth0 にアプリケーションを登録する](/docs/ja-jp/get-started/auth0-overview/create-applications)。
* 適切な **アプリケーションタイプ** を選択します。
* **許可されたコールバック URL** に `{https://yourApp/callback}` を追加します。
* アプリケーションの [**グラントタイプ**](/docs/ja-jp/get-started/applications/update-grant-types) に適切なフローが含まれていることを確認します。
## 手順
アプリケーションを Active Directory/LDAP に接続するには、次の手順を行います。
1. [Auth0 でエンタープライズ接続を作成し](#create-an-enterprise-connection-in-auth0)、インストーラーをダウンロードします
2. [ネットワークにコネクタをインストールする](#install-the-connector-on-your-network)
3. [Auth0 のアプリケーションでエンタープライズ接続を有効にする](#enable-the-enterprise-connection-for-your-auth0-application)
4. [接続をテストする](#test-the-connection)
## Auth0 でエンタープライズ接続を作成する
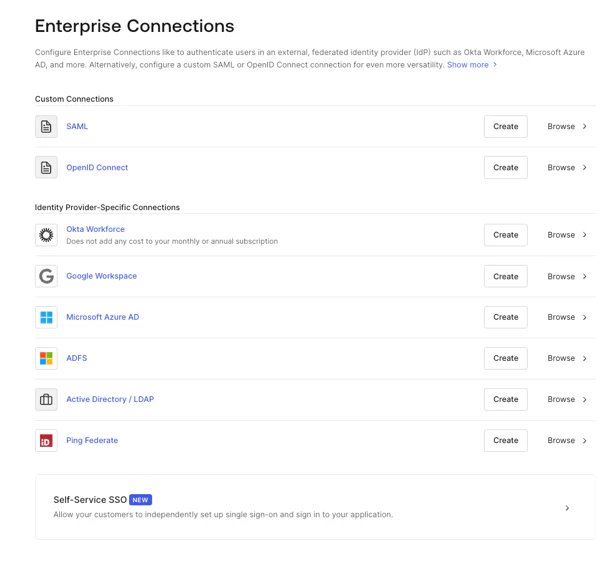
1. [Auth0 Dashboard > Authentication > Enterprise](https://manage.auth0.com/#/connections/enterprise) に移動し、**Active Directory / LDAP** を見つけて `+` を選択します。
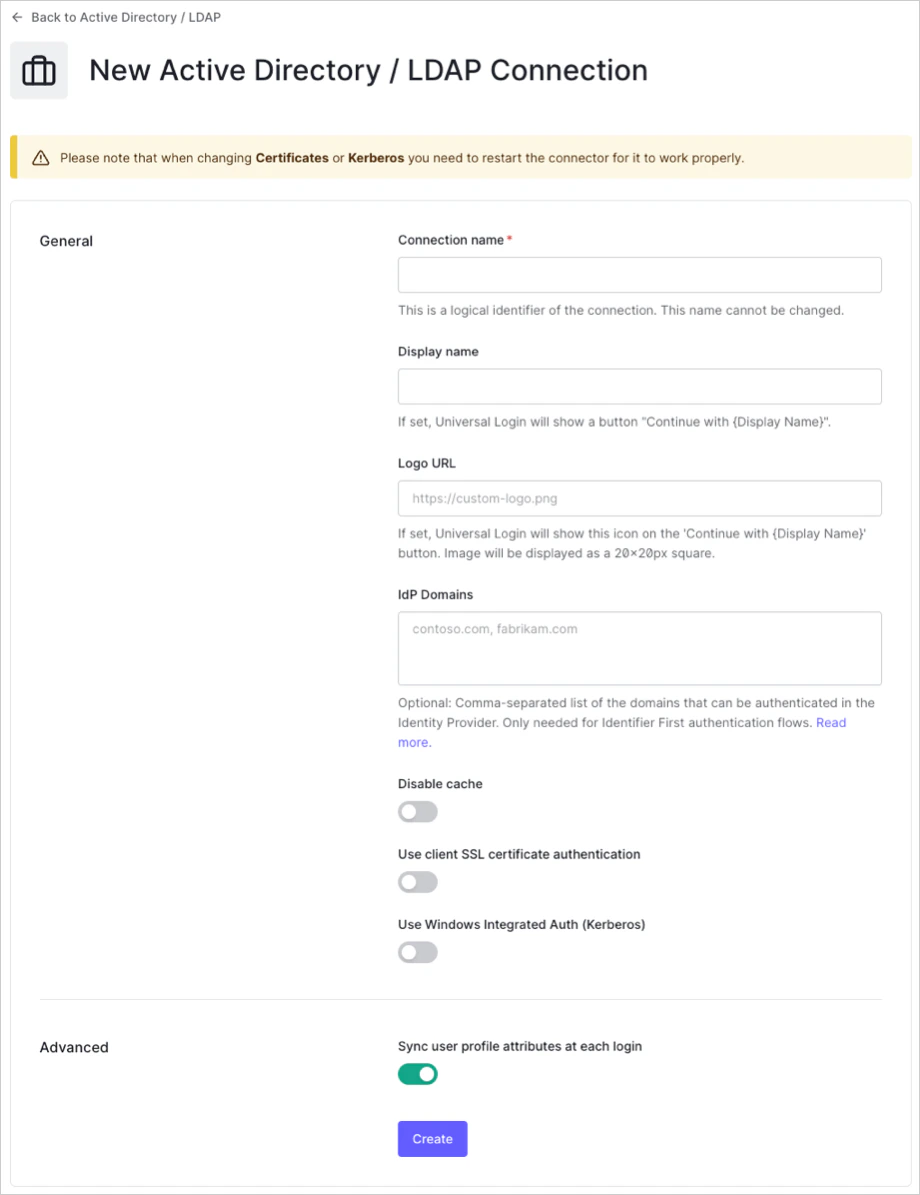
 2. 接続の詳細を入力し、**Create** を選択します。
| Field | Description |
| ---------------------------------------------- | ---------------------------------------------------------------------------------------------------------------------------------------------- |
| **Connection name** | 接続の論理識別子です。テナント内で一意である必要があります。設定後、この名前は変更できません。 |
| **Display name** (optional) | Universal Login のログインボタンをカスタマイズするためのテキストです。設定すると、Universal Login のログインボタンには「\{Display name} で続行」と表示されます。 |
| **Logo URL** (optional) | Universal Login のログインボタンをカスタマイズするための画像 URL です。設定すると、Universal Login のログインボタンに画像が 20px × 20px の正方形で表示されます。 |
| **IdP Domains** (optional) | この接続を使用してログインできる有効なメールドメインを、カンマ区切りで指定します。Lock ログインウィジェットを使用する場合にのみ必要です。 |
| **Disable cache** | 有効にすると、キャッシュが無効になります。 |
| **Use client SSL certificate authentication** | 有効にすると、クライアント SSL 証明書認証を使用します。 |
| **Use Windows Integrated Auth (Kerberos)** | 有効にすると、IP アドレス範囲の入力を求められます。ユーザーがその IP アドレス経由でログインした場合は Kerberos が使用され、それ以外の場合は AD/LDAP のユーザー名とパスワードの入力が求められます。通常、ここで指定する IP 範囲はイントラネットのアドレスです。 |
| **Sync user profile attributes at each login** | 有効にすると、Auth0 はユーザーがログインするたびにユーザープロファイルデータを自動的に同期します。これにより、接続元で加えられた変更が Auth0 に自動的に反映されます。 |
2. 接続の詳細を入力し、**Create** を選択します。
| Field | Description |
| ---------------------------------------------- | ---------------------------------------------------------------------------------------------------------------------------------------------- |
| **Connection name** | 接続の論理識別子です。テナント内で一意である必要があります。設定後、この名前は変更できません。 |
| **Display name** (optional) | Universal Login のログインボタンをカスタマイズするためのテキストです。設定すると、Universal Login のログインボタンには「\{Display name} で続行」と表示されます。 |
| **Logo URL** (optional) | Universal Login のログインボタンをカスタマイズするための画像 URL です。設定すると、Universal Login のログインボタンに画像が 20px × 20px の正方形で表示されます。 |
| **IdP Domains** (optional) | この接続を使用してログインできる有効なメールドメインを、カンマ区切りで指定します。Lock ログインウィジェットを使用する場合にのみ必要です。 |
| **Disable cache** | 有効にすると、キャッシュが無効になります。 |
| **Use client SSL certificate authentication** | 有効にすると、クライアント SSL 証明書認証を使用します。 |
| **Use Windows Integrated Auth (Kerberos)** | 有効にすると、IP アドレス範囲の入力を求められます。ユーザーがその IP アドレス経由でログインした場合は Kerberos が使用され、それ以外の場合は AD/LDAP のユーザー名とパスワードの入力が求められます。通常、ここで指定する IP 範囲はイントラネットのアドレスです。 |
| **Sync user profile attributes at each login** | 有効にすると、Auth0 はユーザーがログインするたびにユーザープロファイルデータを自動的に同期します。これにより、接続元で加えられた変更が Auth0 に自動的に反映されます。 |
 3\. 提供されているインストーラーをダウンロードし、**Provisioning Ticket URL** を控えておきます。
Windows または Linux プラットフォーム向けに、コネクタの異なるバージョンを提供しています。
3\. 提供されているインストーラーをダウンロードし、**Provisioning Ticket URL** を控えておきます。
Windows または Linux プラットフォーム向けに、コネクタの異なるバージョンを提供しています。
## ネットワーク上にコネクタをインストールする
お使いのプラットフォーム向けの手順に従って、[AD/LDAP コネクタ](/docs/ja-jp/authenticate/identity-providers/enterprise-identity-providers/active-directory-ldap/ad-ldap-connector) をセットアップします。
* [Windows に AD/LDAP コネクタをインストールする](/docs/ja-jp/authenticate/identity-providers/enterprise-identity-providers/active-directory-ldap/ad-ldap-connector/install-configure-ad-ldap-connector)
* [Microsoft 以外のプラットフォームに AD/LDAP コネクタをインストールする](/docs/ja-jp/authenticate/identity-providers/enterprise-identity-providers/active-directory-ldap/ad-ldap-connector/install-configure-ad-ldap-connector)
## Auth0アプリケーションでエンタープライズ接続を有効にする
新しいAD接続を使用するには、まずご利用のAuth0アプリケーションで[その接続を有効にする](/docs/ja-jp/authenticate/identity-providers/enterprise-identity-providers/enable-enterprise-connections)必要があります。
## 接続をテストする
これで、[接続をテストする](/docs/ja-jp/authenticate/identity-providers/enterprise-identity-providers/test-enterprise-connections)準備が整いました。
## 次のステップ
* [いずれかのライブラリを使ってAuth0を統合する](/docs/ja-jp/libraries)
* [Authentication APIを使ってAuth0を統合する](https://auth0.com/docs/api/authentication)
* [認証フローの詳細を確認する](/docs/ja-jp/get-started/authentication-and-authorization-flow)
* [IDプロバイダーに追加のパラメーターを渡す](/docs/ja-jp/authenticate/identity-providers/pass-parameters-to-idps)
* [ユーザーに権限の再承認を求める](/docs/ja-jp/authenticate/identity-providers/social-identity-providers/reprompt-permissions)