> ## Documentation Index
> Fetch the complete documentation index at: https://translations.mintlify.site/llms.txt
> Use this file to discover all available pages before exploring further.
> Auth0 と Okta Integration Network(OIN)を使用して Express Configuration を設定する方法を説明します。
# Okta を使用した Express Configuration
[Okta Integration Network (OIN)](https://www.okta.com/integrations/) は、OpenID Connect によるシングルサインオン (SSO) 、SCIM による自動ユーザープロビジョニング、[Universal Logout](https://developer.okta.com/docs/guides/oin-universal-logout-overview) を有効にするための簡易セットアップ機能を Okta が提供している SaaS アプリケーションのカタログです。Okta 管理者は、[Okta Admin Console](https://www.okta.com/okta-administrator-experience) を使用して、Okta テナント内でこれらの統合を設定します。
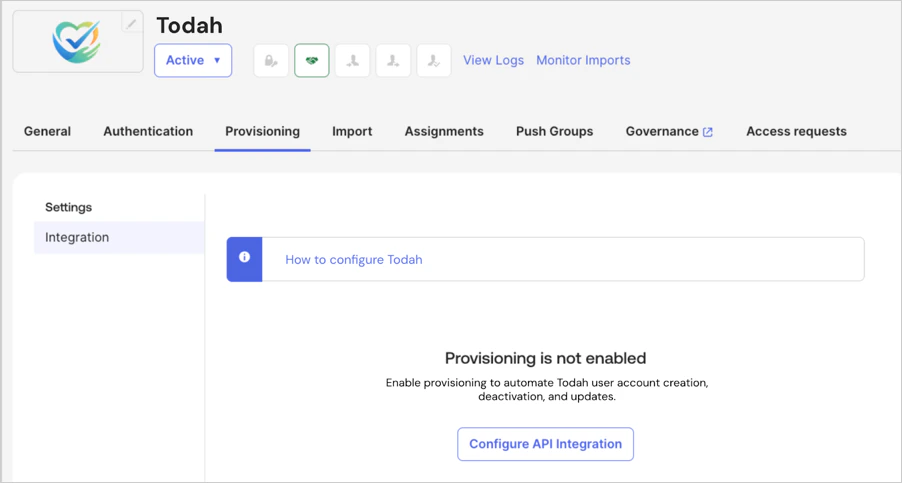 Express Configuration を使用すると、エンタープライズ顧客は、プロトコル固有の設定値をコピー&ペーストすることなく、SaaS アプリケーションとの ID 統合を安全に設定できます。
Express Configuration には、Okta 管理者と SaaS アプリケーション開発者にとって次の利点があります。
* Okta と Auth0 間の設定情報のやり取りを自動化することで、アプリケーションインスタンスのセットアップにかかる時間を短縮します。
* OAuth 2.0 の同意フローを利用して、機密性の高い設定データを安全かつ適切な認可のもとで共有し、認証情報や設定に起因するエラーの可能性を低減します。
* 統合の導入プロセスを簡素化して標準化します。自動化されたワークフローにより、複数の顧客や環境にまたがるアプリケーション統合を一貫性と再現性をもって展開できるため、人為的ミスの余地を減らしつつ、スケーラブルなアプリケーションエコシステムを支えます。
* 手動セットアップの複雑さを解消し、Okta の顧客管理者が Auth0 対応の OIN 統合インスタンスをすばやく追加できるようにします。
Express Configuration を使用すると、エンタープライズ顧客は、プロトコル固有の設定値をコピー&ペーストすることなく、SaaS アプリケーションとの ID 統合を安全に設定できます。
Express Configuration には、Okta 管理者と SaaS アプリケーション開発者にとって次の利点があります。
* Okta と Auth0 間の設定情報のやり取りを自動化することで、アプリケーションインスタンスのセットアップにかかる時間を短縮します。
* OAuth 2.0 の同意フローを利用して、機密性の高い設定データを安全かつ適切な認可のもとで共有し、認証情報や設定に起因するエラーの可能性を低減します。
* 統合の導入プロセスを簡素化して標準化します。自動化されたワークフローにより、複数の顧客や環境にまたがるアプリケーション統合を一貫性と再現性をもって展開できるため、人為的ミスの余地を減らしつつ、スケーラブルなアプリケーションエコシステムを支えます。
* 手動セットアップの複雑さを解消し、Okta の顧客管理者が Auth0 対応の OIN 統合インスタンスをすばやく追加できるようにします。
## 仕組み
Express Configuration API を使用すると、OIN に公開された Auth0 アプリケーションで、顧客が [Okta 接続](/docs/ja-jp/authenticate/identity-providers/enterprise-identity-providers/okta) の Express Configuration を利用できます。Express Configuration は、Auth0 Organization 内で OpenID Connect、SCIM、Universal Logout をサポートします。
OIN 内の Auth0 アプリにおける Express Configuration のワークフローを確認してください。
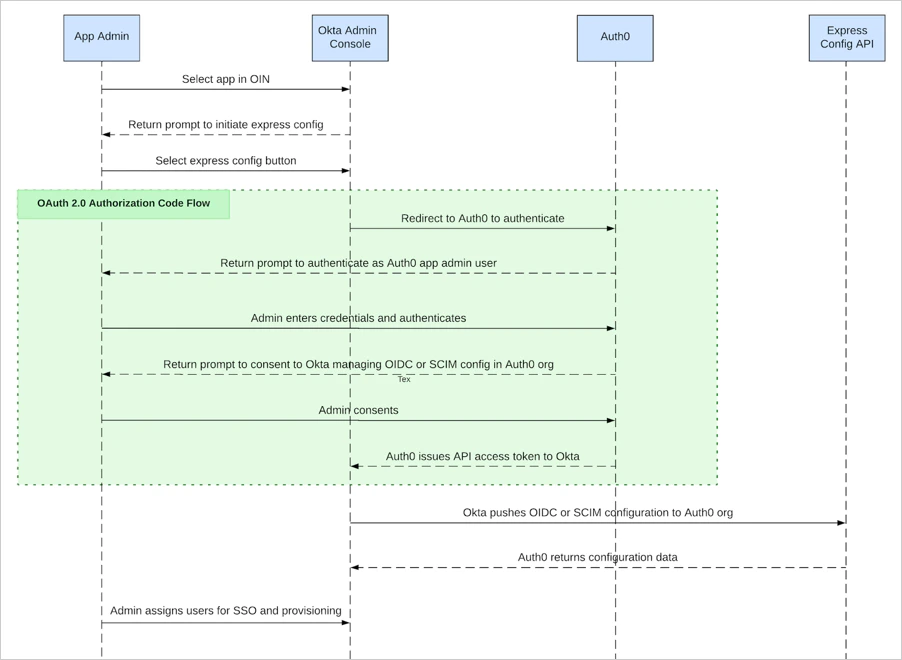 * Okta 管理者は Okta ポータルにサインインし、OIN から Express Configuration 対応アプリケーションを選択します。
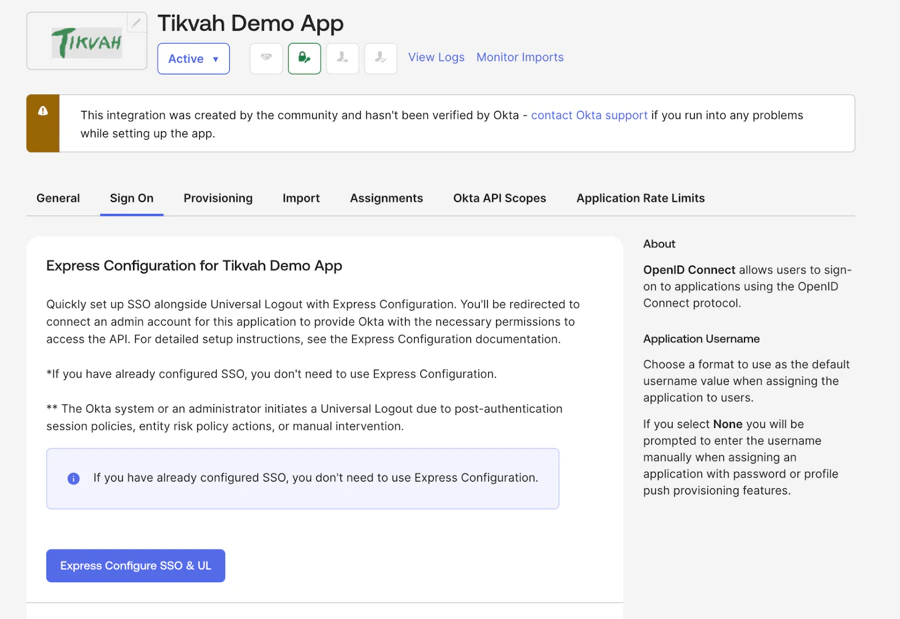
* Okta 管理者は **Sign On** セクションに移動して **Express Configure SSO & UL** を選択します。すると、[Auth0 Universal Login](/docs/ja-jp/authenticate/login/auth0-universal-login/universal-login-vs-classic-login/universal-experience#universal-login-experience) 画面にリダイレクトされます。
* Okta 管理者は Okta ポータルにサインインし、OIN から Express Configuration 対応アプリケーションを選択します。
* Okta 管理者は **Sign On** セクションに移動して **Express Configure SSO & UL** を選択します。すると、[Auth0 Universal Login](/docs/ja-jp/authenticate/login/auth0-universal-login/universal-login-vs-classic-login/universal-experience#universal-login-experience) 画面にリダイレクトされます。
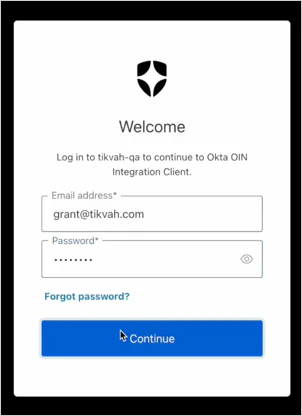
 * Okta 管理者は、Express Configuration の実行が許可されているアプリケーションユーザーの認証情報を入力します。Auth0 では、これは [organization](/docs/ja-jp/manage-users/organizations) のメンバーであり、[organizational role](/docs/ja-jp/manage-users/organizations/configure-organizations/add-member-roles) またはその他の認可方法によって Express Configuration を実行する権限が付与されているユーザーを指します。
 * 認証後、Auth0 は Okta 管理者に同意を求めます。
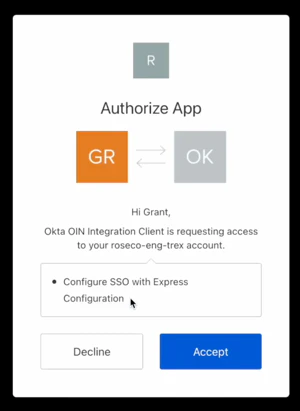 * 同意すると、Okta は Express Configuration API を使用して、Okta 管理者が所属する Auth0 organization 内に [Okta 接続](/docs/ja-jp/authenticate/identity-providers/enterprise-identity-providers/okta) を自動的に構成します。
* その後、Okta 管理者はアプリケーションインスタンスにユーザーを割り当て、シングルサインオンがすぐに利用できることを確認できます。
Auth0 開発者は、SCIM と Universal Logout の Express Configuration を許可するように OIN 統合を構成することもできます。どちらも推奨されています。
* SCIM が有効な場合、Okta 管理者はアプリケーション詳細の **Provisioning** セクションに移動し、**Express Configure SCIM** を選択して SCIM を構成できます。
* Universal Logout が有効な場合は、OpenID Connect 統合の一部として自動的に構成されます。
* 同意すると、Okta は Express Configuration API を使用して、Okta 管理者が所属する Auth0 organization 内に [Okta 接続](/docs/ja-jp/authenticate/identity-providers/enterprise-identity-providers/okta) を自動的に構成します。
* その後、Okta 管理者はアプリケーションインスタンスにユーザーを割り当て、シングルサインオンがすぐに利用できることを確認できます。
Auth0 開発者は、SCIM と Universal Logout の Express Configuration を許可するように OIN 統合を構成することもできます。どちらも推奨されています。
* SCIM が有効な場合、Okta 管理者はアプリケーション詳細の **Provisioning** セクションに移動し、**Express Configure SCIM** を選択して SCIM を構成できます。
* Universal Logout が有効な場合は、OpenID Connect 統合の一部として自動的に構成されます。
## 前提条件
Express Configuration を有効にしてアプリケーションを OIN に公開するには、次のものが必要です。
* [Okta Integrator Free Plan org](https://developer.okta.com/signup/)。Super Admin ロール、または App Admin ロールと Org Admin ロールにアクセスできる必要があります。
* 必要な数の顧客に対して、Okta 接続タイプと Organizations 機能を利用できる [Auth0 subscription](https://auth0.com/pricing)。
* Multi-Organization Architecture を使用して Auth0 と統合された SaaS アプリケーション。
* これには、Auth0 でアプリケーションを [Regular Web Application](/docs/ja-jp/get-started/auth0-overview/create-applications/regular-web-apps) または [Single-Page Application](/docs/ja-jp/get-started/auth0-overview/create-applications/single-page-web-apps) として登録し、各顧客がそれぞれ固有の [identity providers](/docs/ja-jp/authenticate/enterprise-connections) を使用してそのアプリケーションにサインインできるようにすることが含まれます。
* Express Configuration を使用する顧客ごとに、[Auth0 Organization](/docs/ja-jp/manage-users/organizations) がデプロイ済みであるか、デプロイ可能であること。Organizations と organizational roles は、特定のユーザーが所属する organization 内でのみ Express Configuration を実行し、Okta connections を作成できるよう認可するために使用されます。
* Auth0 tenant では、[Enable Application Connections](/docs/ja-jp/get-started/tenant-settings#recommended-settings) tenant setting を無効にしておく必要があります。
**ヒント**: Auth0 Organizations と organizational roles を含むマルチテナント アーキテクチャを実装したサンプル アプリケーションについては、[SaaStart reference application](https://auth0.com/blog/speed-up-your-customer-identity-journey-with-auth0-saastart/) を参照してください。
## アプリケーションを Express Configuration 向けに設定する
Auth0 Dashboard では、Auth0 開発者が自身のアプリケーションで Express Configuration を有効にし、OIN に公開できるようガイドします。
設定から公開までの一連のプロセスを完了するには、本番環境の Auth0 テナントで [Auth0 Admin ロール](/docs/ja-jp/get-started/manage-dashboard-access/feature-access-by-role) が必要です。
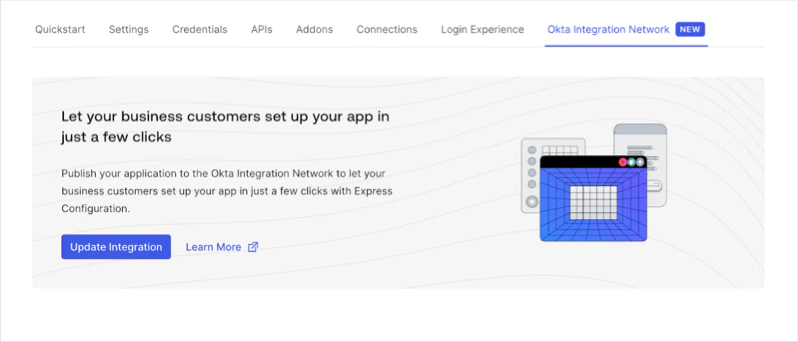 テナントで Express Configuration を設定するには、次の Auth0 コンポーネントを構成します。
* Initiate Login URI Template を設定した登録済みアプリケーション
* [接続プロファイル (CP)](/docs/ja-jp/authenticate/enterprise-connections/connection-profile)
* [ユーザー属性プロファイル](/docs/ja-jp/authenticate/enterprise-connections/user-attribute-profile)
* Organization のログイン設定
* 管理者のログインと同意の設定
テナントで Express Configuration を設定するには、次の Auth0 コンポーネントを構成します。
* Initiate Login URI Template を設定した登録済みアプリケーション
* [接続プロファイル (CP)](/docs/ja-jp/authenticate/enterprise-connections/connection-profile)
* [ユーザー属性プロファイル](/docs/ja-jp/authenticate/enterprise-connections/user-attribute-profile)
* Organization のログイン設定
* 管理者のログインと同意の設定
### Initiate Login URI テンプレートを使用してアプリケーションを登録する
1. Auth0 Dashboard で、アプリケーションを [Regular Web Application](/docs/ja-jp/get-started/auth0-overview/create-applications/regular-web-apps) または [Single-Page Application](/docs/ja-jp/get-started/auth0-overview/create-applications/single-page-web-apps) として登録します。
2. 登録後、作成したアプリケーションを選択し、**Okta Integration Network** タブに移動して Express Configuration のセットアップウィザードを開始します。
3. **Get Started** を選択します。
4. 前提条件を確認し、**Continue** を選択します。
5. **Initiate Login URI Template** を登録します。このテンプレートでは、エンドユーザーを認証のために Auth0 の `/authorize` エンドポイントへ自動的にリダイレクトするエンドポイントを、アプリケーションに実装します。ログインエンドポイントの例については、[Express SDK Quickstart](/docs/ja-jp/quickstart/webapp/express/interactive) の `/login` ルートを参照してください。
* アプリケーションインスタンスの Express Configuration が開始されると、Okta は **Initiate Login URI Template** を使用して、[エンドユーザーダッシュボード](https://help.okta.com/en-us/content/topics/settings/new-dashboard-overview.htm) からアプリケーションを起動します。
* (任意) 使用する Organization または Connection を識別するために、Auth0 の `/authorize` エンドポイントに `organization_name`、`organization_id,`、`connection_name` を設定します。エンドユーザーダッシュボードから URL が起動される際、Okta はこれらの変数を動的に置き換えます。例: `https://{organization_name}.your-app.com?connection={connection_name}`。
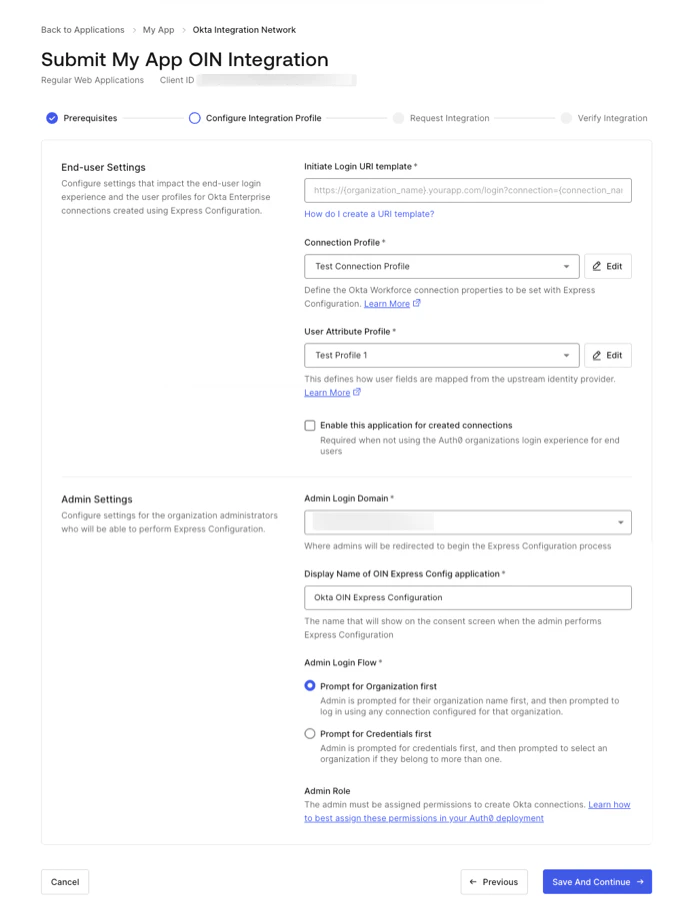 **Initiate Login URI の例:**
`https://your-app.com/login`
**Initiate Login URI の例:**
`https://your-app.com/login`
`https://your-app.com/login?connection={connection_name}`
`https://{organization_name}.your-app.com?connection={connection_name}`
#### 接続プロファイル
Initiate Login URI Template では、**接続プロファイル**を追加できます。[Connection Profile](/docs/ja-jp/authenticate/enterprise-connections/connection-profile) を使用すると、Express Configuration で作成される接続の非公開設定をどのように構成するかを Auth0 で指定できます。これには、接続が Auth0 の Universal Login 機能や Organizations 機能とどのように連携するかを制御する設定も含まれます。
* Auth0 で接続名をどのように作成するかに関するオプション
* 接続で SCIM および/または Universal Logout を使用するためのオプション (推奨)
* 接続のエンドユーザーが、同意した管理者の Organization のメンバーに自動的になれるようにするオプション
* Auth0 の Universal Login ページで、その接続の **Show as button** 設定をどのようにするかに関するオプション
接続プロファイルが設定されていない場合、Auth0 は、Express Configuration で構成された接続向けに、一般的かつ推奨される設定を適用したデフォルトの接続プロファイルを提供します。
デフォルトの CP をカスタマイズする方法については、[Connection Profile](/docs/ja-jp/authenticate/enterprise-connections/connection-profile) を参照してください。
#### ユーザー属性プロファイル
Initiate Login URI Template では、**ユーザー属性プロファイル**を追加できます。[User Attribute Profile (UAP) ](/docs/ja-jp/authenticate/enterprise-connections/user-attribute-profile) を使用すると、Auth0 の開発者は、Auth0 がサポートするさまざまなプロトコル間でユーザー属性を一貫して定義、管理、マッピングできます。Express Configuration と組み合わせて使用することで、ユーザー属性プロファイルを使って、Express Configuration によって生成される Okta 接続に書き込まれる OpenID Connect と SCIM の属性マップを開発者がカスタマイズできます。
ユーザー属性プロファイルが設定されていない場合、Auth0 はデフォルトのユーザー属性プロファイルを提供します。これには、Okta 接続タイプで使用される OpenID Connect や SCIM を含むすべてのプロトコル向けに、一般的かつ推奨されるマッピングがあらかじめ用意されています。
デフォルトの UAP をカスタマイズする方法については、[User Attribute Profile](/docs/ja-jp/authenticate/enterprise-connections/user-attribute-profile) を参照してください。
### 組織のログイン設定
特定の組織ユーザーが分離された接続を作成できるように認可するには Auth0 Organizations が必要です。ただし、[ビジネスユーザー向けの組織ベースのログインフロー](/docs/ja-jp/manage-users/organizations/configure-organizations/define-organization-behavior)に対応するために、アプリケーションの既存のログインフローを変更する必要はありません。
* アプリケーションで現在、[Identifier-First ログインエクスペリエンス](/docs/ja-jp/authenticate/login/auth0-universal-login/identifier-first)とホームレルムディスカバリーを使用している場合は、ホームレルムディスカバリーを有効にする方法について、[Enabling Home Realm Discovery](/docs/ja-jp/authenticate/identity-providers/enterprise-identity-providers/okta/express-configuration#enable-home-realm-discovery)セクションを参照してください。
* `enabled_clients` で複数のアプリケーションを有効にして Express Configuration 接続で使用する場合は、「Enabling Multiple Auth0 Applications Under a Single Integration」を参照してください。
現在のアプリケーション設定で組織ベースのログインフローを使用していない場合は、**Enable this application for created connections** 設定を選択できます。有効にすると、Okta 接続の各 Express Configuration がアプリケーションに直接関連付けられます。接続では必須の `enabled_clients` 設定を使用してください。
### 管理者のログインと同意の設定
Express Configuration を有効にすると、Auth0 は追加のクライアントアプリケーション ID を作成します。これは、Okta と Auth0 間の管理者同意フローで OIN が使用するものです。Okta は、OIN に公開されたアプリケーション統合ごとに、個別の OIN クライアントを 1 つ作成します。
OIN に公開するアプリケーションの **Configure Integration Profile** で、管理者のログインと同意の設定を構成します。
1. [Auth0 Dashboard > Applications](https://manage.auth0.com/dashboard/#/applications) に移動します。
2. OIN に公開するアプリケーションを選択します。
3. **Okta Integration Network** を選択します。
4. 必要な前提条件を満たしていることを確認し、**Continue** を選択します。
5. **Configure Integration Profile** セクションで、**Admin Settings** のオプションを設定します。
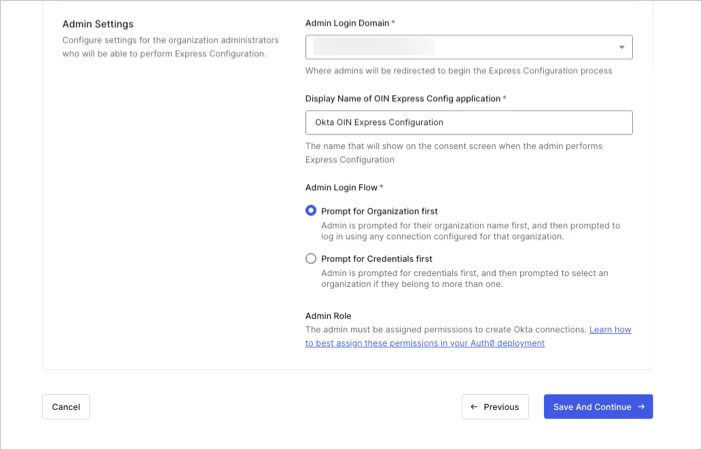 * **Admin Login Domain**: Web ブラウザーでの同意フローの一環として、Okta がリダイレクト先として使用する Auth0 テナントドメインです。Auth0 でカスタムドメイン名を設定している場合は、それを使用します。詳細については、[Custom Domains](docs/customize/custom-domains) を参照してください。
* **Display Name of the OIN Express Configuration Application**: 同意ダイアログに表示される OIN クライアントアプリケーションの名前です。
* **Admin Login Flow**: OIN クライアントアプリケーションの [Organization login](/docs/ja-jp/manage-users/organizations/login-flows-for-organizations) フローを定義するもので、Okta 管理者が Okta コンソールから Express Configuration を実行する際に使用されます。次の中から選択します。
* **Prompt for Organization**: まず管理者に Organization の選択を求め、その後、その Auth0 Organization のログイン画面が表示されます。管理者は、その Organization で設定された [pre-existing connection](/docs/ja-jp/manage-users/organizations/configure-organizations/enable-connections) を使用してサインインできます。
* **Prompt for Credentials**: まず管理者にログイン資格情報の入力を求めます。このオプションを選択すると、管理者ユーザーを含む接続を選択できるボタンが表示されます。これは、共有データベース接続、パスワードレスメール接続、またはすべての Auth0 Organizations に関連付け可能な別の接続です。
* **Admin Role**: Express Configuration を実行するには、管理者に適切な権限が割り当てられている必要があります。現在の Auth0 デプロイメントに最適な方法で管理者を認可する手順については、[Assign express configuration permissions to users](/docs/ja-jp/authenticate/identity-providers/enterprise-identity-providers/okta/express-configuration#assign-permissions-to-users) を参照してください。
最適な同意エクスペリエンスを実現するには、[Customize Consent Prompts](/docs/ja-jp/customize/login-pages/customize-consent-prompts) で説明されているように、テナントの `use_scope_descriptions_for_consent` フラグを `true` に設定してください。統合のテストと検証を行う際に、後で同意プロンプトを確認する機会があります。
* **Admin Login Domain**: Web ブラウザーでの同意フローの一環として、Okta がリダイレクト先として使用する Auth0 テナントドメインです。Auth0 でカスタムドメイン名を設定している場合は、それを使用します。詳細については、[Custom Domains](docs/customize/custom-domains) を参照してください。
* **Display Name of the OIN Express Configuration Application**: 同意ダイアログに表示される OIN クライアントアプリケーションの名前です。
* **Admin Login Flow**: OIN クライアントアプリケーションの [Organization login](/docs/ja-jp/manage-users/organizations/login-flows-for-organizations) フローを定義するもので、Okta 管理者が Okta コンソールから Express Configuration を実行する際に使用されます。次の中から選択します。
* **Prompt for Organization**: まず管理者に Organization の選択を求め、その後、その Auth0 Organization のログイン画面が表示されます。管理者は、その Organization で設定された [pre-existing connection](/docs/ja-jp/manage-users/organizations/configure-organizations/enable-connections) を使用してサインインできます。
* **Prompt for Credentials**: まず管理者にログイン資格情報の入力を求めます。このオプションを選択すると、管理者ユーザーを含む接続を選択できるボタンが表示されます。これは、共有データベース接続、パスワードレスメール接続、またはすべての Auth0 Organizations に関連付け可能な別の接続です。
* **Admin Role**: Express Configuration を実行するには、管理者に適切な権限が割り当てられている必要があります。現在の Auth0 デプロイメントに最適な方法で管理者を認可する手順については、[Assign express configuration permissions to users](/docs/ja-jp/authenticate/identity-providers/enterprise-identity-providers/okta/express-configuration#assign-permissions-to-users) を参照してください。
最適な同意エクスペリエンスを実現するには、[Customize Consent Prompts](/docs/ja-jp/customize/login-pages/customize-consent-prompts) で説明されているように、テナントの `use_scope_descriptions_for_consent` フラグを `true` に設定してください。統合のテストと検証を行う際に、後で同意プロンプトを確認する機会があります。
## ユーザーに権限を割り当てる
Okta では、Auth0 を利用した SaaS アプリケーションで Express Configuration を実行するには、管理者が必要な権限を持つアプリケーションユーザーアカウントを所有している必要があります。
Auth0 では、Express Configuration が設定されたコネクションが作成されている [Auth0 Organization](/docs/ja-jp/manage-users/organizations) のメンバーであれば、どのアプリケーションユーザーにもこの権限を付与できます。これには、以下が含まれます。
* 単一の Organization 専用に作成された専用データベースコネクションのユーザー
* 1 つ以上の Organization に所属する共有データベースコネクションのユーザー
* 1 つ以上の Organization に所属するパスワードレスメールコネクションのユーザー
* 1 つ以上の Organization に所属するソーシャルコネクションまたは既存のエンタープライズコネクションのユーザー
これらの条件が満たされると、Auth0 では Express Configuration の権限を割り当てるための柔軟な方法が提供され、開発者は現在の Auth0 環境に最適な方法を選択できます。
| **Method** | **Recommended for...** |
| --------------------------------------------------------------------------------------------------------------------------------------------------------------------------------------- | ---------------------------------------------------------------------------------------------------------------------------------------------------------------------------------------------------------------- |
| 既存のユーザーロールに Express Configuration の権限を割り当てる | Auth0 テナントに既存のアプリケーションユーザー [role](/docs/ja-jp/manage-users/access-control/configure-core-rbac/roles) がある顧客。 |
| [SaaStart reference application](https://auth0.com/blog/speed-up-your-customer-identity-journey-with-auth0-saastart/) で示されているように、Express Configuration の権限が必要なアプリケーションユーザーに新しいロールを割り当てる | 個々のユーザーに Express Configuration の権限を付与するために Auth0 の [role](/docs/ja-jp/manage-users/access-control/configure-core-rbac/roles) 機能を利用したい顧客。これは Auth0 Dashboard または Management API で実行できます。 |
| Post-Login Action を使用して、属性ベースのアクセス制御により権限を動的に割り当てる | 現在 Auth0 の [role](/docs/ja-jp/manage-users/access-control/configure-core-rbac/roles) 機能を使用しておらず、ロールを割り当てるために Auth0 Dashboard を使ったり Management API を呼び出したりする代わりに、Post-Login Action を使ってユーザー属性に基づいて権限を動的に割り当てたい顧客。 |
Express Configuration を利用するための管理者アカウントのプロビジョニングに関するヒントについては、[Customer Enablement](/docs/ja-jp/authenticate/identity-providers/enterprise-identity-providers/okta/express-configuration#customer-enablement) を参照してください。
### 既存のアプリケーションユーザーロールに権限を割り当てる
アプリケーションロールと API 権限に [Auth0 の RBAC 機能](/docs/ja-jp/manage-users/access-control/configure-core-rbac/roles) を使用しており、アプリケーションを導入する IT 管理者に割り当てる管理者ユーザー用のロールがすでに 1 つ以上ある場合は、Express Configuration 権限の割り当てにこの方法を使用します。
必要な API 権限:
| **権限名** | **API (リソースサーバー) 識別子** |
| ------------------------ | ----------------------------- |
| `express_configure:sso` | `urn:auth0:express-configure` |
| `express_configure:scim` | `urn:auth0:express-configure` |
Auth0 Dashboard および Management API でのロールへの権限の割り当てについて詳しくは、[ロールに権限を追加する](/docs/ja-jp/manage-users/access-control/configure-core-rbac/roles/add-permissions-to-roles)を参照してください。
### アプリケーションユーザーに新しいロールを割り当てる
アプリケーションのロールと API 権限に [Auth0 の RBAC 機能](/docs/ja-jp/manage-users/access-control/configure-core-rbac/roles) を使用しているものの、アプリケーションのデプロイを担当する IT 管理者のような管理ユーザーを表すロールがない場合は、Express Configuration 権限の割り当て方法としてこの方法を使用します。
この方法は、現在は [Auth0 の RBAC 機能](/docs/ja-jp/manage-users/access-control/configure-core-rbac/roles) を使用していないものの、Auth0 Dashboard または Management API を使ってアクセスを許可するユーザーをきめ細かく制御するために活用したい Auth0 開発者にも適しています。
#### ロールを作成する
Auth0 Dashboard、Management API、または [Auth0 CLI](https://auth0.github.io/auth0-cli/auth0_roles_create.html) を使用して、[ロールを作成](/docs/ja-jp/manage-users/access-control/configure-core-rbac/roles/create-roles)できます。この例では、Auth0 CLI を使用します。
```bash theme={null}
auth0 roles create \
--name "EXPRESS_CONFIGURE_ADMIN_ROLE" \
--description "Administrator role for Express Configuration"
```
#### ロールに権限を割り当てる
指定したロールに `express_configuration:sso` と `express_configuration:scim` の権限を割り当てます。`$ROLE_ID` は、権限を付与するロールの ID に置き換えてください。
この方法を使用する場合は、Express Configuration 権限が必要な新しい組織ユーザーにこのロールを割り当てるように、顧客のオンボーディング プロセスを更新する必要があります。
```bash theme={null}
auth0 roles permissions add "$ROLE_ID" \
--api-id "urn:auth0:express-configure" \
--permissions "express_configure:sso"
```
```bash theme={null}
auth0 roles permissions add "$ROLE_ID" \
--api-id "urn:auth0:express-configure" \
--permissions "express_configure:scim"
```
既存の組織ユーザーへのロールの割り当てについて詳しくは、[メンバーのロールを追加する](/docs/ja-jp/manage-users/organizations/configure-organizations/add-member-roles)を参照してください。
### post-login Action を使用して、ユーザー属性に基づいて権限を割り当てる
この Express Configuration の権限割り当て方法は、Role-Based Access Control (RBAC) 、Management API、または Auth0 Dashboard を使ってユーザーロールを割り当てる代わりに、Auth0 の [post-login Action](/docs/ja-jp/customize/actions/explore-triggers/signup-and-login-triggers/login-trigger) を使用して、ユーザー属性に基づく権限の動的な割り当てを行う場合に使用します。
これは、[Auth0 metadata](/docs/ja-jp/manage-users/user-accounts/metadata) のカスタム権限を使用した属性ベースの認可モデルで Auth0 を導入しているお客様に適しています。
**例**
次の例では、既存のカスタムユーザー属性 `user.app_metadata.is_admin` の値に基づいて権限を割り当てるために、post-login Action を使用します。
```bash theme={null}
/**
* ロールの割り当ての代わりにカスタムロジックに基づいてExpress Configurationの権限を割り当てます
*/
exports.onExecutePostLogin = async (event, api) => {
//リクエストがEC APIアクセストークン向けかどうかを確認する
if (event.resource_server && event.resource_server.identifier === "urn:auth0:express-configure") {
//カスタム条件に基づいて権限を追加する
if (event.user.app_metadata && event.user.app_metadata.is_admin === true) {
api.accessToken.addScope("express_configure:sso");
api.accessToken.addScope("express_configure:scim");
}
//ECアクセストークンがリクエストされた場合はアクセスを拒否する
else {
api.access.deny('Access denied');
}
}
};
```
## ホームレルムディスカバリーを有効にする
Express Configuration を実行する前に、HRD を有効にするため、顧客のオンボーディング プロセスの一環として顧客のメール アドレスを収集して確認しておく必要があります。
アプリケーションで [Identifier-First login experience](/docs/ja-jp/authenticate/login/auth0-universal-login/identifier-first) を使用し、メール アドレスに基づいてユーザーをその ID プロバイダー (IdP) に対応付けるためにホームレルムディスカバリー (HRD) を利用している場合は、Auth0 Actions と組み合わせて Express Configuration を使用できます。
メール アドレスは、Express Configuration ワークフロー中に post-login Actions からアクセスできる場所に保存する必要があります。保存先の例は次のとおりです。
* 1 つ以上のメール ドメインを、顧客の Auth0 Organization の [organization metadata](/docs/ja-jp/manage-users/organizations/configure-organizations/create-organizations) に保存できます。
* post-login action から API 呼び出しを行い、環境内で検証済みドメインを保存している任意のシステムから取得することもできます。
管理ユーザーが Okta ポータルで express configuration を開始して認証すると、これらの action によってメール ドメインが Okta に渡されるトークンに追加されます。Okta はその情報を抽出し、正しい HRD 構成で Okta 接続を設定します。
**例 1**
この例では、検証済みドメインは Auth0 Organization の接続メタデータに保存されています。この場合、organization metadata の `domains` というキーに、1 つ以上のメール ドメインをカンマ区切りの文字列として保存しておく必要があります。
値の例: `test.com`,`test2.com`
```javascript theme={null}
exports.onExecutePostLogin = async (event, api) => {
if (event?.resource_server?.identifier === "urn:auth0:express-configure") {
if (event.organization && event.organization.metadata && event.organization.metadata.domains)
{
var domain_aliases = event.organization.metadata.domains.replace(/ /g,'').split(',');
var express_configuration = {
"domain_aliases": domain_aliases
};
api.accessToken.setCustomClaim("express_configuration", express_configuration);
}
}
};
```
**例 2**
この例では、ログイン後の Action が API を呼び出し、お客様の環境内のストレージシステムから検証済みドメインを取得します。
```javascript theme={null}
/**
*/
exports.onExecutePostLogin = async (event, api) => {
if (event?.resource_server?.identifier === "urn:auth0:express-configure") {
const axios = require("axios");
// カスタムAPIコールをここで設定してください
const domains = await axios.get("https://example.org/endpoint");
var express_configuration = {
"domain_aliases": domains
};
api.accessToken.setCustomClaim("express_configuration", express_configuration);
}
};
```
### 接続をまたいで管理者アカウントの一致を維持する
Auth0 では、異なる接続に対して同じメールアドレスを持つユーザーアカウントをプロビジョニングできます。エンドユーザーは、勤務先のメールアドレスを使用するデータベース接続、ソーシャル、またはパスワードレスのアカウントを持つ一方で、フェデレーションされた Okta アカウントでも同じメールアドレスを使用している場合があります。
[Admin login and consent flow](/docs/ja-jp/authenticate/identity-providers/enterprise-identity-providers/okta/express-configuration#provision-admin-accounts) で **Prompt for Credentials** オプションを使用すると、Organization に追加された後は、ホームレルムディスカバリーによって、特定のドメインサフィックスに一致するユーザーが他の接続タイプではなく新しい Okta 接続に照合されるようになります。この Organization のログイン動作の詳細については、[Identifier First Authentication with prompt for credentials](/docs/ja-jp/manage-users/organizations/login-flows-for-organizations#identifier-first-authentication-with-prompt-for-credentials) を参照してください。
この動作が発生するのは、最初の Auth0 管理者ユーザーセッションの有効期限が切れた後に、顧客が Express Configuration をもう一度実行した場合のみです。管理者アカウントの識別子が新しい Okta 接続に一致するメールアドレスである場合、管理者はその接続先にリダイレクトされます。
この動作は、次のいずれかの方法で管理または回避できます。
* [Admin login and consent flow](/docs/ja-jp/authenticate/identity-providers/enterprise-identity-providers/okta/express-configuration#provision-admin-accounts) で **Prompt for Organization** オプションを使用します。
* 一致する確認済みメールアドレスを含む新しい Okta アカウントがプロビジョニングされた後、そのアカウントに対して Express Configuration の権限を有効にします。
* Auth0 Organizations を Express Configuration の管理者同意フローでのみ使用し、アプリケーションの利用体験では使用していない場合は、[Configure SaaS Application Properties](/docs/ja-jp/authenticate/identity-providers/enterprise-identity-providers/okta/express-configuration#configure-saas-application-properties) で説明されている `enable_organization` プロパティを無効にすることで、この問題を解決できます。
* 管理者ユーザーの識別子が、データベース接続のユーザー名のようにメールアドレスではない場合、この問題は発生しません。
## 1 つの統合で複数のアプリケーションを有効にする
Okta 接続の 1 つの Express Configuration のエンドユーザーに、テナント内の複数のアプリケーションへのアクセスを許可する場合は、登録済みの Web アプリケーションに `linked_clients` プロパティを設定できます。
この設定を変更するには、Auth0 Management API を使用して[登録済みの Web アプリケーションを取得](https://auth0.com/docs/api/management/v2/clients/get-clients-by-id)します。`{yourAppId}` は登録済みアプリケーションの Client ID に、`{yourAccessToken}` は Management API v2 のアクセストークンに置き換えてください。Management API で使用するアクセストークンの取得方法については、[Management API Access Tokens](/docs/ja-jp/secure/tokens/access-tokens/management-api-access-tokens) を参照してください。
```curl theme={null}
curl --request GET \
--url 'https://{yourDomain}/api/v2/clients/{yourAppId}' \
--header 'authorization: Bearer {yourAccessToken}'
```
レスポンスから `express_configuration` プロパティを取得し、追加するアプリケーション ID の配列を `linked_clients` プロパティに追加して、[登録済みの Web アプリケーションを更新](https://auth0.com/docs/api/management/v2/clients/patch-clients-by-id)します。
```curl theme={null}
curl --request PATCH \
--url 'https://{yourDomain}/api/v2/clients/{yourAppId}' \
--data '{"express_configuration":
{"admin_login_domain":"TENANT.auth0.com",
"connection_profile_id":"cop_xxxxxxxxxxxxxxx",
"enable_client":true,
"enable_organization":true,
"initiate_login_uri_template":"https://example.org",
"okta_oin_client_id":"LDiGbUeiAYjRB5a4yOGfBvxxxxxxxxxxx",
"user_attribute_profile_id":"uap_1ctMVQUg8jxxxxxxxxxxxx",
"linked_clients": [
{ "client_id": "KJM86F2susguvsasSeAsIxxxxxxxxxxx" },
{ "client_id": "FIXwZCf5iUElvqy6eidlfxxxxxxxxxxx" }
]
}
}' \
--header 'cache-control: no-cache' \
--header 'content-type: application/json' \
--header 'authorization: Bearer {yourAccessToken}'
```
Express Configuration を実行すると、linked\_clients プロパティ内のこれらすべてのアプリケーション ID が、Okta 接続の `enabled_clients` プロパティに追加されます。
## OIN にインテグレーションを公開する
基本構成を作成したら、OIN への申請プロセスを開始できます。このプロセスでは、本番公開前に Express Configuration をエンドツーエンドで十分にテストできます。
1. OIN にアプリケーションを登録する
2\. OIN 統合に Express Configuration を追加する
3\. OIN の公開鍵を設定する
4\. Express Configuration OIN 統合をテストして検証する
5\. OIN への申請を完了する
### OIN にアプリケーションを登録する
OIN の新規または既存のアプリケーションに Express Configuration を追加するには、次のものが必要です。
* テストに使用する、Auth0 対応の Web アプリケーションのインスタンス
* [Okta Integrator Free Plan org](https://developer.okta.com/signup/) (Super Admin ロール、または App Admin ロールと Org Admin ロールにアクセスできるもの)
* 基本的なテストを完了するには、Okta Integrator Free Plan org を Auth0 テナントで [Okta 接続](/docs/ja-jp/authenticate/identity-providers/enterprise-identity-providers/okta) として設定し、Auth0 対応の Web アプリケーションで使用できるよう有効にしておく必要があります
* Okta Browser Plugin がインストールされた Google Chrome ブラウザー ([OIN Wizard requirements](https://developer.okta.com/docs/guides/submit-app-prereq/main/#oin-wizard-requirements) を参照)
1. サインアップ時に使用したユーザーアカウント、または Okta で `SUPER_ADMIN` ロール、もしくは `APP_ADMIN` ロールと `ORG_ADMIN` ロールが割り当てられているアカウントで、Okta Integrator Free Plan org にサインインします。
2. Admin Console で **Applications > Your OIN Integrations** に移動します。
3. 新しいアプリケーションの場合は **Build new OIN integration** を選択します。既存のアプリケーションの場合は、既存の OIN 統合 を選択します。OIN Wizard が表示されます。
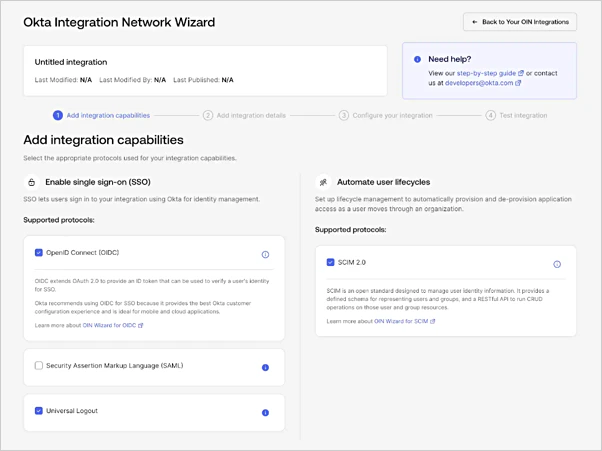 4. **Add integration capabilities** で、SSO プロトコルとして **OpenID Connect (OIDC)** を選択します。
5. 必要に応じて **Universal Logout** と **SCIM 2.0** を選択することもできます。これらはどちらもすべての Okta インテグレーションで強く推奨されており、Express Configuration でもサポートされています。
6. **Add integration details** を選択します。
7. **OIN Catalog Properties** セクションに必要な情報を入力します。参考として、[OIN Catalog Properties](https://developer.okta.com/docs/guides/submit-oin-app/openidconnect/main/#oin-catalog-properties) を参照してください。
8. **Configure your integration** を選択します。この画面でアプリケーションの Express Configuration を有効にします。
4. **Add integration capabilities** で、SSO プロトコルとして **OpenID Connect (OIDC)** を選択します。
5. 必要に応じて **Universal Logout** と **SCIM 2.0** を選択することもできます。これらはどちらもすべての Okta インテグレーションで強く推奨されており、Express Configuration でもサポートされています。
6. **Add integration details** を選択します。
7. **OIN Catalog Properties** セクションに必要な情報を入力します。参考として、[OIN Catalog Properties](https://developer.okta.com/docs/guides/submit-oin-app/openidconnect/main/#oin-catalog-properties) を参照してください。
8. **Configure your integration** を選択します。この画面でアプリケーションの Express Configuration を有効にします。
#### OIN 統合に Express Configuration を追加する
登録済みの OIN Integration で Express Configuration 機能を有効にするには、次の手順に従います。
1. OIN Wizard の **Configure your integration** 画面で、**Enable Express Configuration** を選択します。すると、Auth0 テナントから取得した情報の入力を求めるウィンドウが表示されます。
 2. 新しいブラウザーウィンドウで、[Auth0 Dashboard > Applications > \[Application\] > Okta Integration Network > Create OIN Integration](https://manage.auth0.com/dashboard/#/applications/#/okta-integration-network/wizard) に移動し、画面に表示されている情報をコピーします。
3. OIN Wizard の **Configure your integration** 画面に戻り、その情報を **Express Configuration Information** フィールドに貼り付けます。
4. **Continue** を選択します。
2. 新しいブラウザーウィンドウで、[Auth0 Dashboard > Applications > \[Application\] > Okta Integration Network > Create OIN Integration](https://manage.auth0.com/dashboard/#/applications/#/okta-integration-network/wizard) に移動し、画面に表示されている情報をコピーします。
3. OIN Wizard の **Configure your integration** 画面に戻り、その情報を **Express Configuration Information** フィールドに貼り付けます。
4. **Continue** を選択します。
#### OIN の公開鍵を設定する
次に、Auth0 にアップロードするために必要な公開鍵ファイルを Okta からダウンロードするよう、画面の案内に従ってください。
1. OIN Wizard の **Express Configuration for Auth0 apps** ウィンドウで、**Download Key (.pem)** を選択し、鍵をローカル端末に保存します。
2. ファイルを **[Auth0 Dashboard > Applications > \[Application\] > Okta Integration Network > Create OIN Integration](https://manage.auth0.com/dashboard/#/applications/#/okta-integration-network/wizard)** にアップロードします。
 3. **Save** を選択します。
4. Okta ポータルの **Configure your integration** 画面に戻り、**Finish** を選択します。これにより、統合に必要な設定項目の多くが自動的に自動入力されます。
3. **Save** を選択します。
4. Okta ポータルの **Configure your integration** 画面に戻り、**Finish** を選択します。これにより、統合に必要な設定項目の多くが自動的に自動入力されます。
#### 統合の設定を完了する
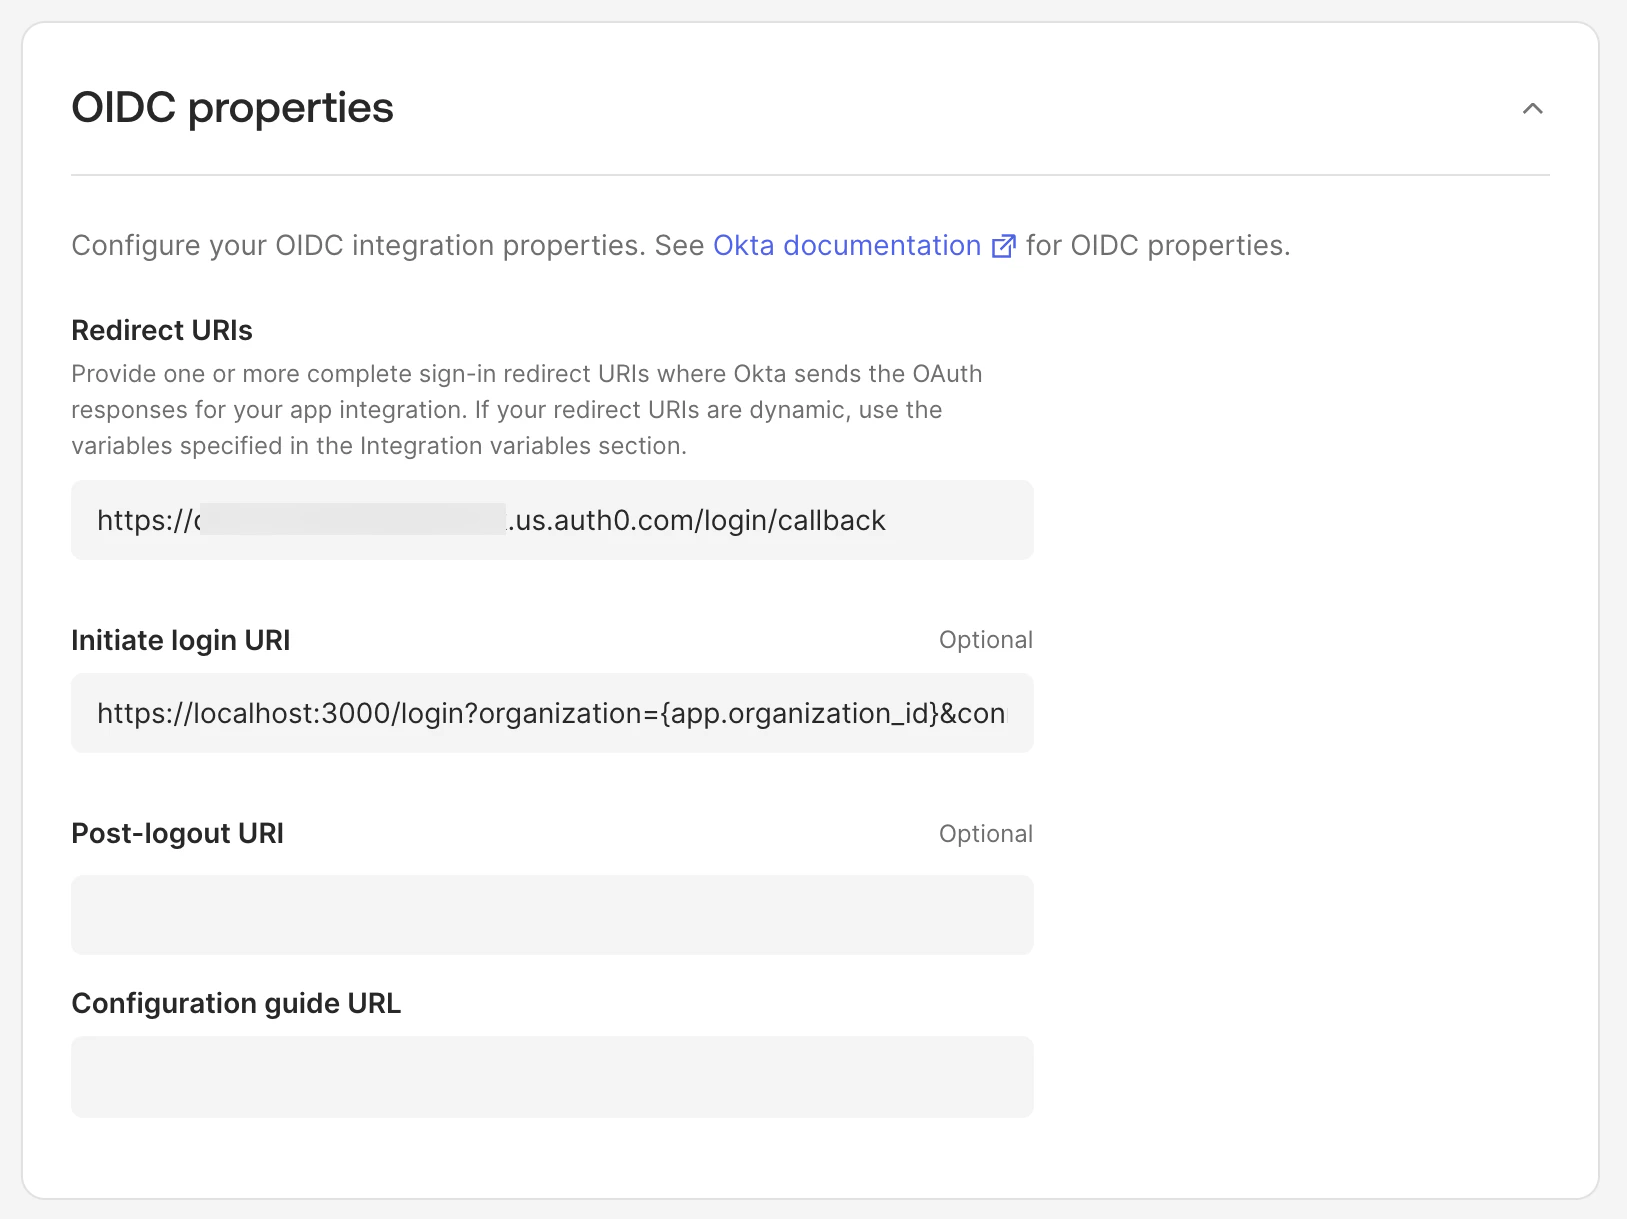
1. **OIDC Properties** で、次の項目を設定します。
* **Redirect URIs** は、自動的に Auth0 テナントのコールバック URI に設定されます。ここでは、テナントのカスタムドメインまたは `auth0.com` ドメインを使用できます。例: `https://tenant.auth0.com/login/callback`
* **Initiate Login URI** は、[Register an application with Initiate Login URI Template](/docs/ja-jp/authenticate/identity-providers/enterprise-identity-providers/okta/express-configuration#register-an-application-with-initiate-login-uri-template) で説明されているように、Auth0 でアプリケーション用に設定した値に自動的に設定されます。Okta はこの URL を使用して、エンドユーザーのダッシュボードからアプリケーションを起動します。なお、変数名は、この画面に表示される統合変数に対応するよう変更されています。
* (任意) **Post-Logout URL** を、アプリのサインアウト後のリダイレクト URI に設定します。これは、エンドユーザーがアプリからサインアウトした後にリダイレクトする先です。サインアウト URI がテナントごとに異なる場合は、統合変数を使用できます。
* **Configuration guide URL** を設定し、Express Configuration を使用して Okta とアプリ間の SSO を構成する方法に関する顧客向け手順へリンクします。詳しくは、[Customer configuration document guidelines](https://developer.okta.com/docs/guides/submit-app-prereq/main/#customer-configuration-document-guidelines) を参照してください。
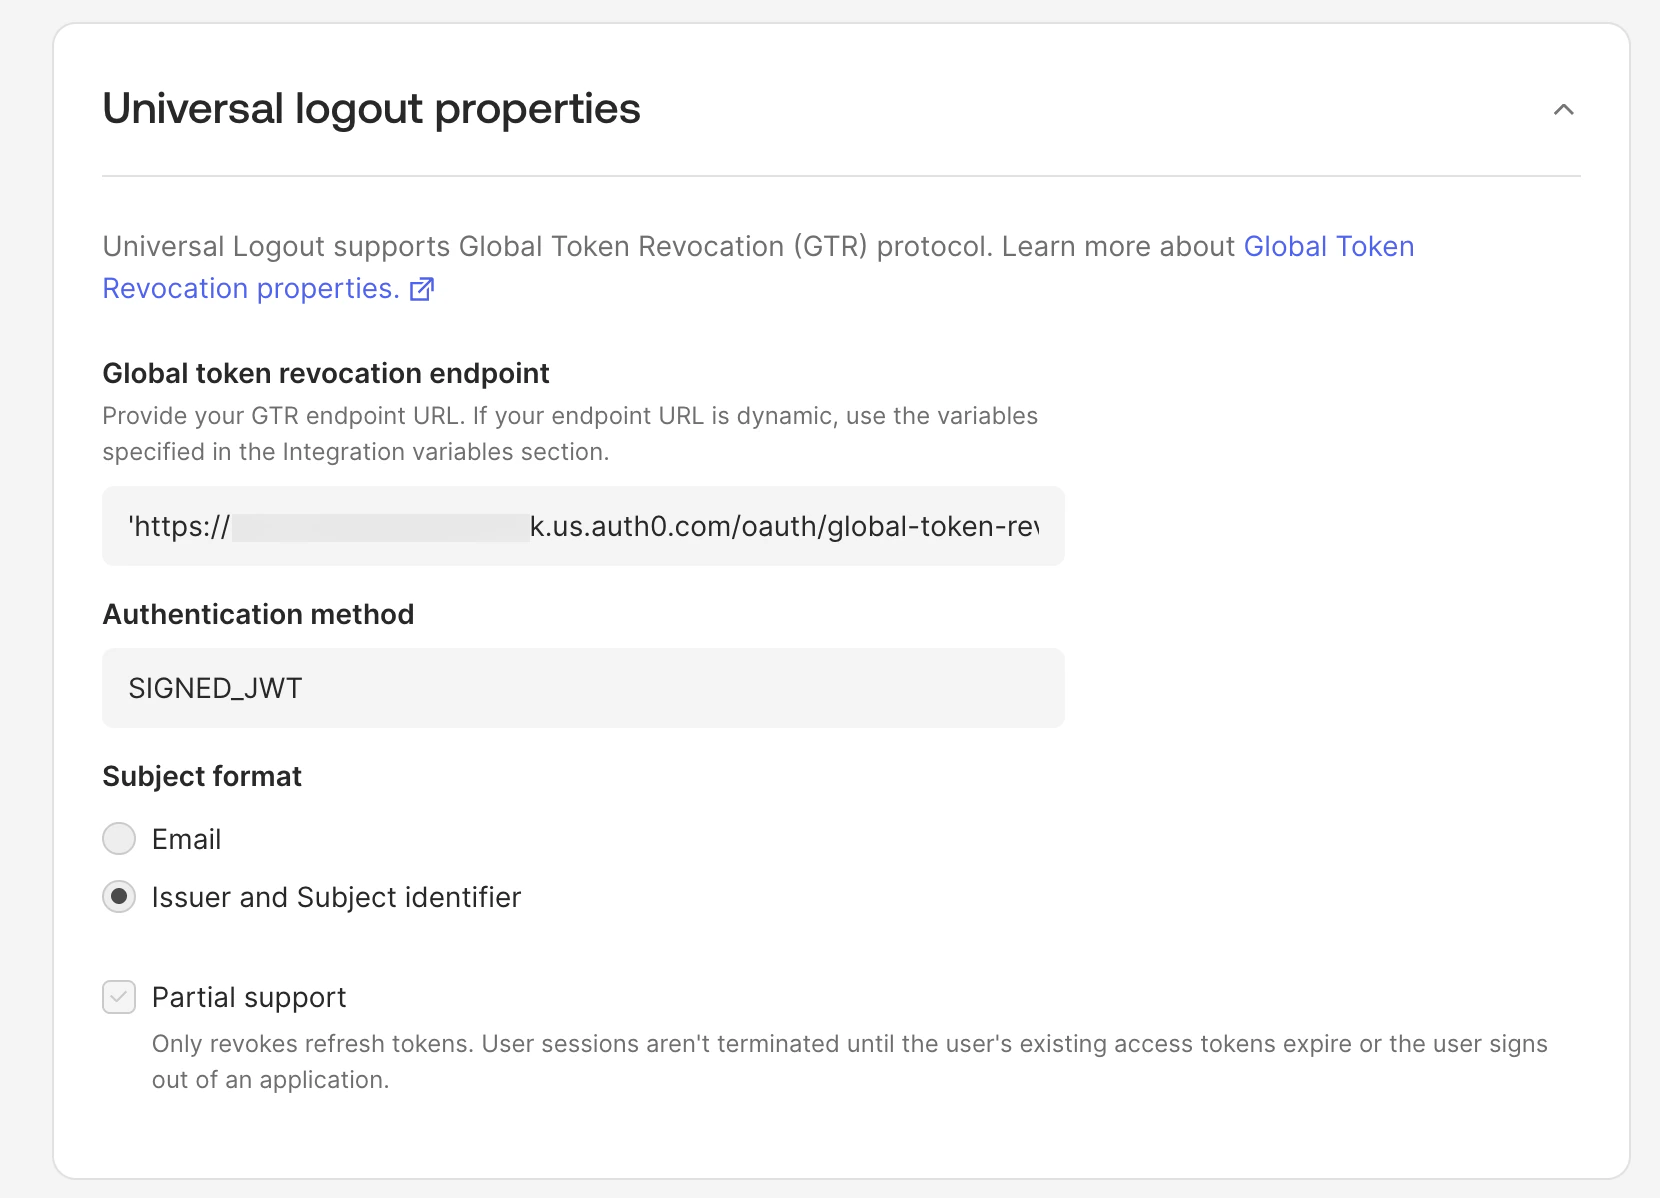
 2. **Universal Logout** が選択されている場合は、Universal logout properties で次の値が設定されていることを確認します。
* **Global token revocation** エンドポイントは自動的に設定されているはずです。この値は、Express Configuration の実行時に動的に置き換えられます。
* **Subject format** は自動的に **Issuer and Subject identifier** に設定されているはずです。
* Auth0 とアプリケーションの間で [OIDC back-channel](https://auth0.com/docs/authenticate/login/logout/universal-logout#revoke-application-user-sessions) ログアウトを使用していない一方で、アプリケーションが [refresh tokens](/docs/ja-jp/secure/tokens/refresh-tokens) を使用している場合は、**Partial support** をチェックします。
2. **Universal Logout** が選択されている場合は、Universal logout properties で次の値が設定されていることを確認します。
* **Global token revocation** エンドポイントは自動的に設定されているはずです。この値は、Express Configuration の実行時に動的に置き換えられます。
* **Subject format** は自動的に **Issuer and Subject identifier** に設定されているはずです。
* Auth0 とアプリケーションの間で [OIDC back-channel](https://auth0.com/docs/authenticate/login/logout/universal-logout#revoke-application-user-sessions) ログアウトを使用していない一方で、アプリケーションが [refresh tokens](/docs/ja-jp/secure/tokens/refresh-tokens) を使用している場合は、**Partial support** をチェックします。
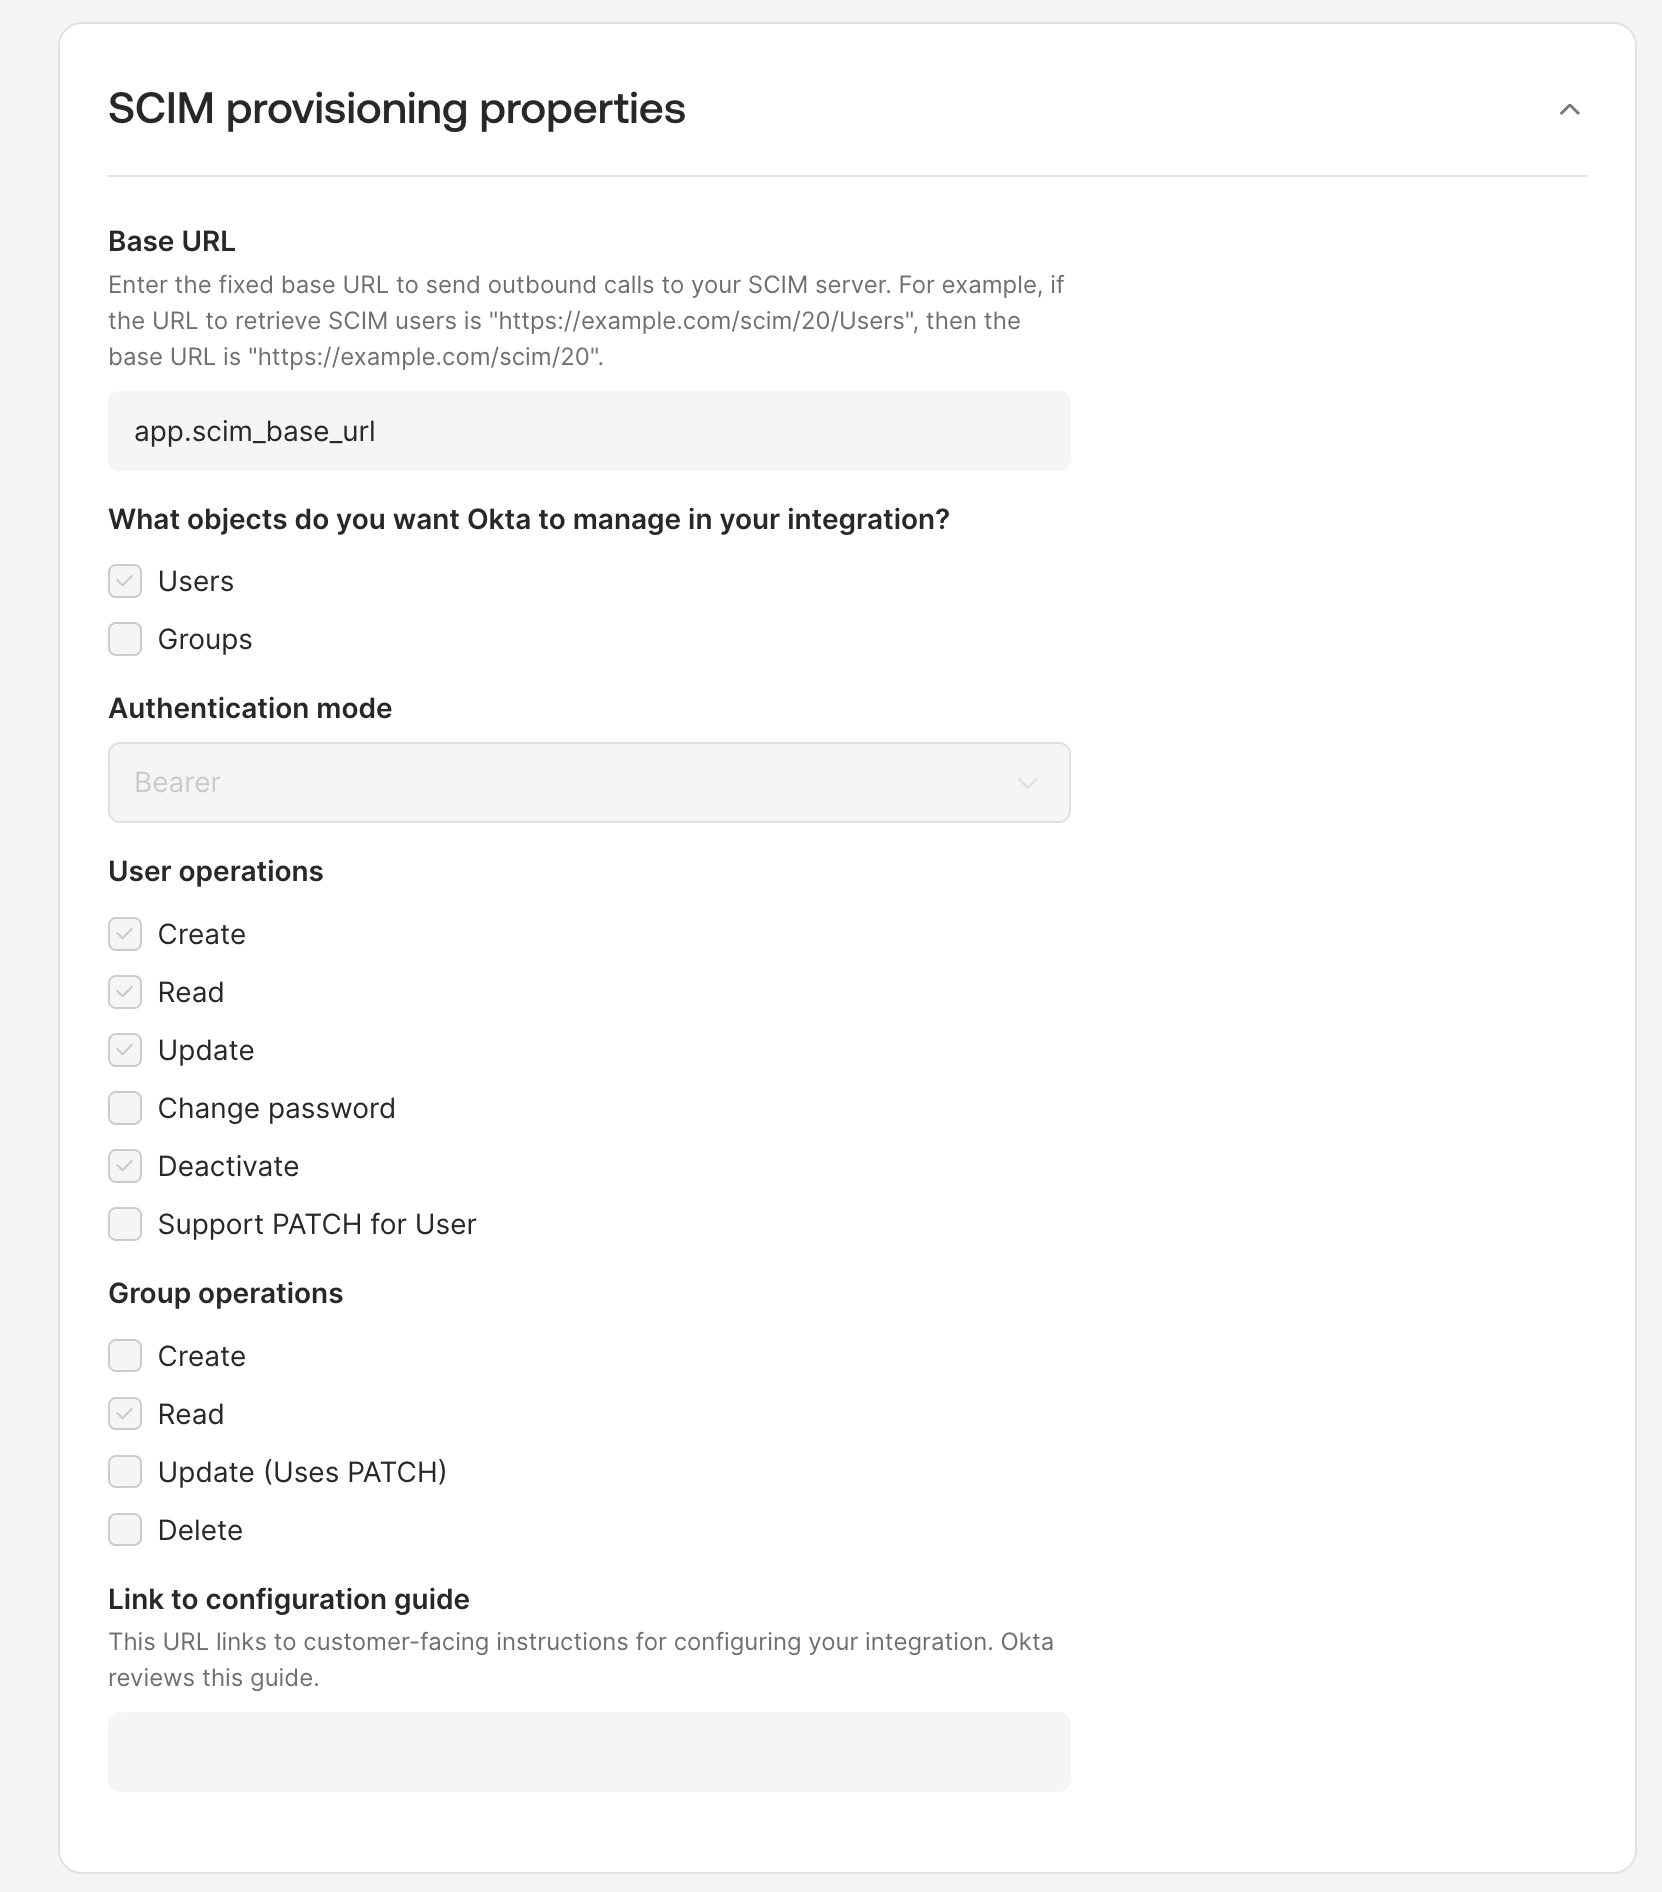
 3. **SCIM 2.0** が選択されている場合は、**SCIM provisioning properties** で次の値が設定されていることを確認します。
* **Base URL** は統合変数に設定されている必要があります。この値は、Express Configuration の実行時に動的に置き換えられます。
* **User Operations** は、自動的に **Create**、**Read**、**Update**、**Deactivate** に設定されているはずです。
* Express Configuration を使用して Okta とアプリ間の SSO を構成する方法に関する顧客向け手順へのリンクを設定します。詳しくは、[Customer configuration document guidelines](https://developer.okta.com/docs/guides/submit-app-prereq/main/#customer-configuration-document-guidelines) を参照してください。
3. **SCIM 2.0** が選択されている場合は、**SCIM provisioning properties** で次の値が設定されていることを確認します。
* **Base URL** は統合変数に設定されている必要があります。この値は、Express Configuration の実行時に動的に置き換えられます。
* **User Operations** は、自動的に **Create**、**Read**、**Update**、**Deactivate** に設定されているはずです。
* Express Configuration を使用して Okta とアプリ間の SSO を構成する方法に関する顧客向け手順へのリンクを設定します。詳しくは、[Customer configuration document guidelines](https://developer.okta.com/docs/guides/submit-app-prereq/main/#customer-configuration-document-guidelines) を参照してください。
 4. **Get started with testing** を選択します。
### 統合をテストして検証する
公開鍵を Auth0 にアップロードしたら、Okta Free Integrator 組織を使って Express Configuration をテストできます。
1. Okta OIN Operations チームと共有できる Auth0 Organization と、ユーザー名/パスワードのアカウントを作成します。
* この用途の Auth0 Organization とユーザー名/パスワードのアカウントを作成するには、[顧客有効化フローの例](/docs/ja-jp/authenticate/identity-providers/enterprise-identity-providers/okta/express-configuration#example-customer-enablement-flow) の手順に従ってください。
* 必要に応じて、新しいアプリケーションテナントを作成するなど、テスト用 Organization がログインできるようにアプリケーション側で追加の対応を行ってください。
2. テストアカウントを作成したら、super admin (`SUPER_ADMIN`) ロール、または app (`APP_ADMIN`) と organization (`ORG_ADMIN`) の admin [ロール](https://developer.okta.com/docs/api/openapi/okta-management/guides/roles/#standard-roles) を持つユーザーとして、Okta Integrator Free 組織にサインインします。
3. Okta 管理コンソールで **Applications > Your OIN Integrations** に移動し、OIN 統合の名前を選択します。
4. **Configure your integration** を選択し、続けて **Get started with testing.** を選択します。
5. **Account URL** には、アプリケーションのログインページを設定します。Okta OIN Operations のエンジニアがこの URL にアクセスし、後続のフィールドで提供したアカウント認証情報を使ってアプリにサインインします。
6. **Username** と **Password** には、Express Configuration のテスト用に設定したテスト Organization 管理者アカウントのユーザー名とパスワードを設定します。
7. **Support Contact** には、統合に関して Okta が自社に連絡するためのメールアドレスを設定します。このメールアドレスが OIN カタログや顧客に公開されることはありません。表示されるのは Okta の内部チームのみです。
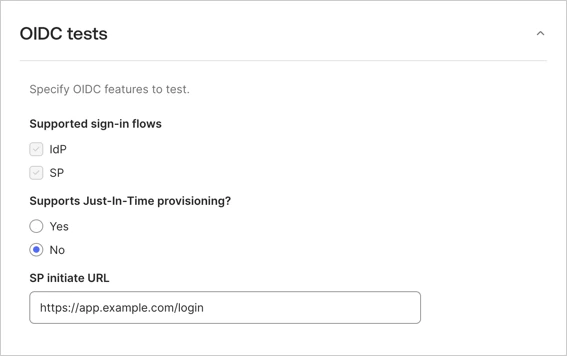
8. **OIDC Tests** で、Just-In Time Provisioning には **No** を選択してこのテストをスキップし、**SP Initiate URL** にはアプリケーションインスタンスの initiate login URL を設定します。
 9. **Test your integration** を選択します。
10. **Generate Instance** を選択し、続けて **Done** を選択します。
11. **Sign On** タブに移動します。
12. Single Sign-On と Universal Logout の Express Configuration をテストするには、**Express Configure SSO & UL** を選択します。
9. **Test your integration** を選択します。
10. **Generate Instance** を選択し、続けて **Done** を選択します。
11. **Sign On** タブに移動します。
12. Single Sign-On と Universal Logout の Express Configuration をテストするには、**Express Configure SSO & UL** を選択します。
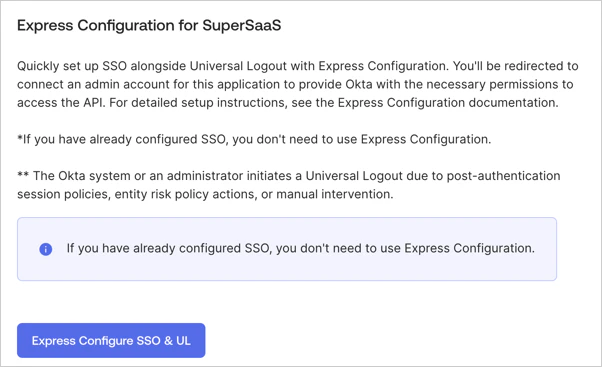 13. Auth0 の Universal Login ページにリダイレクトされたら、Organization 管理者アカウントでサインインし、データ共有に同意します。
14. SCIM をテストするには、**Provisioning** を選択し、続けて **Express Configure SCIM** を選択します。Auth0 の Universal Login にリダイレクトされたら、同意画面の案内に従って進めてください。完了すると、SCIM 統合が設定されます。
15. 次に **Assignments** タブを選択し、認証情報を把握している Okta Free Integrator 組織のユーザーを割り当てます。適切なユーザーが存在しない場合は、[ユーザーを手動で追加する](https://help.okta.com/en-us/content/topics/users-groups-profiles/usgp-add-users.htm) 手順に従ってください。SCIM が有効になっている場合、そのユーザーは Auth0 テナントにプロビジョニングされるはずです。Auth0 Dashboard で確認してください。
16. SSO をテストするには、先ほど割り当てたユーザーアカウントとテストインスタンスを使用します。ユーザーアカウントの認証情報でログインします。
17. Universal Logout をテストするには、[Universal Logout をテストする](/docs/ja-jp/authenticate/login/logout/universal-logout#test-universal-logout) の手順に従ってください。
13. Auth0 の Universal Login ページにリダイレクトされたら、Organization 管理者アカウントでサインインし、データ共有に同意します。
14. SCIM をテストするには、**Provisioning** を選択し、続けて **Express Configure SCIM** を選択します。Auth0 の Universal Login にリダイレクトされたら、同意画面の案内に従って進めてください。完了すると、SCIM 統合が設定されます。
15. 次に **Assignments** タブを選択し、認証情報を把握している Okta Free Integrator 組織のユーザーを割り当てます。適切なユーザーが存在しない場合は、[ユーザーを手動で追加する](https://help.okta.com/en-us/content/topics/users-groups-profiles/usgp-add-users.htm) 手順に従ってください。SCIM が有効になっている場合、そのユーザーは Auth0 テナントにプロビジョニングされるはずです。Auth0 Dashboard で確認してください。
16. SSO をテストするには、先ほど割り当てたユーザーアカウントとテストインスタンスを使用します。ユーザーアカウントの認証情報でログインします。
17. Universal Logout をテストするには、[Universal Logout をテストする](/docs/ja-jp/authenticate/login/logout/universal-logout#test-universal-logout) の手順に従ってください。
### 申請を完了する
前のセクションで基本的なテストは完了しています。申請を完了するには、設定がいくつかの自動テストに合格する必要があります。
1. アプリケーションインスタンスで、申請を完了するには **Begin Testing** を選択します。
2. Express Configuration でテストしたインスタンス名の横にある **Add to Tester** を選択します。
3. 自動 SSO テストを完了するには、**IDP flow** および/または **SP flow** テストの **Run test** を選択します。これらのテストには Okta Browser Plugin が必要です。詳細については、[OIN Wizard Requirements](https://developer.okta.com/docs/guides/submit-app-prereq/main/#oin-wizard-requirements) を参照してください。
* アプリケーションインスタンスに割り当てた Okta Free Integration Organization ユーザーでサインインします。プラグインによってアプリケーションへの正常なサインインが検出されると、その時点でテストは合格になります。これらのテストの詳細については、[Test your integration](https://developer.okta.com/docs/guides/submit-oin-app/openidconnect/main/#test-your-integration) を参照してください。
* ログインテスト中にエラーメッセージ `invalid_request (no connections enabled for the client)` が表示された場合は、数分待ってから再試行してください。新しく作成された接続は、HRD などの機能で利用できるようになるまで数分かかることがあります。
4. **SCIM** に必要な Runscope テストを完了するには、[Okta SCIM 2.0 Spec Tests](https://developer.okta.com/standards/SCIM/SCIMFiles/Okta-SCIM-20-SPEC-Test.json) を使用して、[Test your SCIM API](https://developer.okta.com/docs/guides/submit-oin-app/scim/main/#generate-an-instance-for) の手順に従ってください。
* 2 つ目の SCIM トークンについては、**Authentication > Enterprise > Okta > \[your-express-configred-connection] > Provisioning > Sync user profiles using SCIM > Setup** セクションを使用します。
* 完了したら、共有可能な Runscope テスト URL を OIN Wizard の **Link to Runscope spec test results** フィールドと **Link to Runscope CRUD test results** フィールドに入力します。
5. 完了したら、**Submit Integration** を選択します。
## 顧客向け設定
アプリケーションが OIN で公開されたら、Okta の Express Configuration をサポートしていることが分かるように、製品ドキュメントを更新できます。製品ドキュメントには、どのユーザーロールまたはユーザータイプに Express Configuration を実行する権限があるかを明記してください。
アプリケーションですでに Auth0 Organizations を利用しており、[SaaStart reference application](https://auth0.com/blog/speed-up-your-customer-identity-journey-with-auth0-saastart/) で示されているような Organization administrator ロールがある場合は、そのロールに Express Configuration の権限を追加できます。
まだ顧客向けに Auth0 Organizations を導入していない場合、またはアプリケーションで管理ユーザーを実装していない場合は、顧客オンボーディングフローの例を参照してください。
### 顧客利用開始フローの例
顧客のオンボーディングプロセスでは、次の情報を収集する必要があります。
* 顧客の組織名
* Express Configuration を実行する権限を持つ顧客管理者のメールアドレス
* 管理者のドメインを含む、顧客の IdP がユーザーに発行する確認済みのメールドメイン
この情報は、手動で収集するか、顧客向けのサインアップまたはオンボーディングフローを通じて収集します。この情報を基に、この顧客の Auth0 Organization と管理者ユーザーアカウントを作成します。
1. Auth0 Organization を作成する。
2. database や email passwordless などの Auth0 接続 に管理者ユーザーアカウントを作成する。
3. その 接続 を Auth0 Organization に関連付ける。**Membership On Authentication** は無効にする。
4. 管理者ユーザーアカウントを Auth0 Organization のメンバーとして追加する。
5. Express Configuration を実行する権限を持つ組織ロールを管理者ユーザーに割り当てる。
#### Auth0 CLI の例
**Auth0 CLI を初期化して認証する**
[Auth0 CLI](https://auth0.github.io/auth0-cli/auth0_roles_create.html) を使用して Auth0 に認証します。
```bash theme={null}
auth0 login --scopes "create:users,create:organizations,create:organization_members,create:organization_member_roles,create:organization_connections"
```
**Auth0 Organization を作成する**
Organization の名前と、スペースを含まない短縮名を入力します。複数のメールドメインを収集している場合は、それらを Organization のメタデータとして追加します。
```bash theme={null}
auth0 orgs create --json \
--display "organization_display_name" \
--name "organization_short_name" \
--metadata 'domains=["domain1.com", "domain2.com"]'
```
返された `org_id` を控えておきます。
**Organization の管理者アカウントを作成する**
この例では、[`email`](/docs/ja-jp/authenticate/passwordless/authentication-methods/email-otp) 接続タイプが必要な、メールのパスワードレス接続でユーザーを作成します。このコマンドでは、Express Configuration の実行を許可するユーザーのメールアドレスを入力する必要があります。
```bash theme={null}
auth0 api users \
--data '{"email":"user@example.com","connection":"email", "email_verified":true}'
```
Okta OIN 運用チームに提供するユーザー名とパスワードのテストアカウント用にこの Organization を作成している場合は、共有データベース接続または専用データベース接続のいずれかにテストアカウントを作成してください。
```bash theme={null}
auth0 api users \
--data '{"email":"user@example.com","connection":"db_connection_name_here", "password": "add_a_long_password_here"}'
```
返された `user_id` を控えておきます。
**接続を Organization に関連付ける**
接続 ID を取得します。
```bash theme={null}
auth0 api get "connections" -q "name=connection_name_here"
```
接続 ID を組織 ID `org_id` に紐付けます。
```bash theme={null}
auth0 api post "organizations/org_id_here/enabled_connections" \
--data '{ "connection_id": "connection_id_here" };
```
**管理者ユーザーをOrganizationのメンバーに追加する**
`org_id` と `user_id` が必要です。
```bash theme={null}
auth0 api post "organizations/org_id_here/members" \
--data '{ "members": ["user_id__here"] }'
```
**Express Configuration 権限を持つ Organization ロールを割り当てる**
[ユーザーへの Express Configuration 権限の割り当て](/docs/ja-jp/authenticate/identity-providers/enterprise-identity-providers/okta/express-configuration#assign-permissions-to-users) で設定した、Express Configuration 権限を持つロールの ID を取得します。
```bash theme={null}
auth0 api get "roles" -q "name_filter=role_name_here"
```
`user_id` と `org_id` にロール ID を割り当てます。
```bash theme={null}
auth0 api post "organizations/org_id_here/members/user_id_here/roles" --data '{ "roles": ["role_id_here"] }'
```
完了すると、顧客は組織管理者アカウントを使用して、自社の Okta 組織で [OIN 統合](/docs/ja-jp/authenticate/identity-providers/enterprise-identity-providers/okta/express-configuration#publish-your-integration-to-the-oin) の Express Configuration を実行できます。
### 管理者アカウントを準備する際の推奨事項
既存のユーザーアカウントを使用する場合も、Express Configuration を有効にするために新しいアカウントを作成する場合も、以下の推奨事項に従ってください。
#### 勤務先のメールアドレスを使用する
非フェデレーションの管理者アカウントがデータベース、パスワードレスメール、またはソーシャルユーザーアカウントのいずれであっても、`email` 属性の値は、Okta Enterprise のユーザーアカウントとしてプロビジョニングされるユーザーの勤務先メールアドレス (例: `john@mycompany.com`) と一致させることをおすすめします。
また Auth0 では、[メール確認フロー](/docs/ja-jp/manage-users/user-accounts/verify-emails)を使用して、これらのメールアドレスを検証することも推奨しています。
#### 多要素認証を使用する
ログインのたびに多要素認証を必須にすることで、Express Configuration フローにセキュリティをさらに強化できます。
この [Post-Login Action](/docs/ja-jp/customize/actions/explore-triggers/signup-and-login-triggers/login-trigger) の例では、Express Configuration が実行されるたびに、[デバイスの生体認証を使用した WebAuthN](/docs/ja-jp/secure/multi-factor-authentication/fido-authentication-with-webauthn/configure-webauthn-device-biometrics-for-mfa) や [メールで配信されるワンタイムパスワード](/docs/ja-jp/secure/multi-factor-authentication/multi-factor-authentication-factors/configure-email-notifications-for-mfa) などの要素による認証を、条件に応じて求める方法を示しています。
この Action の例を使用するには、Auth0 テナントで [これらの要素を有効にする](/docs/ja-jp/secure/multi-factor-authentication/enable-mfa#enable-mfa-in-the-auth0-dashboard) とともに、**Customize MFA Factors using Actions** オプションを選択する必要があります。
```javascript theme={null}
exports.onExecutePostLogin = async (event, api) => {
if (event.resource_server && event.resource_server.identifier === "urn:auth0:express-configure") {
api.multifactor.enable('any');
api.authentication.challengeWith({ type: 'email' });
if (!event.user.enrolledFactors.some(m => m.type === 'webauthn-platform')) {
api.authentication.enrollWith({type: 'webauthn-platform'});
} else {
api.authentication.challengeWith({type: 'webauthn-platform'});
}
}
}
```
### Express Configuration の使用状況を監視する
Express Configuration の使用状況は、設定済みの各アプリケーションの **OIN Client ID** で絞り込むことで、[Auth0 テナントログ](/docs/ja-jp/deploy-monitor/logs) から確認できます。これには、すべての管理者ユーザーのログインアクティビティに加え、Okta Enterprise 接続の作成と管理に関するすべての API 操作が含まれます。
アプリケーションの OIN Client ID は、次の場所で確認できます。
* Auth0 Dashboard の **Applications > \[Application] > Okta Integration Network > Create OIN Integration** セクション
* [Auth0 Management API](https://auth0.com/docs/api/management/v2/clients/get-clients-by-id) でアプリケーションを表示したときの `express_configuration.okta_oin_client_id` プロパティ
Client ID を使用したログ検索の詳細については、[Log Search Query Syntax](/docs/ja-jp/deploy-monitor/logs/log-search-query-syntax) を参照してください。
## 制限事項
* 1 つの OIN 統合で使用できる Auth0 テナントは 1 つのみです。同じアプリケーションを複数の Auth0 リージョンにデプロイする場合は、リージョンごとに個別の OIN 統合が必要です
* 1 つの Okta 組織内の 1 つの OIN 統合で、対応する 1 つの Auth0 組織内に 1 つの一意の Okta 接続を作成できます。Okta 組織内で 1 つの OIN アプリケーションの複数インスタンスに対して Express configuration はサポートされていません
* OIN に掲載されている各一意の統合では、それぞれ独立した Okta 接続が作成されます。ホーム レルム検出を備えた [Identifier-First login experience](https://auth0.com/docs/authenticate/login/auth0-universal-login/identifier-first) を必要とするアプリケーションが複数ある場合は、[1 つの統合の下で複数のアプリケーションを公開する](/docs/ja-jp/authenticate/identity-providers/enterprise-identity-providers/okta/express-configuration#enable-multiple-applications-under-a-single-integration)ことをお勧めします。
* [1 つの統合の下で複数のアプリケーションを有効にする](/docs/ja-jp/authenticate/identity-providers/enterprise-identity-providers/okta/express-configuration#enable-multiple-applications-under-a-single-integration)場合、Okta の [エンドユーザー ダッシュボード](https://help.okta.com/en-us/content/topics/settings/new-dashboard-overview.htm) にはメインの OIN アプリケーションのみが表示されます。
## Management API リファレンス
特定のアプリケーションで Express Configuration を有効にする際に、Auth0 Dashboard ではなく [Management API](https://auth0.com/docs/api/management/v2) を使用する場合は、以下の例を参照してください。
### Okta OIN Express Configuration System API を作成する
Organization Admins の認証に使用するリソースサーバーを登録します。これは、ダッシュボードを使用してテナント内のアプリの Express Configuration を一度も設定したことがない場合にのみ必要です。
例:
```curl theme={null}
POST /api/v2/resource-servers
{
"name": "Okta OIN Express Configuration API",
"identifier": "urn:auth0:express-configure"
}
```
[エンドポイントのリファレンス](/docs/ja-jp/api/management/v2/resource-servers/post-resource-servers)
### User Attribute Profile を作成する
[User Attribute Profile](/docs/ja-jp/authenticate/enterprise-connections/user-attribute-profile) を作成します。この手順が必要なのは、既存のプロファイルがない場合、または開発者がカスタムプロファイルを使用したい場合に限られます。
User Attribute Profile のデフォルト設定をもとに作成するには、まず `GET /api/v2/user-attribute-profiles/templates` エンドポイントを呼び出し、そのレスポンスをリクエスト本文に使用して User Attribute Profile を作成します。
例:
```curl theme={null}
GET /api/v2/user-attribute-profiles/templates
```
[エンドポイントのリファレンス](https://auth0.com/docs/api/management/v2/user-attribute-profiles/post-user-attribute-profiles)
```curl theme={null}
POST /api/v2/user-attribute-profiles
{
"name": "Okta OIN Express Configuration API",
"identifier": "urn:auth0:express-configure"
}
```
[エンドポイントのリファレンス](https://auth0.com/docs/api/management/v2/user-attribute-profiles/post-user-attribute-profiles)
### 接続プロファイルを作成する
接続プロファイルを作成します。この手順が必要なのは、既存のプロファイルがない場合、または開発者がカスタムプロファイルを使用する場合のみです。
接続プロファイルのデフォルト設定一式を基に開始するには、`GET /api/v2/connection-profiles/templates` エンドポイントを呼び出し、そのレスポンスをリクエスト本文で使用して接続プロファイルを作成します。
例:
```curl theme={null}
GET /api/v2/connection-profiles/templates
```
[エンドポイントのリファレンス](https://auth0.com/docs/api/management/v2/connection-profiles/get-connection-profile-templates)
```curl theme={null}
POST /api/v2/connection-profile
{
"name": "Okta OIN Express Configuration API",
"identifier": "urn:auth0:express-configure"
}
```
[エンドポイントのリファレンス](https://auth0.com/docs/api/management/v2/connection-profiles/post-connection-profiles)
### OIN Express Configuration Client を作成する
指定したアプリケーションについて、Express Configuration の実行時に Okta が使用するサービスアプリケーションを作成します。このクライアントは、以下の例に示すプロパティで作成する必要があります。
`organization_require_behavior` 属性は、以下のいずれかの値にカスタマイズできます。これらの値については、[Administrator login and consent settings](/docs/ja-jp/authenticate/identity-providers/enterprise-identity-providers/okta/express-configuration#administrator-login-and-consent-settings) でも説明されています。
* `pre_login_prompt`: 認証情報の入力を求める前に、管理者の組織の入力を求めます。
* `post_login_prompt`: 管理者の認証情報の入力を求めます。このオプションでは、`PATCH /api/v2/connections/{id}` エンドポイントを使用して、管理者アカウントを含む接続の `enabled_clients` プロパティに OIN クライアントの Client ID を追加します。
例:
```curl theme={null}
POST /api/v2/clients
{
"name": "Okta OIN Express Configuration",
"app_type": "express_configuration",
"organization_require_behavior": "pre_login_prompt",
"client_authentication_methods": {
"private_key_jwt": {
"credentials": []
}
}
}
```
[エンドポイントのリファレンス](https://auth0.com/docs/api/management/v2/clients/post-clients)
### SaaS アプリケーションのプロパティを設定する
OIN に公開する登録済みアプリケーションの `express_configuration` プロパティに設定値を指定します。例の値は、この統合で使用する有効な Connection Profile ID、User Attribute Profile ID、OIN クライアントアプリケーション ID、ログイン開始 URI、および Auth0 テナントドメインに置き換えてください。
`linked_clients` 属性は、[単一の統合で複数のアプリケーションを有効にする](/docs/ja-jp/authenticate/identity-providers/enterprise-identity-providers/okta/express-configuration#enable-multiple-applications-under-a-single-integration) で説明されている設定に対応します。
`enable_client` 属性は、[Organization のログイン設定](/docs/ja-jp/authenticate/identity-providers/enterprise-identity-providers/okta/express-configuration#organization-login-settings) で説明されている `enabled_clients` の設定に対応します。
`enable_organization` 属性は、作成した接続を対応する Organization に割り当てない場合を除き、通常は `true` に設定します。Okta アプリインスタンスは引き続き接続を管理できますが、Okta ユーザーは Auth0 Organization のメンバーにはなりません。これを `false` に設定すると、[接続間で管理者アカウントの一致を維持する](/docs/ja-jp/authenticate/identity-providers/enterprise-identity-providers/okta/express-configuration#maintain-admin-account-matching-across-connections) で説明されているケースで役立つことがあります。
例:
```curl theme={null}
PATCH /api/v2/clients/{id}
{
"express_configuration": {
"admin_login_domain": "yourAuth0TenantDomain",
"connection_profile_id": "yourConnectionProfileId",
"enable_client": true,
"enable_organization": true,
"initiate_login_uri_template": "yourInitiateLoginUriTemplate",
"okta_oin_client_id": "yourOinClientId",
"user_attribute_profile_id": "yourConnectionProfileId",
"linked_clients": [
{ "client_id": "KJM86F2susguvsasSeAsIxxxxxxxxxxx" },
{ "client_id": "FIXwZCf5iUElvqy6eidlfxxxxxxxxxxx" }
]
}
}
```
[エンドポイントのリファレンス](https://auth0.com/docs/api/management/v2/clients/patch-clients-by-id)
### 公開鍵をアップロード
Okta チームから提供された公開鍵を、OIN クライアントアプリケーションの資格情報としてアップロードします。
例:
```curl theme={null}
POST /api/v2/clients/{oin_client_id}/credentials
{
"credential_type": "public_key",
"pem": "-----BEGIN PUBLIC KEY-----\nMIGf..."
}
```
[エンドポイントのリファレンス](https://auth0.com/docs/api/management/v2/clients/post-credentials)
### OIN クライアントアプリケーションにキーを割り当てる
Okta からアップロードした公開鍵を OIN サービスクライアントに割り当てます。`yourCredentialId` は、前の手順で取得した認証情報 ID に置き換えてください。
例:
```curl theme={null}
PATCH /api/v2/clients/{oin_client_id}
{
"client_authentication_methods": {
"private_key_jwt": {
"credentials": [
{
"id": "yourCredentialId",
}
]
}
}
}
```
[エンドポイントのリファレンス](https://auth0.com/docs/api/management/v2/clients/patch-clients-by-id)
### テナントの同意プロンプトをカスタマイズする
テナント設定を更新すると、同意ページにスコープの詳細を表示できます。これらの設定により、付与される権限に関する情報をユーザーに提供できるため、ユーザー エクスペリエンスの向上につながります。必須ではありませんが、設定することをおすすめします。
例:
```curl theme={null}
PATCH /api/v2/tenants/settings
{
"flags": { "use_scope_descriptions_for_consent": true }
}
```
[エンドポイントのリファレンス](https://auth0.com/docs/api/management/v2/tenants/patch-settings)