> ## Documentation Index
> Fetch the complete documentation index at: https://translations.mintlify.site/llms.txt
> Use this file to discover all available pages before exploring further.
> SSO セッションを終了し、ブラウザーをアプリケーションのログアウト URL に戻すログアウトエンドポイントを介してユーザーをログアウトさせる方法を学びます。
# OIDC エンドポイントを使用して Auth0 でユーザーをログアウトさせる
export const AuthCodeGroup = ({children, dropdown}) => {
const [processedChildren, setProcessedChildren] = useState(children);
useEffect(() => {
let unsubscribe = null;
function init() {
unsubscribe = window.autorun(() => {
const processChildren = node => {
if (typeof node === "string") {
let processedNode = node;
for (const [key, value] of window.rootStore.variableStore.values.entries()) {
const escapedKey = key.replaceAll(/[.*+?^${}()|[\]\\]/g, (String.raw)`\$&`);
processedNode = processedNode.replaceAll(new RegExp(escapedKey, "g"), value);
}
return processedNode;
} else if (Array.isArray(node)) {
return node.map(processChildren);
} else if (node && node.props && node.props.children) {
return {
...node,
props: {
...node.props,
children: processChildren(node.props.children)
}
};
}
return node;
};
setProcessedChildren(processChildren(children));
});
}
if (window.rootStore) {
init();
} else {
window.addEventListener("adu:storeReady", init);
}
return () => {
window.removeEventListener("adu:storeReady", init);
unsubscribe?.();
};
}, [children]);
return {processedChildren};
};
export const AuthCodeBlock = ({filename, icon, language, highlight, children}) => {
const [displayText, setDisplayText] = useState(children);
const [copyText, setCopyText] = useState(children);
const wrapperRef = React.useRef(null);
useEffect(() => {
let unsubscribe = null;
function init() {
if (!window.autorun || !window.rootStore) {
return;
}
unsubscribe = window.autorun(() => {
let processedChildrenForDisplay = children;
let processedChildrenForCopy = children;
for (const [key, value] of window.rootStore.variableStore.values.entries()) {
const escapedKey = key.replaceAll(/[.*+?^${}()|[\]\\]/g, (String.raw)`\$&`);
let displayValue = value;
if (key === "{yourClientSecret}" && value !== "{yourClientSecret}") {
displayValue = value.substring(0, 3) + "*****MASKED*****";
}
processedChildrenForDisplay = processedChildrenForDisplay.replaceAll(new RegExp(escapedKey, "g"), displayValue);
processedChildrenForCopy = processedChildrenForCopy.replaceAll(new RegExp(escapedKey, "g"), value);
}
setDisplayText(processedChildrenForDisplay);
setCopyText(processedChildrenForCopy);
});
}
if (window.rootStore) {
init();
} else {
window.addEventListener("adu:storeReady", init);
}
return () => {
window.removeEventListener("adu:storeReady", init);
unsubscribe?.();
};
}, [children]);
useEffect(() => {
if (!wrapperRef.current) return;
const originalWriteText = navigator.clipboard.writeText.bind(navigator.clipboard);
let isOverriding = false;
const handleClick = e => {
const button = e.target.closest('[data-testid="copy-code-button"]');
if (!button || !wrapperRef.current.contains(button)) return;
isOverriding = true;
navigator.clipboard.writeText = text => {
if (isOverriding) {
isOverriding = false;
navigator.clipboard.writeText = originalWriteText;
return originalWriteText(copyText);
}
return originalWriteText(text);
};
setTimeout(() => {
if (isOverriding) {
isOverriding = false;
navigator.clipboard.writeText = originalWriteText;
}
}, 100);
};
const wrapper = wrapperRef.current;
wrapper.addEventListener('click', handleClick, true);
return () => {
wrapper.removeEventListener('click', handleClick, true);
if (navigator.clipboard.writeText !== originalWriteText) {
navigator.clipboard.writeText = originalWriteText;
}
};
}, [copyText]);
return
{displayText}
;
};
export const codeExample3 = `https://{yourDomain}/oidc/logout?{clientId}={yourClientId}&logout_hint={sessionId}`;
export const codeExample4 = `https://{yourDomain}/oidc/logout?post_logout_redirect_uri=http%3A%2F%2Fwww.example.com`;
export const codeExample5 = `PATCH https://{yourDomain}/api/v2/clients/{clientId}
Authorization: Bearer {yourMgmtApiAccessToken}
Content-Type: application/json
{
"allowed_logout_urls": [
"https://www.example.com",
"https://www.example.com/logout"
]
}
`;
export const codeExample6 = `PATCH https://{yourDomain}/api/v2/tenants/settings
Authorization: Bearer {yourMgmtApiAccessToken}
Content-Type: application/json
{
"allowed_logout_urls": [
"https://www.example.com",
"https://www.example.com/logout"
]
}
`;
Auth0 は、エンドユーザーのログアウト向けに OpenID Connect の [RP-Initiated Logout 1.0](https://openid.net/specs/openid-connect-rpinitiated-1_0.html) を実装しています。この標準は、OpenID Connect の[最終仕様](https://openid.net/developers/specs/)群の一部です。
## 仕組み
RP-Initiated Logout は、relying party (ユーザー) が OpenID プロバイダー (Auth0) にログアウトを要求するシナリオです。
1. ユーザーがアプリケーションでログアウトを開始します。
2. アプリケーションはユーザーを Auth0 Authentication API の [OIDC Logout](https://auth0.com/docs/api/authentication#oidc-logout) エンドポイントに誘導します。
3. Auth0 は、指定された [OIDC Logout エンドポイントパラメーター](#oidc-logout-endpoint-parameters) に基づいて、ユーザーを適切な宛先にリダイレクトします。
## RP-Initiated Logout を設定する
RP-Initiated Logout を設定するには、アプリケーションが Auth0 テナントの[ディスカバリメタデータドキュメント](https://openid.net/specs/openid-connect-discovery-1_0.html#ProviderConfig)から `end_session_endpoint` パラメータを取得できること、および必要なパラメータを指定して OIDC Logout エンドポイントを呼び出すことを確認する必要があります。
### endpoint discovery を有効にする
2023年11月14日以降に作成されたAuth0 テナントでは、**RP-Initiated Logout End Session Endpoint Discovery** はデフォルトで有効になっています。
**RP-Initiated Logout End Session Endpoint Discovery** は、Auth0 Dashboard または Auth0 の Management API で有効にできます。
Auth0 Dashboard で **RP-Initiated Logout End Session Endpoint Discovery** を有効にするには:
1. [Auth0 Dashboard > 設定 > Advanced](https://manage.auth0.com/#/tenant/advanced) に移動します。
2. **Login and Logout** セクションを探します。
3. **RP-Initiated Logout End Session Endpoint Discovery** のトグルを有効にします。
Management API で **RP-Initiated Logout End Session Endpoint Discovery** を有効にするには:
1. `update:tenant_settings` スコープを含む [Management API アクセストークンを取得します](/docs/ja-jp/secure/tokens/access-tokens/management-api-access-tokens/get-management-api-access-tokens-for-production)。
2. 次の payload を使用して、Management API の [テナント設定を更新](https://auth0.com/docs/api/management/v2/tenants/patch-settings) endpoint を呼び出します。
```json JSON lines theme={null}
{
"oidc_logout": {
"rp_logout_end_session_endpoint_discovery": true
}
}
```
### OIDC Logout エンドポイントを呼び出す
Auth0の[SDKライブラリ](/docs/ja-jp/libraries)の大半はOIDCに準拠しており、標準でRP-Initiated Logoutをサポートしています。
OIDC Logout エンドポイントを呼び出す際は、`id_token_hint` パラメーターを指定することが Auth0 によって推奨されています。
アプリケーションでID トークンを安全に保存できない場合は、代わりに `logout_hint` と `client_id` パラメーターを指定できます。
OIDC Logout エンドポイントは、冗長な情報を含めて呼び出すこともできます。
たとえば、`id_token_hint` と `logout_hint`、または `id_token_hint` と `client_id` を送信できます。
どの場合でも、Auth0 はユーザーとセッションのデータに整合性があるかを確認し、不一致があればエラーを返します。
#### OIDC Logout エンドポイントのパラメーター
Authentication API の [OIDC Logout](https://auth0.com/docs/api/authentication#oidc-logout) エンドポイントは、以下のパラメーターをサポートしています。
| パラメーター | 必須? | 説明 |
| -------------------------- | --- | -------------------------------------------------------------------------------------- |
| `id_token_hint` | 推奨 | そのユーザーに以前発行された ID トークン。どのユーザーをログアウトするかを示します。 |
| `logout_hint` | 任意 | どのユーザーをログアウトするかを示すセッション ID (`sid`) の値。 |
| `post_logout_redirect_uri` | 任意 | ログアウト後にユーザーをリダイレクトする先を示すリダイレクト URL の値。 |
| `client_id` | 任意 | アプリケーションの Client ID。 |
| `federated` | 任意 | ユーザーをそのアイデンティティプロバイダーからログアウトさせるよう Auth0 に指示します。 |
| `state` | 任意 | アプリケーションが最初のログアウトリクエストに追加し、Auth0 が `post_logout_redirect_uri` へのリダイレクト時に含める opaque な値。 |
| `ui_locales` | 任意 | リクエストで使用する言語リストを制限するための、スペース区切りのロケール一覧です。一覧の先頭のロケールは、テナントで有効になっているロケールと一致している必要があります。 |
#### id\_token\_hint パラメーター
Auth0 では、OIDC Logout エンドポイントを呼び出す際に `id_token_hint` パラメーターを使用することを推奨しています。
`id_token_hint` パラメーターの値には、ユーザーが認証された後に Auth0 が発行した ID トークンを指定する必要があります。
ID トークンには、検証に使用する登録済みクレームの issuer (`iss`)、audience (`aud`)、および Auth0 セッション ID (`sid`) が含まれます。ID トークンのクレームの詳細については、[ID Token Structure](/docs/ja-jp/secure/tokens/id-tokens/id-token-structure) を参照してください。
##### 例
```http HTTP theme={null}
https://{yourDomain}/oidc/logout?id_token_hint={yourIdToken}&post_logout_redirect_uri={yourCallbackUrl}
```
```bash cURL theme={null}
curl --request GET \
--url 'https://{yourDomain}/oidc/logout' \
--header 'content-type: application/x-www-form-urlencoded' \
--data 'id_token_hint={yourIdToken}' \
--data 'post_logout_redirect_uri={yourCallbackUrl}'
```
#### logout\_hint パラメータ
`logout_hint` パラメータの値には、ユーザーの現在の Auth0 セッションのセッション ID (`sid`) を指定する必要があります。
セッション ID (`sid`) は、ユーザーの認証後に Auth0 が発行した ID トークン内の登録済みクレームとして提供されます。
現在のセッションの開始時に Auth0 が発行した ID トークンに関連付けられたセッション ID (`sid`) を使用する必要があります。Auth0 は、ランダムな値や現在のセッション データを反映していない値を含むリクエストを無視します。
##### 例
#### post\_logout\_redirect\_uri パラメーター
`post_logout_redirect_uri` パラメーターの値は、有効でエンコード済みの URL で、次のいずれかの **Allowed Logout URLs** の一覧に登録されている必要があります。
1. [アプリケーション設定](/docs/ja-jp/get-started/applications/application-settings#application-uris): `id_token_hint` パラメーター、または `logout_hint` パラメーターと `client_id` パラメーターを指定する場合。
2. [テナント設定](/docs/ja-jp/get-started/tenant-settings#login-and-logout): `logout_hint` パラメーターのみを指定する場合。
##### 例
##### アプリケーションの Allowed Logout URLs を更新する
Auth0 Dashboard または Auth0 Management API を使用して、アプリケーションの **Allowed Logout URLs** のリストに URL を登録できます。
Auth0 Dashboard でアプリケーションの **Allowed Logout URLs** のリストに URL を登録するには、次の手順に従います。
1. [Auth0 Dashboard > Applications > Applications](https://manage.auth0.com/#/applications) に移動します。
2. 対象のアプリケーションを選択します。
3. **Application URIs** セクションを見つけます。
4. [ガイドライン](#allowed-logout-urls-guidelines) に従って **Allowed Logout URLs** を更新します。
Management API の [Update a client](https://auth0.com/docs/api/management/v2/clients/patch-clients-by-id) エンドポイントを呼び出すと、リクエスト本文で指定したフィールドの既存の設定データはすべて上書きされます。
意図しないデータ損失を防ぐため、まず Management API の [Get a client](https://auth0.com/docs/api/management/v2/clients/get-clients-by-id) エンドポイントを呼び出して、アプリケーションの現在の設定データを取得してください。
Management API を使用してアプリケーションの **Allowed Logout URLs** のリストに URL を登録するには、次の手順に従います。
1. `update:clients` スコープを含む [Management API アクセストークンを取得します](/docs/ja-jp/secure/tokens/access-tokens/management-api-access-tokens/get-management-api-access-tokens-for-production)。
2. Management API の [Update a client](https://auth0.com/docs/api/management/v2/clients/patch-clients-by-id) エンドポイントを呼び出し、リクエスト本文内の `allowed_logout_urls` フィールドの値にその URL を含めます。
##### テナントの Allowed Logout URLs を更新
Auth0 Dashboard または Auth0 Management API を使用して、テナントの **Allowed Logout URLs** リストに URL を登録できます。
Auth0 Dashboard でテナントの **Allowed Logout URLs** リストに URL を登録するには、次の手順に従います。
1. [Auth0 Dashboard > 設定 > Advanced](https://manage.auth0.com/#/tenant/advanced) に移動します。
2. **Login and Logout** セクションを見つけます。
3. [以下のガイドライン](#allowed-logout-urls-guidelines) に従って **Allowed Logout URLs** を更新します。
Management API の [テナント設定を更新](https://auth0.com/docs/api/management/v2/tenants/patch-settings) エンドポイントを呼び出すと、リクエスト本文で指定したフィールドの既存の設定データはすべて上書きされます。
誤ってデータを失わないよう、まず Management API の [Get tenant settings](https://auth0.com/docs/api/management/v2/tenants/tenant-settings-route) エンドポイントを呼び出して、現在のテナント設定データを取得してください。
Management API を使用してテナントの **Allowed Logout URLs** リストに URL を登録するには、次の手順に従います。
1. `update:tenant_settings` スコープを含む [Management API アクセストークンを取得](/docs/ja-jp/secure/tokens/access-tokens/management-api-access-tokens/get-management-api-access-tokens-for-production) します。
2. Management API の [テナント設定を更新](https://auth0.com/docs/api/management/v2/tenants/patch-settings) エンドポイントを呼び出し、リクエスト本文内の `allowed_logout_urls` フィールドの値にその URL を含めるようにします。
##### Allowed Logout URLs のガイドライン
検証エラーを避けるため、**Allowed Logout URLs** を更新する際は、以下のガイドラインに従ってください。
* 複数の URL 値はコンマ (`,`) で区切ってください。
* URL スキーム (たとえば `https://`) を含めてください。
サブドメイン用のワイルドカードとしてアスタリスク (`*`) を使用できます (たとえば `https://*.example.com`) 。ただし、本番環境ではワイルドカードを使用しないことを推奨します。詳しくは、[Subdomain URL Placeholders](/docs/ja-jp/get-started/applications/wildcards-for-subdomains#wildcard-url-placeholders) を参照してください。
##### post\_logout\_redirect\_uri にクエリ文字列パラメーターを追加する
OIDC Logout エンドポイントは、`post_logout_redirect_uri` パラメーターで指定された URL のクエリ文字列パラメーターを解析します。
**Allowed Logout URLs** には、**クエリ文字列パラメーターを含む完全一致の URL** を含める必要があります。そうしないと、logout request は拒否されます。URL は、すべてのクエリパラメータ名と値を含めて、完全に一致している必要があります。
たとえば、`https://example.com/logout?myParam=1234` を `post_logout_redirect_uri` パラメーターに渡す場合 (`https%3A%2F%2Fexample.com%2Flogout%3FmyParam%3D1234` としてエンコードされます) 、完全な URL `https://example.com/logout?myParam=1234` を **Allowed Logout URLs** に含める必要があります。
動的なクエリパラメータ値はサポートされていません。クエリパラメータ名と値の組み合わせごとに、**Allowed Logout URLs** に個別のエントリとして登録する必要があります。
#### `ui_locales` パラメーター
`ui_locales` パラメーターの値は、スペース区切りの [サポートされているロケール](/docs/ja-jp/customize/internationalization-and-localization/universal-login-internationalization#new-universal-login-experience-localization) のリストである必要があります。
リストの最初の値は、[テナントのデフォルト言語設定](/docs/ja-jp/get-started/tenant-settings#languages) と一致している必要があります。
#### `federated` パラメーター
`federated` パラメーターには値を指定する必要はありません。
OIDC Logout エンドポイントを呼び出す際に `federated` パラメーターを含めると、Auth0 は[ユーザーをそのアイデンティティプロバイダーからログアウトさせようとします](/docs/ja-jp/authenticate/login/logout/log-users-out-of-idps)。
## ログアウト同意プロンプト
OIDC 標準では、OpenID プロバイダーがそのリクエストがユーザー本人によるものだと確認できない場合、ユーザーに同意を求めるためにログアウト フローを中断する必要があると定められています。
Auth0 は、次のいずれかの条件を検出した場合に、ログアウト同意プロンプトを表示してこの動作を実施します。
* `id_token_hint` と `logout_hint` のパラメーターがどちらも指定されていない。
* ID トークンの `sid` クレームが、リクエスト内のブラウザーセッションに対応していない。
* `logout_hint` パラメーターの値が、現在のセッションデータと一致しない。
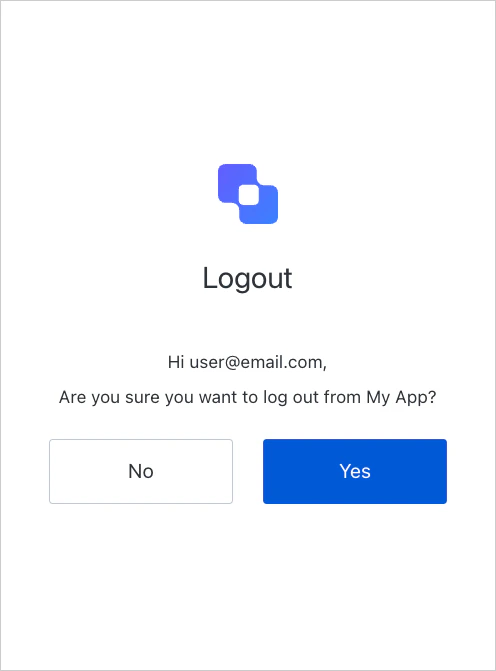 ユーザーがログアウト リクエストを確認すると、Auth0 はログアウト フローを続行します。
### ログアウトの同意プロンプトを無効にする
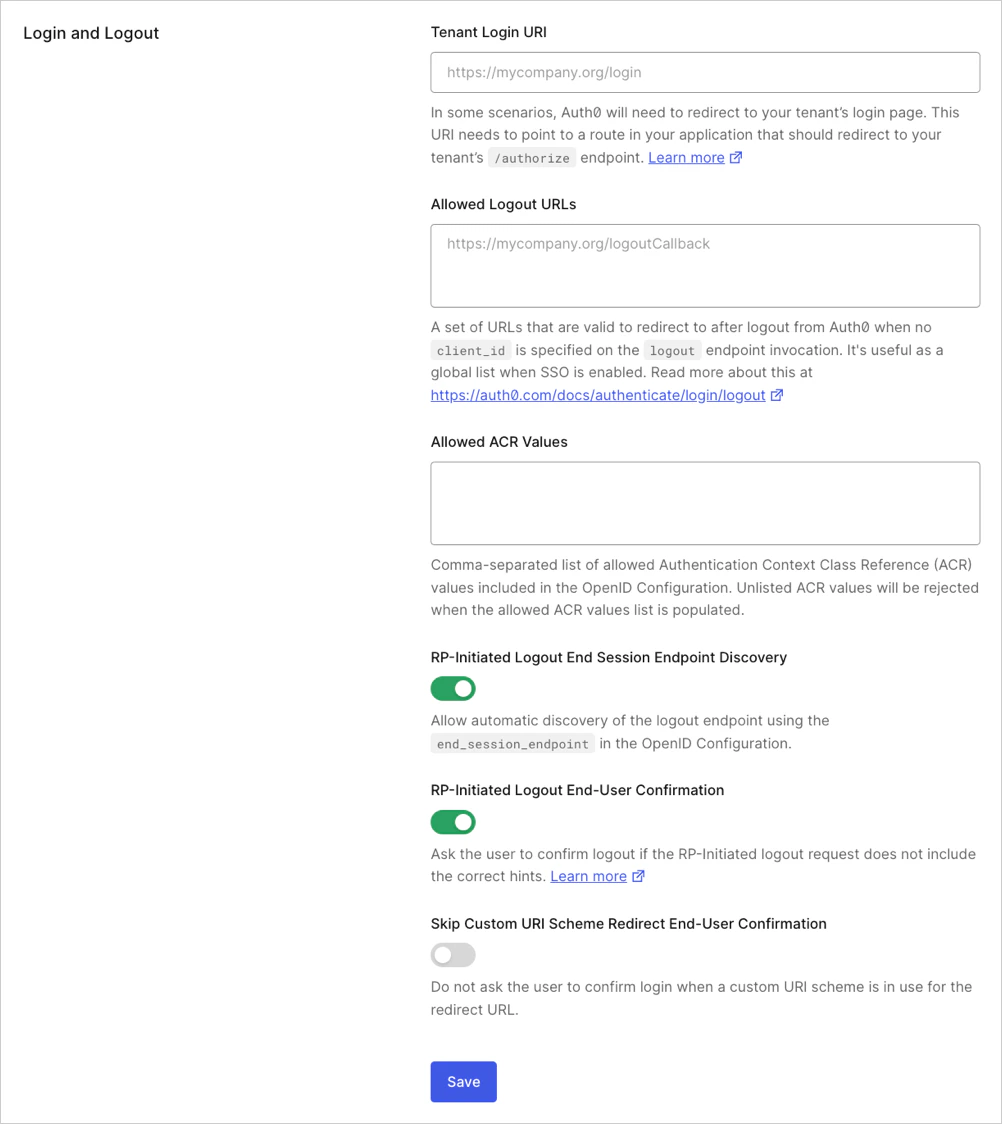
ログアウトの同意プロンプトは無効にできます。無効にすると、Auth0 は異常な挙動を検出しようとせず、ログアウトリクエストを自動的に受け入れます。
Auth0 Dashboard でログアウトの同意プロンプトを無効にするには、次の手順に従います。
1. [Auth0 Dashboard > 設定 > Advanced](https://manage.auth0.com/#/tenant/advanced) に移動します。
2. **Show RP-Initiated Logout End-User Confirmation** トグルを無効にします。
## 詳細はこちら
* [アプリケーションからユーザーをログアウトさせる](/docs/ja-jp/authenticate/login/logout/log-users-out-of-applications)
* [IDプロバイダーからユーザーをログアウトさせる](/docs/ja-jp/authenticate/login/logout/log-users-out-of-idps)
* [SAML IDプロバイダーからユーザーをログアウトさせる](/docs/ja-jp/authenticate/login/logout/log-users-out-of-saml-idps)
* [代替ログアウトを使用してユーザーをリダイレクトする](/docs/ja-jp/authenticate/login/logout/redirect-users-after-logout)