> ## Documentation Index
> Fetch the complete documentation index at: https://translations.mintlify.site/llms.txt
> Use this file to discover all available pages before exploring further.
> OIDCアプリケーションでIDプロバイダー開始のサインオンをサポートするように、Auth0のSAML接続を設定する方法を説明します。
# OIDCアプリへのIdP開始SAMLサインオンを設定する
Auth0 には、アプリケーション向けに、IDプロバイダー (IdP) 開始の SAML レスポンスを OpenID Connect (OIDC) レスポンスに変換する方法が用意されています。
OIDCプロトコルはIdP開始の認証フローをサポートしていませんが、この方法を使えば、[Implicit Flow with Form Post](/docs/ja-jp/get-started/authentication-and-authorization-flow/implicit-flow-with-form-post) を利用して、IdP開始の認証フローをシミュレートできます。
ログインフローはIdPではなくOIDCアプリケーション側で開始することを強くおすすめします。詳しくは、[Configure SAML Identity Provider-Initiated Single Sign-On](/docs/ja-jp/authenticate/protocols/saml/saml-sso-integrations/identity-provider-initiated-single-sign-on) を参照してください。
この方法を実装するには、次の作業が必要です。
* アプリケーションにカスタムログインルートハンドラーを追加します。
* SAML 接続を次のように更新します。
1. 受信したIdP開始のSAMLレスポンスを受け入れる。
2. サービスプロバイダー開始の認証リクエストを送信するデフォルトのアプリケーションにリダイレクトする。
## 仕組み
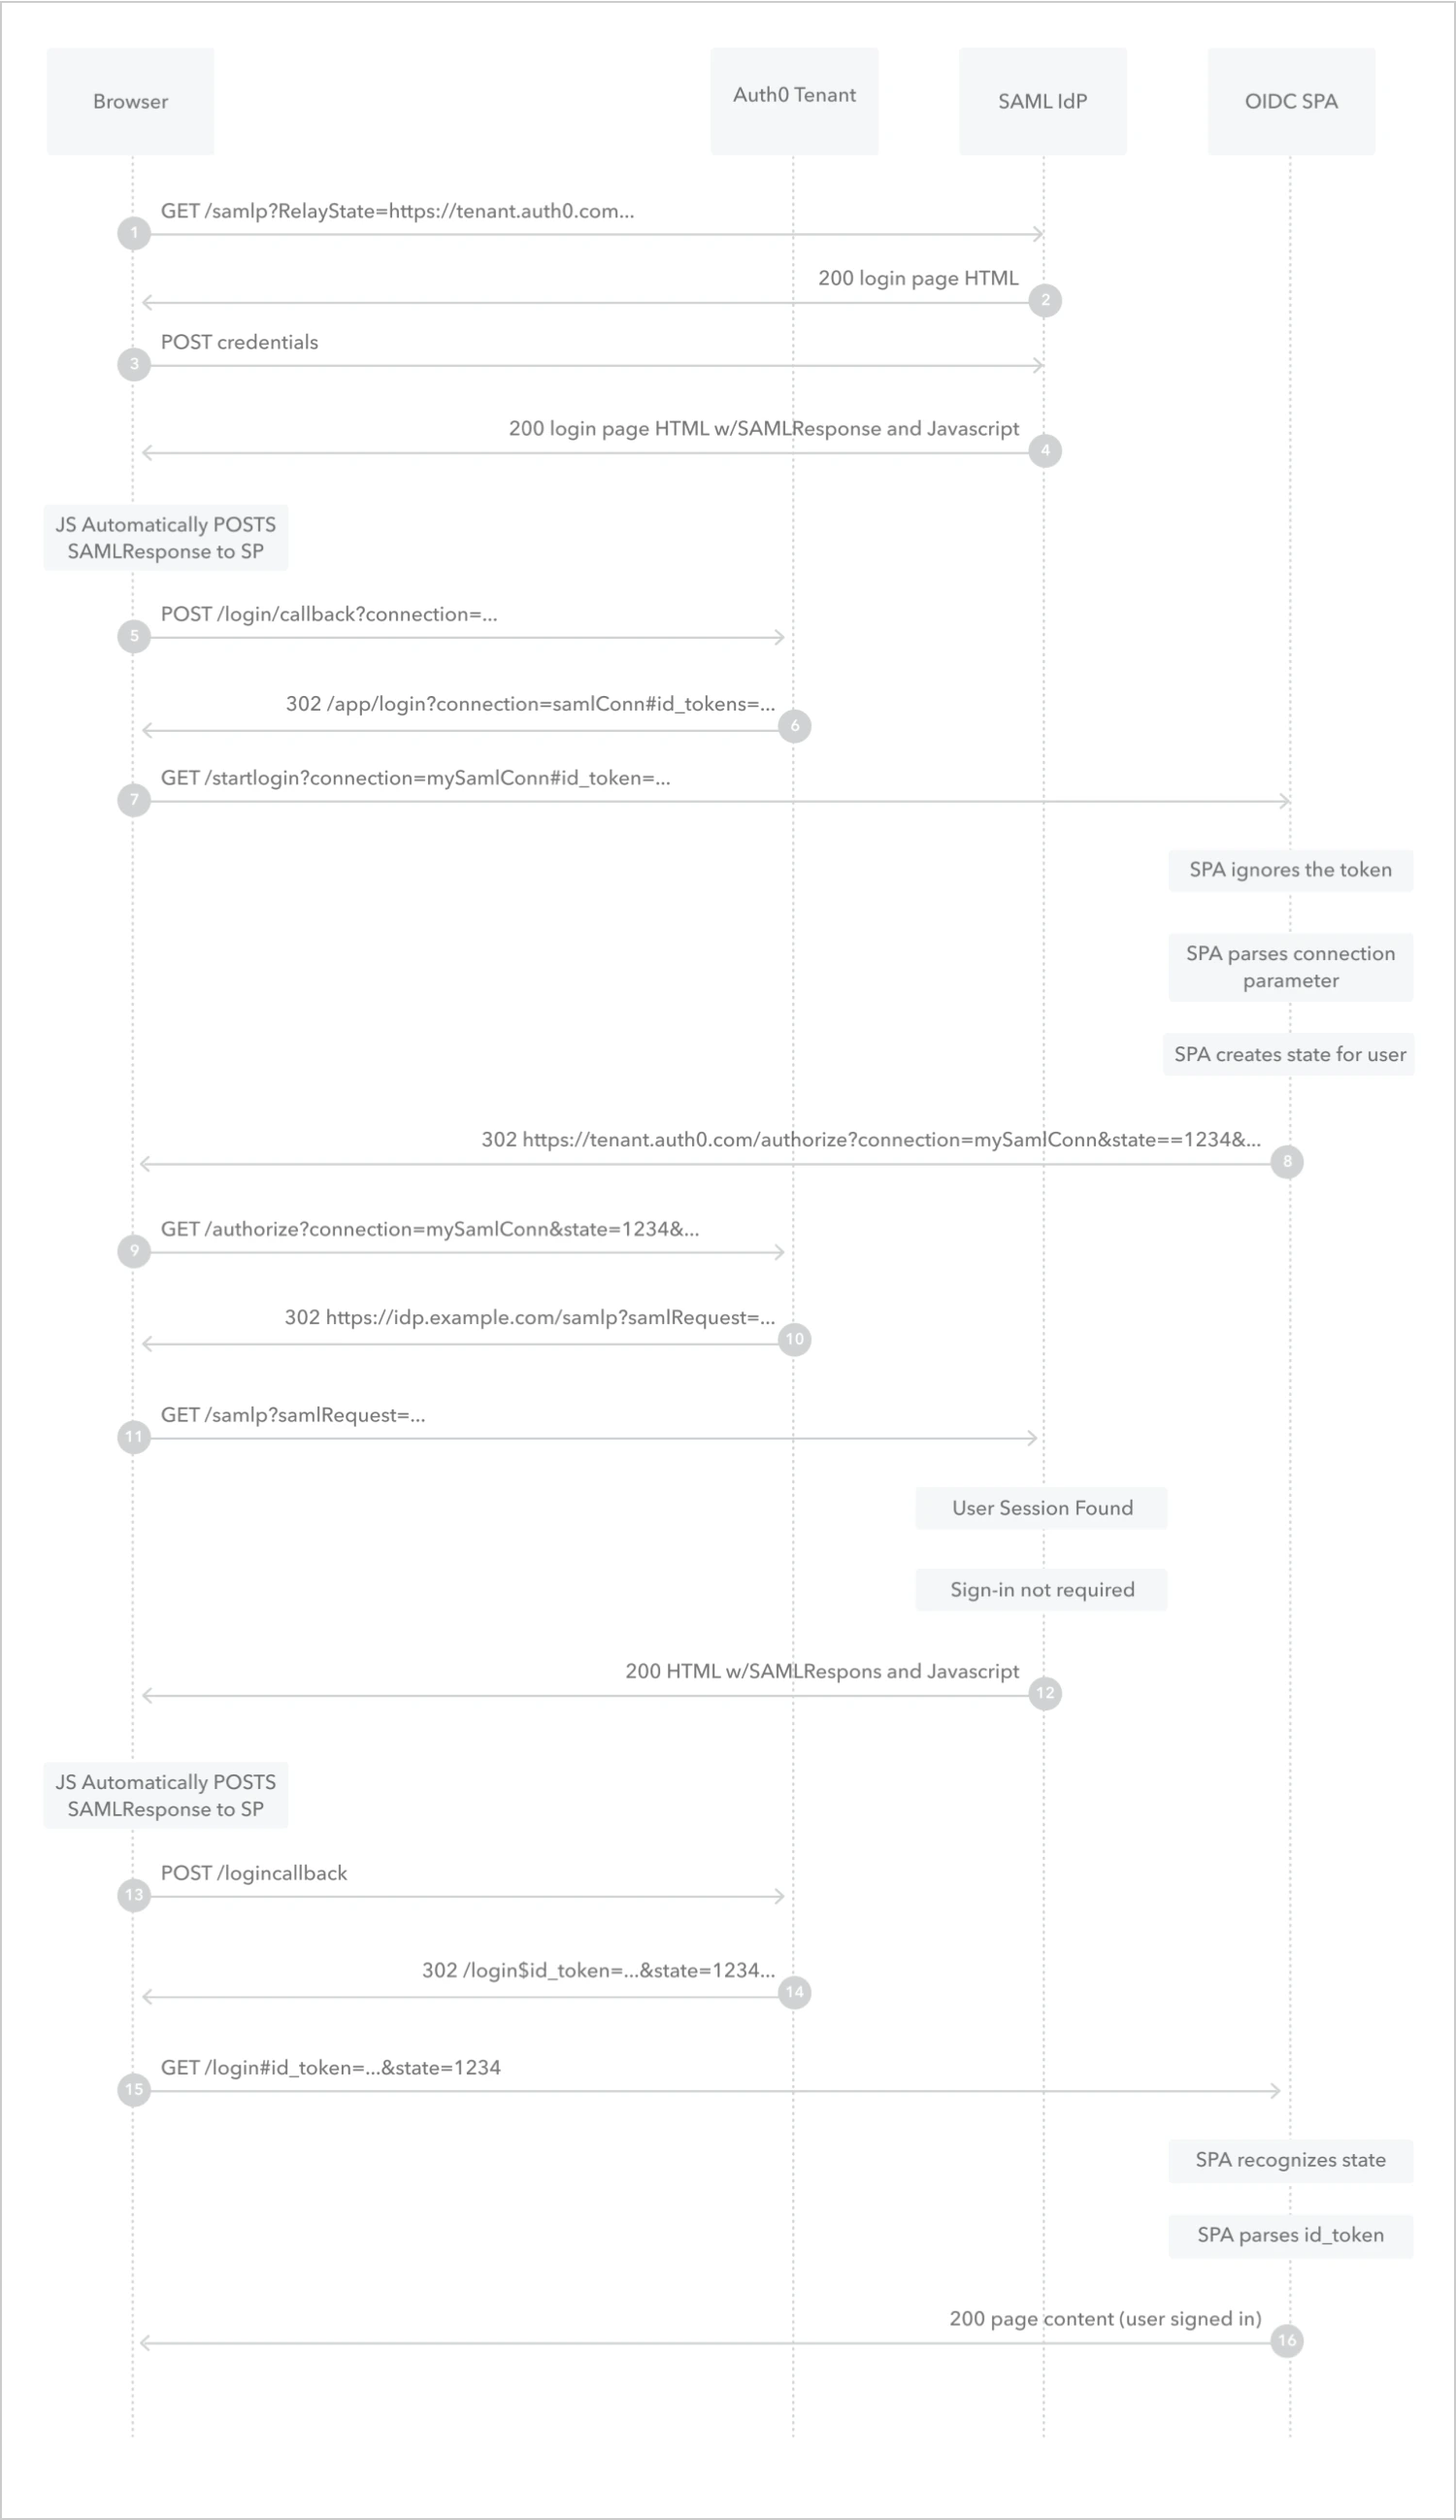 1. ユーザーが SAML IdP のログイン エンドポイントにアクセスします。
2. SAML IdP がログインページを返します。
3. ユーザーが SAML IdP に資格情報を送信します。
4. SAML IdP はユーザーのセッションを作成し、Form Post と SAML レスポンスを含む HTML ページを返します。
5. ページは HTTP `POST` 呼び出しによって、SAML レスポンスを Auth0 テナントに自動送信します。
6. Auth0 テナントは、ID トークンを URL フラグメントとして付与し、ユーザーのブラウザーを OIDC アプリケーションのカスタム ログイン ルート ハンドラーにリダイレクトします。
7. ブラウザーは、`connection` パラメーターと ID トークンを付けて、OIDC アプリケーションのカスタム ログイン ルート ハンドラーを呼び出します。
8. OIDC アプリケーションは ID トークンを無視し、`connection` パラメーターを解析してセッション用の `state` パラメーターを作成した後、ユーザーのブラウザーを Auth0 テナントの `/authorize` エンドポイントにリダイレクトします。
9. ブラウザーは、指定された `connection` パラメーターと `state` パラメーターを付けて、Auth0 テナントの `/authorize` エンドポイントを呼び出します。
10. Auth0 テナントは SAML ログイン リクエストを生成し、ユーザーのブラウザーを SAML IdP のログイン エンドポイントにリダイレクトします。
11. ブラウザーは SAML ログイン リクエストを SAML IdP のログイン エンドポイントに送信します。
12. SAML IdP はユーザーのセッションを見つけると、Form Post と SAML レスポンスを含む HTML ページを返します。
13. ページは HTTP `POST` 呼び出しによって、SAML レスポンスを Auth0 テナントに自動送信します。
14. Auth0 テナントは、ユーザーのブラウザーをアプリケーションのログイン ルート ハンドラーにリダイレクトします。
15. ブラウザーは、指定された `state` パラメーターと ID トークンを付けて、アプリケーションのログイン ルート ハンドラーを呼び出します。
16. OIDC アプリケーションは `state` パラメーターを検証し、ID トークンを解析して、ユーザーのアプリケーションセッションを作成します。
1. ユーザーが SAML IdP のログイン エンドポイントにアクセスします。
2. SAML IdP がログインページを返します。
3. ユーザーが SAML IdP に資格情報を送信します。
4. SAML IdP はユーザーのセッションを作成し、Form Post と SAML レスポンスを含む HTML ページを返します。
5. ページは HTTP `POST` 呼び出しによって、SAML レスポンスを Auth0 テナントに自動送信します。
6. Auth0 テナントは、ID トークンを URL フラグメントとして付与し、ユーザーのブラウザーを OIDC アプリケーションのカスタム ログイン ルート ハンドラーにリダイレクトします。
7. ブラウザーは、`connection` パラメーターと ID トークンを付けて、OIDC アプリケーションのカスタム ログイン ルート ハンドラーを呼び出します。
8. OIDC アプリケーションは ID トークンを無視し、`connection` パラメーターを解析してセッション用の `state` パラメーターを作成した後、ユーザーのブラウザーを Auth0 テナントの `/authorize` エンドポイントにリダイレクトします。
9. ブラウザーは、指定された `connection` パラメーターと `state` パラメーターを付けて、Auth0 テナントの `/authorize` エンドポイントを呼び出します。
10. Auth0 テナントは SAML ログイン リクエストを生成し、ユーザーのブラウザーを SAML IdP のログイン エンドポイントにリダイレクトします。
11. ブラウザーは SAML ログイン リクエストを SAML IdP のログイン エンドポイントに送信します。
12. SAML IdP はユーザーのセッションを見つけると、Form Post と SAML レスポンスを含む HTML ページを返します。
13. ページは HTTP `POST` 呼び出しによって、SAML レスポンスを Auth0 テナントに自動送信します。
14. Auth0 テナントは、ユーザーのブラウザーをアプリケーションのログイン ルート ハンドラーにリダイレクトします。
15. ブラウザーは、指定された `state` パラメーターと ID トークンを付けて、アプリケーションのログイン ルート ハンドラーを呼び出します。
16. OIDC アプリケーションは `state` パラメーターを検証し、ID トークンを解析して、ユーザーのアプリケーションセッションを作成します。
## カスタムログインルートハンドラーを作成する
カスタムログインルートハンドラーは、アプリケーションのログインメソッドを呼び出します。このハンドラーは `connection` パラメーターを受け取り、それを Auth0 テナントに送信する認証リクエストに含める必要があります。
カスタムログインルートハンドラーは、標準のログインルートハンドラーとは別のエンドポイントに関連付けることをおすすめします。たとえば、標準のログインルートハンドラーが `/login` エンドポイントに関連付けられている場合は、カスタムログインルートハンドラーを `/startlogin` エンドポイントに関連付けることができます。
認証の処理に Auth0 SDK を使用していない場合は、CSRF 攻撃から保護するために、アプリケーションのログインメソッドが `/authorize` エンドポイントに `state` パラメーター値を渡し、IDプロバイダーからのレスポンスに含まれる `state` パラメーターを検証するようにする必要があります。詳しくは、[OAuth 2.0 の state パラメータで攻撃を防ぎ、ユーザーをリダイレクトする](/docs/ja-jp/secure/attack-protection/state-parameters)を参照してください。
### 例
[Auth0 Single Page App SDK](/docs/ja-jp/libraries/auth0-single-page-app-sdk) を使用している場合は、カスタムログインルートハンドラーを追加し、次のように `login` メソッドを更新して `connection` パラメーターに対応させることができます。
```javascript lines expandable theme={null}
const router = {
"/": () => showContent("content-home"),
"/profile": () =>
requireAuth(() => showContent("content-profile"), "/profile"),
"/login": () => login(),
"/startlogin": () => startlogin()
};
//IdP-Initiated コールバックからログインを開始する新しいメソッド
const startlogin = async () => {
console.log(window.location.href)
let myURL = new URL(window.location.href);
let conn = myURL.searchParams.get("connection");
return login(null, conn);
}
/**
* 認証フローを開始する
*/
const login = async (targetUrl, connection) => {
try {
console.log("Logging in", targetUrl);
const options = {
redirect_uri: window.location.origin,
};
if (connection) {
options.connection = connection;
}
if (targetUrl) {
options.appState = { targetUrl };
}
await auth0.loginWithRedirect(options);
} catch (err) {
console.log("Log in failed", err);
}
};
```
## クエリ文字列を作成する
クエリ文字列には `redirect_uri` パラメーターが含まれます。このパラメーターの値は URL エンコードする必要があり、次の要素で構成されます。
1. カスタムログインルートハンドラーに対応するアプリケーションのエンドポイント。
2. SAML 接続名を値として指定した `connection` パラメーター。
### 例
アプリケーションのエンドポイントが `https://exampleco.com/startlogin` で、SAML接続の名前が `my-saml-connection` の場合、クエリ文字列は `redirect_uri=https%3A%2F%2Fexampleco.com%2Fstartlogin%3Fconnection%3Dmy-saml-connection` になります。
## アプリケーションを設定する
1. [Auth0 Dashboard > アプリケーション > アプリケーション](https://manage.auth0.com/#/applications) に移動します。
2. Auth0 で OIDC アプリケーションを表す新しいアプリケーションを作成します。
3. **Allowed Callback URLs** を更新し、カスタムログインルートハンドラーに関連付けられたアプリケーションのエンドポイントを追加します。
## 接続を設定する
1. [Auth0 Dashboard > Authentication > Enterprise > SAML](https://manage.auth0.com/#/connections/enterprise/samlp) に移動します。
2. 新しい SAML 接続を作成します。
3. **IdP-Initiated SSO** ビューに切り替えます。
4. **Accept Requests** を選択します。
5. **Default Application** で、先ほど作成したアプリケーションを選択します。
6. **Response Protocol** で **OpenID Connect** を選択します。
7. **クエリ文字列** に、先ほど作成したクエリ文字列を入力します。
## 詳しく見る
* [アプリを SAML IDプロバイダーに接続する](/docs/ja-jp/authenticate/identity-providers/enterprise-identity-providers/saml)
* [SAML IDプロバイダー起点のシングルサインオンを設定する](/docs/ja-jp/authenticate/protocols/saml/saml-sso-integrations/identity-provider-initiated-single-sign-on)
* [SAML IDプロバイダーからユーザーをログアウトする](/docs/ja-jp/authenticate/login/logout/log-users-out-of-saml-idps)