> ## Documentation Index
> Fetch the complete documentation index at: https://translations.mintlify.site/llms.txt
> Use this file to discover all available pages before exploring further.
> Auth0 を SAML シングルサインオン(SSO)のアイデンティティプロバイダーとして使用するために、SAML2 Web App アドオンを有効にする方法を学びます。
# SAML2 Web App アドオンを有効にする
アプリケーションで使用する SAML2 Web App アドオンを設定できます。
1. [Auth0 Dashboard > アプリケーション > アプリケーション](https://manage.auth0.com/#/applications) に移動します。
2. SAML2 Web App を使用するアプリケーションを見つけて、そのアプリケーション名をクリックし、設定画面を開きます。
3. **Addons** タブに移動します。
4. **SAML2 Web App** ボックスで、スライダーをクリックしてアドオンを有効にします。
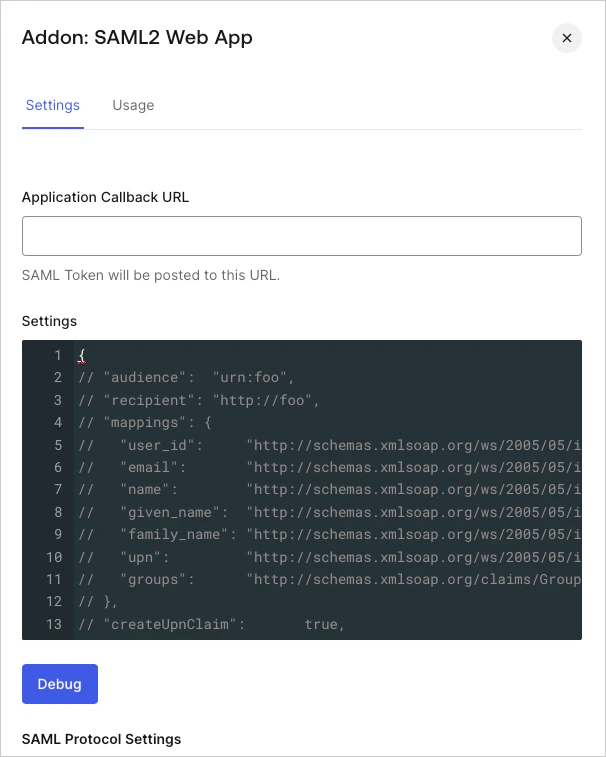 5. **Settings** タブに移動し、SAML レスポンスを受け取る **Application Callback URL** と **Settings** を入力します。**Settings** タブには、有効にする設定を決める際に使えるサンプルオブジェクトがあります。
6. **Debug** をクリックして、指定したパラメーターが有効かどうかをテストします。
7. 完了したら **Save** をクリックします。
5. **Settings** タブに移動し、SAML レスポンスを受け取る **Application Callback URL** と **Settings** を入力します。**Settings** タブには、有効にする設定を決める際に使えるサンプルオブジェクトがあります。
6. **Debug** をクリックして、指定したパラメーターが有効かどうかをテストします。
7. 完了したら **Save** をクリックします。
## アプリケーションの詳細を入力する
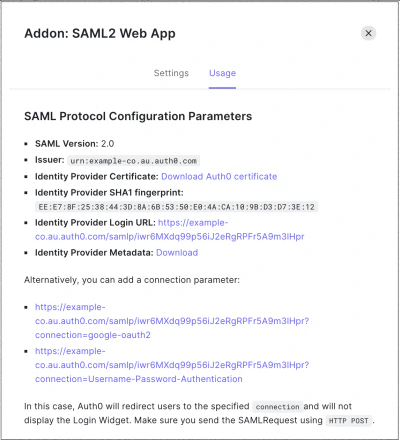
SAML2 Web App にアプリケーションの詳細を入力する具体的な手順は状況によって異なりますが、必要な設定情報は、アドオンを設定した後に **使用状況** タブから取得できます。
## 連携
以下の連携を選択できます。
* [Amazon Web Services](/docs/ja-jp/authenticate/single-sign-on/outbound-single-sign-on/configure-auth0-saml-identity-provider/configure-saml2-web-app-addon-for-aws)
* [GitHub Enterprise Cloud](/docs/ja-jp/authenticate/single-sign-on/outbound-single-sign-on/configure-auth0-saml-identity-provider/configure-saml2-web-app-addon-for-github-enterprise-cloud)
* [GitHub Enterprise Server](/docs/ja-jp/authenticate/single-sign-on/outbound-single-sign-on/configure-auth0-saml-identity-provider/configure-saml2-web-app-addon-for-github-enterprise-server)
* [Heroku](/docs/ja-jp/authenticate/single-sign-on/outbound-single-sign-on/configure-auth0-saml-identity-provider/configure-saml2-web-app-addon-for-heroku)
* [Oracle Eloqua Marketing Cloud](/docs/ja-jp/authenticate/single-sign-on/outbound-single-sign-on/configure-auth0-saml-identity-provider/configure-saml2-addon-eloqua)
## 制限事項
SAML2 Web App アドオンは、パッシブな SAML リクエスト (例: `isPassive=true` の場合) には対応していません。
## 詳細はこちら
* [Amazon Web Services を SAML サービスプロバイダーとして設定する](/docs/ja-jp/authenticate/single-sign-on/outbound-single-sign-on/configure-auth0-saml-identity-provider/configure-saml2-web-app-addon-for-aws)
* [GitHub Enterprise Cloud を SAML サービスプロバイダーとして設定する](/docs/ja-jp/authenticate/single-sign-on/outbound-single-sign-on/configure-auth0-saml-identity-provider/configure-saml2-web-app-addon-for-github-enterprise-cloud)
* [GitHub Enterprise Server を SAML サービスプロバイダーとして設定する](/docs/ja-jp/authenticate/single-sign-on/outbound-single-sign-on/configure-auth0-saml-identity-provider/configure-saml2-web-app-addon-for-github-enterprise-server)
* [Heroku を SAML サービスプロバイダーとして設定する](/docs/ja-jp/authenticate/single-sign-on/outbound-single-sign-on/configure-auth0-saml-identity-provider/configure-saml2-web-app-addon-for-heroku)
* [Oracle Eloqua Marketing Cloud を SAML サービスプロバイダーとして設定する](/docs/ja-jp/authenticate/single-sign-on/outbound-single-sign-on/configure-auth0-saml-identity-provider/configure-saml2-addon-eloqua)