> ## Documentation Index
> Fetch the complete documentation index at: https://translations.mintlify.site/llms.txt
> Use this file to discover all available pages before exploring further.
# Microsoft Entra ID SAML 接続用 Inbound SCIM
> SAML SCIM 経由で Microsoft Entra ID(旧称 Azure Active Directory)接続を設定する手順。
この機能を使用するには、Auth0 のプランまたはカスタム契約にエンタープライズ接続が含まれている必要があります。詳しくは、[Auth0 の料金ページ](https://auth0.com/pricing)をご覧ください。
Inbound SCIM 接続をテストするには、[Postman](https://www.postman.com/downloads/) をローカル環境にインストールする必要があります。
ユーザーを Auth0 の SCIM エンドポイントにプロビジョニングするには、Microsoft Entra ID (旧称 Azure Active Directory) で非ギャラリーのエンタープライズ アプリケーションを設定する必要があります。
## Auth0 で SCIM 設定を行う
1. [Auth0 Dashboard](https://manage.auth0.com/#/) で、**Authentication > Enterprise > SAML > \[YOUR\_AUTH0\_CONNECTION] > Provisioning** に移動します。
2. **Sync user profiles using SCIM** をオンにします。すると、同じページに追加設定用の新しいセクションが表示されます。
3. 次の設定を確認します。
A. **Mapping** タブで、**SCIM attribute containing the User ID** フィールドが **userName** に設定されていることを確認します。
B. **Additional Mappings** セクションで、次の値を確認します。
```json lines theme={null}
{
"scim": "emails[type eq \"work\"].value",
"auth0": "email"
},
```
[属性マッピング](/docs/ja-jp/authenticate/protocols/scim/configure-inbound-scim#attribute-mapping) を確認し、拡張 SCIM 属性が使用したい Auth0 属性にマッピングされていることも確認できます。
4. 必要に応じて、**Save Changes** を選択します。
## SCIM エンドポイント URL とトークンを取得する
Microsoft Entra ID テナントで SCIM を設定するには、Auth0 から SCIM エンドポイント URL とトークンを取得する必要があります。これらの値は Auth0 Dashboard から取得できます。
1. [Auth0 Dashboard](https://manage.auth0.com/#/) で **Authentication > Enterprise > SAML > \[your-connection] > Provisioning** に移動します。
2. **Sync user profiles using SCIM > Setup** セクションで、**SCIM Endpoint URL** をコピーします。
3. 同じセクションの **Bearer Token** で、**Generate New Token** を選択します。トークンの有効期限とスコープを選択し、**Generate Token** を選択します。デフォルトでは、Azure AD で使用される `get:users`、`post:users`、`patch:users`、`delete:users` のスコープが必要です。グループをプロビジョニングする場合は、必要に応じて `get:groups`、`post:groups`、`patch:groups`、`delete:groups` も選択できます。
4. ベアラートークンをコピーします。セキュリティ上、このトークンが表示されるのはこのときだけです。
これらの値は、[`/v2/connections/{id}/scim-configuration/tokens`](https://auth0.com/docs/api/management/v2/connections/get-scim-tokens) などの Management API の SCIM エンドポイントを使用して、プログラムから取得することもできます。
ベストプラクティスについては、[Configure Inbound SCIM deployment guidelines](/docs/ja-jp/authenticate/protocols/scim/configure-inbound-scim#deployment-guidelines) を参照してください。
## SAML アプリケーション用に Entra ID で SCIM を設定する
SAML アプリケーションがまだ登録されていない場合は、[Configure IdP-Initiated SAML Login with Azure as the IdP](https://support.auth0.com/center/s/article/Configure-IdP-Initiated-SAML-Login-with-Azure-as-the-IdP) に従って、Entra ID テナントにカスタムの非ギャラリー エンタープライズ アプリケーションを登録してください。
次に、SCIM を設定するには、以下の手順に従います。
1. Microsoft Entra admin center で、**Entra ID > Enterprise apps > \[YOUR\_APPLICATION]** に移動します。
2. **Manage > Properties** に進み、**Assignment Required** を **Yes** に設定します。
3. **Manage > Users and Groups** に移動し、プロビジョニングする Azure AD ユーザーを割り当てます。group を割り当てると、そのグループ内のユーザーがプロビジョニングされます。
4. **Manage > Provisioning** に移動し、**Get started** を選択します。
5. **Provisioning Mode** を **Automatic** に設定します。
6. **Admin Credentials** セクションを展開し、次のパラメータを設定します。
* **Tenant URL** フィールドに、前の手順で保存した SCIM エンドポイント URL を設定し、URL の末尾にクエリパラメータ `?aadOptscim062020` を追加します。これは、[既知の SCIM 2.0 の問題に対する Microsoft 推奨の回避策](https://learn.microsoft.com/en-us/entra/identity/app-provisioning/application-provisioning-config-problem-scim-compatibility)です。
* **Secret Token** に前の手順で保存したトークンの値を設定し、**Save** を選択します。
7. **Mappings** セクションを展開します。
8. 必要に応じてグループをプロビジョニングするには、**Provision Entra ID Groups** が **Enabled** に設定されていることを確認します。設定しない場合は、**Disabled** にします。
9. 次に、**Provision Azure Active Directory Users** を選択して、**Attribute Mapping** 画面を開きます。
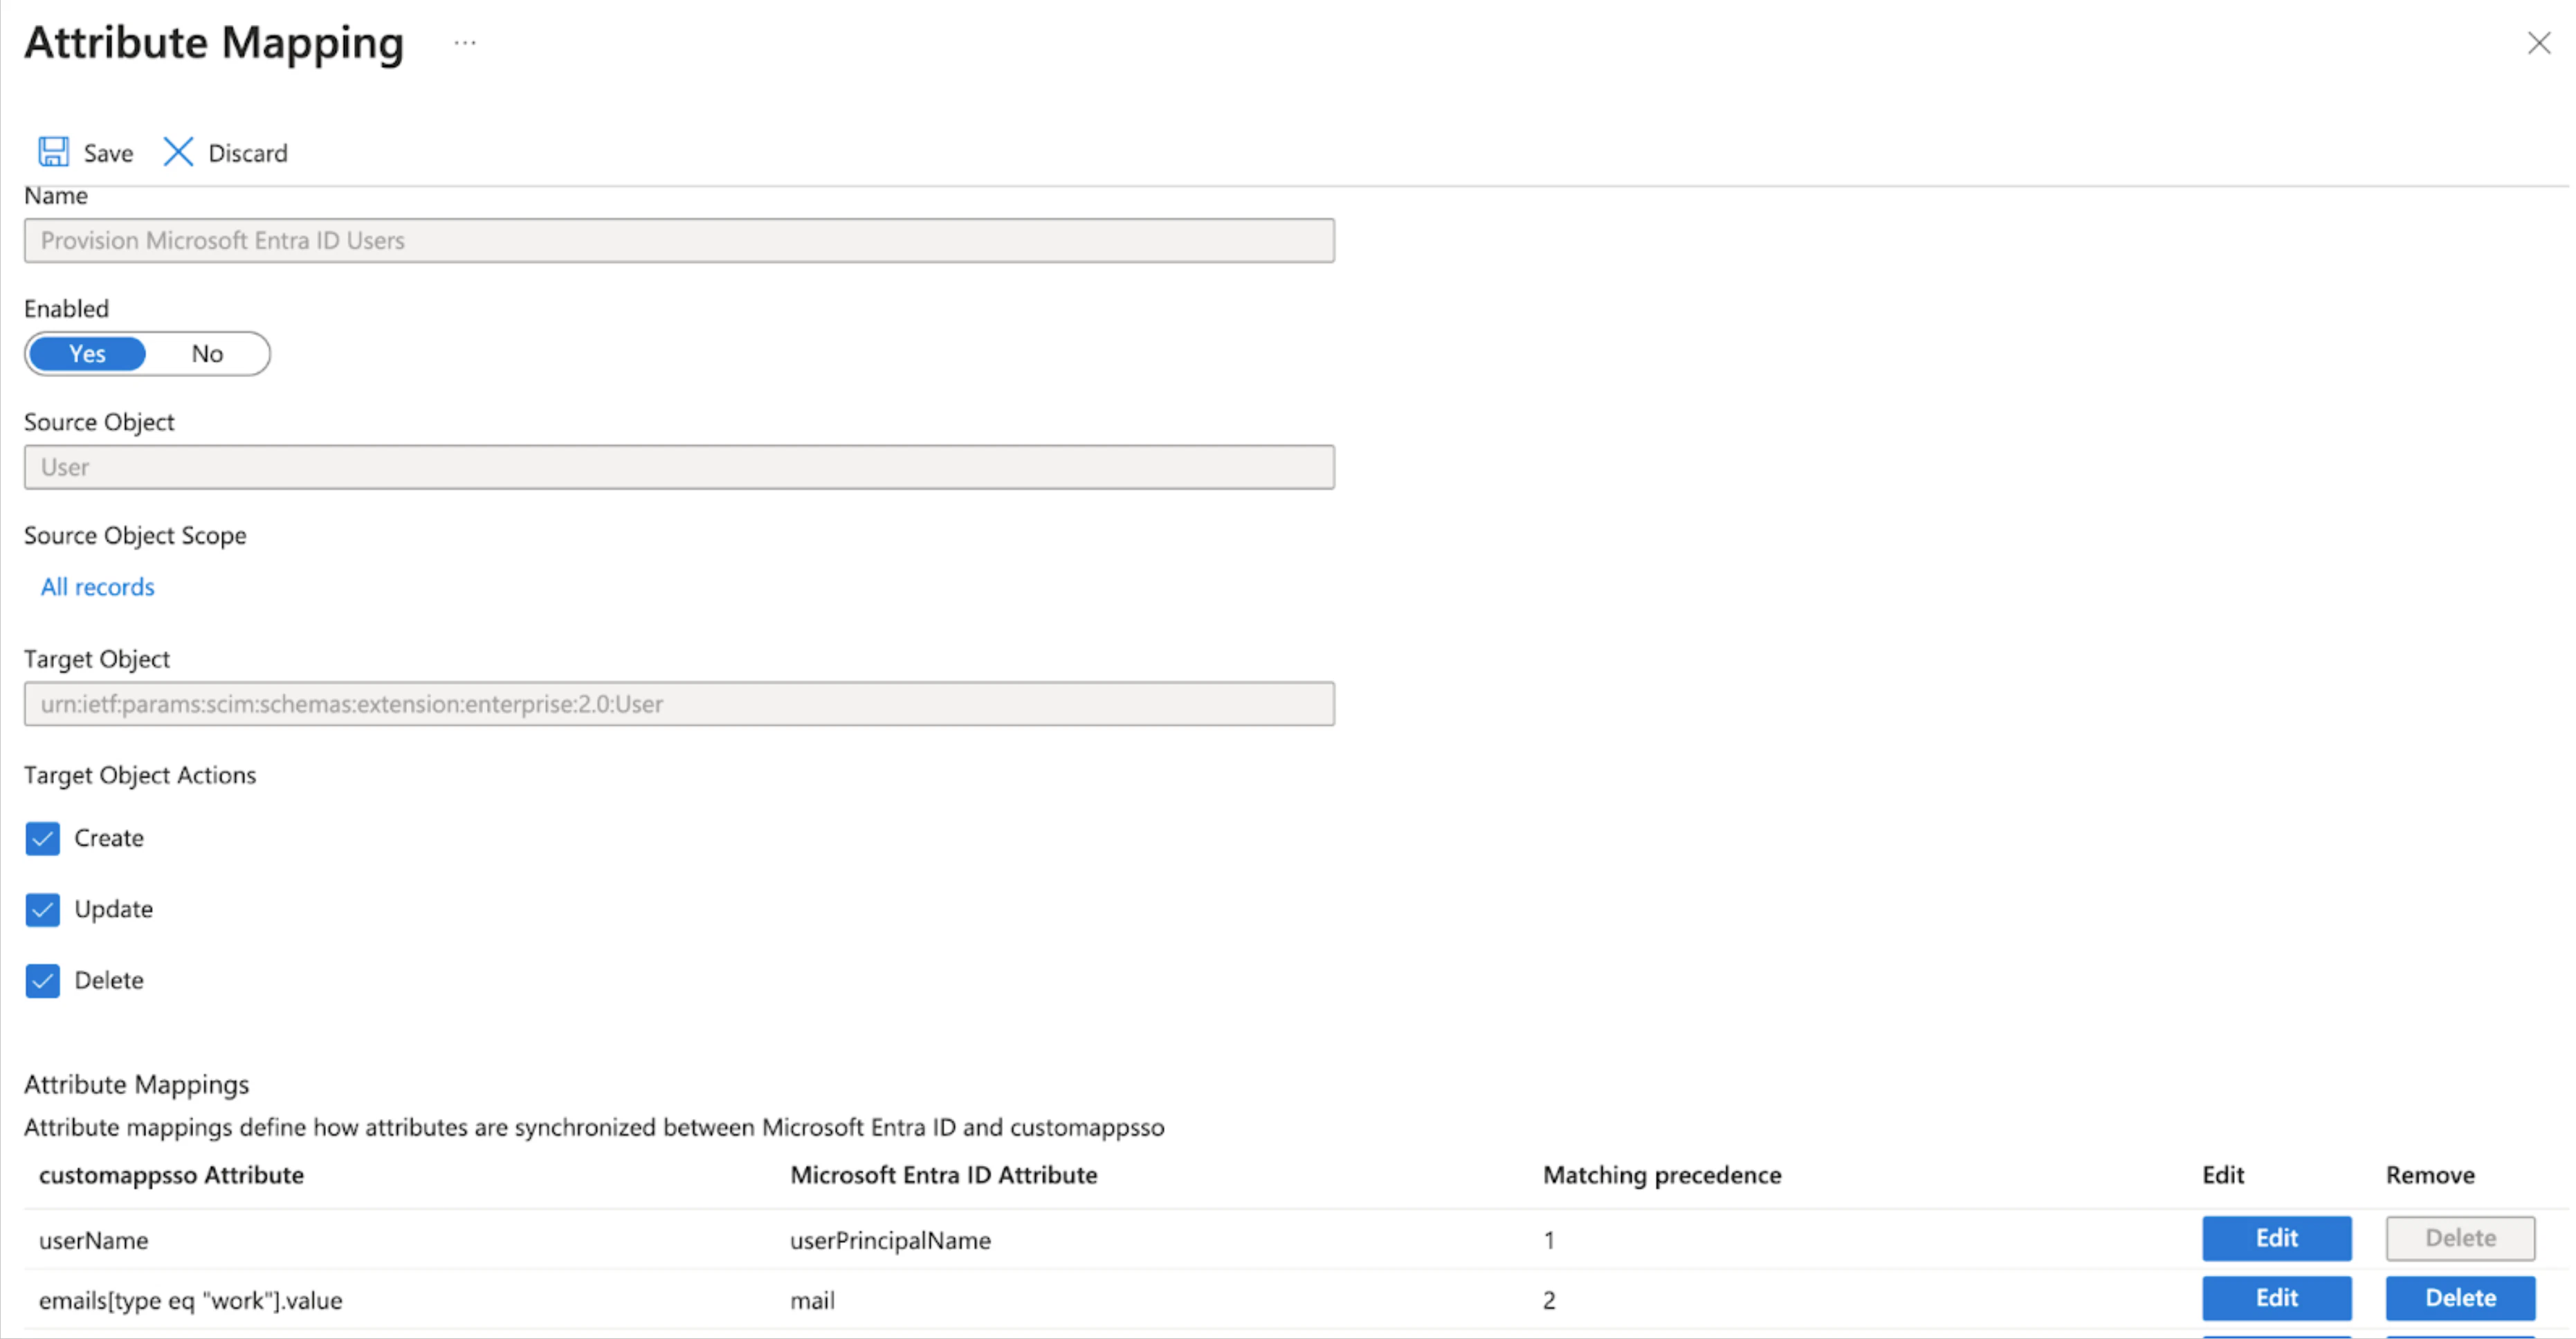 10. `emails[type eq "work"].value` と `mail` を含む属性マッピング テーブルの行で **Edit** を選択し、**Edit Attribute** 画面に移動して、次のパラメータを設定します。
* **Match objects using this attribute** を **Yes** に設定します。
* **Matching precedence** を **2** に設定します。
11. **OK** を選択して設定を保存します。これで **Edit Attribute** 画面が閉じます。次に、**Attribute Mapping** 画面で **Save** を選択します。
10. `emails[type eq "work"].value` と `mail` を含む属性マッピング テーブルの行で **Edit** を選択し、**Edit Attribute** 画面に移動して、次のパラメータを設定します。
* **Match objects using this attribute** を **Yes** に設定します。
* **Matching precedence** を **2** に設定します。
11. **OK** を選択して設定を保存します。これで **Edit Attribute** 画面が閉じます。次に、**Attribute Mapping** 画面で **Save** を選択します。
## テスト
1. SCIM 接続をテストするには、エンタープライズ アプリケーションの概要画面で **Manage > Provisioning > Provision on Demand** に移動します。
2. **Select a user or group** で、アプリケーションに割り当てたユーザーまたはグループの名前を入力し、該当する項目を選択して **Provision** を選びます。これにより、Auth0 テナントにユーザーまたはグループが作成されます。
3. [割り当てられたすべてのユーザーとグループをプロビジョニング](https://learn.microsoft.com/en-us/entra/identity/app-provisioning/configure-automatic-user-provisioning-portal#provisioning-status)するには、**Provisioning Status** を **On** に設定します。