> ## Documentation Index
> Fetch the complete documentation index at: https://translations.mintlify.site/llms.txt
> Use this file to discover all available pages before exploring further.
> アプリケーションでネイティブからWebへのSSOを利用するための設定方法を学びます。
# ネイティブからWebへのSSOの設定と実装
export const AuthCodeGroup = ({children, dropdown}) => {
const [processedChildren, setProcessedChildren] = useState(children);
useEffect(() => {
let unsubscribe = null;
function init() {
unsubscribe = window.autorun(() => {
const processChildren = node => {
if (typeof node === "string") {
let processedNode = node;
for (const [key, value] of window.rootStore.variableStore.values.entries()) {
const escapedKey = key.replaceAll(/[.*+?^${}()|[\]\\]/g, (String.raw)`\$&`);
processedNode = processedNode.replaceAll(new RegExp(escapedKey, "g"), value);
}
return processedNode;
} else if (Array.isArray(node)) {
return node.map(processChildren);
} else if (node && node.props && node.props.children) {
return {
...node,
props: {
...node.props,
children: processChildren(node.props.children)
}
};
}
return node;
};
setProcessedChildren(processChildren(children));
});
}
if (window.rootStore) {
init();
} else {
window.addEventListener("adu:storeReady", init);
}
return () => {
window.removeEventListener("adu:storeReady", init);
unsubscribe?.();
};
}, [children]);
return {processedChildren};
};
export const AuthCodeBlock = ({filename, icon, language, highlight, children}) => {
const [displayText, setDisplayText] = useState(children);
const [copyText, setCopyText] = useState(children);
const wrapperRef = React.useRef(null);
useEffect(() => {
let unsubscribe = null;
function init() {
if (!window.autorun || !window.rootStore) {
return;
}
unsubscribe = window.autorun(() => {
let processedChildrenForDisplay = children;
let processedChildrenForCopy = children;
for (const [key, value] of window.rootStore.variableStore.values.entries()) {
const escapedKey = key.replaceAll(/[.*+?^${}()|[\]\\]/g, (String.raw)`\$&`);
let displayValue = value;
if (key === "{yourClientSecret}" && value !== "{yourClientSecret}") {
displayValue = value.substring(0, 3) + "*****MASKED*****";
}
processedChildrenForDisplay = processedChildrenForDisplay.replaceAll(new RegExp(escapedKey, "g"), displayValue);
processedChildrenForCopy = processedChildrenForCopy.replaceAll(new RegExp(escapedKey, "g"), value);
}
setDisplayText(processedChildrenForDisplay);
setCopyText(processedChildrenForCopy);
});
}
if (window.rootStore) {
init();
} else {
window.addEventListener("adu:storeReady", init);
}
return () => {
window.removeEventListener("adu:storeReady", init);
unsubscribe?.();
};
}, [children]);
useEffect(() => {
if (!wrapperRef.current) return;
const originalWriteText = navigator.clipboard.writeText.bind(navigator.clipboard);
let isOverriding = false;
const handleClick = e => {
const button = e.target.closest('[data-testid="copy-code-button"]');
if (!button || !wrapperRef.current.contains(button)) return;
isOverriding = true;
navigator.clipboard.writeText = text => {
if (isOverriding) {
isOverriding = false;
navigator.clipboard.writeText = originalWriteText;
return originalWriteText(copyText);
}
return originalWriteText(text);
};
setTimeout(() => {
if (isOverriding) {
isOverriding = false;
navigator.clipboard.writeText = originalWriteText;
}
}, 100);
};
const wrapper = wrapperRef.current;
wrapper.addEventListener('click', handleClick, true);
return () => {
wrapper.removeEventListener('click', handleClick, true);
if (navigator.clipboard.writeText !== originalWriteText) {
navigator.clipboard.writeText = originalWriteText;
}
};
}, [copyText]);
return
{displayText}
;
};
## ネイティブからWebへのSSOを設定する
ネイティブからWebへのシングルサインオン (SSO) を使用するには、Auth0のManagement APIを使用して、ネイティブアプリケーションとWeb (Single Page AppまたはRegular Web App) でセッションを作成および管理するよう設定します。
Management APIまたはAuth0 CLIを使用するには、[アクセストークン](/docs/ja-jp/secure/tokens/access-tokens/management-api-access-tokens)が必要です。
ネイティブからWebへのSSOを設定するには、session\_transfer\_tokensを作成・管理し、ネイティブアプリケーションとWeb アプリケーションを設定する必要があります。
ネイティブからWebへのSSOでは、次のSDKがサポートされています: [Auth0 Android SDK](https://github.com/auth0/auth0.android/blob/main/EXAMPLES.md#native-to-web-sso-login-ea)、[Auth0 Swift SDK](https://github.com/auth0/Auth0.swift/blob/master/EXAMPLES.md#sso-credentials-ea)、および [Auth0 React Native SDK](https://github.com/auth0/react-native-auth0/blob/master/EXAMPLES.md#native-to-web-sso-early-access)。
ネイティブからWebへのSSOのサポートは、次のツールで利用できます: [Auth0 Deploy CLI](/docs/ja-jp/deploy-monitor/deploy-cli-tool)、[Auth0 Terraform Provider](/docs/ja-jp/deploy-monitor/auth0-terraform-provider)、および [Auth0 CLI](https://auth0.github.io/auth0-cli/)。
ネイティブからWebへのSSOは、リフレッシュトークンを返すすべての認証フローをサポートしています。たとえば、[Resource Owner Password Flow](/docs/ja-jp/secure/multi-factor-authentication/authenticate-using-ropg-flow-with-mfa) や [Proof Key for Code Exchange (PKCE) を使用する認可コードフロー](/docs/ja-jp/get-started/authentication-and-authorization-flow/authorization-code-flow-with-pkce) です。
### Session Transfer Token の作成と管理
最初の Management API 呼び出しでは、Native アプリケーションと Web アプリケーションで次のことが可能になります。
* `session_transfer_tokens` の作成と管理
* Cookie または URL パラメーターを介して Web ブラウザーでセッションを作成する
* IP アドレスまたは ASN を使って、セッションをユーザーのデバイスに紐付ける
既存のアプリケーションの場合は、[Update a Client](https://auth0.com/docs/api/management/v2/clients/patch-clients-by-id) エンドポイントに `PATCH` 呼び出しを行います。新しいアプリケーションを作成するには、[Create a Client](https://auth0.com/docs/api/management/v2/clients/post-clients) エンドポイントに `POST` 呼び出しを行います。
```json lines theme={null}
{
"session_transfer": {
"can_create_session_transfer_token": false,
"allowed_authentication_methods": ["cookie", "query"],
"enforce_device_binding": "ip", // "none" や "asn" も指定可能,
"allow_refresh_token": false,
"enforce_cascade_revocation": true,
"enforce_online_refresh_tokens": true
}
}
```
### ネイティブアプリケーションを設定する
ユーザーが認証されると、Auth0 は [アクセストークン](/docs/ja-jp/secure/tokens/access-tokens) と [ID トークン](/docs/ja-jp/secure/tokens/id-tokens)、さらに (任意で) [リフレッシュトークン](/docs/ja-jp/secure/tokens/refresh-tokens) を返します。
ネイティブアプリケーションを設定して、リフレッシュトークンを Session Transfer Token と交換できます。Web アプリケーションがクッキーの挿入をサポートしていない場合は、Session Transfer Token を URI パラメーターとして渡せるように、ネイティブアプリケーション側で Web アプリケーションの **Login URI** も設定する必要があります。
* Auth0 Dashboard を使用してネイティブアプリケーションを更新します。
1. [Dashboard > Applications](https://manage.auth0.com/dashboard/#/applications) に移動します。
2. アプリケーションを選択するか、[アプリケーションを作成します](/docs/ja-jp/get-started/auth0-overview/create-applications#create-applications)。
3. **設定** タブを選択します。
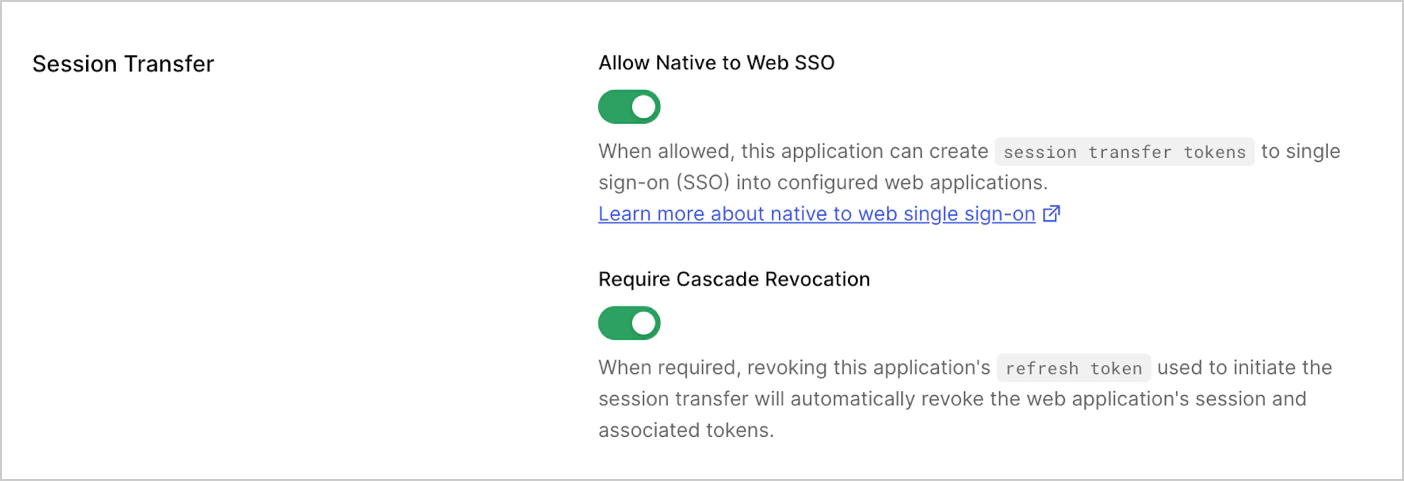
4. **Session Transfer** で **Allow Native to Web SSO** を有効にします。
5. **Require Cascade Revocation** を選択すると、Web アプリケーションのセッションと関連するトークンが自動的に取り消されます。
6. **Save** を選択してアプリケーションを更新します。
 * [Update a Client](https://auth0.com/docs/api/management/v2/clients/patch-clients-by-id) エンドポイントで、Management API の Access Token を使用してネイティブアプリケーションを更新します。
export const codeExample1 = `curl --request PATCH \
--url 'https://{yourDomain}/api/v2/clients/{yourClientId}' \
--header 'authorization: Bearer {yourMgmtApiAccessToken}' \
--header 'content-type: application/json' \
--data '{
"session_transfer": {
"can_create_session_transfer_token": true,
"enforce_cascade_revocation": true
}
}'`;
* [Auth0 CLI](https://auth0.github.io/auth0-cli/auth0_apps_session-transfer_update.html) を使用して、Native アプリケーションを更新します:
export const codeExample2 = `auth0 apps session-transfer update {yourClientId} --can-create-token=true`;
* [Update a Client](https://auth0.com/docs/api/management/v2/clients/patch-clients-by-id) エンドポイントで、Management API の Access Token を使用してネイティブアプリケーションを更新します。
export const codeExample1 = `curl --request PATCH \
--url 'https://{yourDomain}/api/v2/clients/{yourClientId}' \
--header 'authorization: Bearer {yourMgmtApiAccessToken}' \
--header 'content-type: application/json' \
--data '{
"session_transfer": {
"can_create_session_transfer_token": true,
"enforce_cascade_revocation": true
}
}'`;
* [Auth0 CLI](https://auth0.github.io/auth0-cli/auth0_apps_session-transfer_update.html) を使用して、Native アプリケーションを更新します:
export const codeExample2 = `auth0 apps session-transfer update {yourClientId} --can-create-token=true`;
### Web アプリケーションを設定する
Session Transfer Token を有効にする前に、追加のパラメーターを処理できるよう、Web アプリケーションの **Application Login URI** を設定してください。URI の詳細については、[Application Settings](/docs/ja-jp/get-started/applications/application-settings#application-uris) を参照してください。
* Auth0 Dashboard を使用して Web アプリケーションを更新します。
1. [Dashboard > Applications](https://manage.auth0.com/dashboard/#/applications) に移動します。
2. Web アプリケーションを選択するか、新規作成します。
3. **設定** タブを選択します。
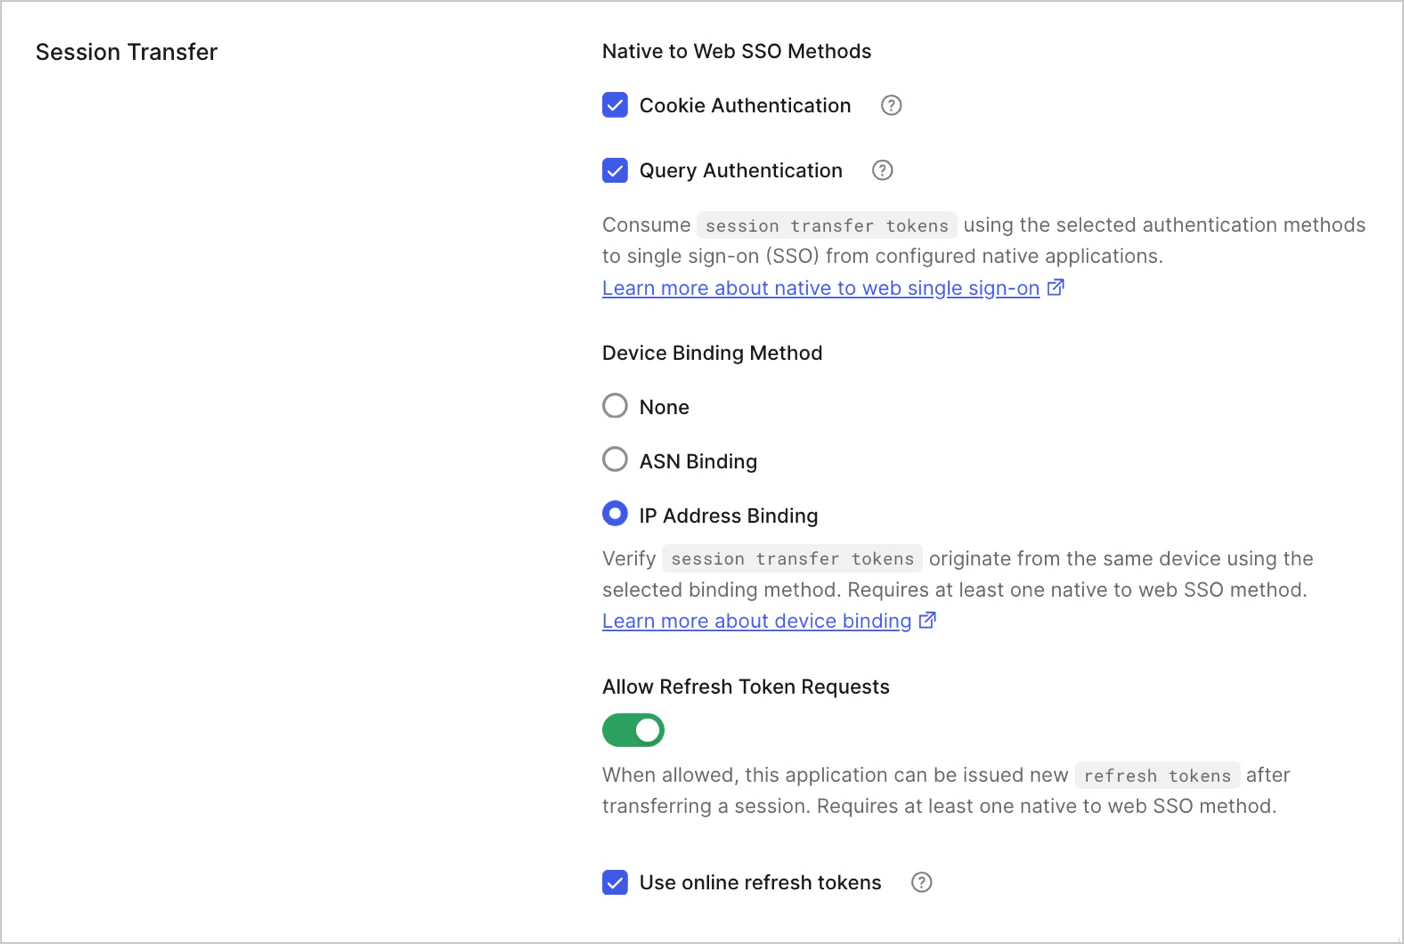
4. **Session Transfer** で **Native to Web SSO Methods** を有効にします。
5. **Cookie Authentication** と **Query Authentication** を選択します。
6. **Device Binding Method** で、**None**、**ASN Binding**、または **IP Address Binding** のいずれかを選択します。
7. セッション転送後に新しいリフレッシュトークンを発行するには、**Allow Refresh Token Requests** を有効にします。
8. **Use online refresh tokens** を選択します。
9. Web アプリケーションを更新するには、**Save** を選択します。
 * [Update a Client](https://auth0.com/docs/api/management/v2/clients/patch-clients-by-id) エンドポイントで Management API Access Token を使用して Web アプリケーションを更新します。
export const codeExample3 = `curl --request PATCH \
--url '{yourDomain}/api/v2/clients//{yourClientId}' \
--header 'authorization: Bearer {yourMgmtApiAccessToken}' \
--header 'content-type: application/json' \
--data '{
"session_transfer": {
"allowed_authentication_methods": ["cookie", "query"],
"enforce_device_binding": "ip", // "none" または "asn" も指定可能
"allow_refresh_token": false,
"enforce_online_refresh_tokens": true
}
}'`;
* [Auth0 CLI](https://auth0.github.io/auth0-cli/auth0_apps_session-transfer_update.html) を使用して Web アプリケーションを更新します。
export const codeExample4 = `auth0 apps session-transfer update {yourClientId} --allowed-auth-methods=cookie,query --enforce-device-binding=ip`;
* [Update a Client](https://auth0.com/docs/api/management/v2/clients/patch-clients-by-id) エンドポイントで Management API Access Token を使用して Web アプリケーションを更新します。
export const codeExample3 = `curl --request PATCH \
--url '{yourDomain}/api/v2/clients//{yourClientId}' \
--header 'authorization: Bearer {yourMgmtApiAccessToken}' \
--header 'content-type: application/json' \
--data '{
"session_transfer": {
"allowed_authentication_methods": ["cookie", "query"],
"enforce_device_binding": "ip", // "none" または "asn" も指定可能
"allow_refresh_token": false,
"enforce_online_refresh_tokens": true
}
}'`;
* [Auth0 CLI](https://auth0.github.io/auth0-cli/auth0_apps_session-transfer_update.html) を使用して Web アプリケーションを更新します。
export const codeExample4 = `auth0 apps session-transfer update {yourClientId} --allowed-auth-methods=cookie,query --enforce-device-binding=ip`;
## ネイティブからWebへのSSOを実装する
Native to Web Single SSO では、認証済みユーザーが ネイティブアプリケーションから Web アプリケーションへシームレスに移動できるユーザー体験を実現できます。
これを実現するには、ネイティブアプリケーションでリフレッシュトークンを Session Transfer Token に交換し、その Session Transfer Token を URL またはクッキー経由で Web アプリケーションに送信して、セッションを認可する必要があります。
* クライアントで`allow_refresh_token`が無効になっていても、アプリケーションが`offline_access`を要求した場合、Auth0は`refresh_token`を発行しませんが、認証自体は引き続き機能します。
* Refresh Tokenのローテーションが有効になっている場合、Auth0はトークン交換の呼び出しで新しい`refresh_token`を返します。リフレッシュトークン交換は、コードから Web アプリケーションを開く直前に実行する必要があります。
### Native アプリケーションで
#### Step 1: リフレッシュトークンを Session Transfer Token に交換する
ネイティブアプリケーションで [/token](https://auth0.com/docs/api/authentication/authorization-code-flow-with-pkce/get-token-pkce) エンドポイントを使用して、リフレッシュトークンを Session Transfer Token に交換します。
* Swift、Android、または React Native SDK を使用して、リフレッシュトークンを Session Transfer Token に交換する:
```swift lines theme={null}
credentialsManager.ssoCredentials { result in
switch result {
case .success(let ssoCredentials):
print("Obtained SSO credentials: \(ssoCredentials)")
case .failure(let error):
print("Failed with: \(error)")
}
}
// または、async/await を使用
do {
let ssoCredentials = try await credentialsManager.ssoCredentials()
print("Obtained SSO credentials: \(ssoCredentials)")
} catch {
print("Failed with: \(error)")
}
```
```kotlin lines theme={null}
secureCredentialsManager.getSsoCredentials(
mapOf(), // オプションのパラメーター
object : Callback {
override fun onSuccess(result: SSOCredentials) {
// result.sessionTransferToken を使用して
// アプリ内の Web セッションでユーザーを認証します
}
override fun onFailure(error: CredentialsManagerException) {
// エラーを処理
}
}
)
```
```typescript lines theme={null}
// フックを使用
import { useAuth0 } from 'react-native-auth0';
function MyComponent() {
const { getSSOCredentials } = useAuth0();
const openWebApp = async () => {
try {
const ssoCredentials = await getSSOCredentials();
// ssoCredentials.sessionTransferToken を使用して
// アプリ内の Web セッションでユーザーを認証します
console.log('Session Transfer Token:', ssoCredentials.sessionTransferToken);
} catch (error) {
console.error('Failed to get SSO credentials:', error);
}
};
}
// Auth0 クラスを使用
import Auth0 from 'react-native-auth0';
const auth0 = new Auth0({
domain: '{yourDomain}',
clientId: '{yourClientId}',
});
const ssoCredentials = await auth0.credentialsManager.getSSOCredentials();
console.log('Session Transfer Token:', ssoCredentials.sessionTransferToken);
```
* HTTP を使用して、リフレッシュトークンを Session Transfer Token に交換する:
export const codeExample5 = `curl -X POST https://{yourDomain}/oauth/token \
-H 'Content-type: application/json' \
-d '{"grant_type":"refresh_token",
"client_id":{yourClientId}",
"refresh_token":"YOUR_REFRESH_TOKEN",
"audience":"urn:YOUR_AUTH0_TENANT_DOMAIN:session_transfer"}'`;
これらのサンプルでは、動的な値にプレースホルダーを使用しています。プレースホルダーは、お使いの Auth0 ドメイン、client\_id、既存の refresh\_token に置き換えてください。
Auth0 テナントは、1 回限り使用可能で有効期間の短い (1 分間) session\_transfer\_token を返します。
```json lines theme={null}
{
"access_token": "{session_transfer_token}",
"issued_token_type": "urn:auth0:params:oauth:token-type:session_transfer_token",
"token_type": "N_A",
"expires_in": 60
}
```
Refresh Tokenのローテーションが有効な場合、この交換処理ではリフレッシュトークンも返されます。
認証時にID トークンをリクエストしていた場合、この呼び出しではID トークンも返されます。
#### ステップ 2: URL またはクッキーを介して Session Transfer Token を送信する
設定されている `allowed_authentication_methods` に応じて、`session_transfer_token` を Web アプリケーションに送信する方法は 2 つあります。
##### オプション 1: `session_transfer_token` を Cookie として送信する
WebView またはブラウザーを使用する Web アプリケーションが Cookie の挿入をサポートしている場合は、次のように ネイティブアプリケーションを設定できます。
* `session_transfer_token` を Cookie に追加します。
* WebView またはブラウザーを使用して Web アプリケーションを開きます。
* Web アプリケーションから Auth0 テナントまたは カスタムドメイン にログインします。 `session_transfer_token` が Cookie に含まれているため、ユーザーに第 1 認証要素の入力は求められません。
export const codeExample6 = `curl --cookie auth0_session_transfer_token=YOUR_SESSION_TRANSFER_TOKEN
https://{yourDomain}/authorize?{authorize_params}`;
##### オプション 2: URLパラメーターとして session\_transfer\_token を送信する
Web アプリケーションが Cookie の挿入をサポートしていない場合は、ネイティブアプリケーションで URLパラメーターを使用するよう設定することで、次のことを行えます。
* URLパラメーターとして session\_transfer\_token を追加する。
* WebView またはブラウザーで Web アプリケーションを開く。
* `session_transfer_token` を URLパラメーターとして [/authorize](https://auth0.com/docs/api/authentication/authorization-code-flow/authorize-application) エンドポイントに付加し、Web アプリケーションにログインする。session\_transfer\_token は有効で信頼されているため、Auth0 テナントは第1認証要素での認証を要求せずにユーザーを認証します。
```bash cURL lines theme={null}
curl --request GET \
--url 'https://your_web_app_login_url/?session_transfer_token=YOUR_SESSION_TRANSFER_TOKEN'
```
```csharp C# lines theme={null}
var client = new RestClient("https://your_web_app_login_url/?session_transfer_token=YOUR_SESSION_TRANSFER_TOKEN");
var request = new RestRequest(Method.GET);
IRestResponse response = client.Execute(request);
```
```go Go lines theme={null}
package main
import (
"fmt"
"net/http"
"io/ioutil"
)
func main() {
url := "https://your_web_app_login_url/?session_transfer_token=YOUR_SESSION_TRANSFER_TOKEN"
req, _ := http.NewRequest("GET", url, nil)
res, _ := http.DefaultClient.Do(req)
defer res.Body.Close()
body, _ := ioutil.ReadAll(res.Body)
fmt.Println(res)
fmt.Println(string(body))
}
```
```java Java lines theme={null}
HttpResponse response = Unirest.get("https://your_web_app_login_url/?session_transfer_token=YOUR_SESSION_TRANSFER_TOKEN")
.asString();
```
```javascript Node.JS lines theme={null}
var axios = require("axios").default;
var options = {
method: 'GET',
url: 'https://your_web_app_login_url/',
params: {session_transfer_token: 'YOUR_SESSION_TRANSFER_TOKEN'}
};
axios.request(options).then(function (response) {
console.log(response.data);
}).catch(function (error) {
console.error(error);
});
```
```php PHP lines theme={null}
$curl = curl_init();
curl_setopt_array($curl, [
CURLOPT_URL => "https://your_web_app_login_url/?session_transfer_token=YOUR_SESSION_TRANSFER_TOKEN",
CURLOPT_RETURNTRANSFER => true,
CURLOPT_ENCODING => "",
CURLOPT_MAXREDIRS => 10,
CURLOPT_TIMEOUT => 30,
CURLOPT_HTTP_VERSION => CURL_HTTP_VERSION_1_1,
CURLOPT_CUSTOMREQUEST => "GET",
]);
$response = curl_exec($curl);
$err = curl_error($curl);
curl_close($curl);
if ($err) {
echo "cURL Error #:" . $err;
} else {
echo $response;
}
```
```python Python lines theme={null}
import http.client
conn = http.client.HTTPSConnection("your_web_app_login_url")
conn.request("GET", "/?session_transfer_token=YOUR_SESSION_TRANSFER_TOKEN")
res = conn.getresponse()
data = res.read()
print(data.decode("utf-8"))
```
```ruby Ruby lines theme={null}
require 'uri'
require 'net/http'
require 'openssl'
url = URI("https://your_web_app_login_url/?session_transfer_token=YOUR_SESSION_TRANSFER_TOKEN")
http = Net::HTTP.new(url.host, url.port)
http.use_ssl = true
http.verify_mode = OpenSSL::SSL::VERIFY_PEER
request = Net::HTTP::Get.new(url)
response = http.request(request)
puts response.read_body
```
### Web アプリケーションで
Session Transfer Token が cookie として送信される場合、ブラウザーが `/authorize` エンドポイントへのリクエストにその cookie を含めて送信するため、追加の設定は不要です。
URLパラメーターを使用して Web アプリケーションに Native to Web Web Single SSO を実装するには、次のようにします。
#### オプション 1: Web アプリケーションのリクエストに Session Transfer Token を追加する
アプリケーションのログイン URL から、`session_transfer_token` を URL パラメータとして送信して `/authorize` endpoint にリダイレクトします。
```bash cURL theme={null}
curl --request GET \
--url 'https://{yourDomain}/authorize?session_transfer_token=YOUR_SESSION_TRANSFER_TOKEN&client_ID={yourClientId}&redirect_uri=YOUR_REDIRECT_URI&response_type=code'
```
```csharp C# theme={null}
var client = new RestClient("https://{yourDomain}/authorize?session_transfer_token=YOUR_SESSION_TRANSFER_TOKEN&client_ID={yourClientId}&redirect_uri=YOUR_REDIRECT_URI&response_type=code");
var request = new RestRequest(Method.GET);
IRestResponse response = client.Execute(request);
```
```go Go theme={null}
package main
import (
"fmt"
"net/http"
"io/ioutil"
)
func main() {
url := "https://{yourDomain}/authorize?session_transfer_token=YOUR_SESSION_TRANSFER_TOKEN&client_ID={yourClientId}&redirect_uri=YOUR_REDIRECT_URI&response_type=code"
req, _ := http.NewRequest("GET", url, nil)
res, _ := http.DefaultClient.Do(req)
defer res.Body.Close()
body, _ := ioutil.ReadAll(res.Body)
fmt.Println(res)
fmt.Println(string(body))
}
```
```java Java theme={null}
HttpResponse response = Unirest.get("https://{yourDomain}/authorize?session_transfer_token=YOUR_SESSION_TRANSFER_TOKEN&client_ID={yourClientId}&redirect_uri=YOUR_REDIRECT_URI&response_type=code")
.asString();
```
```javascript Node.JS theme={null}
var axios = require("axios").default;
var options = {
method: 'GET',
url: 'https://{yourDomain}/authorize',
params: {
session_transfer_token: 'YOUR_SESSION_TRANSFER_TOKEN',
client_ID: '{yourClientId}',
redirect_uri: 'YOUR_REDIRECT_URI',
response_type: 'code'
}
};
axios.request(options).then(function (response) {
console.log(response.data);
}).catch(function (error) {
console.error(error);
});
```
```php PHP theme={null}
$curl = curl_init();
curl_setopt_array($curl, [
CURLOPT_URL => "https://{yourDomain}/authorize?session_transfer_token=YOUR_SESSION_TRANSFER_TOKEN&client_ID={yourClientId}&redirect_uri=YOUR_REDIRECT_URI&response_type=code",
CURLOPT_RETURNTRANSFER => true,
CURLOPT_ENCODING => "",
CURLOPT_MAXREDIRS => 10,
CURLOPT_TIMEOUT => 30,
CURLOPT_HTTP_VERSION => CURL_HTTP_VERSION_1_1,
CURLOPT_CUSTOMREQUEST => "GET",
]);
$response = curl_exec($curl);
$err = curl_error($curl);
curl_close($curl);
if ($err) {
echo "cURL Error #:" . $err;
} else {
echo $response;
}
```
```python Python theme={null}
import http.client
conn = http.client.HTTPSConnection("")
conn.request("GET", "/{yourDomain}/authorize?session_transfer_token=YOUR_SESSION_TRANSFER_TOKEN&client_ID={yourClientId}&redirect_uri=YOUR_REDIRECT_URI&response_type=code")
res = conn.getresponse()
data = res.read()
print(data.decode("utf-8"))
```
#### オプション 2: Auth0 SDKs を使用して Session Transfer Token を Web アプリケーションに追加する
Auth0 SDKs は Native to Web Single SSO を自動ではサポートしておらず、`/authorize` エンドポイントへのリクエストに `session_transfer_token` は含まれません。
以下は、Auth0 SDKs を使用して `/authorize` エンドポイントへのリクエストで `session_transfer_token` をリダイレクトする Web アプリケーションの例です。
##### Node (Express.js)
Web アプリケーションで [Express.js](https://expressjs.com/) または [Auth0 Express SDK](https://github.com/auth0/express-openid-connect) を使用している場合は、以下のコードで `session_transfer_token` に対応するミドルウェアを追加できます。
```javascript javascript lines theme={null}
const baseConfig = {
authRequired: false,
auth0Logout: true
};
// session_transfer_tokenを自動検出するためにミドルウェアを拡張する
app.use((req, res, next) => {
const { session_transfer_token } = req.query;
// stateの漏洩を防ぐために、リクエストごとに新しい設定を作成する
const config = { ...baseConfig };
if (session_transfer_token) {
config.authorizationParams = {
session_transfer_token,
};
}
auth(config)(req, res, next);
});
```
##### Auth0 SPA SDK (@auth0/auth0-spa-js)
Web アプリケーションで [Auth0 SPA SDK](https://github.com/auth0/auth0-spa-js) を使用している場合は、`authorizationParams` を通じて `session_transfer_token` を `loginWithRedirect()` に渡せます。
```typescript typescript lines theme={null}
import { Auth0Client } from '@auth0/auth0-spa-js';
const auth0 = new Auth0Client({
domain: '{yourDomain}',
clientId: '{yourClientId}',
});
// URLクエリパラメータからsession_transfer_tokenを取得する(ネイティブアプリから渡される)
const urlParams = new URLSearchParams(window.location.search);
const sessionTransferToken = urlParams.get('session_transfer_token');
// session_transfer_tokenを使用してloginWithRedirectを呼び出す
if (sessionTransferToken) {
await auth0.loginWithRedirect({
authorizationParams: {
session_transfer_token: sessionTransferToken,
redirect_uri: window.location.origin,
},
});
}
```
##### Auth0 React SDK (@auth0/auth0-react)
[Auth0 React SDK](https://github.com/auth0/auth0-react) を使用している Web アプリケーションでは、`useAuth0` フックの `loginWithRedirect` を使って `session_transfer_token` を渡せます。
```typescript typescript lines theme={null}
import { useEffect } from 'react';
import { useAuth0 } from '@auth0/auth0-react';
function App() {
const { loginWithRedirect, isAuthenticated, isLoading } = useAuth0();
useEffect(() => {
if (isLoading || isAuthenticated) return;
const urlParams = new URLSearchParams(window.location.search);
const sessionTransferToken = urlParams.get('session_transfer_token');
if (sessionTransferToken) {
loginWithRedirect({
authorizationParams: {
session_transfer_token: sessionTransferToken,
},
});
}
}, [loginWithRedirect, isLoading, isAuthenticated]);
return ...
;
}
```
##### SAML と WS-Federation
Web アプリケーションで SAML または WS-Fed のサービスプロバイダーを使用し、Auth0 を IdP として使用している場合は、`session_transfer_token` を URLパラメーターとして Auth0 の `/authorize` エンドポイントに送信できます。また、`redirect_uri` には SAML または WS-Fed のサインイン URL を指定します。
```bash cURL theme={null}
curl --request GET \
--url 'https://{yourDomain}/samlp//{yourClientId}?session_transfer_token=YOUR_SESSION_TRANSFER_TOKEN' \
--header 'cookie: session_transfer_token=YOUR_SESSION_TRANSFER_TOKEN' \
--cookie session_transfer_token=YOUR_SESSION_TRANSFER_TOKEN
```
```csharp C# theme={null}
var client = new RestClient("https://{yourDomain}/samlp//{yourClientId}?session_transfer_token=YOUR_SESSION_TRANSFER_TOKEN");
var request = new RestRequest(Method.GET);
request.AddHeader("cookie", "session_transfer_token=YOUR_SESSION_TRANSFER_TOKEN");
IRestResponse response = client.Execute(request);
```
```go Go theme={null}
package main
import (
"fmt"
"net/http"
"io/ioutil"
)
func main() {
url := "https://{yourDomain}/samlp//{yourClientId}?session_transfer_token=YOUR_SESSION_TRANSFER_TOKEN"
req, _ := http.NewRequest("GET", url, nil)
req.Header.Add("cookie", "session_transfer_token=YOUR_SESSION_TRANSFER_TOKEN")
res, _ := http.DefaultClient.Do(req)
defer res.Body.Close()
body, _ := ioutil.ReadAll(res.Body)
fmt.Println(res)
fmt.Println(string(body))
}
```
```java Java theme={null}
HttpResponse response = Unirest.get("https://{yourDomain}/samlp//{yourClientId}?session_transfer_token=YOUR_SESSION_TRANSFER_TOKEN")
.header("cookie", "session_transfer_token=YOUR_SESSION_TRANSFER_TOKEN")
.asString();
```
```javascript Node.JS theme={null}
var axios = require("axios").default;
var options = {
method: 'GET',
url: 'https://{yourDomain}/samlp//{yourClientId}',
params: {session_transfer_token: 'YOUR_SESSION_TRANSFER_TOKEN'},
headers: {cookie: 'session_transfer_token=YOUR_SESSION_TRANSFER_TOKEN'}
};
axios.request(options).then(function (response) {
console.log(response.data);
}).catch(function (error) {
console.error(error);
});
```
```php PHP theme={null}
$curl = curl_init();
curl_setopt_array($curl, [
CURLOPT_URL => "https://{yourDomain}/samlp//{yourClientId}?session_transfer_token=YOUR_SESSION_TRANSFER_TOKEN",
CURLOPT_RETURNTRANSFER => true,
CURLOPT_ENCODING => "",
CURLOPT_MAXREDIRS => 10,
CURLOPT_TIMEOUT => 30,
CURLOPT_HTTP_VERSION => CURL_HTTP_VERSION_1_1,
CURLOPT_CUSTOMREQUEST => "GET",
CURLOPT_HTTPHEADER => [
"cookie: session_transfer_token=YOUR_SESSION_TRANSFER_TOKEN"
],
]);
$response = curl_exec($curl);
$err = curl_error($curl);
curl_close($curl);
if ($err) {
echo "cURL Error #:" . $err;
} else {
echo $response;
}
```
```python Python theme={null}
import http.client
conn = http.client.HTTPSConnection("")
headers = { 'cookie': "session_transfer_token=YOUR_SESSION_TRANSFER_TOKEN" }
conn.request("GET", "/{yourDomain}/samlp//{yourClientId}?session_transfer_token=YOUR_SESSION_TRANSFER_TOKEN", headers=headers)
res = conn.getresponse()
data = res.read()
print(data.decode("utf-8"))
```
```ruby Ruby theme={null}
require 'uri'
require 'net/http'
require 'openssl'
url = URI("https://{yourDomain}/samlp//{yourClientId}?session_transfer_token=YOUR_SESSION_TRANSFER_TOKEN")
http = Net::HTTP.new(url.host, url.port)
http.use_ssl = true
http.verify_mode = OpenSSL::SSL::VERIFY_PEER
request = Net::HTTP::Get.new(url)
request["cookie"] = 'session_transfer_token=YOUR_SESSION_TRANSFER_TOKEN'
response = http.request(request)
puts response.read_body
```
## Organizations でのネイティブからWebへのSSO
ネイティブからWebへのSSO は [Organizations](/docs/ja-jp/manage-users/organizations) をサポートしています。ユーザーがネイティブアプリケーションで organization を指定して認証されると、Session Transfer Token には組織コンテキストが含まれます。
Organizations をネイティブからWebへのSSO と併用する場合、Web アプリケーションの `/authorize` リクエストに含まれる `organization` パラメーターは、Session Transfer Token に関連付けられた organization と一致している必要があります。一致しない場合、認証は失敗し、ユーザーは再度ログインを求められます。
Organizations をネイティブからWebへのSSO と併用するには:
1. ネイティブアプリケーションで organization を指定してユーザーを認証します:
```javascript javascript lines theme={null}
// organizationを使用したNativeアプリのログイン
await authorize({
organization: 'org_abc123',
scope: 'openid profile email offline_access'
});
```
2. Web アプリケーションにリダイレクトする際は、`/authorize` リクエストに同じ organization を含めます:
```bash bash lines theme={null}
https://{yourDomain}/authorize?
client_id={yourWebClientId}&
redirect_uri={yourRedirectUri}&
response_type=code&
organization=org_abc123&
session_transfer_token=YOUR_SESSION_TRANSFER_TOKEN
```
`/authorize` リクエスト内の organization が Session Transfer Token 内の organization と一致しない場合、Session Transfer Token は拒否され、ユーザーは再認証のためログインページにリダイレクトされます。イベントの説明が "シングルサインオンに失敗しました: Session Transfer Token の organization の不一致が検出されました。" の警告ログが、テナントログに出力されます。
## Session Transfer Token with Actions
[Actions](/docs/ja-jp/customize/actions) で `session_transfer_token` を使用すると、認証後のリスク検知と対応機能を設定し、ユーザー保護を強化できます。
そのために、post-login Action オブジェクト **event.session\_transfer\_token** には、一意の `client_id`、`scope`、`ip`、`asn`、`user_agent` などの `request` 情報や、`cityName`、`countryCode` などの `geoip` 情報をはじめとする関連情報が含まれます。詳しくは、[Actions Triggers: post-login - Event Object](/docs/ja-jp/customize/actions/explore-triggers/signup-and-login-triggers/login-trigger/post-login-event-object) をご覧ください。
以下の Action コードでは、位置情報に基づいて transaction を動的に拒否できます。
```javascript javascript lines theme={null}
/**
* PostLogin フローの実行中に呼び出されるハンドラー。
*
* @param {Event} event - ユーザーとログインコンテキストに関する詳細情報。
* @param {PostLoginAPI} api - ログインの動作を変更するメソッドを提供するインターフェース。
*/
exports.onExecutePostLogin = async (event, api) => {
if(
event.session_transfer_token &&
event.session_transfer_token.request.geoip.countryCode !== event.request.geoip.countryCode
) {
api.access.deny("Network mismatch detected")
}
};
```
### 親リフレッシュトークンのメタデータにアクセスする
ネイティブからWebへのSSOでは、SSOフローの開始に使用された親リフレッシュトークンのメタデータにアクセスできます。これにより、ネイティブアプリケーションで収集したコンテキスト情報 (デバイスの完全性、リスクシグナル、カスタムコンテキストなど) を、`session_transfer_token` から作成されるWebセッションに引き継げます。
Auth0 では、この情報を `event.session.session_transfer.parent_refresh_token.metadata` オブジェクトとして Post Login Actions から利用できます。これにより、プラットフォーム間でメタデータを安全かつ標準化された方法で受け渡せます。
**使用例:** モバイルアプリがリスクデータ (デバイススコア、位置情報など) を収集し、それをリフレッシュトークンのメタデータに保存します。ネイティブアプリがネイティブからWebへのSSOフローを開始すると、そのメタデータは対応するWebセッションで Actions を通じて自動的に利用できるようになります。
以下の Action コードを使用すると、ネイティブアプリケーションから渡されるデバイス信頼メタデータに基づいて、条件付きアクセスのロジックを実行できます。
```javascript javascript lines theme={null}
/**
* PostLoginフローの実行中に呼び出されるハンドラー。
*
* @param {Event} event - ユーザーおよびログイン時のコンテキストに関する詳細情報。
* @param {PostLoginAPI} api - ログインの動作を変更するために使用できるメソッドを持つインターフェース。
*/
exports.onExecutePostLogin = async (event, api) => {
// 親リフレッシュトークン(ネイティブアプリ)からメタデータを取得する
const parentMetadata = event.session?.session_transfer?.parent_refresh_token?.metadata;
if (parentMetadata) {
const deviceTrustLevel = parentMetadata.device_trust;
if (deviceTrustLevel !== 'high') {
api.access.deny("Device trust level insufficient.");
}
// ネイティブアプリのコンテキストに基づいてクレームを追加することも可能
if (parentMetadata.subscription_tier) {
api.idToken.setCustomClaim('subscription_tier', parentMetadata.subscription_tier);
}
}
};
```
## モニタリング
テナントの[ログ](/docs/ja-jp/deploy-monitor/logs)を確認することで、ネイティブからWebへのSSOのアクティビティをモニタリングできます。
### Token Exchange のログ
* `sertft` : リフレッシュトークン交換の成功。このログは、`audience` フィールドが `"audience":"urn:$auth0Domain:session_transfer"` の場合、ネイティブからWebへのSSOでの交換に対応します
* `fertft`: リフレッシュトークン交換の失敗。このログは、`audience` フィールドが `"audience": "urn:$auth0Domain:session_transfer"` の場合、ネイティブからWebへのSSOでの交換に対応します
### セッション転送の検証に関する警告ログ
Auth0 は、`/authorize` リクエスト中にSession Transfer Tokenの検証が失敗すると、警告ログ (`w`) を出力します。これらのログは、ネイティブからWebへのSSO の問題をトラブルシューティングするのに役立ちます。
| イベントの説明 | 原因 |
| ------------------------------------------------------------------------------------------------------------------------ | ------------------------------------------------------------------------------------------ |
| `Single Sign-On failed: Session Transfer Token not found or expired. This may indicate token reuse or expiration.` | Session Transfer Token が見つからない、すでに使用されている、または有効期限が切れています (トークンは1回しか使用できず、1分で期限切れになります) 。 |
| `Single Sign-On failed: Session Transfer Token device binding validation failed due to IP/ASN mismatch.` | Web リクエストの IP アドレスまたは ASN が、Session Transfer Token に設定されたデバイスバインディングと一致しません。 |
| `Single Sign-On failed: Session Transfer Token organization mismatch detected.` | `/authorize` リクエストの `organization` パラメーターが、Session Transfer Token 内の organization と一致しません。 |
| `Single Sign-On failed: Session Transfer Token user mismatch detected.` | 既存の Auth0 セッションが、Session Transfer Token とは異なるユーザーに属しています。 |
| `Single Sign-On failed: Parent refresh token not found. Session Transfer Token won't be used for session establishment.` | Session Transfer Token の作成に使用された親リフレッシュトークンが、取り消されているか削除されています。 |