> ## Documentation Index
> Fetch the complete documentation index at: https://translations.mintlify.site/llms.txt
> Use this file to discover all available pages before exploring further.
> GitHub Enterprise Cloud(github.com)のorganization向けに、SAML2 Web App アドオンを使用してAuth0をアイデンティティプロバイダーとして設定する方法を説明します。
# GitHub Enterprise CloudをSAMLサービスプロバイダーとして設定する
Auth0を、[GitHub Enterprise Cloud](https://help.github.com/en/articles/about-authentication-with-saml-single-sign-on) (github.com) のアイデンティティプロバイダーとして設定できます。GitHubで外部のSAML IdPを使用するには、エンタープライズレベルのサブスクリプションが必要です。
* GitHubでのSSOについては、[https://docs.github.com](https://docs.github.com) の [About authentication with SAML single sign-on](https://help.github.com/en/articles/about-authentication-with-saml-single-sign-on) を参照してください。
* GitHub Enterprise Server (プライベートインスタンス) のアイデンティティプロバイダーとしてAuth0を設定する方法については、[Configure Auth0 as Identity Provider for GitHub Enterprise Server](/docs/ja-jp/authenticate/single-sign-on/outbound-single-sign-on/configure-auth0-saml-identity-provider/configure-saml2-web-app-addon-for-github-enterprise-server) を参照してください。
## Auth0 で SAML SSO を設定する
1. [Auth0 Dashboard > アプリケーション > アプリケーション](https://manage.auth0.com/#/applications) に移動し、新しいアプリケーションを作成します。**GitHub** などのわかりやすい名前を付けてください。アプリケーションの種類はどれでも選択できますが、**Regular Web App** を推奨します。
2. [Addons](https://manage.auth0.com/#/applications/\{yourClientId}/addons) タブに移動し、**SAML2 Web App** のトグルを有効にします。
3. **設定** タブで、**Application Callback URL** に次の値を設定します: `https://github.com/orgs/{YOUR_GITHUB_ORG_NAME}/saml/consume`.
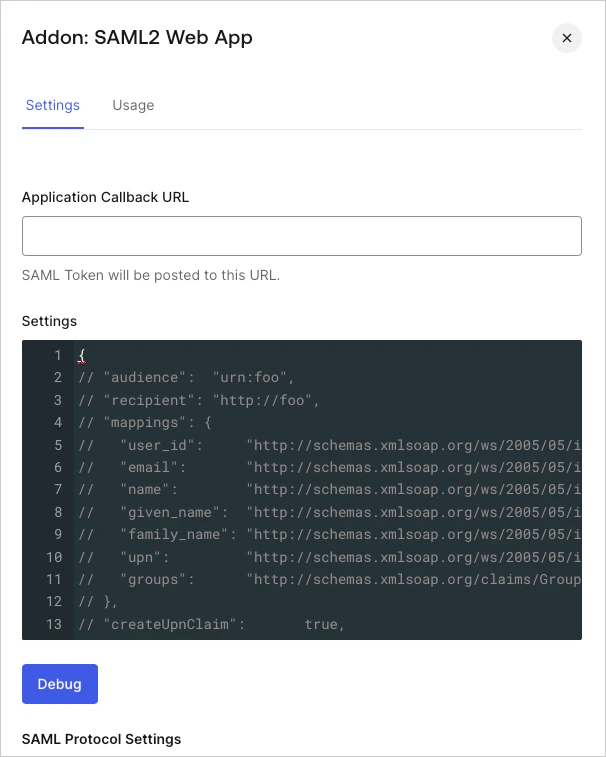 4. 次のコードを **設定** のテキストボックスに貼り付け、**Debug** をクリックします。
```json lines theme={null}
{
"audience": "https://github.com/orgs/{yourGitHubOrgName}",
"mappings": {
"user_id": "http://schemas.xmlsoap.org/ws/2005/05/identity/claims/nameidentifier",
"email": "emails",
"name": "full_name"
},
"passthroughClaimsWithNoMapping": false,
"mapIdentities": false,
"signatureAlgorithm": "rsa-sha256",
"digestAlgorithm": "sha256",
"nameIdentifierProbes": [
"http://schemas.xmlsoap.org/ws/2005/05/identity/claims/nameidentifier"
]
}
```
1. `{YOUR_GITHUB_ORG_NAME}` は、ご利用のサブスクリプションに対応する GitHub の organization名 に置き換えてください。このマッピングにより、`user_id` が **Name Identifier** として GitHub に送信されます。GitHub アプリケーションで複数の接続を有効にする場合は、各ユーザーに異なる ID が割り当てられるため、一意性を確保できます。
2. 1 つの接続だけを使用している場合は、よりわかりやすい **Name Identifier** として `nickname` や別の一意な識別子を使うこともできます (ただし、選択するプロパティは一意である必要があります) 。たとえば、**Name Identifier** に `nickname` を使用する場合、上記の `mappings` セクションは次のようになります:
5. タブの一番下までスクロールし、**Enable** をクリックします。
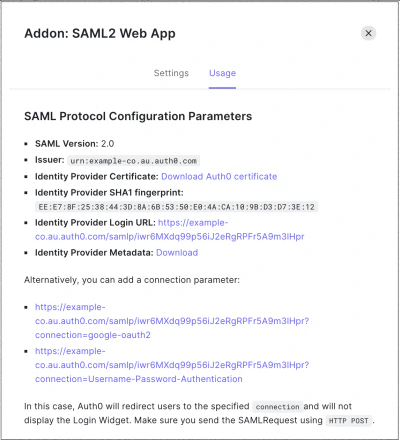
6. **使用状況** タブで **Identity Provider Metadata** を見つけ、**Download** をクリックしてメタデータファイルをダウンロードします。これは、Auth0 をアイデンティティプロバイダーとして設定するときに必要です。
4. 次のコードを **設定** のテキストボックスに貼り付け、**Debug** をクリックします。
```json lines theme={null}
{
"audience": "https://github.com/orgs/{yourGitHubOrgName}",
"mappings": {
"user_id": "http://schemas.xmlsoap.org/ws/2005/05/identity/claims/nameidentifier",
"email": "emails",
"name": "full_name"
},
"passthroughClaimsWithNoMapping": false,
"mapIdentities": false,
"signatureAlgorithm": "rsa-sha256",
"digestAlgorithm": "sha256",
"nameIdentifierProbes": [
"http://schemas.xmlsoap.org/ws/2005/05/identity/claims/nameidentifier"
]
}
```
1. `{YOUR_GITHUB_ORG_NAME}` は、ご利用のサブスクリプションに対応する GitHub の organization名 に置き換えてください。このマッピングにより、`user_id` が **Name Identifier** として GitHub に送信されます。GitHub アプリケーションで複数の接続を有効にする場合は、各ユーザーに異なる ID が割り当てられるため、一意性を確保できます。
2. 1 つの接続だけを使用している場合は、よりわかりやすい **Name Identifier** として `nickname` や別の一意な識別子を使うこともできます (ただし、選択するプロパティは一意である必要があります) 。たとえば、**Name Identifier** に `nickname` を使用する場合、上記の `mappings` セクションは次のようになります:
5. タブの一番下までスクロールし、**Enable** をクリックします。
6. **使用状況** タブで **Identity Provider Metadata** を見つけ、**Download** をクリックしてメタデータファイルをダウンロードします。これは、Auth0 をアイデンティティプロバイダーとして設定するときに必要です。
## GitHub で SAML SSO を設定する
1. GitHub の [organization 向け SAML シングルサインオン (SSO) の有効化とテスト](https://help.github.com/en/articles/enabling-and-testing-saml-single-sign-on-for-your-organization) の手順に従って、GitHub Enterprise Cloud での設定を完了します。
2. 次の情報が必要です。
| フィールド | 値 |
| --------- | -------------------------------------------------------------------------------------------------------------- |
| サインオン URL | `https://{yourDomain}/samlp/{CLIENT_ID}`
`{'{CLIENT_ID}'}` は、Auth0 で作成した GitHub アプリケーションの `client_id` です。 |
| 発行者 | `urn:auth0:{yourTenant}` |
| 公開証明書 | `https://{yourDomain}/pem` からダウンロードします。ダウンロードしたファイルをテキストエディターで開き、内容をコピーして GitHub のテキストエリアに貼り付けます。 |
| 署名方式 | `RSA256-SHA256` |
| ダイジェスト方式 | `SHA256` |
3. GitHub のドキュメントで推奨されているとおり、organization に対して SAML SSO を有効にする前に、入力した情報が正しいことを確認するため、**Test SAML configuration** をクリックします。
organization 向けに SAML シングルサインオン (SSO) を設定する際は、**Require SAML SSO authentication** **for all members of the organization** をオフのままにしておくことで、organization のメンバーに影響を与えずに設定をテストできます。