> ## Documentation Index
> Fetch the complete documentation index at: https://translations.mintlify.site/llms.txt
> Use this file to discover all available pages before exploring further.
> Auth0 のカスタムドメインプロキシとして使用するために、ロードバランシングを備えた Google Cloud Platform(GCP)を設定する方法を説明します。
# リバースプロキシとしてロードバランシングを使用する Google Cloud Platform を設定する
Auth0 のカスタムドメインは、いずれの有料[サブスクリプションプラン](https://manage.auth0.com/#/tenant/billing/subscription)でも利用できます。SSL/TLS 証明書を自分で管理する場合は、**Enterprise** サブスクリプションが必要です。詳しくは、[Auth0 料金プラン](https://auth0.com/pricing)を参照してください。
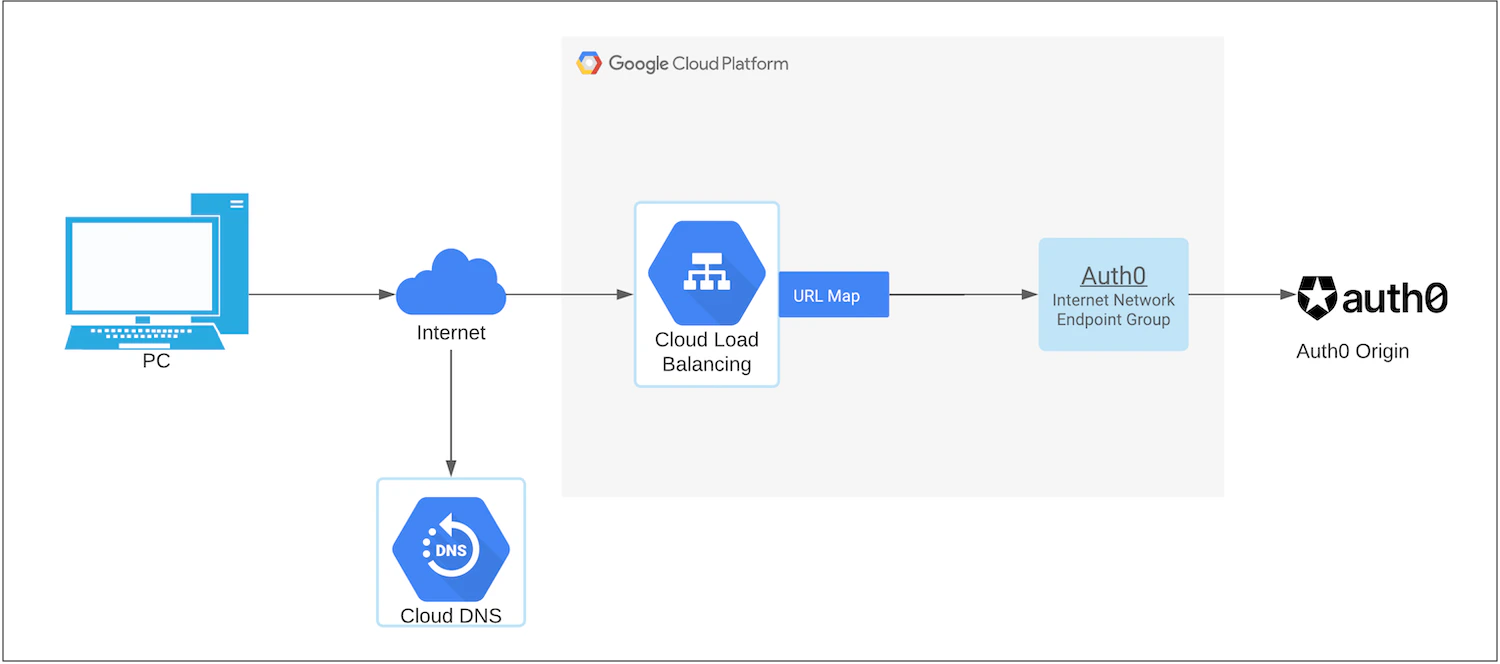
Google Cloud Platform (GCP) は、ロードバランシングを備えたリバースプロキシとして設定できます。次の図は、この構成のコンポーネントを示しています。
* **Google Cloud Platform Load Balancer** は、複数のアプリケーションインスタンスにトラフィックを分散します。
* **Internet Network Endpoint Group** は、Google Cloud の外部にあるバックエンドです。詳しくは、[Internet Network endpoint group](https://cloud.google.com/load-balancing/docs/negs/internet-neg-concepts)を参照してください。
 1. まだ設定していない場合は、[Configure Custom Domains with Self-Managed Certificates](/docs/ja-jp/customize/custom-domains/self-managed-certificates) を実施してください。後で使用するため、**Origin Domain Name** と `cname-api-key` の値を控えておきます。
2. [Auth0 Dashboard > Tenant Settings > Custom Domains](https://manage.auth0.com/#/tenant/custom_domains) で DNS サーバーに TXT レコードを追加してドメインの所有権を確認し、**Verify** をクリックします。
3. GCP でドメインの確認が完了したら、[GCP console](https://console.cloud.google.com) にログインします。
4. **Network Services > Load Balancing** に移動します。**Create Load Balancer** をクリックします。詳しくは、Google Cloud ドキュメントの [Google Cloud Platform Load Balancing](https://cloud.google.com/load-balancing/docs) を参照してください。
1. **HTTP(S) Load Balancing** を選択します。
2. インターネットから Auth0 へトラフィックをルーティングする必要があるため、**From Internet to my VMs** を選択します。**Continue** をクリックします。
3. `auth0-reverse-proxy` などのロードバランサー名を入力し、**Create** をクリックします。
5. バックエンドを設定します。
1. Google Cloud の外部にあるバックエンドである internet network endpoint group (NEG) を作成します。詳しくは、Google Cloud ドキュメントの [Internet network endpoint groups overview](https://cloud.google.com/load-balancing/docs/negs/internet-neg-concepts) を参照してください。
2. 新しく作成した Internet NEG をバックエンドサービス設定のバックエンドとして選択し、Auth0 テナントの `cname-api-key` と `host` の値 (オリジンドメイン名) を設定します。
3. **Done** をクリックします。
6. `host` と `path` のルールを設定します。
1. **Action** として **Route traffic to a single backend** を選択します。
2. **Host rewrite** に、先ほど控えておいた Auth0 テナントのオリジンドメイン名を入力します。
3. **Create** をクリックします。
7. フロントエンドを設定します。
1. 証明書を作成します。最も簡単なのは **Google-managed certificate** を選択する方法です。Google が SSL 証明書を自動的にプロビジョニングします。
2. Google 管理証明書を選択しない場合は、証明書の有効期限が切れる前に、使用している certificate authority で SSL 証明書を更新してアップロードする必要があります。
8. 設定内容を確認し、構成を完了します。
GCP がロードバランサーを設定するまでに 1 分ほどかかります。エラーの原因になりやすい代表的な問題は次のとおりです。
* **Invalid API key**: `cname-api-key` が GCP から Auth0 に設定されていません。
* **403 Forbidden**: `host` header が GCP から Auth0 に送信されていません。
9. DNS レコードを更新して、[ドメインをロードバランサーに接続](https://cloud.google.com/load-balancing/docs/https/setup-global-ext-https-external-backend#update_dns)します。
1. まだ設定していない場合は、[Configure Custom Domains with Self-Managed Certificates](/docs/ja-jp/customize/custom-domains/self-managed-certificates) を実施してください。後で使用するため、**Origin Domain Name** と `cname-api-key` の値を控えておきます。
2. [Auth0 Dashboard > Tenant Settings > Custom Domains](https://manage.auth0.com/#/tenant/custom_domains) で DNS サーバーに TXT レコードを追加してドメインの所有権を確認し、**Verify** をクリックします。
3. GCP でドメインの確認が完了したら、[GCP console](https://console.cloud.google.com) にログインします。
4. **Network Services > Load Balancing** に移動します。**Create Load Balancer** をクリックします。詳しくは、Google Cloud ドキュメントの [Google Cloud Platform Load Balancing](https://cloud.google.com/load-balancing/docs) を参照してください。
1. **HTTP(S) Load Balancing** を選択します。
2. インターネットから Auth0 へトラフィックをルーティングする必要があるため、**From Internet to my VMs** を選択します。**Continue** をクリックします。
3. `auth0-reverse-proxy` などのロードバランサー名を入力し、**Create** をクリックします。
5. バックエンドを設定します。
1. Google Cloud の外部にあるバックエンドである internet network endpoint group (NEG) を作成します。詳しくは、Google Cloud ドキュメントの [Internet network endpoint groups overview](https://cloud.google.com/load-balancing/docs/negs/internet-neg-concepts) を参照してください。
2. 新しく作成した Internet NEG をバックエンドサービス設定のバックエンドとして選択し、Auth0 テナントの `cname-api-key` と `host` の値 (オリジンドメイン名) を設定します。
3. **Done** をクリックします。
6. `host` と `path` のルールを設定します。
1. **Action** として **Route traffic to a single backend** を選択します。
2. **Host rewrite** に、先ほど控えておいた Auth0 テナントのオリジンドメイン名を入力します。
3. **Create** をクリックします。
7. フロントエンドを設定します。
1. 証明書を作成します。最も簡単なのは **Google-managed certificate** を選択する方法です。Google が SSL 証明書を自動的にプロビジョニングします。
2. Google 管理証明書を選択しない場合は、証明書の有効期限が切れる前に、使用している certificate authority で SSL 証明書を更新してアップロードする必要があります。
8. 設定内容を確認し、構成を完了します。
GCP がロードバランサーを設定するまでに 1 分ほどかかります。エラーの原因になりやすい代表的な問題は次のとおりです。
* **Invalid API key**: `cname-api-key` が GCP から Auth0 に設定されていません。
* **403 Forbidden**: `host` header が GCP から Auth0 に送信されていません。
9. DNS レコードを更新して、[ドメインをロードバランサーに接続](https://cloud.google.com/load-balancing/docs/https/setup-global-ext-https-external-backend#update_dns)します。
## さらに詳しく
* [カスタムドメインを使用する機能を設定する](/docs/ja-jp/customize/custom-domains/configure-features-to-use-custom-domains)
* [TLS (SSL) のバージョンと暗号スイート](/docs/ja-jp/customize/custom-domains/self-managed-certificates/tls-ssl)