> ## Documentation Index
> Fetch the complete documentation index at: https://translations.mintlify.site/llms.txt
> Use this file to discover all available pages before exploring further.
> アプリケーションでシングルサインオン ログインを有効にするための、Auth0 シングルサインオン(SSO)Dashboard Extension のインストール方法を説明します。
# シングルサインオン Dashboard Extension をインストールする
1. Auth0 で [SSO Dashboard アプリケーションを作成](/docs/ja-jp/customize/extensions/single-sign-on-dashboard-extension/create-sso-dashboard-application) します。
2. SSO Dashboard アプリケーションの **Client ID** の値をコピーします。
複数のエンタープライズ アプリケーションに対するユーザーのシングルサインオン ログインを管理するには、シングルサインオン (SSO) Dashboard Extension を使用します。詳しくは、[GitHub のこの拡張機能をご覧ください](https://github.com/auth0-extensions/auth0-sso-dashboard-extension)。
## 拡張機能をインストール
Auth0 Dashboard から SSO Dashboard 拡張機能をインストールできます。
1. [Auth0 Dashboard > Extensions](https://manage.auth0.com/#/extensions) に移動し、利用可能な拡張機能の一覧から **SSO Dashboard** を選択します。**Install Extension** ウィンドウが開きます。
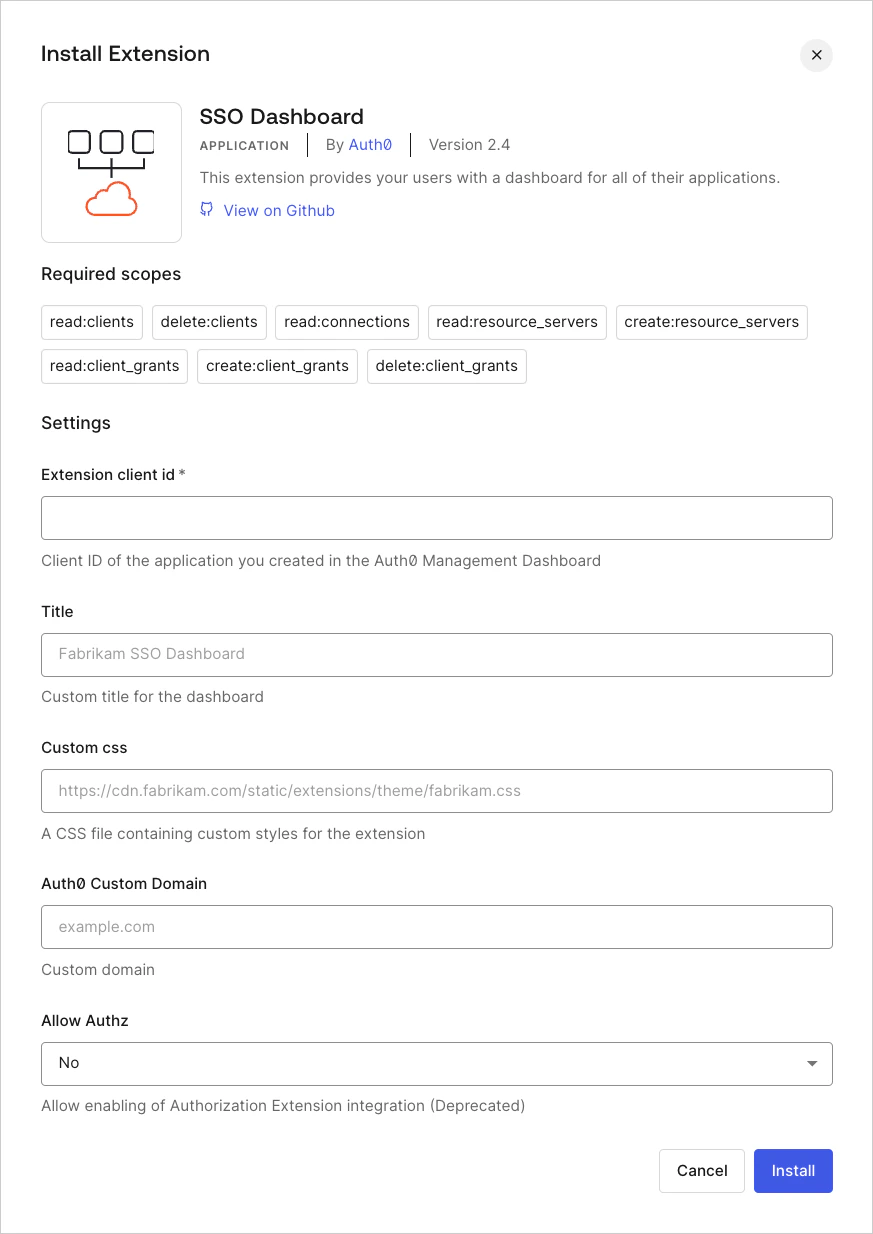 2. 次の設定変数を設定します。
| Variable | Required | Description |
| --------------------- | -------- | ------------------------------------------------------------ |
| `EXTENSION_CLIENT_ID` | 必須 | 拡張機能用に作成した Auth0 アプリケーションの **Client ID**。 |
| `TITLE` | 任意 | SSO Dashboard ページ上部に表示されるカスタムタイトル。 |
| `CUSTOM_CSS` | 任意 | SSO Dashboard ページの表示スタイルを設定するためのカスタム CSS ファイルへのパス。 |
| `FAVICON_PATH` | 任意 | カスタム favicon へのパス。 |
| `AUTH0_CUSTOM_DOMAIN` | 任意 | Auth0 で設定した[カスタムドメイン](/docs/ja-jp/customize/custom-domains)。 |
`AUTH0_CUSTOM_DOMAIN` 変数を設定しても拡張機能の URL には影響せず、拡張機能で使用される認可エンドポイントの URL が変更されるだけです。カスタムドメインを使用すると、拡張機能にログインするユーザーは、デフォルトの `https://{yourTenant}.{yourRegion}.auth0.com/login` ではなく `https://{yourAuth0CustomDomain}/login` にリダイレクトされます。
3. **Install** を選択します。
[Auth0 Dashboard > アプリケーション > アプリケーション](https://manage.auth0.com/#/applications) に移動すると、`auth0-sso-dashboard` という名前のアプリケーションが自動的に作成されていることがわかります。このアプリケーションは、拡張機能が Management API へのアクセスを許可するために使用されるもので、変更してはいけません。
2. 次の設定変数を設定します。
| Variable | Required | Description |
| --------------------- | -------- | ------------------------------------------------------------ |
| `EXTENSION_CLIENT_ID` | 必須 | 拡張機能用に作成した Auth0 アプリケーションの **Client ID**。 |
| `TITLE` | 任意 | SSO Dashboard ページ上部に表示されるカスタムタイトル。 |
| `CUSTOM_CSS` | 任意 | SSO Dashboard ページの表示スタイルを設定するためのカスタム CSS ファイルへのパス。 |
| `FAVICON_PATH` | 任意 | カスタム favicon へのパス。 |
| `AUTH0_CUSTOM_DOMAIN` | 任意 | Auth0 で設定した[カスタムドメイン](/docs/ja-jp/customize/custom-domains)。 |
`AUTH0_CUSTOM_DOMAIN` 変数を設定しても拡張機能の URL には影響せず、拡張機能で使用される認可エンドポイントの URL が変更されるだけです。カスタムドメインを使用すると、拡張機能にログインするユーザーは、デフォルトの `https://{yourTenant}.{yourRegion}.auth0.com/login` ではなく `https://{yourAuth0CustomDomain}/login` にリダイレクトされます。
3. **Install** を選択します。
[Auth0 Dashboard > アプリケーション > アプリケーション](https://manage.auth0.com/#/applications) に移動すると、`auth0-sso-dashboard` という名前のアプリケーションが自動的に作成されていることがわかります。このアプリケーションは、拡張機能が Management API へのアクセスを許可するために使用されるもので、変更してはいけません。
## 拡張機能を使用する
1. [Auth0 Dashboard > Extensions](https://manage.auth0.com/#/extensions) に移動し、**Installed Extensions** ビューを選択します。
2. **SSO Dashboard** を選択します。インストール済みの拡張機能を初めて選択すると、必要な権限を付与するよう求められます。同意すると、カスタム **SSO Dashboard** に移動し、ページ上部に指定した **Title** が表示されます。カスタム CSS ファイルを指定している場合は、そのスタイルも適用されます。
3. SSO Dashboard にログインするには、次を使用します。
1. **管理者** の場合:
`https://{yourTenant}.YOUR_REGION_KEY.webtask.io/auth0-sso-dashboard/admins/login`
2. **ユーザー** の場合:
`https://{yourTenant}.YOUR_REGION_KEY.webtask.io/auth0-sso-dashboard/login`
| Region | Region Domain |
| ------ | -------------- |
| US-1 | us.webtask.io |
| US-3 | us.webtask.run |
| US-4 | us.webtask.run |
| US-5 | us.webtask.run |
| EU | eu.webtask.io |
| EU-2 | eu.webtask.run |
| AU | au.webtask.io |
| JP-1 | jp.webtask.run |
| UK-1 | uk.webtask.run |
| CA-1 | ca.webtask.run |
## 詳細はこちら
* [シングルサインオン (SSO) Dashboard アプリケーションを作成する](/docs/ja-jp/customize/extensions/single-sign-on-dashboard-extension/create-sso-dashboard-application)
* [シングルサインオン Dashboard にアプリケーションを追加する](/docs/ja-jp/customize/extensions/single-sign-on-dashboard-extension/add-applications-to-the-sso-dashboard)
* [SSO Dashboard のアプリケーションを更新する](/docs/ja-jp/customize/extensions/single-sign-on-dashboard-extension/update-applications-on-the-sso-dashboard)
* [セッションの有効期間を設定する](/docs/ja-jp/manage-users/sessions/configure-session-lifetime-settings)
* [ログアウト](/docs/ja-jp/authenticate/login/logout)