> ## Documentation Index
> Fetch the complete documentation index at: https://translations.mintlify.site/llms.txt
> Use this file to discover all available pages before exploring further.
> Auth0 Dashboard、Management API、または IaC ツールを使用して Auth0 Advanced Customizations for Universal Login を有効化および設定し、Login experience をカスタマイズします。
# ACUL を設定する
Auth0 Dashboard、Auth0 Management API、Infrastructure as Code (IaC) ツールを使用して ACUL を設定できます。いずれの方法でも、同じ画面ごとのレンダリング設定オブジェクトが変更されます。
ACUL を設定するには、カスタムの設定ファイルとアセットがパブリック CDN でホストされていることを確認してください。
レンダリング設定オブジェクトとそのプロパティについては、[ACUL レンダリング設定リファレンス](/docs/ja-jp/customize/login-pages/advanced-customizations/configure/reference) を参照してください。
## Auth0 Dashboard
Auth0 Dashboard を使用して、ACUL で画面をカスタマイズできます。
A. [Auth0 Dashboard > Branding > Universal Login](https://manage.auth0.com/dashboard/#/universal-login/customizations-new) に移動します
1. **Customize authentication screens** を選択します。
2\. カスタマイズする screen を選択します。
3\. **Settings > Rendering mode** で **Advanced mode** を選択します。
4\. (任意) **Use custom page template** を選択します。
5\. (任意) **Advanced mode filters** を選択します。
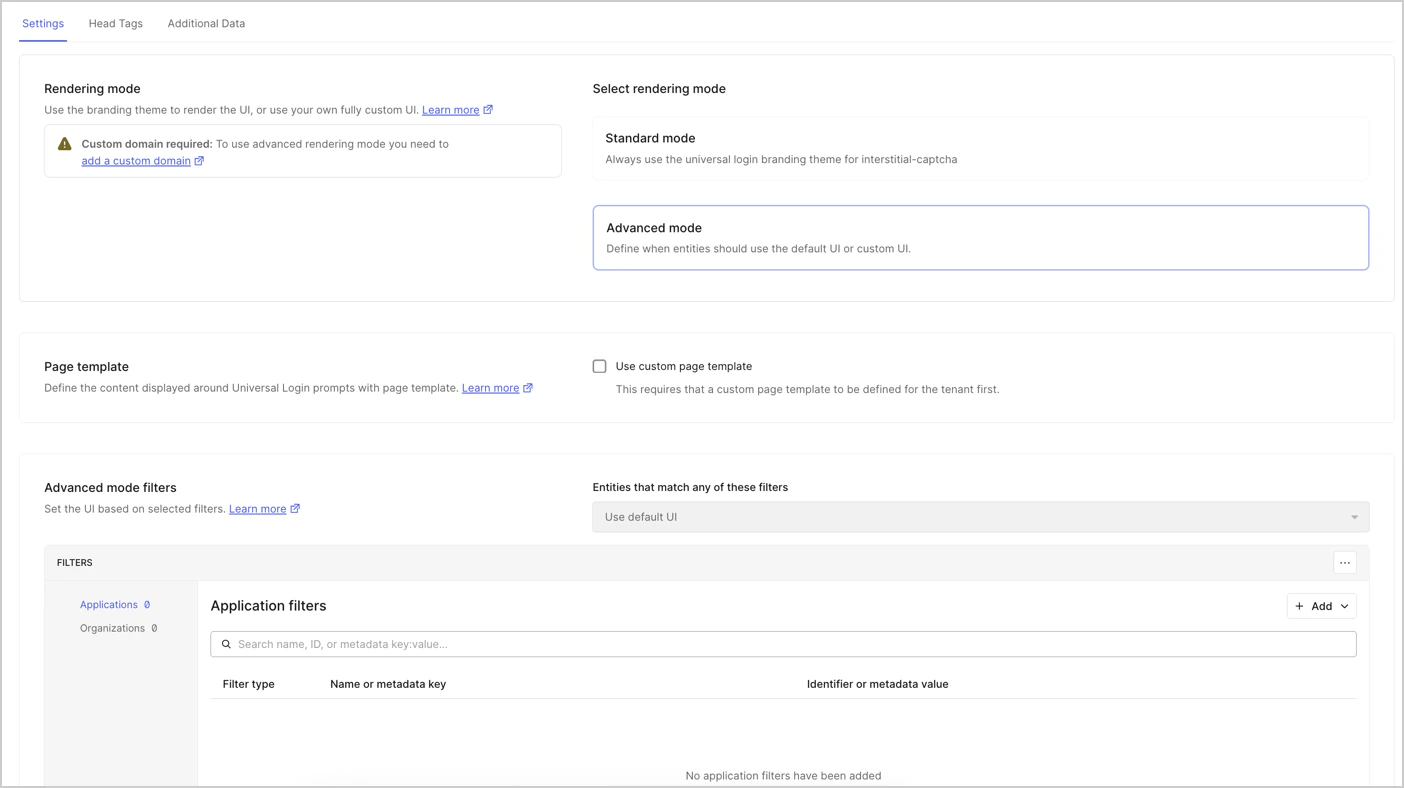 6. 独自の HTML `Head Tags` を追加するには、**Head Tags** を選択します。
7\. (任意) ブラウザーに送信する追加データを選択するには、**Additional Data** を選択します。
**Additional Data** では、任意のコンテキストデータプロパティを追加できます。たとえば、[`user`](/docs/ja-jp/libraries/acul/js-sdk/Screens/interfaces/UserMembers) のオプトイン コンテキストデータなどです。
B. **Save & Publish** を選択します。
6. 独自の HTML `Head Tags` を追加するには、**Head Tags** を選択します。
7\. (任意) ブラウザーに送信する追加データを選択するには、**Additional Data** を選択します。
**Additional Data** では、任意のコンテキストデータプロパティを追加できます。たとえば、[`user`](/docs/ja-jp/libraries/acul/js-sdk/Screens/interfaces/UserMembers) のオプトイン コンテキストデータなどです。
B. **Save & Publish** を選択します。
## Infrastructure as Code (IaC)
ACUL は、次のような IaC ツールを使用して設定できます。
* **Auth0 CLI** の [`auth0 acul`](https://auth0.github.io/auth0-cli/auth0_acul.html) コマンド
* **Auth0 Terraform Provider** の [`auth0_prompt_screen_renderer`](https://registry.terraform.io/providers/auth0/auth0/latest/docs/resources/prompt_screen_renderer) リソース
* **Auth0 Deploy CLI** の [`prompts`](https://github.com/auth0/auth0-deploy-cli/blob/master/docs/resource-specific-documentation.md#prompts) リソース
## Auth0 Management API
Auth0 Management API のエンドポイントを使用すると、Universal Login の画面を個別に設定したり、1 回の API 呼び出しで複数の画面をまとめて更新したりできます。リクエストには [Management API access token](/docs/ja-jp/secure/tokens/access-tokens/management-api-access-tokens) が必要です。
**個別の画面設定**
* [`GET /v2/prompts/{prompt}/screen/{screen}/rendering` エンドポイント](/docs/ja-jp/api/management/v2/prompts/get-rendering) は、1 つの画面の設定を取得します。
* [`PATCH /v2/prompts/{prompt}/screen/{screen}/rendering` エンドポイント](/docs/ja-jp/api/management/v2/prompts/patch-rendering) は、1 つの画面で ACUL を設定します。
**画面の一括設定**
* [`GET /v2/prompts/rendering` エンドポイント](/docs/ja-jp/api/management/v2/prompts/get-all-rendering) は、すべての画面の設定を取得します。
* [`PATCH /v2/prompts/rendering` エンドポイント](/docs/ja-jp/api/management/v2/prompts/patch-bulk-rendering) は、画面を一括で更新します。