> ## Documentation Index
> Fetch the complete documentation index at: https://translations.mintlify.site/llms.txt
> Use this file to discover all available pages before exploring further.
# ユーザーの同意とサードパーティアプリケーション
> アプリケーションがユーザーに代わってAPIへのアクセスを要求する際に、Auth0がユーザーの同意をどのように処理するかを学びます。
export const AuthCodeGroup = ({children, dropdown}) => {
const [processedChildren, setProcessedChildren] = useState(children);
useEffect(() => {
let unsubscribe = null;
function init() {
unsubscribe = window.autorun(() => {
const processChildren = node => {
if (typeof node === "string") {
let processedNode = node;
for (const [key, value] of window.rootStore.variableStore.values.entries()) {
const escapedKey = key.replaceAll(/[.*+?^${}()|[\]\\]/g, (String.raw)`\$&`);
processedNode = processedNode.replaceAll(new RegExp(escapedKey, "g"), value);
}
return processedNode;
} else if (Array.isArray(node)) {
return node.map(processChildren);
} else if (node && node.props && node.props.children) {
return {
...node,
props: {
...node.props,
children: processChildren(node.props.children)
}
};
}
return node;
};
setProcessedChildren(processChildren(children));
});
}
if (window.rootStore) {
init();
} else {
window.addEventListener("adu:storeReady", init);
}
return () => {
window.removeEventListener("adu:storeReady", init);
unsubscribe?.();
};
}, [children]);
return {processedChildren};
};
export const AuthCodeBlock = ({filename, icon, language, highlight, children}) => {
const [displayText, setDisplayText] = useState(children);
const [copyText, setCopyText] = useState(children);
const wrapperRef = React.useRef(null);
useEffect(() => {
let unsubscribe = null;
function init() {
if (!window.autorun || !window.rootStore) {
return;
}
unsubscribe = window.autorun(() => {
let processedChildrenForDisplay = children;
let processedChildrenForCopy = children;
for (const [key, value] of window.rootStore.variableStore.values.entries()) {
const escapedKey = key.replaceAll(/[.*+?^${}()|[\]\\]/g, (String.raw)`\$&`);
let displayValue = value;
if (key === "{yourClientSecret}" && value !== "{yourClientSecret}") {
displayValue = value.substring(0, 3) + "*****MASKED*****";
}
processedChildrenForDisplay = processedChildrenForDisplay.replaceAll(new RegExp(escapedKey, "g"), displayValue);
processedChildrenForCopy = processedChildrenForCopy.replaceAll(new RegExp(escapedKey, "g"), value);
}
setDisplayText(processedChildrenForDisplay);
setCopyText(processedChildrenForCopy);
});
}
if (window.rootStore) {
init();
} else {
window.addEventListener("adu:storeReady", init);
}
return () => {
window.removeEventListener("adu:storeReady", init);
unsubscribe?.();
};
}, [children]);
useEffect(() => {
if (!wrapperRef.current) return;
const originalWriteText = navigator.clipboard.writeText.bind(navigator.clipboard);
let isOverriding = false;
const handleClick = e => {
const button = e.target.closest('[data-testid="copy-code-button"]');
if (!button || !wrapperRef.current.contains(button)) return;
isOverriding = true;
navigator.clipboard.writeText = text => {
if (isOverriding) {
isOverriding = false;
navigator.clipboard.writeText = originalWriteText;
return originalWriteText(copyText);
}
return originalWriteText(text);
};
setTimeout(() => {
if (isOverriding) {
isOverriding = false;
navigator.clipboard.writeText = originalWriteText;
}
}, 100);
};
const wrapper = wrapperRef.current;
wrapper.addEventListener('click', handleClick, true);
return () => {
wrapper.removeEventListener('click', handleClick, true);
if (navigator.clipboard.writeText !== originalWriteText) {
navigator.clipboard.writeText = originalWriteText;
}
};
}, [copyText]);
return
{displayText}
;
};
OAuth では、アプリケーションがユーザーに代わってAPIにアクセスできます。アプリケーションがユーザーに代わって処理を行うには、事前にユーザーが要求された権限を明示的に承認する必要があります。この承認の手順をユーザー同意と呼びます。
[サードパーティアプリケーション](/docs/ja-jp/get-started/applications/third-party-applications)では、ユーザー同意が常に必要です。ユーザーは認可リクエストのたびに承認しなければなりません。[ファーストパーティアプリケーション](/docs/ja-jp/get-started/applications/first-party-and-third-party-applications)では、アプリケーションを管理しており、適切に動作すると信頼できるため、設定によっては同意を省略できます。
## 同意ダイアログ
サードパーティアプリケーションがユーザーを `/authorize` エンドポイントにリダイレクトして API へのアクセスをリクエストすると、Auth0 は、そのアプリケーションがリクエストしている権限の一覧を表示する同意ダイアログを表示します。
次の認可リクエストでは、API の `read:posts` 権限と `write:posts` 権限を承認するようユーザーに求める同意ダイアログが表示されます。
```http wrap lines theme={null}
GET /authorize?
client_id=tpc_THIRD_PARTY_CLIENT_ID
&redirect_uri=https://partner.example.com/callback
&response_type=code
&scope=read:posts write:posts
&audience=https://social.example.com
&code_challenge=CODE_CHALLENGE
&code_challenge_method=S256
&state=STATE_VALUE
```
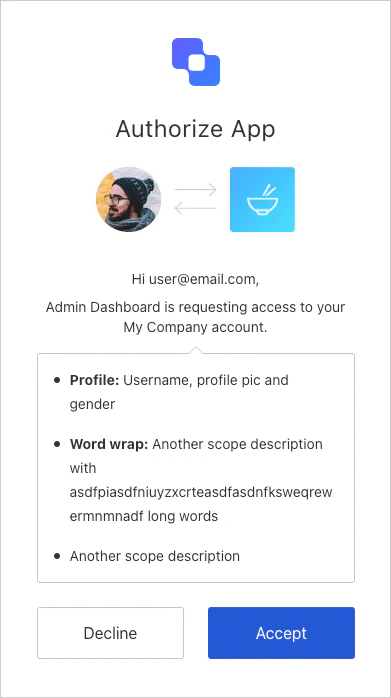 ユーザーが承認すると、Auth0 はそのアプリケーション、API、要求されたスコープの組み合わせに対するユーザーの同意を表すユーザーグラントを作成します。アプリケーションは通常どおり認可コードを受け取ります。
いったん同意すると、明示的に同意を取り消さない限り、その後のログイン時に同意ダイアログは表示されません。
強化されたセキュリティ制御が適用されたサードパーティアプリケーションでは、このリリースで OIDC スコープ (`openid`、`profile`、`email`) はサポートされていません。同意ダイアログには API スコープのみが表示されます。サードパーティアプリケーションの OIDC サポートは、今後のリリースで提供される予定です。
ユーザーが承認すると、Auth0 はそのアプリケーション、API、要求されたスコープの組み合わせに対するユーザーの同意を表すユーザーグラントを作成します。アプリケーションは通常どおり認可コードを受け取ります。
いったん同意すると、明示的に同意を取り消さない限り、その後のログイン時に同意ダイアログは表示されません。
強化されたセキュリティ制御が適用されたサードパーティアプリケーションでは、このリリースで OIDC スコープ (`openid`、`profile`、`email`) はサポートされていません。同意ダイアログには API スコープのみが表示されます。サードパーティアプリケーションの OIDC サポートは、今後のリリースで提供される予定です。
## スコープの説明
デフォルトでは、同意ページではユーザーに同意を求める際にスコープ名が使用されます。以下のように、わかりやすく表示されるよう、スコープは `action:resource_name` 形式で定義します。
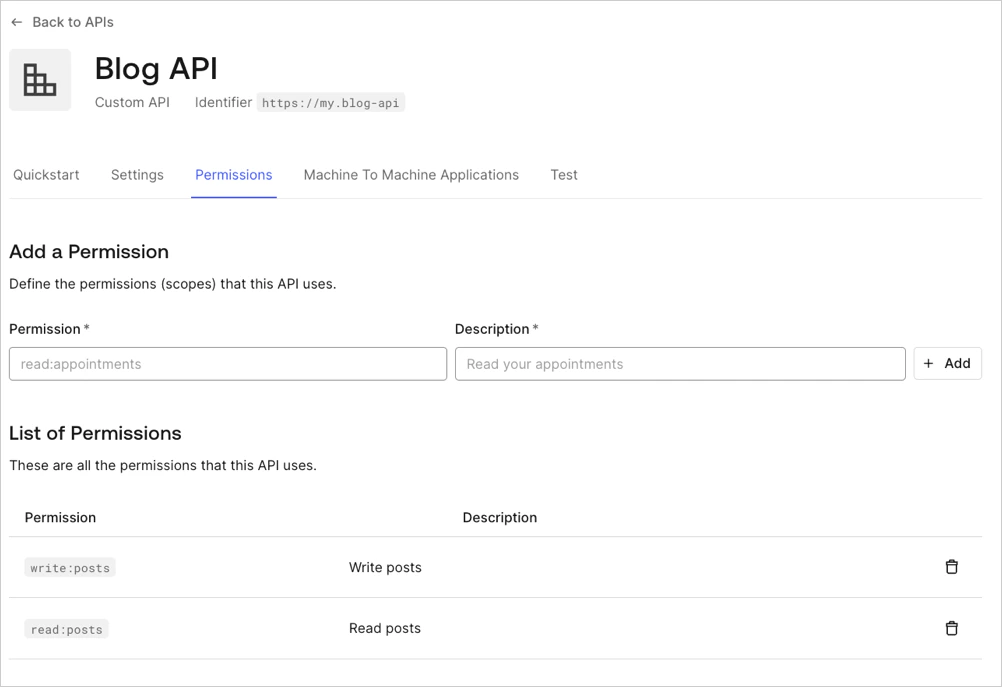 同意ページでは、同じ API のスコープがグループ化され、すべてのアクションが 1 行にまとめて表示されます。たとえば、上記の設定では **Posts: read and write your posts** と表示されます。
スコープ名の代わりに **Description** フィールドを表示するには、テナントの `use_scope_descriptions_for_consent` フラグを `true` に設定します。
```bash cURL wrap lines theme={null}
curl --request PATCH \
--url 'https://YOUR_DOMAIN/api/v2/tenants/settings' \
--header 'Authorization: Bearer YOUR_MANAGEMENT_API_TOKEN' \
--header 'Content-Type: application/json' \
--data '{ "flags": { "use_scope_descriptions_for_consent": true } }'
```
この設定は、そのテナント上のすべての API の同意プロンプトに影響します。
同意ページでは、同じ API のスコープがグループ化され、すべてのアクションが 1 行にまとめて表示されます。たとえば、上記の設定では **Posts: read and write your posts** と表示されます。
スコープ名の代わりに **Description** フィールドを表示するには、テナントの `use_scope_descriptions_for_consent` フラグを `true` に設定します。
```bash cURL wrap lines theme={null}
curl --request PATCH \
--url 'https://YOUR_DOMAIN/api/v2/tenants/settings' \
--header 'Authorization: Bearer YOUR_MANAGEMENT_API_TOKEN' \
--header 'Content-Type: application/json' \
--data '{ "flags": { "use_scope_descriptions_for_consent": true } }'
```
この設定は、そのテナント上のすべての API の同意プロンプトに影響します。
## 拒否されたアクセス許可への対応
ユーザーが同意を拒否した場合の動作は、アプリケーションの[リダイレクトポリシー](/docs/ja-jp/get-started/applications/third-party-applications/security-controls#redirect-protection)によって異なります。
* **`open_redirect_protection`** (サードパーティ アプリの既定) : Auth0 はリダイレクトせず、代わりにエラーページを表示します。これにより、オープンリダイレクト攻撃を防止します。
* **`allow_always`**: Auth0 は `access_denied` エラーを付けて `redirect_uri` にリダイレクトします。
```http wrap lines theme={null}
HTTP/1.1 302 Found
Location: https://partner.example.com/callback?
error=access_denied
&state=STATE_VALUE
```
## ファーストパーティアプリケーションの同意をスキップする
API で **Allow Skipping User Consent** オプションが有効になっている場合、ファーストパーティアプリケーションでは同意ダイアログをスキップできます。
**Allow Skipping User Consent** の切り替えに移動するには、**Applications > APIs > (API を選択) > Settings > Access Settings** を選択します。
サードパーティアプリケーションでは常に同意が必要で、同意ダイアログをスキップすることはできません。
ファーストパーティアプリケーションで同意をスキップする場合でも、アプリケーションが検証不能なコールバック URI (`localhost` やカスタム URI スキームなど) を使用していると、ログイン確認プロンプトが表示されることがあります。これは、同じデバイス上でのアプリケーションのなりすましからユーザーを保護するためです。詳しくは、[アプリケーションのなりすまし対策](/docs/ja-jp/secure/security-guidance/measures-against-app-impersonation) を参照してください。
## Organizations における同意
サードパーティアプリケーションが[組織](/docs/ja-jp/manage-users/organizations)コンテキストでユーザーを認証する場合、同意は組織ごとに設定されます。ある組織でアプリケーションへの同意を行ったユーザーは、別の組織で同じアプリケーションに対して同意したことにはなりません。
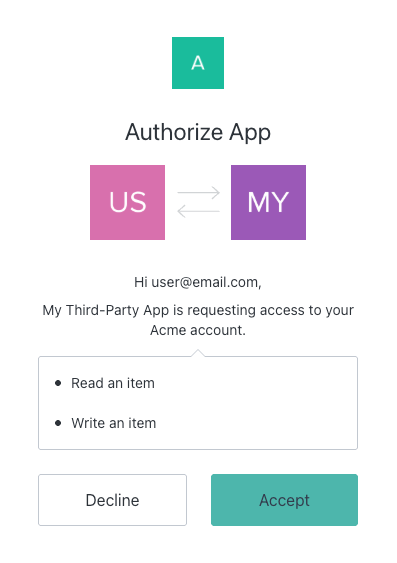 つまり、次のようになります。
* 新しい組織から同じサードパーティアプリケーションにアクセスする場合、別の組織ですでに同意していても、ユーザーには再度同意ダイアログが表示されます。
* ある組織で同意を取り消しても、別の組織での同意には影響しません。
* グラントは組織ごとに保存されます。
つまり、次のようになります。
* 新しい組織から同じサードパーティアプリケーションにアクセスする場合、別の組織ですでに同意していても、ユーザーには再度同意ダイアログが表示されます。
* ある組織で同意を取り消しても、別の組織での同意には影響しません。
* グラントは組織ごとに保存されます。
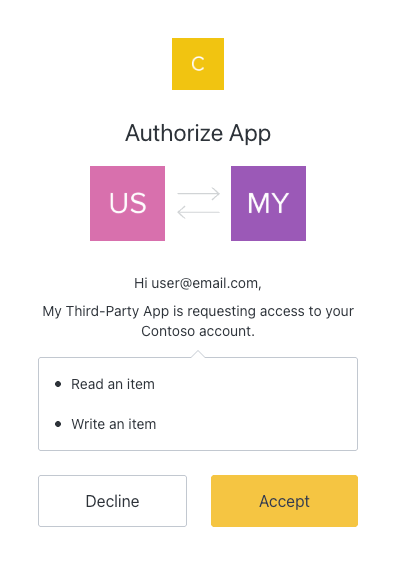 特定の組織コンテキストで再度同意を求めるには、`/authorize` リクエストに `prompt=consent` を含めます。
## 同意を取り消す
特定のアプリケーションに対するユーザーの同意を取り消すには、次の手順を実行します。
1. **Auth0 Dashboard > User Management > Users** に移動します。
2. ユーザーを選択します。
3. **Authorized Applications** タブを選択します。
4. アプリケーションの横にある **取り消す** を選択します。
## パスワードベースのフロー
[Resource Owner Password Flow](/docs/ja-jp/get-started/authentication-and-authorization-flow/resource-owner-password-flow) は、サードパーティアプリケーションでは利用できません。ファーストパーティアプリケーションにのみ適用されます。
ファーストパーティアプリケーションでは、ユーザーは自身のパスワードをアプリケーションに直接提供するため、同意ダイアログは表示されません。これは、ユーザーのアカウントへの完全なアクセス権をそのアプリケーションに与えるのと同等です。
## 同意を毎回求める
ユーザーにログインのたびに同意を求めるには (既存のグラントがある場合も含め) 、`/authorize` request に `prompt=consent` を含めます。
```http wrap lines theme={null}
GET /authorize?
client_id=tpc_THIRD_PARTY_CLIENT_ID
&redirect_uri=https://partner.example.com/callback
&response_type=code
&scope=read:posts write:posts
&audience=https://social.example.com
&prompt=consent
&code_challenge=CODE_CHALLENGE
&code_challenge_method=S256
&state=STATE_VALUE
```
## 詳しくはこちら
* [サードパーティアプリケーション](/docs/ja-jp/get-started/applications/third-party-applications)
* [ファーストパーティアプリケーションとサードパーティアプリケーション](/docs/ja-jp/get-started/applications/first-party-and-third-party-applications)
* [サードパーティアプリケーションのセキュリティ制御](/docs/ja-jp/get-started/applications/third-party-applications/security-controls)
* [アプリケーションのグラントタイプ](/docs/ja-jp/get-started/applications/application-grant-types)
* [アプリケーションのなりすまし対策](/docs/ja-jp/secure/security-guidance/measures-against-app-impersonation)