> ## Documentation Index
> Fetch the complete documentation index at: https://translations.mintlify.site/llms.txt
> Use this file to discover all available pages before exploring further.
> Private Key JWT 認証で使用するアサーションの構築方法を説明します。
# Private Key JWT で認証する
先に進む前に、Auth0 Dashboard で新しいアプリケーションを作成するか、既存のアプリケーションを変換しておく必要があります。詳しくは、[Private Key JWT 認証を設定する](/docs/ja-jp/get-started/applications/configure-private-key-jwt)をお読みください。
`private_key_jwt` で認証するには、2 つの手順を完了する必要があります。
1. クライアントアサーションを作成します。このアサーションは、キーペアの生成時に使用した秘密鍵で署名された JWT です。キーペアの生成方法については、[Private Key JWT 認証を設定する](/docs/ja-jp/get-started/applications/configure-private-key-jwt)をお読みください。
2. そのアサーションを使用して Auth0 で認証します。
## アサーションを構築する
Auth0 の SDK のいずれかを使用すれば、アサーションを自動的に構築できます。SDK を使用しない場合は、アサーションを自分で作成する必要があります。
このアサーションは JSON Web トークン (JWT) で、次のプロパティとクレームを含める必要があります。
特に明記されていない限り、すべてのクレームが必須です。JWT クレームの詳細については、[JSON Web Token Claims](/docs/ja-jp/secure/tokens/json-web-tokens/json-web-token-claims) を参照してください。
* Header
* `alg`: アサーションの署名に使用するアルゴリズムです。このアルゴリズムは、アプリケーションの認証情報を作成したときに指定したアルゴリズムと一致している必要があります。
* `kid`**:** (任意) 認証情報に対して Auth0 が生成した `kid` です。`kid` は認証情報の作成時に生成されます。
* Payload
* `iss`**:** アプリケーションの Client ID です。この値は、[Auth0 Dashboard > アプリケーション > アプリケーション](https://manage.auth0.com/dashboard/#/applications/) で **設定** タブを選択すると、アプリケーション設定で確認できます。
* `sub`**:** アプリケーションの Client ID です。この値はアプリケーション設定でも確認できます。[Auth0 Dashboard > アプリケーション > アプリケーション](https://manage.auth0.com/dashboard/#/applications/) で **設定** タブを選択すると、アプリケーション設定で確認できます。
* `aud`**:** アサーションを受け取る Auth0 テナントまたはカスタムドメインの URL です。例: `https://{yourTenant}.auth0.com/`**.** 末尾のスラッシュを含めてください。
Auth0 テナントにカスタムドメインを設定している場合は、それを `aud` クレームとして使用できます。この場合は、カスタムドメインを使用することをお勧めします。
* `iat` (任意), `nbf` (任意), および `exp`: Issued At、Not Before、Expiration の各クレームで、正しいタイムスタンプに設定します。相互運用性を確保するため、`iat` と `nbf` (存在する場合) では最大 10 秒までのクロックスキューが許容されます。クライアントアサーションは 1 回限り使用するトークンであるため、有効期限はできるだけ短くすることをお勧めします。Auth0 では、トークンの有効期間として最大 5 分をサポートしています。
* `jti`: クライアントが作成する一意のクレーム ID です。Universally Unique Identifier (UUID) 形式の使用をお勧めします。
この JWT は 1 回限り使用するトークンであるため、それを前提として有効期限は短く設定してください。最大 1 分に設定することをお勧めします。
次に、このトークンを、Private Key JWT 認証用にアプリケーションを作成または設定したときに生成した秘密鍵で署名する必要があります。方法については、[JSON Web Token specification](https://www.rfc-editor.org/rfc/rfc7519#section-7.1) を参照してください。
トークンを一から自分で実装するのではなく、この機能を標準でサポートしている標準ツールやサードパーティライブラリを使って構築することをお勧めします。 サポートライブラリの詳細については、[JWT.io](https://jwt.io/libraries) の一覧を参照してください。
### 例
以下の例では、Node.js スクリプトで [jose パッケージ](https://github.com/panva/jose) を使用してアサーションを生成します。
```javascript lines expandable theme={null}
const { SignJWT } = require('jose')
const crypto = require("crypto");
const uuid = require("uuid");
async function main() {
const privateKeyPEM = crypto.createPrivateKey(/**
ここに秘密鍵の内容を読み込みます。秘密鍵は安全なインフラストラクチャに保存することをお勧めします。
*/);
const jwt = await new SignJWT({})
.setProtectedHeader({
alg: 'RS256', // または RS384 または PS256
kid: '(OPTIONAL) KID_GENERATED_BY_AUTH0'
})
.setIssuedAt()
.setIssuer('CLIENT_ID')
.setSubject('CLIENT_ID')
.setAudience('https://YOUR_TENANT.auth0.com/') // またはカスタムドメイン
.setExpirationTime('1m')
.setJti(uuid.v4())
.sign(privateKeyPEM);
console.log(jwt)
}
main();
```
秘密鍵で署名したクライアントアサーションの例:
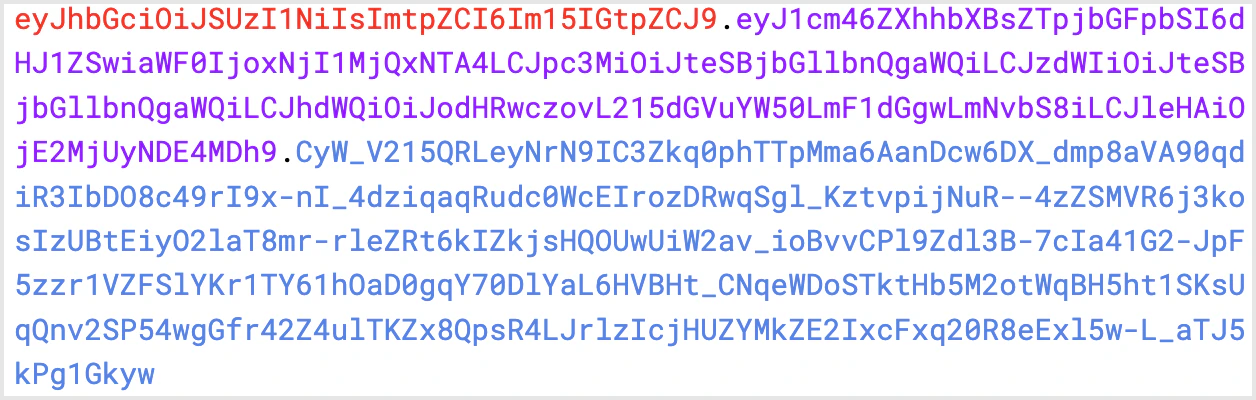 次に対応します:
```json lines theme={null}
{
"alg": "RS256",
"kid": "my kid"
}
{
"iat": 1626684584,
"iss": "my client id",
"sub": "my client id",
"aud": "https://mytenant.auth0.com/",
"exp": 1626684644,
"jti": "e4dc8ed1-b108-4901-8bbc-c07a791817e7"
}
```
必要な情報を含むJWTを生成したら、Auth0に対するアプリケーションの認証を行う準備は完了です。
次に対応します:
```json lines theme={null}
{
"alg": "RS256",
"kid": "my kid"
}
{
"iat": 1626684584,
"iss": "my client id",
"sub": "my client id",
"aud": "https://mytenant.auth0.com/",
"exp": 1626684644,
"jti": "e4dc8ed1-b108-4901-8bbc-c07a791817e7"
}
```
必要な情報を含むJWTを生成したら、Auth0に対するアプリケーションの認証を行う準備は完了です。
## アサーションをアクセストークンに交換する
次の例では、[Client Credential Flow](/docs/ja-jp/get-started/authentication-and-authorization-flow/client-credentials-flow) を使用します。Private Key JWT 認証は、`client_secret` を `client_assertion` に置き換えられる他のグラントタイプでも使用できます。
JWT アサーションをアクセストークンに交換するには、次のパラメーターを指定して Authentication API の[トークンエンドポイント](https://auth0.com/docs/api/authentication#authenticate-user)を呼び出します。
* `$client_assertion`: JWT アサーション
* `$resource_server_identifier`: リソースサーバー識別子。詳しくは、[Register APIs](/docs/ja-jp/get-started/auth0-overview/set-up-apis) を参照してください。
```bash lines theme={null}
curl --location --request POST 'https://$tenant/oauth/token' \
--header 'Content-Type: application/x-www-form-urlencoded' \
--data-urlencode 'grant_type=client_credentials' \
--data-urlencode 'client_assertion_type=urn:ietf:params:oauth:client-assertion-type:jwt-bearer' \
--data-urlencode 'client_assertion=$client_assertion' \
--data-urlencode 'audience=$resource_server_idenifier'
```
## サポート対象エンドポイント
[https://\$tenant/oauth/token](https://auth0.com/docs/api/authentication#get-token) エンドポイントに加えて、以下の Auth0 Authentication API エンドポイントでも、設定済みのアプリケーションで `private_key_jwt` 認証をサポートしています。
* [POST /oauth/revoke](https://auth0.com/docs/api/authentication#revoke-refresh-token)
* [POST /mfa/challenge](https://auth0.com/docs/api/authentication#challenge-request)
* [POST /passwordless/start](https://auth0.com/docs/api/authentication#get-code-or-link)
## アサーションの上限
JWT アサーションの最大長は 2048 バイトです。
アサーション内のクレームには、次の上限があります。
* `iss`: 64 文字
* `sub`: 64 文字
* `jti`: 64 文字
* `alg`: 16 文字
## 詳細はこちら
* [Private Key JWT 認証を設定する](/docs/ja-jp/get-started/applications/configure-private-key-jwt)
* [Okta と OIDC 接続向けの Private Key JWT クライアント認証](/docs/ja-jp/authenticate/enterprise-connections/private-key-jwt-client-auth)