> ## Documentation Index
> Fetch the complete documentation index at: https://translations.mintlify.site/llms.txt
> Use this file to discover all available pages before exploring further.
> モバイルのプッシュ通知を使用して、クライアント主導のバックチャネル認証フローでユーザーを認証する方法を説明します。
# CIBA でのモバイルプッシュ通知
クライアント主導のバックチャネル認証 (CIBA) 機能を使用するには、Enterprise プランまたは適切なアドオンが必要です。詳しくは、[Auth0 Pricing](https://auth0.com/pricing/)を参照してください。
CIBA でモバイルプッシュ通知を使用すると、ユーザーは登録済みのモバイルデバイスでリクエストを認証または承認するためのプッシュ通知を受け取ります。CIBA でモバイルプッシュ通知を送信するには、Auth0 Guardian アプリ、または Auth0 Guardian SDK を統合したカスタムアプリを使用できます。
モバイルプッシュ通知を使用する CIBA フローでは、ブラウザーを介さずにユーザーをモバイルデバイス上で認証および認可できます。利用側のデバイスではアクティブなブラウザーセッションが不要なため、CIBA リクエストがトリガーされる前にユーザーがログインしている必要はありません。これにより、ユーザーがすでに持っている既存のセッションにも CIBA フローが影響しないことが保証されます。
次の図は、モバイルプッシュ通知を使用するエンドツーエンドの CIBA フローを示しています。
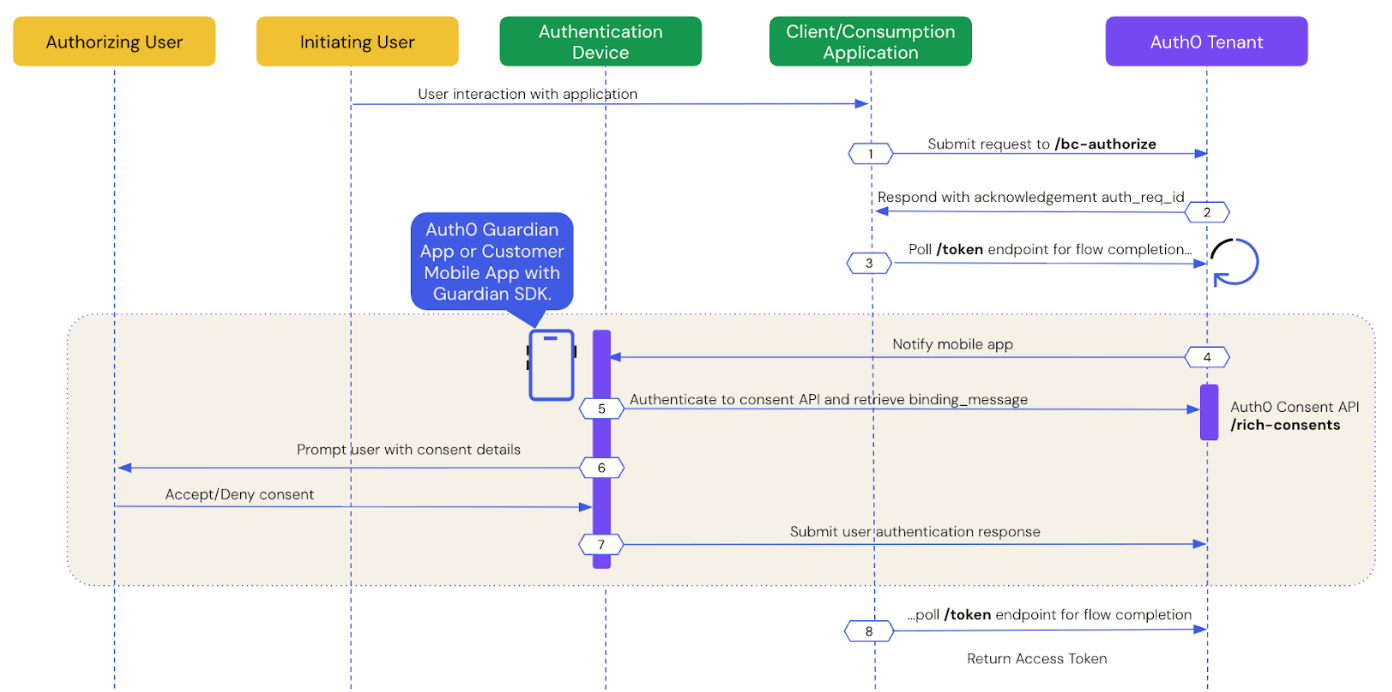 以下の各セクションでは、モバイルプッシュ通知を使用した CIBA におけるユーザー認証の仕組みをステップごとに説明します。
* [前提条件](#prerequisites)
* [ステップ 1: クライアントアプリケーションが CIBA リクエストを開始する](#step-1%3A-client-application-initiates-a-ciba-request)
* [ステップ 2: Auth0 テナントが CIBA リクエストの受領を確認する](#step-2%3A-auth0-tenant-acknowledges-the-ciba-request)
* [ステップ 3: クライアントアプリケーションがレスポンスをポーリングする](#step-3%3A-client-application-polls-for-a-response)
* [ステップ 4: モバイルアプリケーションがプッシュ通知を受信する](#step-4%3A-mobile-application-receives-the-push-notification)
* [ステップ 5: モバイルアプリケーションが同意の詳細を取得する](#step-5%3A-mobile-application-retrieves-the-consent-details)
* [ステップ 6: モバイルアプリケーションが同意の詳細をユーザーに表示する](#step-6%3A-mobile-application-presents-the-consent-details-to-the-user)
* [ステップ 7: モバイルアプリケーションがユーザーの応答を Auth0 に返送する](#step-7%3A-mobile-application-sends-the-user-response-back-to-auth0)
* [ステップ 8: フローの完了後に Auth0 がユーザーの応答を受信する](#step-8%3A-auth0-receives-user-response-after-the-flow-completes)
* [ステップ 9: Auth0 がクライアントアプリケーションにアクセストークンを返す](#step-9%3A-auth0-returns-access-token-to-client-application)
以下の各セクションでは、モバイルプッシュ通知を使用した CIBA におけるユーザー認証の仕組みをステップごとに説明します。
* [前提条件](#prerequisites)
* [ステップ 1: クライアントアプリケーションが CIBA リクエストを開始する](#step-1%3A-client-application-initiates-a-ciba-request)
* [ステップ 2: Auth0 テナントが CIBA リクエストの受領を確認する](#step-2%3A-auth0-tenant-acknowledges-the-ciba-request)
* [ステップ 3: クライアントアプリケーションがレスポンスをポーリングする](#step-3%3A-client-application-polls-for-a-response)
* [ステップ 4: モバイルアプリケーションがプッシュ通知を受信する](#step-4%3A-mobile-application-receives-the-push-notification)
* [ステップ 5: モバイルアプリケーションが同意の詳細を取得する](#step-5%3A-mobile-application-retrieves-the-consent-details)
* [ステップ 6: モバイルアプリケーションが同意の詳細をユーザーに表示する](#step-6%3A-mobile-application-presents-the-consent-details-to-the-user)
* [ステップ 7: モバイルアプリケーションがユーザーの応答を Auth0 に返送する](#step-7%3A-mobile-application-sends-the-user-response-back-to-auth0)
* [ステップ 8: フローの完了後に Auth0 がユーザーの応答を受信する](#step-8%3A-auth0-receives-user-response-after-the-flow-completes)
* [ステップ 9: Auth0 がクライアントアプリケーションにアクセストークンを返す](#step-9%3A-auth0-returns-access-token-to-client-application)
## 前提条件
Auth0 を使用して CIBA のプッシュリクエストを開始するには、次の設定が必要です。
* テナントとアプリケーションで、[クライアント主導のバックチャネル認証を設定](/docs/ja-jp/get-started/applications/configure-client-initiated-backchannel-authentication)していること。これには、[モバイル向けプッシュ通知](/docs/ja-jp/get-started/applications/configure-client-initiated-backchannel-authentication/#configure-mobile-push-notifications)の設定も含まれます。
* `requested_expiry` パラメーターを、秒単位で 300 以下の値に設定すること。詳しくは、[通知チャネルを設定](/docs/ja-jp/get-started/applications/configure-client-initiated-backchannel-authentication#configure-notification-channel)をご覧ください。
## ステップ 1: クライアントアプリケーションが CIBA リクエスト を開始する
CIBA リクエスト を開始する対象の認可を行うユーザーを特定し、そのユーザー ID を取得するには、[User Search APIs](/docs/ja-jp/manage-users/user-search) を使用します。
認可を行うユーザーのユーザー ID を取得したら、Authentication API または [SDK](/docs/ja-jp/libraries) を使用して、`/bc-authorize` endpoint に CIBA リクエスト を送信します。
```bash lines theme={null}
curl --location 'https://{YOUR_DOMAIN}.auth0.com/bc-authorize' \
--header 'Content-Type: application/x-www-form-urlencoded' \
--data-urlencode 'client_id={YOUR_CLIENT_ID}' \
--data-urlencode 'client_secret={YOUR_CLIENT_SECRET}' \
--data-urlencode 'login_hint={ "format": "iss_sub", "iss": "https://{YOUR_DOMAIN}.auth0.com/", "sub": "{USER_ID}" }' \
--data-urlencode 'scope={SCOPES}' \
--data-urlencode 'binding_message={BINDING_MESSAGE}'
```
```csharp lines theme={null}
var response = await authenticationApiClient.ClientInitiatedBackchannelAuthorization(
new ClientInitiatedBackchannelAuthorizationRequest()
{
ClientId = "{YOUR_CLIENT_ID}",
Scope = "openid",
ClientSecret = "{YOUR_CLIENT_SECRET}",
BindingMessage = "{BINDING_MESSAGE}",
LoginHint = new LoginHint()
{
Format = "iss_sub",
Issuer = "https://{YOUR_DOMAIN}.auth0.com/",
Subject = "{USER_ID}"
}
}
);
```
```go lines theme={null}
resp, err := authAPI.CIBA.Initiate(context.Background(), ciba.Request{
ClientID: mgmtClientID,
ClientSecret: mgmtClientSecret,
Scope: "openid",
LoginHint: map[string]string{
"format": "iss_sub",
"iss": "https://{YOUR_DOMAIN}.auth0.com/",
"sub": "{USER_ID}",
},
BindingMessage: "{BINDING_MESSAGE}",
})
```
```java lines theme={null}
//AuthClient インスタンスを作成
AuthAPI auth = AuthAPI.newBuilder(domain, clientId, clientSecret).build();
//認可
Map loginHint = new HashMap<>();
loginHint.put("format", "iss_sub");
loginHint.put("iss", "https://{YOUR_DOMAIN}.auth0.com/");
loginHint.put("sub", "{USER_ID}");
Request request = auth.authorizeBackChannel("openid", "{BINDING_MESSAGE}", loginHint);
BackChannelAuthorizeResponse resp = request.execute().getBody();
```
| パラメーター | 説明 |
| ------------------ | ---------------------------------------------------------------------------------------------------------------------------------------------------------------------------------------------------------------------------------------------------------------------------------------------------------------------------------------------------------------------------------------------------------------------------------------------------------- |
| `tenant` | テナント名です。カスタムドメインを指定することもできます。`iss_sub` 形式を使用する場合、テナント名は `iss` クレーム内で渡されます。 |
| `client_id` | クライアントアプリケーションの識別子です。 |
| `client_secret` | CIBA でのユーザー認証に使用するクライアント認証方式です。Client Secret、Private Key JWT、mTLS Authentication などがあります。Private Key JWT または mTLS を使用する場合は、client secret を含める必要はありません。 |
| `scope` | `openid` を含める必要があります。
必要に応じて、リフレッシュトークンを要求するために `offline_access` を含めることもできます。ただし、CIBAフローでトランザクションを 1 回だけ認可する場合、リフレッシュトークンは不要であり、このコンテキストでは意味を持ちません。 |
| `user_id` | `login_hint` 構造内で渡される、認可を行うユーザーのユーザー ID です。`iss_sub` 形式を使用する場合、ユーザー ID は `sub` クレーム内で渡されます。
ユーザー ID の形式は、外部プロバイダーによって異なる場合があります。 |
| `requested_expiry` | CIBA セッションの最大有効時間 (秒単位) です。CIBAフローの requested expiry は 1~259200 秒 (72 時間) の範囲で、デフォルトは 300 秒です。CIBAフローにカスタムの有効期限を設定するには、`requested_expiry` パラメーターを含めてください。
`requested_expiry` パラメーターは、CIBA が使用する通知チャネルの判断にも使われます。- `requested_expiry` を 300 秒以下に設定すると、有効になっている場合は、CIBA はモバイルプッシュ通知チャネルを使用します。テナントに MFA が設定されていない場合、CIBA リクエストは失敗します。
- `requested_expiry` を 301~259200 秒 (72 時間) に設定すると、有効になっている場合は、CIBA はメール通知チャネルを使用します。
|
| `binding_message` | 認証デバイスと利用デバイスの間で CIBAフローを関連付けるために使用される、人が読めるメッセージです。binding message は必須で、64 文字以内である必要があります。使用できるのは英数字と `+-_.,:#` のみです。 |
ユーザーごとのレート制限があり、認可を行うユーザーには 1 分あたり 5 件を超えるリクエストは送信されません。
## ステップ 2: Auth0 テナントが CIBA リクエストを受け付ける
Auth0 テナントが `POST` リクエストを正常に受信すると、そのリクエストを参照する `auth-req-id` を含むレスポンスが返されます:
```json lines theme={null}
{
"auth_req_id": "eyJh...",
"expires_in": 300,
"interval": 5
}
```
`auth_req_id` の値は、CIBAフローの完了をポーリングして確認するために、`/token` エンドポイントに渡されます。
## ステップ 3: クライアントアプリケーションがレスポンスをポーリングする
Authentication API または [SDK](/docs/ja-jp/libraries) を使用して、`urn:openid:params:grant-type:ciba` グラントタイプと `/bc-authorize` エンドポイントから受け取った `auth_req_id` を指定し、`/token` エンドポイントを呼び出します。
```bash lines theme={null}
curl --location 'https://$tenant.auth0.com/oauth/token' \
--header 'Content-Type: application/x-www-form-urlencoded' \
--data-urlencode 'client_id=' \
--data-urlencode 'client_secret=' \
--data-urlencode 'auth_req_id=' \
--data-urlencode 'grant_type=urn:openid:params:grant-type:ciba'
```
```csharp lines theme={null}
var token = await authenticationApiClient.GetTokenAsync(
new ClientInitiatedBackchannelAuthorizationTokenRequest()
{
AuthRequestId = response.AuthRequestId,
ClientId = "",
ClientSecret = ""
}
);
```
```go lines theme={null}
token, err := authAPI.OAuth.LoginWithGrant(context.Background(),
"urn:openid:params:grant-type:ciba",
url.Values{
"auth_req_id": []string{resp.AuthReqID},
"client_id": []string{clientID},
"client_secret": []string{clientSecret},
},
oauth.IDTokenValidationOptions{})
```
```java lines theme={null}
Request tokenRequest = auth.getBackChannelLoginStatus(authReqId, "grant-type");
BackChannelTokenResponse tokenResponse = tokenRequest.execute().getBody();
```
認可を行うユーザーがトランザクションを承認するまで、次のレスポンスが返されます。
```json lines theme={null}
{
"error": "authorization_pending",
"error_description": "エンドユーザーの認証が保留中です"
}
```
ポーリングの待機間隔は約5秒です。これより頻繁にポーリングすると、次の応答が返されます。説明はバックオフ間隔に応じて異なります。
```json lines theme={null}
{
"error": "slow_down",
"error_description": "You are polling faster than allowed. Try again in 10 seconds."
"interval": 10
}
```
このエラーを解消するには、次の間隔 (秒) が経過してから `/token` エンドポイントをポーリングしてください。
## ステップ 4: モバイルアプリケーションがプッシュ通知を受信する
Auth0 は、Auth0 Guardian アプリまたは [Auth0 Guardian SDK](/docs/ja-jp/secure/multi-factor-authentication/auth0-guardian) を統合したカスタムアプリを通じて、ユーザーが登録したモバイルアプリまたはデバイスにプッシュ通知を送信します。
カスタムアプリを使用している場合、[Auth0 Guardian SDK](/docs/ja-jp/secure/multi-factor-authentication/auth0-guardian) には、プッシュ通知で受信したデータを解析し、すぐに使える `Notification` インスタンスを返すメソッドが用意されています。`Notification` インスタンスにはトランザクションのリンク ID (`txlinkid`) が含まれており、モバイルアプリケーションはこれを使って Auth0 から同意の詳細を取得します。
以下のコードサンプルは、Guardian SDK を使用した iOS と Android のモバイル向けプッシュ通知実装例です。
```swift lines theme={null}
//UNUserNotificationCenterDelegate を実装
func userNotificationCenter(_ center: UNUserNotificationCenter, willPresent notification: UNNotification, withCompletionHandler completionHandler: (UNNotificationPresentationOptions) -> Void) {
let userInfo = notification.request.content.userInfo
if let notification = Guardian.notification(from: userInfo) {
// この関数を実装してプロンプトを表示し、ユーザーの同意または拒否を処理します。
handleGuardianNotification(notification: notification)
}
}
```
```kotlin lines theme={null}
// FCM リスナーで RemoteMessage を受信
@Override
public void onMessageReceived(RemoteMessage message) {
Notification notification = Guardian.parseNotification(message.getData());
if (notification != null) {
// Guardian 通知を受信したので処理します
handleGuardianNotification(notification);
return;
}
/* 使用している可能性がある他のプッシュ通知を処理します ... */
}
```
## ステップ 5: モバイルアプリケーションが同意の詳細を取得する
Auth0 Guardianアプリ、または Auth0 Guardian SDK と統合されたカスタムアプリケーションは、Auth0 Consent API から同意の詳細、つまり `binding_message` の内容を取得します。
カスタムアプリケーションを使用している場合、次のコードサンプルは、Auth0 Consent API からデータを取得する iOS および Android の実装例です。
```swift lines theme={null}
let device: AuthenticationDevice = // 初回の Guardian SDK 登録時に取得し、ローカルに保存したオブジェクト
if let consentId = notification.transactionLinkingId {
Guardian
.consent(forDomain: {yourTenantDomain}, device: device)
.fetch(consentId: consentId, notificationToken: notification.transactionToken)
.start{result in
switch result {
case .success(let payload):
// ユーザーに同意の詳細を表示する
case .failure(let cause):
// 問題が発生した
}
}
}
```
```kotlin lines theme={null}
Enrollment enrollment = // 初回の Guardian SDK 登録時に取得し、ローカルに保存したオブジェクト
if (notification.getTransactionLinkingId() != null) {
guardian
.fetchConsent(notification, enrollment)
.start(new Callback {
@Override
void onSuccess(RichConsent consentDetails) {
// ユーザーに同意の詳細を表示する
}
@Override
void onFailure(Throwable exception) {
// 問題が発生した
}
});
}
```
## ステップ 6: モバイルアプリケーションがユーザーに同意の詳細を表示する
Auth0 Consent API は、`binding_message`、`scope`、`audience` を含む同意の詳細を、Auth0 Guardian アプリまたは Auth0 Guardian SDK を統合したカスタムアプリに返します。モバイルアプリケーションに返されるスコープは、RBAC ポリシーに基づいてフィルタリングされます。詳しくは、[ロールベースのアクセス制御](/docs/ja-jp/manage-users/access-control/rbac) を参照してください。
モバイルアプリケーションは、認証リクエストや同意の詳細をユーザーに表示します。
次のコードサンプルは、Auth0 Consent API からのレスポンス例です。
```json lines theme={null}
{
"id": "cns_abc123",
"requested_details": {
"audience": "https://$tenant.auth0.com/userinfo",
"scope": ["openid"],
"binding_message": "21-49-38"
},
"created_at": 1746693720
"expires_at": 1746693750
}
```
この時点で、ユーザーは認証リクエストを承認することも拒否することもできます。
## ステップ 7: モバイルアプリケーションがユーザーの応答を Auth0 に送信する
Auth0 Guardian アプリまたはカスタムアプリが、ユーザーの応答を Auth0 に送信します。
Auth0 Guardian SDK と連携したカスタムアプリを使用している場合、次のコードサンプルは、ユーザーの応答を処理する iOS および Android の実装例です:
### ユーザーが認証リクエストを承認する
```swift lines theme={null}
Guardian
.authentication(forDomain: "{yourTenantDomain}", device: device)
.allow(notification: notification)
// または reject(notification: notification, withReason: "hacked")
.start { result in
switch result {
case .success:
// 認証リクエストは正常に拒否されました
case .failure(let cause):
// エラーが発生した場合は、cause を確認して原因を特定してください
}
}
```
```kotlin lines theme={null}
guardian
.allow(notification, enrollment)
.execute(); // または start(new Callback<> ...)
```
### ユーザーが認証リクエストを拒否する
```swift lines theme={null}
Guardian
.authentication(forDomain: "{yourTenantDomain}", device: device)
.reject(notification: notification)
// または reject(notification: notification, withReason: "hacked")
.start { result in
switch result {
case .success:
// 認証リクエストの拒否に成功しました
case .failure(let cause):
// 失敗しました。cause を確認して原因を特定してください
}
}
```
```kotlin lines theme={null}
guardian
.reject(notification, enrollment) // または reject(notification, enrollment, reason)
.execute(); // または start(new Callback<> ...)
```
## ステップ 8: フローの完了後、Auth0 がユーザーの応答を受信する
クライアントアプリケーションは、`/token` エンドポイントから応答を受信すると、ポーリングを終了します。CIBAフローでは、認可を行うユーザーからの応答 (承認または拒否) が常に必要であり、既存のグラントは確認されません。
## ステップ 9: Auth0 がクライアントアプリケーションにアクセストークンを返す
ユーザーがプッシュリクエストを拒否した場合、Auth0 は次のようなエラーレスポンスをクライアントアプリケーションに返します。
```json lines theme={null}
{
"error": "access_denied",
"error_description": "エンドユーザーが認証リクエストを拒否したか、有効期限が切れました"
}
```
ユーザーがプッシュリクエストを承認すると、Auth0 は次のような アクセストークン をクライアントアプリケーションに返します。
```json lines theme={null}
{
"access_token": "eyJh...",
"id_token": "eyJh...",
"expires_in": 86400,
"scope": "openid",
"token_type": "Bearer"
}
```
`refresh_token` は、最初の `/bc-authorize` リクエストに `offline_access` スコープが含まれている場合にのみ付与されます。
## 詳細情報
* [クライアント主導のバックチャネル認証フロー](/docs/ja-jp/get-started/authentication-and-authorization-flow/client-initiated-backchannel-authentication-flow)
* [クライアント主導のバックチャネル認証を設定する](/docs/ja-jp/get-started/applications/configure-client-initiated-backchannel-authentication)