> ## Documentation Index
> Fetch the complete documentation index at: https://translations.mintlify.site/llms.txt
> Use this file to discover all available pages before exploring further.
> Device Authorization Flow を使用して、入力が制限されたデバイスから API を呼び出す方法を学びます。
# Device Authorization Flow を使用して API を呼び出す
export const AuthCodeGroup = ({children, dropdown}) => {
const [processedChildren, setProcessedChildren] = useState(children);
useEffect(() => {
let unsubscribe = null;
function init() {
unsubscribe = window.autorun(() => {
const processChildren = node => {
if (typeof node === "string") {
let processedNode = node;
for (const [key, value] of window.rootStore.variableStore.values.entries()) {
const escapedKey = key.replaceAll(/[.*+?^${}()|[\]\\]/g, (String.raw)`\$&`);
processedNode = processedNode.replaceAll(new RegExp(escapedKey, "g"), value);
}
return processedNode;
} else if (Array.isArray(node)) {
return node.map(processChildren);
} else if (node && node.props && node.props.children) {
return {
...node,
props: {
...node.props,
children: processChildren(node.props.children)
}
};
}
return node;
};
setProcessedChildren(processChildren(children));
});
}
if (window.rootStore) {
init();
} else {
window.addEventListener("adu:storeReady", init);
}
return () => {
window.removeEventListener("adu:storeReady", init);
unsubscribe?.();
};
}, [children]);
return {processedChildren};
};
export const AuthCodeBlock = ({filename, icon, language, highlight, children}) => {
const [displayText, setDisplayText] = useState(children);
const [copyText, setCopyText] = useState(children);
const wrapperRef = React.useRef(null);
useEffect(() => {
let unsubscribe = null;
function init() {
if (!window.autorun || !window.rootStore) {
return;
}
unsubscribe = window.autorun(() => {
let processedChildrenForDisplay = children;
let processedChildrenForCopy = children;
for (const [key, value] of window.rootStore.variableStore.values.entries()) {
const escapedKey = key.replaceAll(/[.*+?^${}()|[\]\\]/g, (String.raw)`\$&`);
let displayValue = value;
if (key === "{yourClientSecret}" && value !== "{yourClientSecret}") {
displayValue = value.substring(0, 3) + "*****MASKED*****";
}
processedChildrenForDisplay = processedChildrenForDisplay.replaceAll(new RegExp(escapedKey, "g"), displayValue);
processedChildrenForCopy = processedChildrenForCopy.replaceAll(new RegExp(escapedKey, "g"), value);
}
setDisplayText(processedChildrenForDisplay);
setCopyText(processedChildrenForCopy);
});
}
if (window.rootStore) {
init();
} else {
window.addEventListener("adu:storeReady", init);
}
return () => {
window.removeEventListener("adu:storeReady", init);
unsubscribe?.();
};
}, [children]);
useEffect(() => {
if (!wrapperRef.current) return;
const originalWriteText = navigator.clipboard.writeText.bind(navigator.clipboard);
let isOverriding = false;
const handleClick = e => {
const button = e.target.closest('[data-testid="copy-code-button"]');
if (!button || !wrapperRef.current.contains(button)) return;
isOverriding = true;
navigator.clipboard.writeText = text => {
if (isOverriding) {
isOverriding = false;
navigator.clipboard.writeText = originalWriteText;
return originalWriteText(copyText);
}
return originalWriteText(text);
};
setTimeout(() => {
if (isOverriding) {
isOverriding = false;
navigator.clipboard.writeText = originalWriteText;
}
}, 100);
};
const wrapper = wrapperRef.current;
wrapper.addEventListener('click', handleClick, true);
return () => {
wrapper.removeEventListener('click', handleClick, true);
if (navigator.clipboard.writeText !== originalWriteText) {
navigator.clipboard.writeText = originalWriteText;
}
};
}, [copyText]);
return
{displayText}
;
};
このチュートリアルでは、Device Authorization Flow を使って、入力機能が制限されたデバイスから独自の API を呼び出す方法を学べます。このフローの仕組みや、これを使うべき理由については、[Device Authorization Flow](/docs/ja-jp/get-started/authentication-and-authorization-flow/device-authorization-flow)を参照してください。
Auth0 を使えば、アプリに Device Authorization フロー を簡単に実装できます。
* [Authentication API](https://auth0.com/docs/api/authentication): Auth0 の API を直接呼び出す方法については、このまま読み進めてください。対話形式で試したい場合は、[Device Flow Playground](https://auth0.github.io/device-flow-playground/)を参照してください。
## 前提条件
このチュートリアルを始める前に、以下を確認してください。
* Device Authorization Flow が実装に適していることを確認するため、制限事項 (下記) を確認します。
* [Auth0 にアプリケーションを登録します](/docs/ja-jp/get-started/auth0-overview/create-applications/native-apps)。
* **アプリケーションの種類** として **Native** を選択します。
* 必要に応じて **Allowed Web Origins** を設定します。これは、ローカル開発用に localhost をオリジンとして許可したり、CORS の対象となる特定の TV ソフトウェア (例: HTML5 + JS) に対して許可するオリジンを設定したりする場合に使用できます。ほとんどのアプリケーションでは、この設定は使用しません。
* **OIDC Conformant** トグルが有効になっていることを確認します。この設定は、[Auth0 Dashboard](https://manage.auth0.com/#) の **アプリケーション > アプリケーション > 詳細設定 > OAuth** にあります。
* アプリケーションの **グラントタイプ** に **デバイスコード** が含まれていることを確認します。方法については、[グラントタイプを更新する](/docs/ja-jp/get-started/applications/update-grant-types) を参照してください。
* アプリケーションでリフレッシュトークンを使用できるようにするには、アプリケーションの **グラントタイプ** に **リフレッシュトークン** が含まれていることを確認します。方法については、[グラントタイプを更新する](/docs/ja-jp/get-started/applications/update-grant-types) を参照してください。リフレッシュトークンの詳細については、[リフレッシュトークン](/docs/ja-jp/secure/tokens/refresh-tokens) を参照してください。
* アプリケーション用に少なくとも 1 つの接続を設定し、有効にします: [データベース接続](/docs/ja-jp/get-started/applications/set-up-database-connections), [ソーシャル接続](/docs/ja-jp/authenticate/identity-providers/social-identity-providers)
* [Auth0 に API を登録します](/docs/ja-jp/get-started/architecture-scenarios/mobile-api/part-2#create-the-api)
* API が以前のトークンの有効期限が切れたときに新しいトークンを取得できるよう、API でリフレッシュトークンを受け取れるようにするには、**オフラインアクセスの許可** を有効にします。リフレッシュトークンの詳細については、[リフレッシュトークン](/docs/ja-jp/secure/tokens/refresh-tokens) を参照してください。
* ランダムに生成されるユーザーコードの文字セット、形式、長さを定義するため、[デバイスのユーザーコード設定を構成します](/docs/ja-jp/get-started/tenant-settings/configure-device-user-code-settings)。
## 手順
1. [デバイスコードをリクエストする](#request-device-code) (Device Flow): ユーザーがデバイスを認可するために使用するデバイスコードをリクエストします。
2. [デバイスのアクティベーションをリクエストする](#request-device-activation) (Device Flow): ユーザーに、ノートパソコンまたはスマートフォンを使ってデバイスを認可してもらいます。
3. [トークンをリクエストする](#request-tokens) (Device Flow): トークンをリクエストするため、トークンエンドポイントをポーリングします。
4. [ユーザーがデバイスを認可する](#authorize-user) (Browser Flow): ユーザーがデバイスを認可し、デバイスがトークンを受け取れるようにします。
5. [トークンを受け取る](#receive-tokens) (Device Flow): ユーザーがデバイスを正常に認可したら、トークンを受け取ります。
6. [API を呼び出す](#call-your-api) (Device Flow): 取得したアクセストークンを使用して API を呼び出します。
7. [トークンを更新する](#refresh-tokens) (Device Flow): 既存のトークンの有効期限が切れたときに新しいトークンをリクエストするため、リフレッシュトークンを使用します。
任意: [サンプルユースケースを確認する](#sample-use-cases)。
任意: [トラブルシューティング](#troubleshoot)。
### デバイスコードをリクエストする
ユーザーがデバイスアプリを起動してデバイスを認可しようとする場合は、デバイスコードを取得する必要があります。ユーザーがブラウザベースのデバイスでセッションを開始すると、このコードはそのセッションに関連付けられます。
デバイスコードを取得するには、アプリから [device code URL](https://auth0.com/docs/api/authentication#get-device-code) にコードをリクエストし、その際に Client ID を含める必要があります。
#### デバイスコードURL への POST の例
```bash cURL theme={null}
curl --request POST \
--url 'https://{yourDomain}/oauth/device/code' \
--header 'content-type: application/x-www-form-urlencoded' \
--data 'client_id={yourClientId}' \
--data 'scope={scope}' \
--data 'audience={audience}'
```
```csharp C# theme={null}
var client = new RestClient("https://{yourDomain}/oauth/device/code");
var request = new RestRequest(Method.POST);
request.AddHeader("content-type", "application/x-www-form-urlencoded");
request.AddParameter("application/x-www-form-urlencoded", "client_id={yourClientId}&scope=%7Bscope%7D&audience=%7Baudience%7D", ParameterType.RequestBody);
IRestResponse response = client.Execute(request);
```
```go Go theme={null}
package main
import (
"fmt"
"strings"
"net/http"
"io/ioutil"
)
func main() {
url := "https://{yourDomain}/oauth/device/code"
payload := strings.NewReader("client_id={yourClientId}&scope=%7Bscope%7D&audience=%7Baudience%7D")
req, _ := http.NewRequest("POST", url, payload)
req.Header.Add("content-type", "application/x-www-form-urlencoded")
res, _ := http.DefaultClient.Do(req)
defer res.Body.Close()
body, _ := ioutil.ReadAll(res.Body)
fmt.Println(res)
fmt.Println(string(body))
}
```
```java Java theme={null}
HttpResponse response = Unirest.post("https://{yourDomain}/oauth/device/code")
.header("content-type", "application/x-www-form-urlencoded")
.body("client_id={yourClientId}&scope=%7Bscope%7D&audience=%7Baudience%7D")
.asString();
```
```javascript Node.JS theme={null}
var axios = require("axios").default;
var options = {
method: 'POST',
url: 'https://{yourDomain}/oauth/device/code',
headers: {'content-type': 'application/x-www-form-urlencoded'},
data: {client_id: '{yourClientId}', scope: '{scope}', audience: '{audience}'}
};
axios.request(options).then(function (response) {
console.log(response.data);
}).catch(function (error) {
console.error(error);
});
```
```php PHP theme={null}
$curl = curl_init();
curl_setopt_array($curl, [
CURLOPT_URL => "https://{yourDomain}/oauth/device/code",
CURLOPT_RETURNTRANSFER => true,
CURLOPT_ENCODING => "",
CURLOPT_MAXREDIRS => 10,
CURLOPT_TIMEOUT => 30,
CURLOPT_HTTP_VERSION => CURL_HTTP_VERSION_1_1,
CURLOPT_CUSTOMREQUEST => "POST",
CURLOPT_POSTFIELDS => "client_id={yourClientId}&scope=%7Bscope%7D&audience=%7Baudience%7D",
CURLOPT_HTTPHEADER => [
"content-type: application/x-www-form-urlencoded"
],
]);
$response = curl_exec($curl);
$err = curl_error($curl);
curl_close($curl);
if ($err) {
echo "cURL Error #:" . $err;
} else {
echo $response;
}
```
```python Python theme={null}
import http.client
conn = http.client.HTTPSConnection("")
payload = "client_id={yourClientId}&scope=%7Bscope%7D&audience=%7Baudience%7D"
headers = { 'content-type': "application/x-www-form-urlencoded" }
conn.request("POST", "/{yourDomain}/oauth/device/code", payload, headers)
res = conn.getresponse()
data = res.read()
print(data.decode("utf-8"))
```
```ruby Ruby theme={null}
require 'uri'
require 'net/http'
require 'openssl'
url = URI("https://{yourDomain}/oauth/device/code")
http = Net::HTTP.new(url.host, url.port)
http.use_ssl = true
http.verify_mode = OpenSSL::SSL::VERIFY_PEER
request = Net::HTTP::Post.new(url)
request["content-type"] = 'application/x-www-form-urlencoded'
request.body = "client_id={yourClientId}&scope=%7Bscope%7D&audience=%7Baudience%7D"
response = http.request(request)
puts response.read_body
```
##### デバイスコードのパラメーター
カスタム API を呼び出すためのデバイスコードをリクエストする場合は、次の点に注意してください。
* audience パラメーターを含める必要があります
* 対象の API でサポートされている追加のスコープを含めることもできます
アプリが認証済みユーザーの情報を取得するためだけにアクセストークンを必要とする場合は、audience パラメーターは不要です。
| パラメーター名 | 説明 |
| ----------- | ----------------------------------------------------------------------------------------------------------------------------------------------------------------------------------------------------------------------------------------------------------------------------------------------------------------------------------------------------------------------------------------------------------------------------------------------------------------------------------------------------------------------------------------------------------------------------------------------------------------------------------------------------------------------------------------------------------------------------------------------------------------------------------------------------------------- |
| `client_id` | アプリケーションの Client ID です。この値は [アプリケーション設定](https://manage.auth0.com/#/Applications/\{yourClientId}/settings) で確認できます。 |
| `scope` | 認可をリクエストする [スコープ](/docs/ja-jp/get-started/apis/scopes) です。スペース区切りで指定する必要があります。`profile` や `email` などのユーザーに関する [標準 OIDC スコープ](https://openid.net/specs/openid-connect-core-1_0.html#StandardClaims)、[名前空間形式](/docs/ja-jp/secure/tokens/json-web-tokens/create-custom-claims) に準拠した [カスタムクレーム](/docs/ja-jp/secure/tokens/json-web-tokens/json-web-token-claims#custom-claims)、または [対象 API でサポートされている任意のスコープ](/docs/ja-jp/get-started/apis/scopes/api-scopes) (例: `read:contacts`) をリクエストできます。ID トークンを取得する場合、またはユーザーのプロファイル情報を取得するために [/userinfo endpoint](https://auth0.com/docs/api/authentication#user-profile) を使用できるようにする場合は、`openid` を含めてください。リフレッシュトークンを取得するには、`offline_access` を含めてください ([API 設定](https://manage.auth0.com/#/apis) で **オフラインアクセスの許可** フィールドが有効になっていることを確認してください) 。なお、これは URL エンコードする必要があります。 |
| `audience` | アプリがアクセスする API の一意の識別子です。このチュートリアルの前提条件として作成した API の [設定](https://manage.auth0.com/#/apis) タブにある **Identifier** の値を使用してください。なお、これは URL エンコードする必要があります。 |
#### デバイスコードのレスポンス
正常に処理されると、`device_code`、`user_code`、`verification_uri`、`expires_in`、`interval`、`verification_uri_complete` の各値を含むペイロードを含む `HTTP 200` レスポンスが返されます:
```json lines theme={null}
{
"device_code": "Ag_EE...ko1p",
"user_code": "QTZL-MCBW",
"verification_uri": "https://accounts.acmetest.org/activate",
"verification_uri_complete": "https://accounts.acmetest.org/activate?user_code=QTZL-MCBW",
"expires_in": 900,
"interval": 5
}
```
* `device_code` はデバイスを一意に識別するコードです。ユーザーがブラウザベースのデバイスで `verification_uri` にアクセスすると、このコードがそのセッションに紐付けられます。
* `user_code` には、デバイスを認可するために `verification_uri` で入力するコードが含まれます。
* `verification_uri` には、デバイスを認可するためにユーザーがアクセスするURLが含まれます。
* `verification_uri_complete` には、デバイスを認可するためにユーザーがアクセスする完全なURLが含まれます。これにより、必要に応じてアプリで `user_code` をURLに埋め込めます。
* `expires_in` は、`device_code` と `user_code` の有効期間 (秒) を示します。
* `interval` は、token URL に対して token をリクエストするためにアプリがポーリングを行う間隔 (秒) を示します。
[ランダムに生成される user code の文字セット、形式、長さ](/docs/ja-jp/get-started/tenant-settings/configure-device-user-code-settings)は、テナント設定で構成できます。
ブルートフォース攻撃を防ぐため、`user_code` には次の制限を設けています。
**最小長**:
* BASE20 Letters: 8文字
* Numbers: 9文字
**最大長**:
* 20文字 (読みやすくするための区切りとして追加されるハイフンとスペースを含む)
**有効期限**:
* 15分
### デバイスのアクティベーションをリクエストする
`device_code` と `user_code` を受け取ったら、ユーザーにノートパソコンまたはスマートフォンで `verification_uri` にアクセスし、`user_code` を入力するよう案内する必要があります。
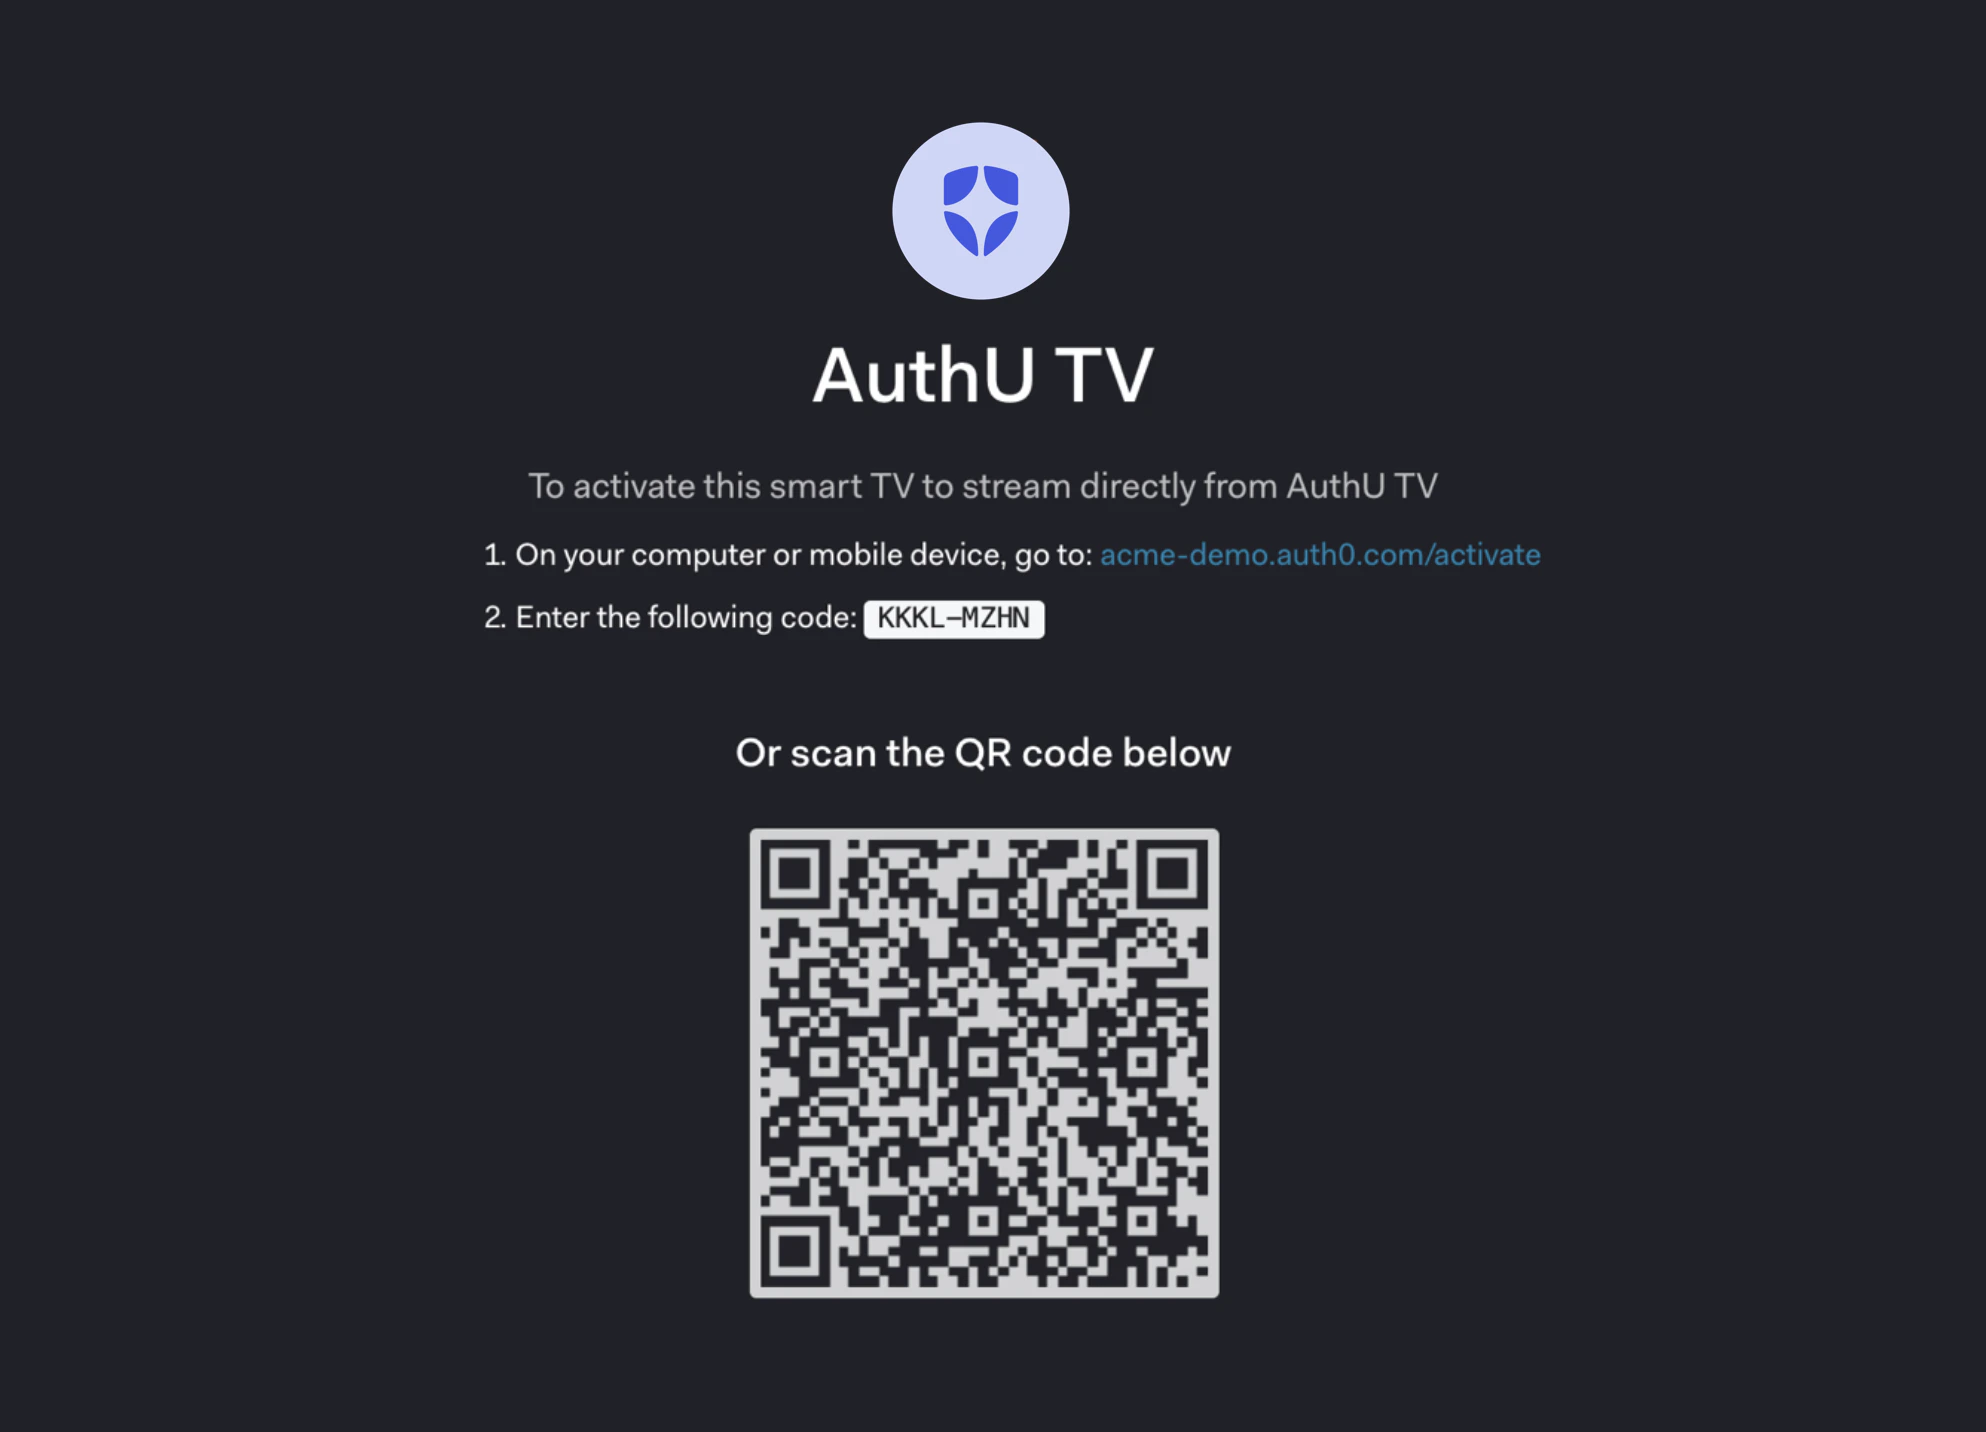 `device_code` はユーザーが直接使用するものではないため、混乱を避けるために、操作中は表示しないでください。
CLI を構築する場合は、この手順を省略して、すぐに `verification_uri_complete` でブラウザーを開くこともできます。
`device_code` はユーザーが直接使用するものではないため、混乱を避けるために、操作中は表示しないでください。
CLI を構築する場合は、この手順を省略して、すぐに `verification_uri_complete` でブラウザーを開くこともできます。
### トークンをリクエストする
ユーザーがデバイスを有効化するのを待つ間に、アクセストークン をリクエストするため、token URL へのポーリングを開始します。前のステップで取得したポーリング間隔 (`interval`) を使って、`device_code` を含めたうえで [token URL](https://auth0.com/docs/api/authentication#device-auth) に `POST` する必要があります。
ネットワーク遅延によるエラーを避けるため、各間隔は、直前のポーリング リクエストへのレスポンスを受信してから数え始めてください。
#### token URL に token をリクエストする POST の例
```bash cURL theme={null}
curl --request POST \
--url 'https://{yourDomain}/oauth/token' \
--header 'content-type: application/x-www-form-urlencoded' \
--data grant_type=urn:ietf:params:oauth:grant-type:device_code \
--data 'device_code={yourDeviceCode}' \
--data 'client_id={yourClientId}'
```
```csharp C# theme={null}
var client = new RestClient("https://{yourDomain}/oauth/token");
var request = new RestRequest(Method.POST);
request.AddHeader("content-type", "application/x-www-form-urlencoded");
request.AddParameter("application/x-www-form-urlencoded", "grant_type=urn%3Aietf%3Aparams%3Aoauth%3Agrant-type%3Adevice_code&device_code=%7ByourDeviceCode%7D&client_id={yourClientId}", ParameterType.RequestBody);
IRestResponse response = client.Execute(request);
```
```go Go theme={null}
package main
import (
"fmt"
"strings"
"net/http"
"io/ioutil"
)
func main() {
url := "https://{yourDomain}/oauth/token"
payload := strings.NewReader("grant_type=urn%3Aietf%3Aparams%3Aoauth%3Agrant-type%3Adevice_code&device_code=%7ByourDeviceCode%7D&client_id={yourClientId}")
req, _ := http.NewRequest("POST", url, payload)
req.Header.Add("content-type", "application/x-www-form-urlencoded")
res, _ := http.DefaultClient.Do(req)
defer res.Body.Close()
body, _ := ioutil.ReadAll(res.Body)
fmt.Println(res)
fmt.Println(string(body))
}
```
```java Java theme={null}
HttpResponse response = Unirest.post("https://{yourDomain}/oauth/token")
.header("content-type", "application/x-www-form-urlencoded")
.body("grant_type=urn%3Aietf%3Aparams%3Aoauth%3Agrant-type%3Adevice_code&device_code=%7ByourDeviceCode%7D&client_id={yourClientId}")
.asString();
```
```javascript Node.JS theme={null}
var axios = require("axios").default;
var options = {
method: 'POST',
url: 'https://{yourDomain}/oauth/token',
headers: {'content-type': 'application/x-www-form-urlencoded'},
data: new URLSearchParams({
grant_type: 'urn:ietf:params:oauth:grant-type:device_code',
device_code: '{yourDeviceCode}',
client_id: '{yourClientId}'
})
};
axios.request(options).then(function (response) {
console.log(response.data);
}).catch(function (error) {
console.error(error);
});
```
```php PHP theme={null}
$curl = curl_init();
curl_setopt_array($curl, [
CURLOPT_URL => "https://{yourDomain}/oauth/token",
CURLOPT_RETURNTRANSFER => true,
CURLOPT_ENCODING => "",
CURLOPT_MAXREDIRS => 10,
CURLOPT_TIMEOUT => 30,
CURLOPT_HTTP_VERSION => CURL_HTTP_VERSION_1_1,
CURLOPT_CUSTOMREQUEST => "POST",
CURLOPT_POSTFIELDS => "grant_type=urn%3Aietf%3Aparams%3Aoauth%3Agrant-type%3Adevice_code&device_code=%7ByourDeviceCode%7D&client_id={yourClientId}",
CURLOPT_HTTPHEADER => [
"content-type: application/x-www-form-urlencoded"
],
]);
$response = curl_exec($curl);
$err = curl_error($curl);
curl_close($curl);
if ($err) {
echo "cURL Error #:" . $err;
} else {
echo $response;
}
```
```python Python theme={null}
import http.client
conn = http.client.HTTPSConnection("")
payload = "grant_type=urn%3Aietf%3Aparams%3Aoauth%3Agrant-type%3Adevice_code&device_code=%7ByourDeviceCode%7D&client_id={yourClientId}"
headers = { 'content-type': "application/x-www-form-urlencoded" }
conn.request("POST", "/{yourDomain}/oauth/token", payload, headers)
res = conn.getresponse()
data = res.read()
print(data.decode("utf-8"))
```
```ruby Ruby theme={null}
require 'uri'
require 'net/http'
require 'openssl'
url = URI("https://{yourDomain}/oauth/token")
http = Net::HTTP.new(url.host, url.port)
http.use_ssl = true
http.verify_mode = OpenSSL::SSL::VERIFY_PEER
request = Net::HTTP::Post.new(url)
request["content-type"] = 'application/x-www-form-urlencoded'
request.body = "grant_type=urn%3Aietf%3Aparams%3Aoauth%3Agrant-type%3Adevice_code&device_code=%7ByourDeviceCode%7D&client_id={yourClientId}"
response = http.request(request)
puts response.read_body
```
##### トークンリクエストのパラメータ
| パラメータ名 | 説明 |
| ------------- | ---------------------------------------------------------------------------------------------------------------------------------------------------------------------------------- |
| `grant_type` | これを "urn:ietf:params:oauth:grant-type:device\_code" に設定します。これは拡張グラントタイプです ([RFC6749](https://tools.ietf.org/html/rfc6749#section-4.5) の第4.5節で定義されています) 。なお、これは URL エンコードする必要があります。 |
| `device_code` | このチュートリアルの前のステップで取得した `device_code` です。 |
| `client_id` | お使いのアプリケーションの Client ID です。この値は [アプリケーション設定](https://manage.auth0.com/#/Applications/\{yourClientId}/settings) で確認できます。 |
#### トークン応答
ユーザーがデバイスを認可するまでの間、`HTTP 4xx` レスポンスがいくつか返されることがあります。
##### 認可保留中
ユーザーが操作を完了するまで、このエラーが表示されます。このチュートリアルの前のStepで取得した推奨間隔で、ポーリングを続けてください。
```json lines theme={null}
HTTP/1.1 403 Forbidden
{
"error": "authorization_pending",
"error_description": "..."
}
```
##### 速度を落とす
ポーリングの間隔が短すぎます。このチュートリアルの前のステップで取得した推奨の間隔を使用してください。ネットワーク遅延によってこのエラーが発生するのを防ぐには、最後のポーリング リクエストへのレスポンスを受信してから、次の間隔の計測を開始してください。
```json lines theme={null}
HTTP/1.1 429 Too Many Requests
{
"error": "slow_down",
"error_description": "..."
}
```
##### 期限切れのトークン
ユーザーによるデバイスの認可が間に合わなかったため、`device_code` は期限切れになっています。アプリケーションは、フローの有効期限が切れたことをユーザーに通知し、フローを再度開始するよう促す必要があります。
`expired_token` エラーが返されるのは1回限りで、その後は `invalid_grant` が返されます。デバイスは**必ず**ポーリングを停止してください。
```json lines theme={null}
HTTP/1.1 403 Bad Request
{
"error": "expired_token",
"error_description": "..."
}
```
##### アクセスが拒否されました
最後に、アクセスが拒否された場合は、以下が表示されます。
```json lines theme={null}
HTTP/1.1 403 Forbidden
{
"error": "access_denied",
"error_description": "..."
}
```
これは、たとえば次のようなさまざまな理由で発生することがあります。
* ユーザーがデバイスの認可を拒否した
* 認可サーバーがトランザクションを拒否した
* 設定されたルールによってアクセスが拒否された (詳しくは、[Auth0 ルール](/docs/ja-jp/customize/rules) を参照してください。)
### ユーザーを認可する
ユーザーは、QRコードをスキャンするか、アクティベーションページを開いてユーザーコードを入力します。
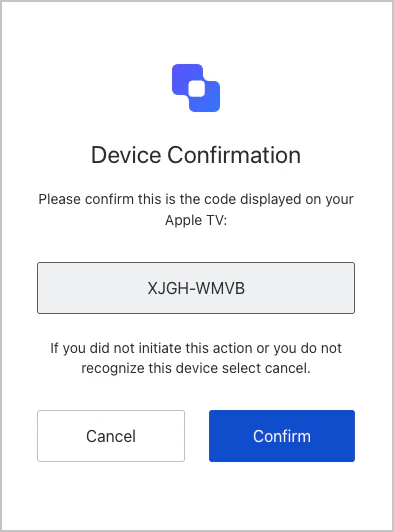
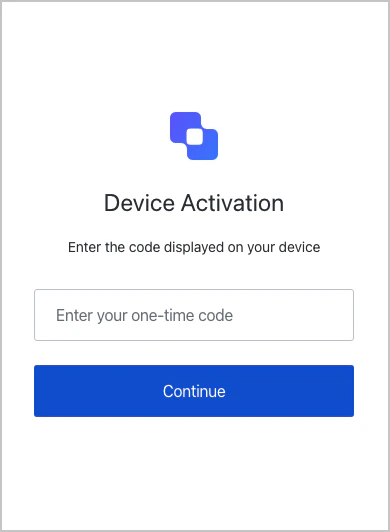 続いて、このデバイスが正しいことをユーザーに確認してもらうための確認ページが表示されます。
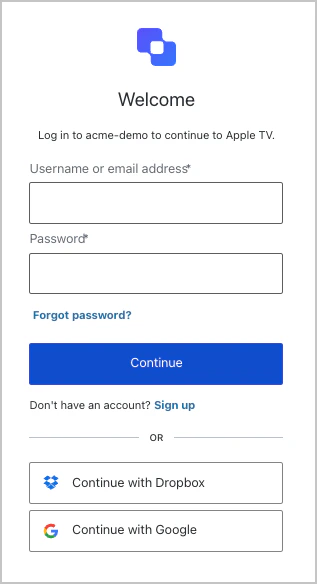
 ユーザーはサインインしてトランザクションを完了します。この手順には、次のプロセスが1つ以上含まれる場合があります。
* ユーザーの認証
* 認証を処理するため、ユーザーをIDプロバイダーにリダイレクトすること
* アクティブなSSOセッションの確認
* 以前に同意が得られていない場合、デバイスに対するユーザーの同意を取得すること
ユーザーはサインインしてトランザクションを完了します。この手順には、次のプロセスが1つ以上含まれる場合があります。
* ユーザーの認証
* 認証を処理するため、ユーザーをIDプロバイダーにリダイレクトすること
* アクティブなSSOセッションの確認
* 以前に同意が得られていない場合、デバイスに対するユーザーの同意を取得すること
 認証と同意が正常に完了すると、確認プロンプトが表示されます。
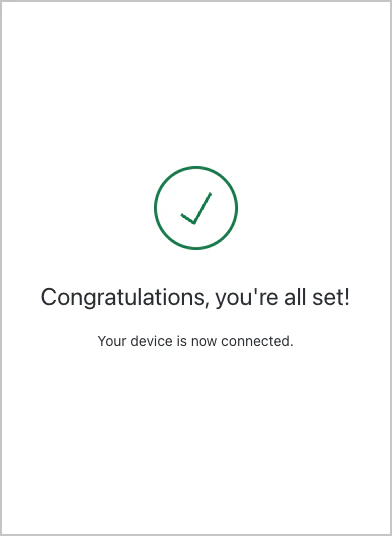 この時点で、ユーザーの認証が完了し、デバイスは認可されています。
### トークンを受け取る
ユーザーがデバイスの認証と認可を行っている間も、デバイスアプリはアクセストークンを要求するために Token URL へのリクエストを継続的にポーリングします。
ユーザーがデバイスを正常に認可すると、`access_token`、`refresh_token` (省略可) 、`id_token` (省略可) 、`token_type`、`expires_in` の各値を含むペイロードを伴う `HTTP 200` レスポンスを受け取ります。
```json lines theme={null}
{
"access_token":"eyJz93a...k4laUWw",
"refresh_token":"GEbRxBN...edjnXbL",
"id_token": "eyJ0XAi...4faeEoQ",
"token_type":"Bearer",
"expires_in":86400
}
```
保存する前にトークンを検証してください。方法については、[ID トークンを検証する](/docs/ja-jp/secure/tokens/id-tokens/validate-id-tokens) と [アクセストークンを検証する](/docs/ja-jp/secure/tokens/access-tokens/validate-access-tokens) を参照してください。
アクセストークンは、Auth0 Authentication API の [`/userinfo` エンドポイント](https://auth0.com/docs/api/authentication#get-user-info) または別の API を呼び出すために使用されます。 (アクセストークンの詳細については、[Access Tokens](/docs/ja-jp/secure/tokens/access-tokens) を参照してください。) アクセストークンで `/userinfo` を呼び出せるのは、`openid` scope を含めた場合のみです。独自の API を呼び出す場合、最初に必要になるのは [アクセストークンを検証する](/docs/ja-jp/secure/tokens/access-tokens/validate-access-tokens) ことです。
ID トークン には、デコードして取り出す必要があるユーザー情報が含まれています。 (ID トークンの詳細については、[ID Tokens](/docs/ja-jp/secure/tokens/id-tokens) を参照してください。) `id_token` がレスポンスに含まれるのは、`openid` scope を含めた場合のみです。
リフレッシュトークン は、以前のアクセストークンまたは ID トークンの有効期限が切れたあとに、新しいアクセストークンまたは ID トークンを取得するために使用されます。 (リフレッシュトークンの詳細については、[Refresh Tokens](/docs/ja-jp/secure/tokens/refresh-tokens) を参照してください。) `refresh_token` がレスポンスに含まれるのは、`offline_access` scope を含め、さらに Auth0 Dashboard でその API に対して **オフラインアクセスの許可** を有効にしている場合のみです。
リフレッシュトークンがあれば、ユーザーの認証状態を実質的に無期限で維持できるため、安全に保管する必要があります。
### API を呼び出す
API を呼び出すには、アプリケーションで取得した アクセストークン を Bearer トークンとして HTTP リクエストの Authorization ヘッダーに含める必要があります。
```bash cURL lines theme={null}
curl --request GET \
--url https://myapi.com/api \
--header 'authorization: Bearer ACCESS_TOKEN' \
--header 'content-type: application/json'
```
```csharp C# lines theme={null}
var client = new RestClient("https://myapi.com/api");
var request = new RestRequest(Method.GET);
request.AddHeader("content-type", "application/json");
request.AddHeader("authorization", "Bearer ACCESS_TOKEN");
IRestResponse response = client.Execute(request);
```
```go Go lines expandable theme={null}
package main
import (
"fmt"
"net/http"
"io/ioutil"
)
func main() {
url := "https://myapi.com/api"
req, _ := http.NewRequest("GET", url, nil)
req.Header.Add("content-type", "application/json")
req.Header.Add("authorization", "Bearer ACCESS_TOKEN")
res, _ := http.DefaultClient.Do(req)
defer res.Body.Close()
body, _ := ioutil.ReadAll(res.Body)
fmt.Println(res)
fmt.Println(string(body))
}
```
```java Java lines theme={null}
HttpResponse response = Unirest.get("https://myapi.com/api")
.header("content-type", "application/json")
.header("authorization", "Bearer ACCESS_TOKEN")
.asString();
```
```javascript Node.JS lines theme={null}
var axios = require("axios").default;
var options = {
method: 'GET',
url: 'https://myapi.com/api',
headers: {'content-type': 'application/json', authorization: 'Bearer ACCESS_TOKEN'}
};
axios.request(options).then(function (response) {
console.log(response.data);
}).catch(function (error) {
console.error(error);
});
```
```php PHP lines expandable theme={null}
$curl = curl_init();
curl_setopt_array($curl, [
CURLOPT_URL => "https://myapi.com/api",
CURLOPT_RETURNTRANSFER => true,
CURLOPT_ENCODING => "",
CURLOPT_MAXREDIRS => 10,
CURLOPT_TIMEOUT => 30,
CURLOPT_HTTP_VERSION => CURL_HTTP_VERSION_1_1,
CURLOPT_CUSTOMREQUEST => "GET",
CURLOPT_HTTPHEADER => [
"authorization: Bearer ACCESS_TOKEN",
"content-type: application/json"
],
]);
$response = curl_exec($curl);
$err = curl_error($curl);
curl_close($curl);
if ($err) {
echo "cURL Error #:" . $err;
} else {
echo $response;
}
```
```python Python lines theme={null}
import http.client
conn = http.client.HTTPSConnection("myapi.com")
headers = {
'content-type': "application/json",
'authorization': "Bearer ACCESS_TOKEN"
}
conn.request("GET", "/api", headers=headers)
res = conn.getresponse()
data = res.read()
print(data.decode("utf-8"))
```
```ruby Ruby lines theme={null}
require 'uri'
require 'net/http'
require 'openssl'
url = URI("https://myapi.com/api")
http = Net::HTTP.new(url.host, url.port)
http.use_ssl = true
http.verify_mode = OpenSSL::SSL::VERIFY_PEER
request = Net::HTTP::Get.new(url)
request["content-type"] = 'application/json'
request["authorization"] = 'Bearer ACCESS_TOKEN'
response = http.request(request)
puts response.read_body
```
### リフレッシュトークン
このチュートリアルに沿ってここまで進め、次の作業を完了していれば、すでにリフレッシュトークンを受け取っています。
* API でオフラインアクセスを許可するよう設定した
* [authorize エンドポイント](https://auth0.com/docs/api/authentication/reference#authorize-application) を通じて認証リクエストを開始する際に、`offline_access` スコープを含めた
リフレッシュトークンを使うと、新しいアクセストークンを取得できます。通常、ユーザーが新しいアクセストークンを必要とするのは、前のトークンの有効期限が切れた後か、新しいリソースへのアクセスを初めて取得するときだけです。API を呼び出すたびに新しいアクセストークンを取得するために毎回このエンドポイントを呼び出すのは、望ましい方法ではありません。また、Auth0 ではレート制限が設けられており、同じ IP から同じトークンを使ってそのエンドポイントに送信できるリクエスト数は制限されます。
トークンを更新するには、`grant_type=refresh_token` を使用して、Authentication API の `/oauth/token` エンドポイントに `POST` リクエストを送信します。
#### Token URL へのリフレッシュトークンの POST の例
```bash cURL theme={null}
curl --request POST \
--url 'https://{yourDomain}/oauth/token' \
--header 'content-type: application/x-www-form-urlencoded' \
--data grant_type=refresh_token \
--data 'client_id={yourClientId}' \
--data 'client_secret={yourClientSecret}' \
--data 'refresh_token={yourRefreshToken}'
```
```csharp C# theme={null}
var client = new RestClient("https://{yourDomain}/oauth/token");
var request = new RestRequest(Method.POST);
request.AddHeader("content-type", "application/x-www-form-urlencoded");
request.AddParameter("application/x-www-form-urlencoded", "grant_type=refresh_token&client_id={yourClientId}&client_secret={yourClientSecret}&refresh_token=%7ByourRefreshToken%7D", ParameterType.RequestBody);
IRestResponse response = client.Execute(request);
```
```go Go theme={null}
package main
import (
"fmt"
"strings"
"net/http"
"io/ioutil"
)
func main() {
url := "https://{yourDomain}/oauth/token"
payload := strings.NewReader("grant_type=refresh_token&client_id={yourClientId}&client_secret={yourClientSecret}&refresh_token=%7ByourRefreshToken%7D")
req, _ := http.NewRequest("POST", url, payload)
req.Header.Add("content-type", "application/x-www-form-urlencoded")
res, _ := http.DefaultClient.Do(req)
defer res.Body.Close()
body, _ := ioutil.ReadAll(res.Body)
fmt.Println(res)
fmt.Println(string(body))
}
```
```java Java theme={null}
HttpResponse response = Unirest.post("https://{yourDomain}/oauth/token")
.header("content-type", "application/x-www-form-urlencoded")
.body("grant_type=refresh_token&client_id={yourClientId}&client_secret={yourClientSecret}&refresh_token=%7ByourRefreshToken%7D")
.asString();
```
```javascript Node.JS theme={null}
var axios = require("axios").default;
var options = {
method: 'POST',
url: 'https://{yourDomain}/oauth/token',
headers: {'content-type': 'application/x-www-form-urlencoded'},
data: new URLSearchParams({
grant_type: 'refresh_token',
client_id: '{yourClientId}',
client_secret: '{yourClientSecret}',
refresh_token: '{yourRefreshToken}'
})
};
axios.request(options).then(function (response) {
console.log(response.data);
}).catch(function (error) {
console.error(error);
});
```
```php PHP theme={null}
$curl = curl_init();
curl_setopt_array($curl, [
CURLOPT_URL => "https://{yourDomain}/oauth/token",
CURLOPT_RETURNTRANSFER => true,
CURLOPT_ENCODING => "",
CURLOPT_MAXREDIRS => 10,
CURLOPT_TIMEOUT => 30,
CURLOPT_HTTP_VERSION => CURL_HTTP_VERSION_1_1,
CURLOPT_CUSTOMREQUEST => "POST",
CURLOPT_POSTFIELDS => "grant_type=refresh_token&client_id={yourClientId}&client_secret={yourClientSecret}&refresh_token=%7ByourRefreshToken%7D",
CURLOPT_HTTPHEADER => [
"content-type: application/x-www-form-urlencoded"
],
]);
$response = curl_exec($curl);
$err = curl_error($curl);
curl_close($curl);
if ($err) {
echo "cURL Error #:" . $err;
} else {
echo $response;
}
```
```python Python theme={null}
import http.client
conn = http.client.HTTPSConnection("")
payload = "grant_type=refresh_token&client_id={yourClientId}&client_secret={yourClientSecret}&refresh_token=%7ByourRefreshToken%7D"
headers = { 'content-type': "application/x-www-form-urlencoded" }
conn.request("POST", "/{yourDomain}/oauth/token", payload, headers)
res = conn.getresponse()
data = res.read()
print(data.decode("utf-8"))
```
```ruby Ruby theme={null}
require 'uri'
require 'net/http'
require 'openssl'
url = URI("https://{yourDomain}/oauth/token")
http = Net::HTTP.new(url.host, url.port)
http.use_ssl = true
http.verify_mode = OpenSSL::SSL::VERIFY_PEER
request = Net::HTTP::Post.new(url)
request["content-type"] = 'application/x-www-form-urlencoded'
request.body = "grant_type=refresh_token&client_id={yourClientId}&client_secret={yourClientSecret}&refresh_token=%7ByourRefreshToken%7D"
response = http.request(request)
puts response.read_body
```
##### リフレッシュトークンのリクエストパラメーター
| パラメーター名 | 説明 |
| --------------- | --------------------------------------------------------------------------------------------------------------------------- |
| `grant_type` | これを "refresh\_token" に設定します。 |
| `client_id` | アプリケーションの Client ID です。この値は [アプリケーション設定](https://manage.auth0.com/#/Applications/\{yourClientId}/settings) で確認できます。 |
| `client_secret` | アプリケーションの Client Secret です。この値は [アプリケーション設定](https://manage.auth0.com/#/Applications/\{yourClientSecret}/settings) で確認できます。 |
| `refresh_token` | 使用するリフレッシュトークンです。 |
| `scope` | (任意) 要求するスコープ権限のスペース区切りリストです。送信しない場合は元のスコープが使用され、送信する場合はスコープを絞って要求できます。なお、URL エンコードが必要です。 |
#### リフレッシュトークンのレスポンス
問題がなければ、新しい`access_token`、`id_token` (任意) 、トークンの有効期限 (秒) (`expires_in`) 、付与された`scope`値、`token_type`を含むペイロード付きの`HTTP 200`レスポンスを受け取ります。
```json lines theme={null}
{
"access_token": "eyJ...MoQ",
"expires_in": 86400,
"scope": "openid offline_access",
"id_token": "eyJ...0NE",
"token_type": "Bearer"
}
```
保存する前に、トークンを検証してください。手順については、[ID トークンを検証する](/docs/ja-jp/secure/tokens/id-tokens/validate-id-tokens) と [アクセストークンを検証する](/docs/ja-jp/secure/tokens/access-tokens/validate-access-tokens) をご覧ください。
## 使用例
### Device Authorization Flow の使用を検出する
ルールを使用すると、現在のトランザクションで Device Authorization Flow が使われているかどうかを検出できます。 (ルールの詳細については、[Auth0 ルール](/docs/ja-jp/customize/rules) を参照してください。) その場合は、`context` オブジェクトの `protocol` プロパティを確認します。
```javascript lines theme={null}
function (user, context, callback) {
if (context.protocol === 'oauth2-device-code') {
...
}
callback(null, user, context);
}
```
### サンプル実装
* [Device Authorization Playground](https://auth0.github.io/device-flow-playground/)
* [AppleTV (Swift)](https://github.com/pushpabrol/auth0-device-flow-appletv): AppleTV で Device Authorization Flow を使用して Auth0 を利用する方法を示すシンプルなアプリケーションです。
* [CLI (Node.js)](https://gist.github.com/panva/ebaacfe433a8677bdbf458f6e1132045): 認可コードフローではなく Device Authorization Flow を使用する CLI のサンプル実装です。主な違いは、CLI で Web サーバーを立ち上げてポートを待ち受ける必要がないことです。
## トラブルシューティング
テナントログは、発生したあらゆる操作について作成され、問題の切り分けに利用できます。詳しくは、[ログ](/docs/ja-jp/deploy-monitor/logs)を参照してください。
### エラーコード
| Code | Name | Description |
| ------- | ---------------------- | ------------------- |
| `fdeaz` | デバイス認可リクエストの失敗 | |
| `fdeac` | デバイスのアクティブ化の失敗 | |
| `fdecc` | ユーザーがデバイスの確認をキャンセルしました | |
| `fede` | 交換に失敗 | デバイスコードをアクセストークンに交換 |
| `sede` | 交換に成功 | デバイスコードをアクセストークンに交換 |
### 制限事項
Device Authorization Flow を使用するには、デバイスが次の要件を満たしている必要があります。
* [カスタムドメイン](/docs/ja-jp/customize/custom-domains)を使用する場合は、Server Name Indication (SNI) をサポートしていること
* [Auth0 アプリケーションの種類](/docs/ja-jp/get-started/applications)が **Native** であること
* [Token Endpoint Authentication Method](/docs/ja-jp/get-started/applications/application-settings) が **None** に設定されていること
* [OIDC-conformant](/docs/ja-jp/get-started/applications/application-settings) であること
* [Dynamic Client Registration](/docs/ja-jp/get-started/applications/dynamic-client-registration) によって作成されていないこと
さらに、Device Authorization Flow では次のことはサポートされていません。
* [Universal Login エクスペリエンス](/docs/ja-jp/authenticate/login/auth0-universal-login/universal-login-vs-classic-login/universal-experience)を使用している場合を除き、[Auth0 developer keys](/docs/ja-jp/authenticate/identity-providers/social-identity-providers/devkeys) を使用する [Social Connections](/docs/ja-jp/authenticate/identity-providers/social-identity-providers)
* ホストされたログインページ、ルール、または Actions からクエリ文字列パラメーターにアクセスすること
* [ユーザーアカウントのリンク](/docs/ja-jp/manage-users/user-accounts/user-account-linking)
confidential Clients を除き、Draft 15 全体をサポートしています。詳しくは、[ietf.org の OAuth 2.0 Device Authorization Grant Draft 15](https://tools.ietf.org/html/draft-ietf-oauth-device-flow-15) を参照してください。
## 詳細はこちら
* [OAuth 2.0 認可フレームワーク](/docs/ja-jp/authenticate/protocols/oauth)
* [OpenID Connect プロトコル](/docs/ja-jp/authenticate/protocols/openid-connect-protocol)
* [トークン](/docs/ja-jp/secure/tokens)
* [ログ](/docs/ja-jp/deploy-monitor/logs)