> ## Documentation Index
> Fetch the complete documentation index at: https://translations.mintlify.site/llms.txt
> Use this file to discover all available pages before exploring further.

# ユーザーのパスキー管理

> Auth0 My Account API を使用して、ユーザーが自身の WebAuthn パスキーを登録・取り消しできるカード形式の UI をレンダリングします。

export const ReleaseStageNotice = ({feature, stage, plans, contact, terms}) => {
  const stageTextMap = {
    "beta": "Beta",
    "ea": "早期アクセス"
  };
  const stageText = stageTextMap[stage] || "製品リリース段階";
  const prsLink = "/docs/troubleshoot/product-lifecycle/product-release-stages";
  const linkify = (text, url) => {
    return <a href={url} target="_blank" rel="noreferrer" class="link">{text}</a>;
  };
  const includeDetails = (plans, contact, terms) => {
    const hasDetails = terms || plans || contact;
    if (!hasDetails) return null;
    return <span data-as="p">
            {plans && <>この機能は{linkify(`${plans}プラン`, "https://auth0.com/pricing")}でご利用いただけます。 </>}
            {contact && "参加をご希望の場合は、" + contact + "までお問い合わせください。 "}
            {terms && <>この機能を使用することにより、Oktaの該当する無料トライアル規約および{linkify("Master Subscription Agreement", "https://www.okta.com/legal")}に同意したものとみなされます。</>}
        </span>;
  };
  return <Warning>
            <span data-as="p">
                <strong>{feature}機能は現在、{linkify(stageText, prsLink)}です。</strong>
            </span>

            {includeDetails(plans, contact, terms)}
        </Warning>;
};

<ReleaseStageNotice feature="Auth0 Universal Components" stage="beta" terms="true" contact="Auth0 Support" />

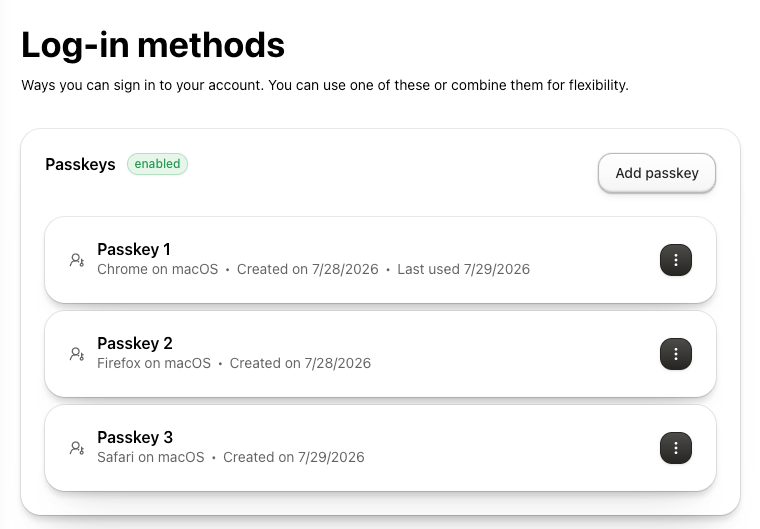
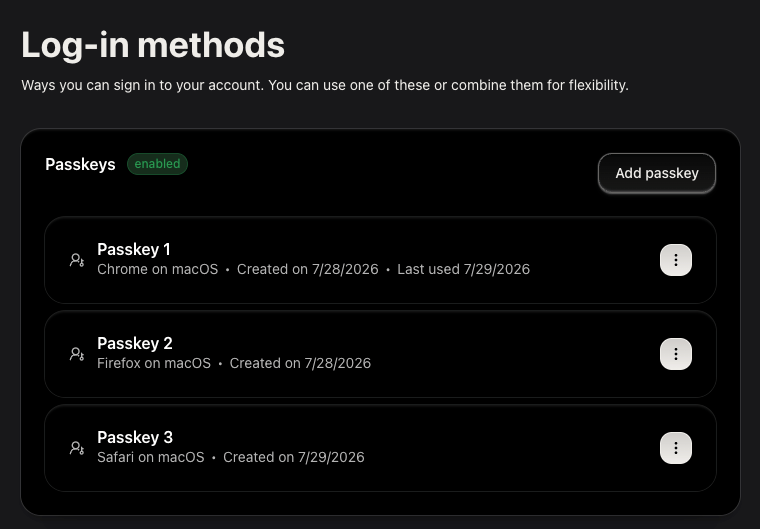
`UserPasskeyManagement` コンポーネントを使用すると、ユーザーは [My Account API](/docs/ja-jp/manage-users/my-account-api) を使用して、カード形式の単一インターフェースで[パスキー](/docs/ja-jp/authenticate/database-connections/passkeys)を登録・取り消しできます。レンダリングにプロップスは必要ありません。
このコンポーネントには、登録済みのパスキーのリスト、新しいパスキーを追加するボタン、取り消しオプションが表示されます。

<Frame>
  <img className="block dark:hidden" src="https://mintcdn.com/translations/-d41Muac7Op9CEDm/docs/images/universal-components/my-account/web/user-passkey-management-light.png?fit=max&auto=format&n=-d41Muac7Op9CEDm&q=85&s=230b945465860d3060808c40646a58e2" alt="登録済みのパスキーを表示するユーザーパスキー管理コンポーネント" width="760" height="529" data-path="docs/images/universal-components/my-account/web/user-passkey-management-light.png" />

  <img className="hidden dark:block" src="https://mintcdn.com/translations/-d41Muac7Op9CEDm/docs/images/universal-components/my-account/web/user-passkey-management-dark.png?fit=max&auto=format&n=-d41Muac7Op9CEDm&q=85&s=51fc61076aa241fc63507ce16fc77afa" alt="登録済みのパスキーを表示するユーザーパスキー管理コンポーネント" width="760" height="529" data-path="docs/images/universal-components/my-account/web/user-passkey-management-dark.png" />
</Frame>

<div id="prerequisites">
  ## 前提条件
</div>

パスキーのサポートを有効にするには、次の要件を満たす必要があります。

* **Auth0 テナントにカスタムドメインを設定する**。パスキーを使用するには、[カスタムドメイン](/docs/ja-jp/customize/custom-domains)が必要です。

* **Auth0 のデータベース接続でパスキーを有効にする**。Auth0 テナントでパスキーを有効にする方法については、[パスキーを設定する](/docs/ja-jp/authenticate/database-connections/passkeys/configure-passkey-policy#configure-passkeys)を参照してください。

* **オリジンを一致させる**。Relying Party ID は、アプリケーションのドメインと同一であるか、その登録可能な親ドメインである必要があります。詳細については、[パスキーの Relying Party ID](/docs/ja-jp/authenticate/database-connections/passkeys#relying-party-id-for-passkeys)を参照してください。

* **アプリケーションで HTTPS を使用していることを確認する**。WebAuthn では、アプリケーションが HTTPS 経由で提供される必要があります。

* **アプリケーションに Universal Components をインストールして設定する**。Universal Components のインストールと設定については、[アカウントセキュリティ UI を構築する](/docs/ja-jp/get-started/universal-components/web/components/my-account-overview#prerequisites)を参照してください。

<div id="configure-your-application">
  ## アプリケーションを設定する
</div>

フレームワークを選択して、環境変数とUniversal Componentsを設定します。

<Tabs>
  <Tab title="React（SPA）">
    ## コンポーネントをインストールする

    <CodeGroup>
      ```bash pnpm wrap lines theme={null}
      pnpm add @auth0/universal-components-react react-hook-form @tanstack/react-query
      ```

      ```bash npm wrap lines theme={null}
      npm install @auth0/universal-components-react react-hook-form @tanstack/react-query
      ```
    </CodeGroup>

    <Callout icon="file-lines" color="#0EA5E9" iconType="regular">
      `react-hook-form` と `@tanstack/react-query` はピア依存関係です。このコマンドにより、共有ユーティリティおよび Auth0 連携に必要な `@auth0/universal-components-core` もインストールされます。
    </Callout>

    ## はじめに

    ```tsx wrap lines theme={null}
    import { UserPasskeyManagement } from "@auth0/universal-components-react";

    export function SecurityPage() {
      return <UserPasskeyManagement />;
    }
    ```

    <Callout icon="file-lines" color="#0EA5E9" iconType="regular">
      * コンポーネントはフレームワークにかかわらず、常にルートエントリ `@auth0/universal-components-react` からインポートします。
      * フレームワーク固有のサブパスを使用するのは `Auth0ComponentProvider` コンポーネントだけです。React アプリケーションには `/spa`、Next.js アプリケーションには `/rwa` を使用します。
    </Callout>

    <Accordion title="連携の完全な例">
      ```tsx wrap lines theme={null}
      import React from "react";
      import { UserPasskeyManagement } from "@auth0/universal-components-react";
      import { Auth0Provider } from "@auth0/auth0-react";
      import { Auth0ComponentProvider } from "@auth0/universal-components-react/spa";
      import { analytics } from "./lib/analytics";

      function SecurityPage() {
        return (
          <div className="max-w-3xl mx-auto p-6">
            <UserPasskeyManagement
              addAction={{
                onAfter: () => {
                  analytics.track("Passkey Enrolled");
                },
              }}
              revokeAction={{
                onBefore: (passkey) =>
                  window.confirm(`Remove passkey "${passkey.name}"?`),
                onAfter: (passkey) => {
                  analytics.track("Passkey Revoked", { passkeyId: passkey.id });
                },
              }}
              customMessages={{
                header: {
                  title: "Passkeys",
                  description: "Sign in faster and more securely without a password.",
                },
              }}
              styling={{
                variables: {
                  light: { "--color-primary": "#4f46e5" },
                  dark: { "--color-primary": "#818cf8" },
                },
              }}
            />
          </div>
        );
      }

      export default function App() {
        const domain = "YOUR_TENANT_DOMAIN.auth0.com";
        const clientId = "YOUR_CLIENT_ID";

        return (
          <Auth0Provider
            domain={domain}
            clientId={clientId}
            authorizationParams={{ redirect_uri: window.location.origin }}
            interactiveErrorHandler="popup"
          >
            <Auth0ComponentProvider domain={domain}>
              <SecurityPage />
            </Auth0ComponentProvider>
          </Auth0Provider>
        );
      }
      ```
    </Accordion>
  </Tab>

  <Tab title="Next.js（RWA）">
    ## コンポーネントをインストールする

    <CodeGroup>
      ```bash pnpm wrap lines theme={null}
      pnpm add @auth0/universal-components-react react-hook-form @tanstack/react-query
      ```

      ```bash npm wrap lines theme={null}
      npm install @auth0/universal-components-react react-hook-form @tanstack/react-query
      ```
    </CodeGroup>

    <Callout icon="file-lines" color="#0EA5E9" iconType="regular">
      `react-hook-form` と `@tanstack/react-query` はピア依存関係です。このコマンドでは、共有ユーティリティと Auth0 連携に必要な `@auth0/universal-components-core` もインストールされます。
    </Callout>

    ## はじめに

    ```tsx app/security/passkeys/page.tsx wrap lines theme={null}
    "use client";

    import { UserPasskeyManagement } from "@auth0/universal-components-react";

    export default function PasskeysPage() {
      return <UserPasskeyManagement />;
    }
    ```

    <Accordion title="連携の完全な例">
      ```tsx app/security/passkeys/page.tsx wrap lines theme={null}
      "use client";

      import { UserPasskeyManagement } from "@auth0/universal-components-react";
      import { analytics } from "@/lib/analytics";

      export default function PasskeysPage() {
        return (
          <div className="max-w-3xl mx-auto p-6">
            <UserPasskeyManagement
              addAction={{
                onAfter: () => {
                  analytics.track("Passkey Enrolled");
                },
              }}
              revokeAction={{
                onAfter: (passkey) => {
                  analytics.track("Passkey Revoked", { passkeyId: passkey.id });
                },
              }}
              customMessages={{
                header: {
                  title: "Passkeys",
                  description: "Sign in faster and more securely without a password.",
                },
              }}
              styling={{
                variables: {
                  light: { "--color-primary": "#4f46e5" },
                  dark: { "--color-primary": "#818cf8" },
                },
              }}
            />
          </div>
        );
      }
      ```
    </Accordion>
  </Tab>

  <Tab title="shadcn">
    ## コンポーネントをインストールする

    ```bash wrap lines theme={null}
    npx shadcn@latest add https://auth0-universal-components.vercel.app/r/my-account/user-passkey-management.json
    ```

    <Callout icon="file-lines" color="#0EA5E9" iconType="regular">
      インストールコマンドを実行すると、コンポーネントのソースがすべての UI 依存関係とともに `src/components/auth0/my-account/` に追加されます。また、共有ユーティリティと Auth0 連携に必要な `@auth0/universal-components-core` 依存関係も追加されます。
    </Callout>

    ## はじめに

    ```tsx wrap lines theme={null}
    import { UserPasskeyManagement } from "@/components/auth0/my-account/user-passkey-management";

    export function SecurityPage() {
      return <UserPasskeyManagement />;
    }
    ```

    <Accordion title="連携の完全な例">
      ```tsx wrap lines theme={null}
      import React from "react";
      import { UserPasskeyManagement } from "@/components/auth0/my-account/user-passkey-management";
      import { Auth0Provider } from "@auth0/auth0-react";
      import { Auth0ComponentProvider } from "@auth0/universal-components-react/spa";
      import { analytics } from "./lib/analytics";

      function SecurityPage() {
        return (
          <div className="max-w-3xl mx-auto p-6">
            <UserPasskeyManagement
              addAction={{
                onAfter: () => {
                  analytics.track("Passkey Enrolled");
                },
              }}
              revokeAction={{
                onBefore: (passkey) =>
                  window.confirm(`Remove passkey "${passkey.name}"?`),
                onAfter: (passkey) => {
                  analytics.track("Passkey Revoked", { passkeyId: passkey.id });
                },
              }}
              customMessages={{
                header: {
                  title: "Passkeys",
                  description: "Sign in faster and more securely without a password.",
                },
              }}
              styling={{
                variables: {
                  light: { "--color-primary": "#4f46e5" },
                  dark: { "--color-primary": "#818cf8" },
                },
              }}
            />
          </div>
        );
      }

      export default function App() {
        const domain = "YOUR_TENANT_DOMAIN.auth0.com";
        const clientId = "YOUR_CLIENT_ID";

        return (
          <Auth0Provider
            domain={domain}
            clientId={clientId}
            authorizationParams={{ redirect_uri: window.location.origin }}
            interactiveErrorHandler="popup"
          >
            <Auth0ComponentProvider domain={domain}>
              <SecurityPage />
            </Auth0ComponentProvider>
          </Auth0Provider>
        );
      }
      ```
    </Accordion>
  </Tab>
</Tabs>

<div id="props">
  ## プロップス
</div>

<div id="display-props">
  ### 表示プロップス
</div>

表示プロップスは、コンポーネントの動作に影響を与えずに表示方法を制御します。

<table class="table">
  <thead>
    <tr>
      <th>プロップス</th>
      <th>型</th>
      <th>デフォルト</th>
      <th>説明</th>
    </tr>
  </thead>

  <tbody>
    <tr>
      <td><code>hideHeader</code></td>
      <td><code>boolean</code></td>
      <td><code>false</code></td>
      <td>ページのヘッダー (タイトルと説明) を非表示にします。パスキー一覧を含むセクションカードは常に表示されます。</td>
    </tr>
  </tbody>
</table>

<div id="action-props">
  ### Action プロップス
</div>

Action プロップスを使用すると、コンポーネントのライフサイクルイベントにフックして、操作をトリガーまたはキャンセルできます。

<table class="table">
  <thead>
    <tr>
      <th>プロップ</th>
      <th>型</th>
      <th>説明</th>
    </tr>
  </thead>

  <tbody>
    <tr>
      <td><code>addAction</code></td>
      <td><code>ComponentAction\<void></code></td>
      <td>パスキー追加フロー用のライフサイクルフックです。追加ボタンを非表示にするには、<code>disabled: true</code>を設定します。</td>
    </tr>

    <tr>
      <td><code>revokeAction</code></td>
      <td><code>ComponentAction\<Passkey></code></td>
      <td>パスキー取り消しフロー用のライフサイクルフックです。取り消しオプションを非表示にするには、<code>disabled: true</code>を設定します。</td>
    </tr>

    <tr>
      <td><code>onFetch</code></td>
      <td><code>() => void</code></td>
      <td>パスキーのリストが正常に読み込まれた後にトリガーされます。</td>
    </tr>
  </tbody>
</table>

**addAction**

パスキー追加フローを制御します。`onBefore`はブラウザーにWebAuthnプロンプトが表示される前にトリガーされます。キャンセルするには`false`を返します (たとえば、パスキー数の上限を設ける場合) 。`onAfter`は新しいパスキーが保存された後にトリガーされます。

* `disabled`は「パスキーを追加」ボタンを非表示にします。
* `onBefore()`はWebAuthn登録セレモニーの前に実行されます。キャンセルするには`false`を返します。
* `onAfter()`はパスキーが正常に登録された後に実行されます。セッションの状態を更新したり、分析データを送信したりする際に使用します。

```tsx wrap lines theme={null}
<UserPasskeyManagement
  addAction={{
    onBefore: () => {
      if (passkeys.length >= 5) {
        toast.error("You can register a maximum of 5 passkeys.");
        return false;
      }
      return true;
    },
    onAfter: () => {
      analytics.track("Passkey Enrolled");
    },
  }}
/>
```

**revokeAction**

パスキーの取り消しフローを制御します。`onBefore` は組み込みの確認モーダルが表示される前に実行されるため、ユーザーにモーダルが表示される前にフローをキャンセルできます。`onAfter` は、パスキーがアカウントから削除された後にトリガーされます。

* `disabled` は、パスキーアクションメニューから取り消しオプションを非表示にします。
* `onBefore(passkey)` は、取り消し API 呼び出しの前に実行されます。`Passkey` オブジェクトを受け取ります。キャンセルするには `false` を返します。
* `onAfter(passkey)` は、パスキーが正常に取り消された後に実行されます。取り消された `Passkey` オブジェクトを受け取ります。

```tsx wrap lines theme={null}
<UserPasskeyManagement
  revokeAction={{
    onAfter: (passkey) => {
      auditLog.record({ action: "passkey_revoked", passkeyId: passkey.id });
    },
  }}
/>
```

**onFetch**

マウント時にパスキーのリストが正常に読み込まれた後にトリガーされます。ユーザーに登録済みのパスキーがあるかどうかに応じて、関連するUIを表示または非表示にするために使用します。

```tsx wrap lines theme={null}
<UserPasskeyManagement
  onFetch={() => {
    setPasskeysLoaded(true);
  }}
/>
```

リストを読み取り専用でレンダリングするには、両方のActionで `disabled: true` を設定します。

```tsx wrap lines theme={null}
<UserPasskeyManagement
  addAction={{ disabled: true }}
  revokeAction={{ disabled: true }}
/>
```

<div id="customize-props">
  ### プロップスをカスタマイズする
</div>

カスタマイズ用プロップスを使用すると、ソースコードを変更せずに文言やスタイリングを調整できます。

<table class="table">
  <thead>
    <tr>
      <th>プロップス</th>
      <th>型</th>
      <th>説明</th>
    </tr>
  </thead>

  <tbody>
    <tr>
      <td><code>customMessages</code></td>
      <td><code>Partial\<UserPasskeyManagementMessages></code></td>
      <td>デフォルトのUIテキストと翻訳を上書きします。</td>
    </tr>

    <tr>
      <td><code>styling</code></td>
      <td><code>ComponentStyling\<UserPasskeyManagementClasses></code></td>
      <td>CSS変数とクラスの上書き。</td>
    </tr>
  </tbody>
</table>

**customMessages**

すべてのテキストと翻訳をカスタマイズできます。すべてのフィールドは任意です。

<Accordion title="利用可能なメッセージ">
  * **header**—`title`、`description` (ページレベルのヘッダー。`hideHeader` が `true` の場合は非表示)
  * **トップレベルのカード**—`section_title`、`enabled` (パスキーが登録されている場合に表示されるバッジ) 、`no_passkeys` (パスキーがない場合に表示するメッセージ) 、`add_passkey` (追加ボタンのラベル)
  * **リスト項目**—`created_at` (プレースホルダーとして `${date}` を使用) 、`last_used` (プレースホルダーとして `${date}` を使用)
  * **Actions**—`actions.revoke` (パスキーごとのアクションメニュー内のラベル)
  * **成功トースト**—`success.add`、`success.revoke`
  * **取り消し確認モーダル**—`modals.revoke.title`、`modals.revoke.consent` (パスキー名を太字にするには `<bold>${name}</bold>` を使用) 、`modals.revoke.cancel`、`modals.revoke.confirm`
</Accordion>

```tsx wrap lines theme={null}
<UserPasskeyManagement
  customMessages={{
    header: {
      title: "Passkeys",
      description: "Sign in faster and more securely without a password.",
    },
    section_title: "Your passkeys",
    no_passkeys: "No passkeys registered yet.",
    add_passkey: "Add a passkey",
    created_at: "Added ${date}",
    last_used: "Last used ${date}",
    success: {
      add: "Passkey registered successfully.",
      revoke: "Passkey removed.",
    },
    modals: {
      revoke: {
        title: "Remove passkey?",
        consent: "This will permanently remove <bold>${name}</bold>.",
        cancel: "Cancel",
        confirm: "Remove",
      },
    },
  }}
/>
```

**スタイルをカスタマイズ**

CSS変数とクラスのオーバーライドを使用して外観をカスタマイズできます。ライト/ダークテーマに対応しています。

<Accordion title="利用可能なスタイリングオプション">
  **変数**—CSSカスタムプロパティ

  * `common` 両方のテーマに適用
  * `light` ライトモードのみ
  * `dark` ダークモードのみ

  **クラスのオーバーライド**

  * `UserPasskeyManagement-root` パスキーリストを囲む外側のカードコンテナ
  * `UserPasskeyManagement-item` 各パスキー行のカード
  * `PasskeyActionModal-modalContent` 取り消し確認モーダルのコンテンツ領域
</Accordion>

```tsx wrap lines theme={null}
<UserPasskeyManagement
  styling={{
    variables: {
      light: { "--color-primary": "#4f46e5" },
      dark: { "--color-primary": "#818cf8" },
    },
    classes: {
      "UserPasskeyManagement-root": "rounded-2xl shadow-md",
      "UserPasskeyManagement-item": "rounded-xl border border-gray-200",
      "PasskeyActionModal-modalContent": "max-w-sm",
    },
  }}
/>
```

<div id="typescript-definitions">
  ## TypeScript 型定義
</div>

```typescript wrap lines theme={null}
interface Passkey {
  id: string;
  name?: string;
  createdAt?: string;
  lastUsedAt?: string;
  deviceInfo?: string;
}

interface UserPasskeyManagementClasses {
  "UserPasskeyManagement-root"?: string;
  "UserPasskeyManagement-item"?: string;
  "PasskeyActionModal-modalContent"?: string;
}

// ComponentActionは、実行前後のフックと無効化フラグを提供します。
// 両方のフックは同じデータ型Tを受け取ります。
interface ComponentAction<Item, Context = void> {
  disabled?: boolean;
  onBefore?: (item: Item, context?: Context) => boolean;
  onAfter?: (item: Item, context?: Context) => void | boolean | Promise<boolean>;
}

interface UserPasskeyManagementProps {
  hideHeader?: boolean;
  customMessages?: Partial<UserPasskeyManagementMessages>;
  styling?: ComponentStyling<UserPasskeyManagementClasses>;
  addAction?: ComponentAction<void>;
  revokeAction?: ComponentAction<Passkey>;
  onFetch?: () => void;
}
```

<div id="advanced-customization">
  ## 高度なカスタマイズ
</div>

上記のコンポーネント設定に加え、パスキー管理用のカスタムインターフェースを構築する必要がある場合は、`useUserPasskey` フックを使用します。

```tsx wrap lines theme={null}
import { useUserPasskey } from "@auth0/universal-components-react";

export function CustomPasskeyManagement() {
  const {
    passkeys,
    isLoading,
    isEnrolling,
    isRevoking,
    disableAdd,
    disableRevoke,
    currentPasskey,
    isRevokeModalOpen,
    setIsRevokeModalOpen,
    handleAddPasskey,
    handleRevokePasskey,
    handleConfirmRevoke,
  } = useUserPasskey({});

  if (isLoading) return <p>Loading passkeys…</p>;

  return (
    <>
      <button disabled={disableAdd || isEnrolling} onClick={handleAddPasskey}>
        Add passkey
      </button>

      <ul>
        {passkeys.map((passkey) => (
          <li key={passkey.id}>
            {passkey.name ?? "Unnamed passkey"}
            <button
              disabled={disableRevoke || isRevoking}
              onClick={() => handleRevokePasskey(passkey)}
            >
              Remove
            </button>
          </li>
        ))}
      </ul>

      {isRevokeModalOpen && currentPasskey && (
        <div role="dialog" aria-modal="true">
          <p>Remove {currentPasskey.name ?? "passkey"}?</p>
          <button disabled={isRevoking} onClick={handleConfirmRevoke}>
            Confirm removal
          </button>
          <button onClick={() => setIsRevokeModalOpen(false)}>Cancel</button>
        </div>
      )}
    </>
  );
}
```

フックは `customMessages`、`addAction`、`revokeAction`、`onFetch` を受け取ります。パスキーデータ、読み込み状態とアクションの状態、現在の取り消し対象、パスキーの登録および取り消し用ハンドラーを返します。

組み込みのインターフェースを使用する場合は、`UserPasskeyManagement` を使用してください。フックを使用する場合は、対応する取り消し確認 UI と、それを閉じる動作を実装してください。

<div id="learn-more">
  ## 詳しく見る
</div>

<CardGroup cols={2}>
  <Card title="ユーザーのMFA管理" icon="shield" href="/docs/ja-jp/get-started/universal-components/web/components/user-mfa-management">
    パスキーと併せて、MFA認証要素 (TOTP、SMS、メールOTP、プッシュ、リカバリーコード) を管理します。
  </Card>

  <Card title="セルフサービスのアカウントセキュリティインターフェースを構築する" icon="key" href="/docs/ja-jp/get-started/universal-components/web/components/my-account-overview">
    すべてのMy Accountコンポーネントの概要、前提条件、フレームワークの設定方法を紹介します。
  </Card>
</CardGroup>