> ## Documentation Index
> Fetch the complete documentation index at: https://translations.mintlify.site/llms.txt
> Use this file to discover all available pages before exploring further.
> Auth0 Dashboard と Management API を使用して、M2M アクセス用にアプリケーションを設定する方法を学びます。
# M2M アクセス用にアプリケーションを設定する
export const AuthCodeBlock = ({filename, icon, language, highlight, children}) => {
const [displayText, setDisplayText] = useState(children);
const [copyText, setCopyText] = useState(children);
const wrapperRef = React.useRef(null);
useEffect(() => {
let unsubscribe = null;
function init() {
if (!window.autorun || !window.rootStore) {
return;
}
unsubscribe = window.autorun(() => {
let processedChildrenForDisplay = children;
let processedChildrenForCopy = children;
for (const [key, value] of window.rootStore.variableStore.values.entries()) {
const escapedKey = key.replaceAll(/[.*+?^${}()|[\]\\]/g, (String.raw)`\$&`);
let displayValue = value;
if (key === "{yourClientSecret}" && value !== "{yourClientSecret}") {
displayValue = value.substring(0, 3) + "*****MASKED*****";
}
processedChildrenForDisplay = processedChildrenForDisplay.replaceAll(new RegExp(escapedKey, "g"), displayValue);
processedChildrenForCopy = processedChildrenForCopy.replaceAll(new RegExp(escapedKey, "g"), value);
}
setDisplayText(processedChildrenForDisplay);
setCopyText(processedChildrenForCopy);
});
}
if (window.rootStore) {
init();
} else {
window.addEventListener("adu:storeReady", init);
}
return () => {
window.removeEventListener("adu:storeReady", init);
unsubscribe?.();
};
}, [children]);
useEffect(() => {
if (!wrapperRef.current) return;
const originalWriteText = navigator.clipboard.writeText.bind(navigator.clipboard);
let isOverriding = false;
const handleClick = e => {
const button = e.target.closest('[data-testid="copy-code-button"]');
if (!button || !wrapperRef.current.contains(button)) return;
isOverriding = true;
navigator.clipboard.writeText = text => {
if (isOverriding) {
isOverriding = false;
navigator.clipboard.writeText = originalWriteText;
return originalWriteText(copyText);
}
return originalWriteText(text);
};
setTimeout(() => {
if (isOverriding) {
isOverriding = false;
navigator.clipboard.writeText = originalWriteText;
}
}, 100);
};
const wrapper = wrapperRef.current;
wrapper.addEventListener('click', handleClick, true);
return () => {
wrapper.removeEventListener('click', handleClick, true);
if (navigator.clipboard.writeText !== originalWriteText) {
navigator.clipboard.writeText = originalWriteText;
}
};
}, [copyText]);
return
{displayText}
;
};
export const codeExample1 = `curl --request POST \\
--url 'https://{yourDomain}/api/v2/client-grants' \\
--header 'authorization: Bearer MGMT_API_ACCESS_TOKEN' \\
--header 'content-type: application/json' \\
--data '{
"client_id": "CLIENT_ID",
"audience": "API_IDENTIFIER",
"scope": [
"scope1",
"scope2"
],
"organization_usage": "ORG_USAGE",
"allow_any_organization": false
}'
`;
export const codeExample2 = `curl --request PATCH \\
--url 'https://{yourDomain}/api/v2/client-grants/CLIENT_GRANT_ID' \\
--header 'authorization: Bearer MGMT_API_ACCESS_TOKEN' \\
--header 'content-type: application/json' \\
--data '{
"organization_usage": "ORG_USAGE",
"allow_any_organization": false
}'
`;
export const codeExample3 = `curl -X PATCH --location "https://{yourDomain}/api/v2/clients/{CLIENT_ID}" \\
--header 'authorization: Bearer MGMT_API_ACCESS_TOKEN' \\
--header 'content-type: application/json' \\
--data '{
"default_organization": {
"organization_id": "ORGANIZATION_ID",
"flows": ["client_credentials"]
}
}'
`;
Auth0 では、アプリケーションへのマシンツーマシン (M2M) アクセスを承認できます。[Auth0 でアプリケーションを作成](/docs/ja-jp/get-started/auth0-overview/create-applications)したら、マシンツーマシン アクセス用に設定します。
1. アクセスする必要がある各 API について、[組織の動作を定義する](#define-organization-behavior)。
2. アプリケーションがすべての組織ではなく特定の組織にのみアクセスする必要がある場合は、その特定の組織でアクセスする必要がある各 API に対して、[マシンツーマシン アクセスを設定する](/docs/ja-jp/manage-users/organizations/organizations-for-m2m-applications/manage-m2m-access#authorize-m2m-access)。
## 組織の動作を定義する
各 API について、アプリケーションがクライアント認証情報フローで Organizations をどのように使用するかを設定できます。たとえば、アプリケーションに組織の使用を必須にするか、任意の組織へのアクセスを許可するか、または明示的に関連付けられた組織のみにアクセスを制限するかを指定できます。
次の表では、M2M アクセスにおける組織の動作を定義するための各項目について説明します。
### 組織 の動作 の定義表
| 項目 | 説明 | APIマッピング |
| --------------------------------------------------- | --------------------------------------------------------------------------------------------------------------------------------------------------------------------------------------------------------------------------------------------------------------- | ---------------------------------------------------------------------------------------------------------------------------------------------------------------------------------------- |
| Organization Support | このアプリケーションがクライアント認証情報フローでアクセスする際に、組織をどのように使用できるかを決定します。
選択肢は次のとおりです: - **None:** このアプリケーションは組織を*使用してはいけません*。これは既定値です。
- **Optional:** このアプリケーションは組織を使用するかどうかを*選択できます*。
- **Required:** このアプリケーションは組織を*使用しなければなりません*。
| Organization Support は `organization_usage` に対応します。
選択肢: - **None** は `deny` に対応
- **Optional** は `allow` に対応
- **Required** は `required` に対応
|
| Allow machine-to-machine access to any organization | このアプリケーションがクライアント認証情報フローを使用する際に、任意の組織にアクセスできるか、または明示的に関連付けられた組織のみに制限されるかを決定します。既定では、この動作は許可されていません。
**警告:** 任意の組織へのマシンツーマシンアクセスを有効にすると、明示的に関連付けられていなくても、このアプリケーションは任意の組織にアクセスできるようになります。これは、信頼できる内部アプリケーションに対してのみ有効にするべきです。 | Allow machine-to-machine access to any organization は `allow_any_organization` に対応します。
選択肢: - Checked は `true` に対応
- Unchecked は `false` に対応
|
**Allow machine-to-machine access to any organization** オプションは、[サードパーティアプリケーション](/docs/ja-jp/get-started/applications/third-party-applications)では利用できません。サードパーティアプリケーションでは、各組織に対して明示的な 組織 クライアントグラントが常に必要です。詳細については、[組織のサードパーティアプリケーションアクセスを有効にする](/docs/ja-jp/manage-users/organizations/configure-organizations/enable-third-party-application-access)をお読みください。
### アプリケーションの 組織 の動作 を定義する
アプリケーションの 組織 の動作 を定義するには、[Auth0 Dashboard](https://manage.auth0.com/) または [Management API](https://auth0.com/docs/api/management/v2) を使用します。
Machine-to-Machine アプリケーションの場合は、Auth0 Dashboard で 組織 の動作 を定義します。
1. **Auth0 Dashboard > アプリケーション** に移動し、組織 を設定するアプリケーションを選択します。
2. **APIs** タブを選択し、アクセスを設定する API の `client_grant` の詳細を展開します。
3. [Define 組織 behavior table](#define-organization-behavior-table) の説明に従って、適切な設定を行います。
4. **Save** を選択します。
Machine-to-Machine アプリケーションでない場合は、次の手順に従います。
1. **Auth0 Dashboard > APIs** に移動し、組織 へのアクセスを設定する API を選択します。
2. **Machine-to-Machine Applications** タブを選択します。このタブには、Machine-to-Machine アプリケーションだけでなく、すべてのアプリケーションが表示されます。対象のアプリケーションを見つけます。
3. アクセスを認可するには、対象のアプリケーションのトグルを選択します。次に、そのアプリケーションを選択して設定の詳細を展開します。
4. [Define 組織 behavior table](#define-organization-behavior-table) の説明に従って、適切な設定を行います。
5. **Save** を選択します。
Management API を使用して、アプリケーションの 組織 の動作 を定義することもできます。`client_grant` オブジェクトは、アプリケーションの API へのアクセスを制御します。アプリケーションがアクセスする必要がある API ごとに `client_grant` を設定する必要があります。M2M アクセス用の `client_grant` を設定するには、[クライアントグラントを作成する](https://auth0.com/docs/api/management/v2/client-grants/post-client-grants) または [Update クライアントグラント](https://auth0.com/docs/api/management/v2/client-grants/patch-client-grants-by-id) エンドポイントを使用し、[Define 組織 behavior table](#define-organization-behavior-table) を参照して適切な設定を更新します。
次のコードサンプルは、M2M アクセスを持つ `client_grant` オブジェクトを作成します。
次のコードサンプルは、M2M アクセスを持つ `client_grant` オブジェクトを更新します。
## デフォルトの組織を設定する
一部のクライアントは、[クライアント認証情報フロー](/docs/ja-jp/get-started/authentication-and-authorization-flow/client-credentials-flow)で非標準フィールドをサポートしていません。そのため、`/oauth/token` エンドポイントに必要な `organization` パラメーターを送信できません。こうしたクライアント向けに、`none` が指定され、かつ API で組織 サポートが `required` に設定されている場合は、アプリケーションからのすべての Client Credentials リクエストに自動的に適用されるデフォルトの組織を設定できます。
API (つまり対象の audience) で `organization_usage=require` の場合、デフォルトの組織が適用されます。
次の表では、machine-to-machine アクセスのデフォルトの組織を設定するための各フィールドについて説明します。
### デフォルト組織設定表
| フィールド | 説明 | APIマッピング |
| -------------------- | ------------------------------------------- | ------------------------------------------------------------------------------------------------------------------------------------------------------------------------------------------------------------------------------------------------------------ |
| マシンツーマシンアクセスのデフォルト組織 | 組織を含まないClient Credentialsリクエストに適用する組織を定義します | Default Organization for Machine-to-Machine Access は、次のプロパティを持つ `default_organization` オブジェクトにマッピングされます。 - `organization_id`: 使用する組織のID
- `flows`: デフォルト組織に使用する認証フロー。
この設定はUIでは非表示で、デフォルト値は `["client_credentials"]` です
|
### アプリケーションのデフォルト組織を設定する
アプリケーションのデフォルト組織を設定するには、[Auth0 Dashboard](https://manage.auth0.com/) または [Management API](https://auth0.com/docs/api/management/v2) を使用します。
Auth0 Dashboard でアプリケーションのデフォルト組織を有効にするには、次の手順を実行します。
1. **Auth0 Dashboard > アプリケーション** に移動し、設定するアプリケーションを選択します。
2. **Organizations** タブを選択します。
3. [デフォルト組織の設定表](#set-default-organization-table) の説明に従って、適切な設定を行います。
4. **Save** を選択します。
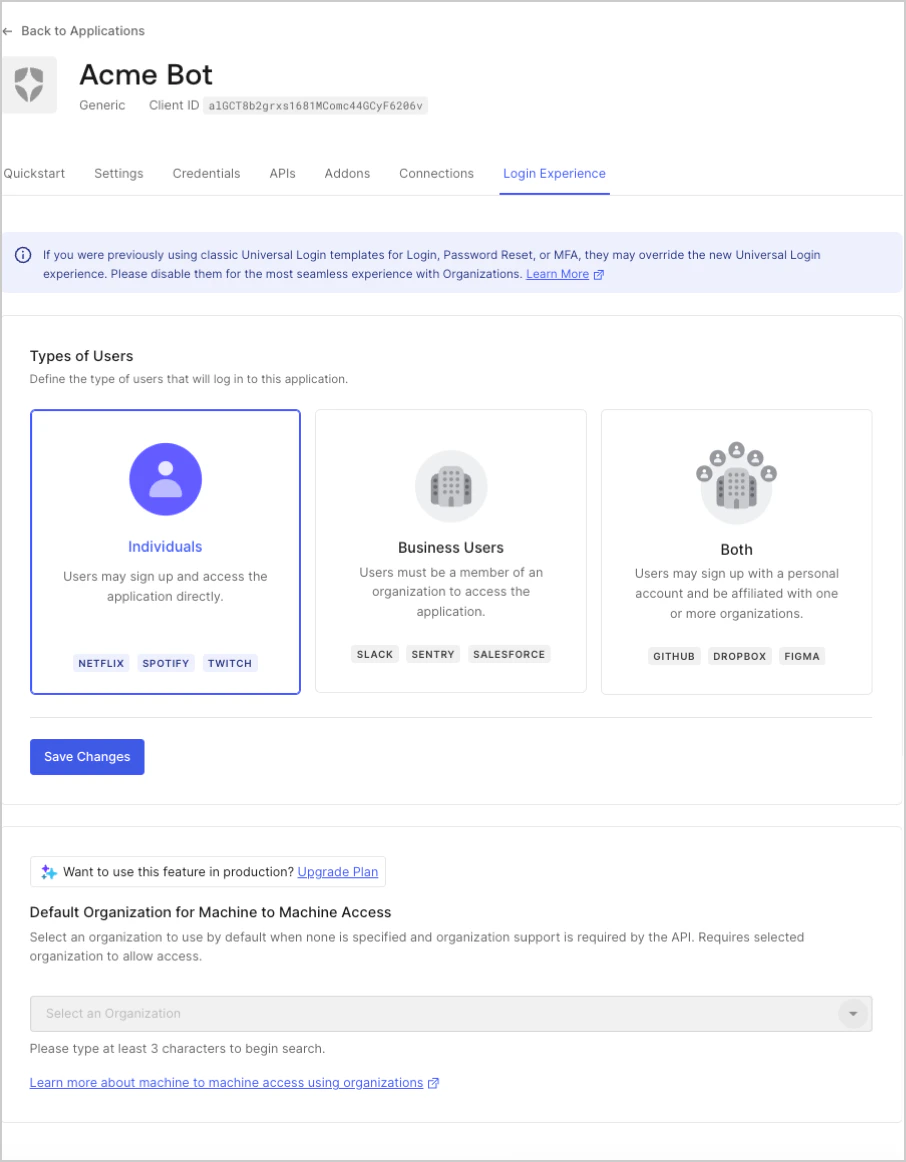 [Create a client](https://auth0.com/docs/api/management/v2/clients/post-clients) または [Update a client](/docs/ja-jp/api/management/v2/clients/patch-clients-by-id) エンドポイントを使用して、アプリケーションのデフォルト組織を設定できます。現在サポート対象のフロー値は `client_credentials` のみです。
次のコードサンプルは、クライアントにデフォルト組織を設定する更新例です。
[Create a client](https://auth0.com/docs/api/management/v2/clients/post-clients) または [Update a client](/docs/ja-jp/api/management/v2/clients/patch-clients-by-id) エンドポイントを使用して、アプリケーションのデフォルト組織を設定できます。現在サポート対象のフロー値は `client_credentials` のみです。
次のコードサンプルは、クライアントにデフォルト組織を設定する更新例です。