> ## Documentation Index
> Fetch the complete documentation index at: https://translations.mintlify.site/llms.txt
> Use this file to discover all available pages before exploring further.
# ASP.NET Web API (OWIN): 認可
> 標準の JWT ミドルウェアを使用して、保護されたエンドポイントを持つ ASP.NET OWIN API に Auth0 の JWT 認可を追加します
export const HowToSchema = () => ;
export const AuthCodeGroup = ({children, dropdown}) => {
const [processedChildren, setProcessedChildren] = useState(children);
useEffect(() => {
let unsubscribe = null;
function init() {
unsubscribe = window.autorun(() => {
const processChildren = node => {
if (typeof node === "string") {
let processedNode = node;
for (const [key, value] of window.rootStore.variableStore.values.entries()) {
const escapedKey = key.replaceAll(/[.*+?^${}()|[\]\\]/g, (String.raw)`\$&`);
processedNode = processedNode.replaceAll(new RegExp(escapedKey, "g"), value);
}
return processedNode;
} else if (Array.isArray(node)) {
return node.map(processChildren);
} else if (node && node.props && node.props.children) {
return {
...node,
props: {
...node.props,
children: processChildren(node.props.children)
}
};
}
return node;
};
setProcessedChildren(processChildren(children));
});
}
if (window.rootStore) {
init();
} else {
window.addEventListener("adu:storeReady", init);
}
return () => {
window.removeEventListener("adu:storeReady", init);
unsubscribe?.();
};
}, [children]);
return {processedChildren};
};
**Auth0は初めてですか?** [Auth0の仕組み](/docs/ja-jp/get-started/auth0-overview)を学び、OAuth 2.0フレームワークを使用した [API の認証および認可の実装方法](/docs/ja-jp/get-started/authentication-and-authorization-flow) についてご確認ください。
## はじめに
Auth0 を使用すると、あらゆる種類のアプリケーションに認可を追加できます。このガイドでは、`Microsoft.Owin.Security.Jwt` パッケージを使用して、新規または既存の ASP.NET OWIN Web API アプリケーションに Auth0 を統合する方法を説明します。各 Auth0 API では API 識別子が使用され、アプリケーションがアクセストークンを検証するにはこれが必要です。
この例では、次の内容を説明します。
* 受信した HTTP リクエストの `Authorization` ヘッダーに JSON Web トークン (JWT) が含まれているかどうかを確認する方法。
* Auth0 アカウントの [JSON Web Key Set (JWKS)](/docs/ja-jp/secure/tokens/json-web-tokens/json-web-key-sets) を使用して、トークンが有効かどうかを確認する方法。アクセストークンの検証について詳しくは、[アクセストークンを検証する](/docs/ja-jp/secure/tokens/access-tokens/validate-access-tokens) を参照してください。
Auth0 Dashboard の [APIs](https://manage.auth0.com/#/apis) セクションで、**Create API** をクリックします。API の名前と識別子を入力します。たとえば `https://quickstarts/api` です。この識別子は、後でアクセストークンの検証を設定する際に `audience` として使用します。**Signing Algorithm** は **RS256** のままにします。
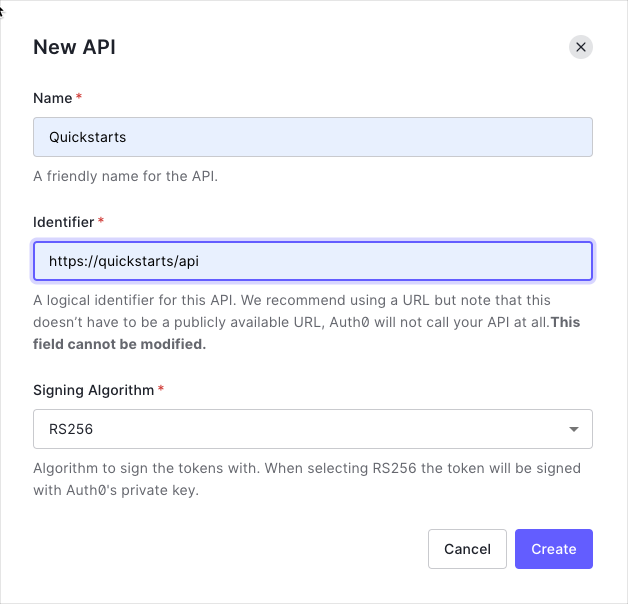
デフォルトでは、API はトークンの署名アルゴリズムとして RS256 を使用します。RS256 は秘密鍵と公開鍵のペアを使用するため、Auth0 アカウントの公開鍵を使ってトークンを検証します。公開鍵は [JSON Web Key Set (JWKS)](/docs/ja-jp/secure/tokens/json-web-tokens/json-web-key-sets) 形式で提供されており、[こちら](https://\{yourDomain}/.well-known/jwks.json) から取得できます。
権限を使うと、指定されたアクセストークンを持つユーザーに代わって、リソースへのアクセス方法を定義できます。たとえば、ユーザーが manager のアクセスレベルを持っている場合は `messages` リソースへの読み取りアクセスを許可し、administrator のアクセスレベルを持っている場合はそのリソースへの書き込みアクセスを許可するといった設定が可能です。
許可する権限は、Auth0 Dashboard の [APIs](https://manage.auth0.com/#/apis) セクションにある **Permissions** view で定義できます。
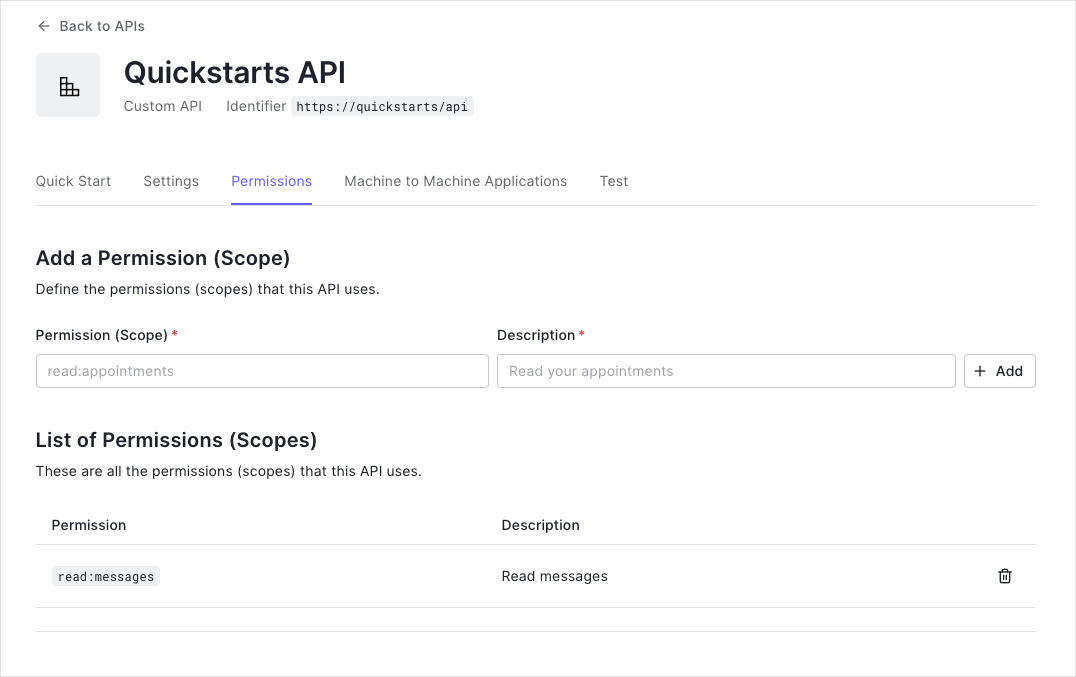
この例では、`read:messages` scope を使用します。
サンプルコードの `Web.config` には `appsettings` セクションがあり、API 用の正しい Auth0 **Domain** と **API 識別子** を使うよう設定されています。このページからコードをダウンロードした場合は、自動的に入力されています。Github の例を使う場合は、自分で入力する必要があります。
```xml web.config lines theme={null}
```
ASP.NET で Auth0 アクセストークンを使用するには、`Microsoft.Owin.Security.Jwt` NuGet パッケージで提供されている OWIN JWT ミドルウェアを使用します。
```bash lines theme={null}
Install-Package Microsoft.Owin.Security.Jwt
```
OWIN JWT ミドルウェアはデフォルトで Open ID Connect Discovery を使用しないため、カスタムの `IssuerSigningKeyResolver` を指定する必要があります。これを行うには、`Support/OpenIdConnectSigningKeyResolver.cs` ファイルに次の内容を追加します。
このようなカスタム リゾルバーは、以前は NuGet 経由で `Auth0.OpenIdConnectSigningKeyResolver` パッケージの一部として公開されていました。[このパッケージは現在利用できない](https://github.com/auth0/auth0-aspnet-owin/blob/master/SECURITY-NOTICE.md)ため、ご自身で用意する必要があります。
```cs OpenIdConnectSigningKeyResolver.cs lines theme={null}
public class OpenIdConnectSigningKeyResolver
{
private readonly OpenIdConnectConfiguration openIdConfig;
public OpenIdConnectSigningKeyResolver(string authority)
{
var cm = new ConfigurationManager($"{authority.TrimEnd('/')}/.well-known/openid-configuration", new OpenIdConnectConfigurationRetriever());
openIdConfig = AsyncHelper.RunSync(async () => await cm.GetConfigurationAsync());
}
public SecurityKey[] GetSigningKey(string kid)
{
return new[] { openIdConfig.JsonWebKeySet.GetSigningKeys().FirstOrDefault(t => t.KeyId == kid) };
}
}
```
`OpenIdConnectSigningKeyResolver` は、OpenID Connect Configuration エンドポイント (`/.well-known/openid-configuration`) から、RS256 トークンの署名に使用される JSON Web Key Set を自動的にダウンロードします。続いて、以下の JWT 登録コードで示すように、これを使って発行者の署名鍵を解決できます。
`Startup` クラスの `Configuration` メソッドを開き、設定済みの `JwtBearerAuthenticationOptions` を渡す `UseJwtBearerAuthentication` の呼び出しを追加します。
`JwtBearerAuthenticationOptions` では、`ValidAudience` プロパティに Auth0 API 識別子を、`ValidIssuer` には Auth0 ドメインの完全なパスを指定する必要があります。また、`IssuerSigningKeyResolver` は、`OpenIdConnectSigningKeyResolver` のインスタンスを使用して署名鍵を解決できるように構成する必要があります:
```cs Startup.cs lines theme={null}
public void Configuration(IAppBuilder app)
{
var domain = $"https://{ConfigurationManager.AppSettings["Auth0Domain"]}/";
var apiIdentifier = ConfigurationManager.AppSettings["Auth0ApiIdentifier"];
var keyResolver = new OpenIdConnectSigningKeyResolver(domain);
app.UseJwtBearerAuthentication(
new JwtBearerAuthenticationOptions
{
AuthenticationMode = AuthenticationMode.Active,
TokenValidationParameters = new TokenValidationParameters()
{
ValidAudience = apiIdentifier,
ValidIssuer = domain,
IssuerSigningKeyResolver = (token, securityToken, kid, parameters) => keyResolver.GetSigningKey(kid)
}
});
// Web API を構成する
WebApiConfig.Configure(app);
}
```
### 末尾のバックスラッシュを忘れないでください
`ValidIssuer` に指定する URL には、末尾のバックスラッシュが含まれていることを必ず確認してください。JWT の発行者 claim と完全に一致している必要があるためです。これはよくある設定ミスで、API 呼び出しが正しく認証されない原因になります。
上記の JWT ミドルウェアは、リクエストに含まれるアクセストークンが有効であることを検証しますが、要求されたリソースにアクセスするために必要な **スコープ** をトークンが十分に持っているかどうかを確認する仕組みは、まだ備わっていません。
`System.Web.Http.AuthorizeAttribute` を継承する `ScopeAuthorizeAttribute` というクラスを作成します。この認可属性は、Auth0 テナント によって発行された `scope` クレームが存在することを確認し、存在する場合は、その `scope` クレームに要求されたスコープが含まれていることを検証します。
```cs ScopeAuthorizeAttribute.cs lines theme={null}
public class ScopeAuthorizeAttribute : AuthorizeAttribute
{
private readonly string scope;
public ScopeAuthorizeAttribute(string scope)
{
this.scope = scope;
}
public override void OnAuthorization(HttpActionContext actionContext)
{
base.OnAuthorization(actionContext);
// 発行者を検証するためにAuth0ドメインを取得する
var domain = $"https://{ConfigurationManager.AppSettings["Auth0Domain"]}/";
// クレームプリンシパルを取得する
ClaimsPrincipal principal = actionContext.ControllerContext.RequestContext.Principal as ClaimsPrincipal;
// scopeクレームを取得する。発行者が正しいAuth0ドメインであることを確認する
var scopeClaim = principal?.Claims.FirstOrDefault(c => c.Type == "scope" && c.Issuer == domain);
if (scopeClaim != null)
{
// scopeを分割する
var scopes = scopeClaim.Value.Split(' ');
// scope配列に必要なscopeが含まれていれば成功とする
if (scopes.Any(s => s == scope))
return;
}
HandleUnauthorizedRequest(actionContext);
}
}
```
以下に示すルートは、次のリクエストで利用できます。
* `GET /api/public`: 非認証のリクエストで利用可能
* `GET /api/private`: 追加のスコープを持たないアクセストークンを含む、認証済みリクエストで利用可能
* `GET /api/private-scoped`: `read:messages` スコープが付与されたアクセストークンを含む、認証済みリクエストで利用可能
JWT ミドルウェアは、標準的な ASP.NET の認証および認可の仕組みと統合されているため、エンドポイントを保護するには、コントローラーのアクションに `[Authorize]` 属性を付与するだけで済みます。特定の API エンドポイントを呼び出すために必要なスコープが含まれていることを確認するには、アクションに `ScopeAuthorize` 属性を付与し、`scope` パラメータに必要な `scope` の名前を渡してください。
```cs ApiController.cs lines theme={null}
[RoutePrefix("api")]
public class ApiController : ApiController
{
[HttpGet]
[Route("public")]
public IHttpActionResult Public()
{
return Json(new
{
Message = "Hello from a public endpoint!"
});
}
[HttpGet]
[Route("private")]
[Authorize]
public IHttpActionResult Private()
{
return Json(new
{
Message = "Hello from a private endpoint! You need to be authenticated to see this."
});
}
[HttpGet]
[Route("private-scoped")]
[ScopeAuthorize("read:messages")]
public IHttpActionResult Scoped()
{
return Json(new
{
Message = "Hello from a private endpoint! You need to be authenticated and have a scope of read:messages to see this."
});
}
}
```
**Checkpoint**
アプリケーションの設定が完了したら、アプリケーションを実行し、次のことを確認してください。
* `GET /api/public` は、認証されていないリクエストで利用できます。
* `GET /api/private` は、認証されたリクエストで利用できます。
* `GET /api/private-scoped` は、`read:messages` scope を持つ アクセストークン を含む認証済みリクエストで利用できます。
## 追加リソース
このQuickstartの完全なサンプルアプリケーション
他のアイデンティティプロバイダーを設定する
多要素認証を有効にする
攻撃対策について学ぶ
カスタムロジックでAuth0を拡張する
Auth0 Communityでサポートを受ける