> ## Documentation Index
> Fetch the complete documentation index at: https://translations.mintlify.site/llms.txt
> Use this file to discover all available pages before exploring further.
> Connected Accounts for Token Vault を設定して使用する方法を学びます。
# Connected Accounts for Token Vault
Connected Accounts for Token Vault を使用すると、アプリケーションは [Token Vault](/docs/ja-jp/secure/tokens/token-vault) を通じて、ユーザーに代わって外部 API に安全にアクセスできます。標準的なユーザー認証では、ソーシャルまたはエンタープライズのアイデンティティプロバイダー経由でユーザーのログインを処理しますが、Connected Accounts ではユーザープロファイルを Google、GitHub、Slack などの外部サービスにリンクし、ユーザーに代わって外部 API への委任アクセスを可能にします。
ユーザーが [サポート対象の外部プロバイダー](/docs/ja-jp/secure/tokens/token-vault#supported-external-providers) への接続とアクセスの認可を正常に完了すると、Auth0 は次の処理を行います。
* そのアカウントを接続済みアカウントとしてユーザーに関連付けます。
* 接続済みアカウントについて、外部プロバイダーのアクセストークンとリフレッシュトークンを Token Vault に保存します。
Connected Accounts for Token Vault は、複数の外部アカウントにリンクされた統合的な Auth0 ユーザープロファイルを作成および管理し、シームレスな認可を実現します。その後、アプリケーションは Token Vault に保存された資格情報を取得し、ユーザーに代わって外部 API を利用します。
## ユーザー認証と Connected Accounts の違い
サポート対象のソーシャル接続またはエンタープライズ接続に対して [Connected Accounts を設定](#configure-connected-accounts)すると、Auth0 はソーシャルまたはエンタープライズのログインフロー (`/authorize` エンドポイント) ではなく、Connected Accounts フロー (`/me/v1/connected-accounts` エンドポイント) を使用して、アクセストークンとリフレッシュトークンを Token Vault に取得・保存します。Connected Accounts フローが正常に完了すると、Auth0 はそのユーザーアカウントをユーザープロファイルの `connected_accounts` 配列に追加します。一方、ソーシャルまたはエンタープライズのログインフローでは、Auth0 はそのユーザーアカウントをユーザープロファイルの `identities` 配列に追加します。
次の表は、ユーザー認証フローと Connected Accounts フローの違いを示しています。
| | ユーザー認証 | Connected Accounts |
| --- | ----------------------------------------- | ---------------------------------------------------------------------------------------------- |
| フロー | `/authorize` エンドポイントを使用するログインフロー | My Account API の `/me/v1/connected-accounts` エンドポイントを使用する Connected Accounts フロー |
| 目的 | ソーシャルまたはエンタープライズのアイデンティティプロバイダーでユーザーを認証する | ユーザーがサポート対象の外部プロバイダー経由でログインし、接続して、その接続を認可した際に、接続済みアカウントのアクセストークンとリフレッシュトークンを Token Vault に保存する |
サポート対象のソーシャル接続またはエンタープライズ接続では、ユーザー認証、Connected Accounts、またはその両方を有効にできます。次の表では、接続に スコープ を渡す方法も含めて、目的設定ごとの動作を説明します。
| 認証 | Connected Accounts | 動作 | スコープ |
| -- | ------------------ | ----------------------------------------------------------------------------------------------------------------------------------------------- | ----------------------------------------------------------------------------------------------------------------------------------------------------------------------------------------------------------------------------------------------------------------------------------------------------------------------------------------------------------------------------- |
| 有効 | 無効 | この接続は、有効なアイデンティティプロバイダーとしてユーザーを認証するために `/authorize` ログインフローを使用します。 | 接続に必要なスコープを渡すには、Auth0 Dashboard または Management API を使用します。実行時には、この一覧に認可リクエストの `connection_scope` パラメーターに含まれる追加のスコープが自動的に補われます。 |
| 無効 | 有効 | この接続は、接続用のトークンを取得して Token Vault に保存するために Connected Accounts フローを使用します。この接続は、ユーザー認証のために `/authorize` ログインフローを使用せず、有効なアイデンティティプロバイダーの一覧にも表示されません。 | 接続に必要なスコープを渡すには、Auth0 Dashboard または Management API を使用します。実行時には、認可リクエストの `scopes` パラメーターに含まれるスコープが、接続で必要とされ、かつ Auth0 Dashboard で有効になっている `offline_access` を除き、Auth0 Dashboard で選択したスコープより優先されます。
**注:** 接続で必要な場合、Auth0 は `offline_access` を有効にするよう求めます。これにより、クライアントアプリケーションは Auth0 からリフレッシュトークンを取得できるようになります。接続の `offline_access` は Auth0 Dashboard で有効にする必要があります。 |
| 有効 | 有効 | この接続は、有効なアイデンティティプロバイダーとしてユーザーを認証するために `/authorize` ログインフローを使用します。あわせて、Connected Accounts フローを使用して、この接続のアクセストークンを取得し、Token Vault に保存します。 | 接続に必要なスコープを渡すには、Auth0 Dashboard と Management API を使用します。実行時には、`scopes` パラメーターに含まれるスコープが、接続で必要とされ、かつ Auth0 Dashboard で有効になっている `offline_access` を除き、Auth0 Dashboard で選択したスコープより優先されます。
**注:** 接続で必要な場合、Auth0 は `offline_access` を有効にするよう求めます。これにより、クライアントアプリケーションは Auth0 からリフレッシュトークンを取得できるようになります。接続の `offline_access` は Auth0 Dashboard で有効にする必要があります。 |
## 仕組み
Connected Accounts フローは、[My Account API](/docs/ja-jp/manage-users/my-account-api) を使用して、対応している外部プロバイダーにまたがるユーザーの接続済みアカウントを作成・管理します。
ユーザーがクライアントアプリケーションから Connected Accounts リクエストを開始する前に、クライアントアプリケーションは My Account API にアクセスするため、Connected Accounts のスコープを含む[アクセストークンを取得](/docs/ja-jp/manage-users/my-account-api#get-an-access-token)しておく必要があります。
アプリケーションで [Organizations](/docs/ja-jp/manage-users/organizations) を使用している場合は、Connected Accounts フローを開始する前に、対象の組織でユーザーを認証してください。Token Vault は接続済みアカウントをユーザーの Auth0 プロファイルに保存するため、組織の各メンバーが自分の外部アカウントを接続し、認可する必要があります。
次のシーケンス図は、Connected Accounts フロー全体の流れを示しています。
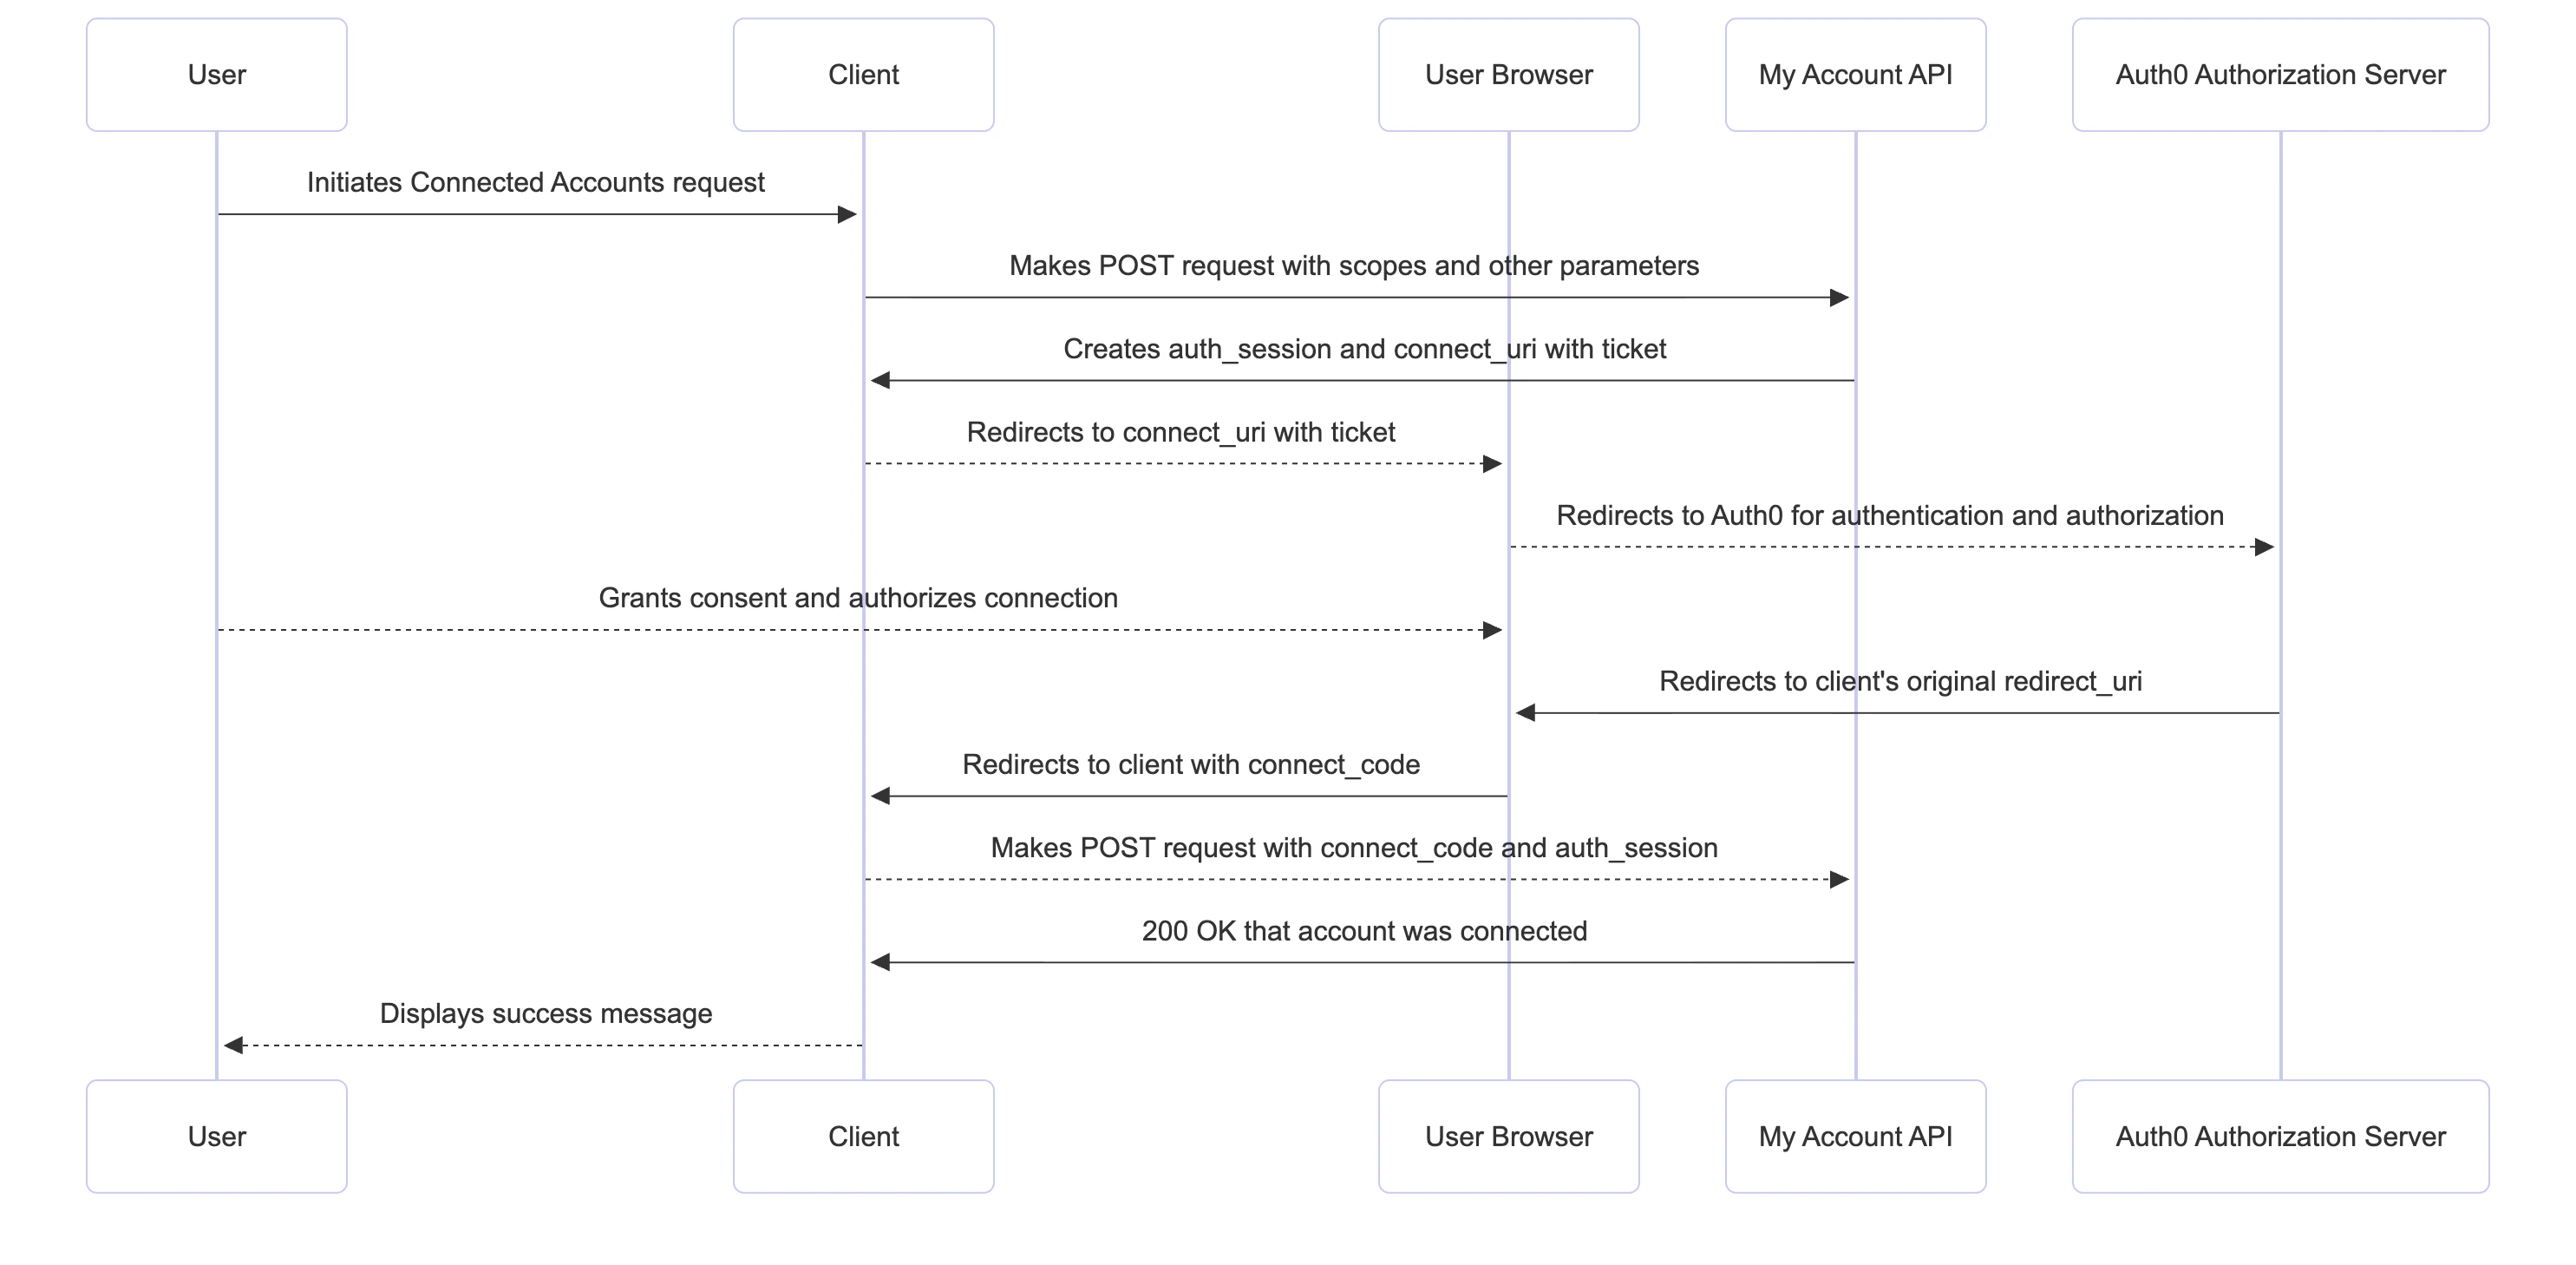 ユーザーが Auth0 経由でサポート対象の外部プロバイダーにログインすると、クライアントアプリケーションから Connected Accounts リクエストを開始します。
1. クライアントアプリケーションは、外部プロバイダーに送信するスコープやその他のパラメータを渡して、My Account API の `/me/v1/connected-accounts/connect` エンドポイントに `POST` リクエストを送信します。詳しくは、[Connected Accounts リクエストを開始する](#initiate-connected-accounts-request)を参照してください。
2. My Account API は、一意の `auth_session` と、ユーザーをウェブブラウザーにリダイレクトするための `ticket` を含む `connect_uri` を作成します。クライアントアプリケーションは、後で検証するために `auth_session` を保存します。[DPoP](/docs/ja-jp/secure/sender-constraining/demonstrating-proof-of-possession-dpop) が設定されている場合、My Account API は DPoP Proof JWT を検証します。
3. クライアントアプリケーションは、ブラウザーでユーザーの認証と認可を行うため、`ticket` をクエリパラメータとして含む `connect_uri` にユーザーをリダイレクトします。クライアントアプリケーションは、[PKCE を使用した Authorization Code フロー](/docs/ja-jp/get-started/authentication-and-authorization-flow/authorization-code-flow-with-pkce) と同様に、`code_challenge` または `code_challenge_method` を URL に渡すこともできます。
4. ユーザーは同意画面で、接続に必要な権限を確認し、認可します。
5. ユーザーが接続を正常に認可すると、外部プロバイダーはユーザーを My Account API にリダイレクトし、My Account API は単一使用の `connect_code` を含む `redirect_uri` を使って、さらにユーザーをクライアントアプリケーションにリダイレクトします。
6. クライアントアプリケーションは、`/me/v1/connected-accounts/complete` エンドポイントに `POST` リクエストを送信して、`connect_code`、`code_verifier` (該当する場合) 、および元の `auth_session` を My Account API に提示します。詳しくは、[Connected Accounts リクエストを完了する](#complete-connected-accounts-request)を参照してください。
7. My Account API は、次を確認してリクエストを検証します。
* `auth_session` が、そのユーザーに対して元々発行された ID と一致すること
* リクエストが、Connected Accounts フローを開始したのと同じデバイスから送信されていること
* DPoP Proof JWT (設定されている場合)
* 単一使用の `connect_code`
* `code_verifier` (PKCE フローを使用している場合)
8. 検証が成功すると、Auth0 Authorization Server はアカウントをユーザープロファイルの `connected_accounts` 配列に追加し、接続済みアカウントのアクセストークンとリフレッシュトークンを Token Vault に保存します。
9. My Account API は、アカウントが正常に接続されたことを示す `200` ステータスコードをクライアントアプリケーションに返し、フローを完了します。
ユーザーが Auth0 経由でサポート対象の外部プロバイダーにログインすると、クライアントアプリケーションから Connected Accounts リクエストを開始します。
1. クライアントアプリケーションは、外部プロバイダーに送信するスコープやその他のパラメータを渡して、My Account API の `/me/v1/connected-accounts/connect` エンドポイントに `POST` リクエストを送信します。詳しくは、[Connected Accounts リクエストを開始する](#initiate-connected-accounts-request)を参照してください。
2. My Account API は、一意の `auth_session` と、ユーザーをウェブブラウザーにリダイレクトするための `ticket` を含む `connect_uri` を作成します。クライアントアプリケーションは、後で検証するために `auth_session` を保存します。[DPoP](/docs/ja-jp/secure/sender-constraining/demonstrating-proof-of-possession-dpop) が設定されている場合、My Account API は DPoP Proof JWT を検証します。
3. クライアントアプリケーションは、ブラウザーでユーザーの認証と認可を行うため、`ticket` をクエリパラメータとして含む `connect_uri` にユーザーをリダイレクトします。クライアントアプリケーションは、[PKCE を使用した Authorization Code フロー](/docs/ja-jp/get-started/authentication-and-authorization-flow/authorization-code-flow-with-pkce) と同様に、`code_challenge` または `code_challenge_method` を URL に渡すこともできます。
4. ユーザーは同意画面で、接続に必要な権限を確認し、認可します。
5. ユーザーが接続を正常に認可すると、外部プロバイダーはユーザーを My Account API にリダイレクトし、My Account API は単一使用の `connect_code` を含む `redirect_uri` を使って、さらにユーザーをクライアントアプリケーションにリダイレクトします。
6. クライアントアプリケーションは、`/me/v1/connected-accounts/complete` エンドポイントに `POST` リクエストを送信して、`connect_code`、`code_verifier` (該当する場合) 、および元の `auth_session` を My Account API に提示します。詳しくは、[Connected Accounts リクエストを完了する](#complete-connected-accounts-request)を参照してください。
7. My Account API は、次を確認してリクエストを検証します。
* `auth_session` が、そのユーザーに対して元々発行された ID と一致すること
* リクエストが、Connected Accounts フローを開始したのと同じデバイスから送信されていること
* DPoP Proof JWT (設定されている場合)
* 単一使用の `connect_code`
* `code_verifier` (PKCE フローを使用している場合)
8. 検証が成功すると、Auth0 Authorization Server はアカウントをユーザープロファイルの `connected_accounts` 配列に追加し、接続済みアカウントのアクセストークンとリフレッシュトークンを Token Vault に保存します。
9. My Account API は、アカウントが正常に接続されたことを示す `200` ステータスコードをクライアントアプリケーションに返し、フローを完了します。
## 前提条件
Connected Accounts を設定する前に、次の設定が完了していることを確認してください。
* 各接続済みアカウントに関連付けられたアクセストークンとリフレッシュトークンを Token Vault に安全に保存できるよう、クライアントアプリケーションに対して [Configure Token Vault](/docs/ja-jp/secure/tokens/token-vault/configure-token-vault) を行います。
* 認証済みユーザーがアカウントを接続および管理するために使用する [Configure the My Account API](#configure-my-account-api) を行います。
* My Account API 用のアクセストークンを取得するため、[Configure Multi-Resource Refresh Token (MRRT)](#configure-multi-resource-refresh-token) を行います。
* (任意) My Account API とクライアントアプリケーションに対して [Configure DPoP](/docs/ja-jp/secure/sender-constraining/configure-sender-constraining) を行い、アクセストークンに送信者制約を適用してトークンの盗難を防止します。デフォルトでは、My Account API は DPoP にバインドされたアクセストークンを受け入れることができます。
### My Account API を設定する
Connected Accounts を使用するには、Auth0 Dashboard で My Account API を設定します。
1. **アプリケーション > APIs** に移動し、[My Account API を有効化する](/docs/ja-jp/manage-users/my-account-api#activate-the-my-account-api)を選択します。
2. 有効化したら、**Auth0 My Account API** を選択し、続いて **Application Access** タブを選択します。
3. 対象のクライアントアプリケーションを見つけて **Edit** を選択し、その[アプリケーションのアクセスポリシー](/docs/ja-jp/get-started/apis/api-access-policies-for-applications)を設定します。
4. **User Access** を選択し、**Authorization** で **Authorized** を選択します。
5. 権限については、そのアプリケーションに [Connected Accounts のスコープ](/docs/ja-jp/manage-users/my-account-api#scope)を **All** で選択します。
6. **Save** を選択します。これにより、クライアントアプリケーションがユーザーに代わって Connected Accounts のスコープで My Account API にアクセスできるようにする[クライアントグラント](/docs/ja-jp/get-started/applications/application-access-to-apis-client-grants)が作成されます。
7. [Multi-Resource Refresh Token](/docs/ja-jp/secure/tokens/refresh-tokens/multi-resource-refresh-token#multi-resource-refresh-token) を使用している場合は、**設定** タブに移動します。**Access Settings** で **Allow Skipping User Consent** を選択します。
### マルチリソース リフレッシュトークンを設定する
マルチリソース リフレッシュトークン (MRRT) を設定すると、ユーザーが再度認証しなくても、新しい My Account API のアクセストークンや他の API 用のアクセストークンと交換できる、単一の長期間有効なリフレッシュトークンを取得できます。
MRRT は、[Auth0 Dashboard](https://manage.auth0.com) または [Management API](https://auth0.com/docs/api/management/v2) で設定できます。
Auth0 Dashboard で MRRT を設定するには、次の手順を実行します。
1. **アプリケーション > アプリケーション** に移動し、対象のアプリケーションを選択します。
2. **Multi-Resource Refresh Token** で **Edit Configuration** を選択します。
3. My Account API で MRRT を有効にするには、**My Account API** をオンにします。
クライアント アプリケーションの MRRT を設定するには、`/api/v2/clients/{clientId}` エンドポイントに `PATCH` リクエストを送信し、リフレッシュトークンの policies に My Account API の API 識別子と Connected Accounts のスコープを追加します。
```bash lines theme={null}
curl -X PATCH --location "https://${account.namespace}/api/v2/clients/{clientId}" \
-H "Authorization: Bearer " \
-H "Content-Type: application/json" \
-d '{
"is_first_party": true,
"refresh_token": {
"expiration_type": "non-expiring",
"leeway": 0,
"infinite_token_lifetime": true,
"infinite_idle_token_lifetime": true,
"token_lifetime": 31557600,
"idle_token_lifetime": 2592000,
"rotation_type": "non-rotating",
"policies": [
{
"audience": "https://'"$DOMAIN"'/me/",
"scope": [
"create:me:connected_accounts",
"read:me:connected_accounts",
"delete:me:connected_accounts"
]
}
]
}
}'
```
## Connected Accounts を設定する
接続に Connected Accounts を設定する前に、その接続がクライアントアプリケーションで認可されていることを確認してください。
Auth0 Dashboard では、次のように操作します。
1. **Authentication > Social Connections** または **Enterprise Connections** に移動し、接続を選択します。
2. **アプリケーション** を選択し、クライアントアプリケーションに対してその接続をオンにします。
Connected Accounts は、[Auth0 Dashboard](https://manage.auth0.com) または [Management API](https://auth0.com/docs/api/management/v2) で設定できます。
Auth0 Dashboard で Connected Accounts を設定するには:
1. **Authentication > Social Connections** または **Enterprise Connections** に移動します。
2. **Create Connection** を選択するか、既存の接続を選択します。
3. **Purpose** で **Connected Accounts for Token Vault** をオンにします。**Purpose** の設定によっては、Auth0 Dashboard で `offline_access` を有効にする必要があります。これにより、クライアントアプリケーションは Connected Accounts フロー中に外部プロバイダーからリフレッシュトークンを取得できるようになります。詳しくは、[ユーザー認証と Connected Accounts の違い](#user-authentication-vs-connected-accounts)を参照してください。
4. **Save** をクリックします。
Management API で Connected Accounts を設定するには、`PATCH` リクエストを `/connections/{connectionId}` エンドポイントに送信し、`connected_accounts` を `true` に設定します。
```bash lines theme={null}
curl -L -X PATCH "https://{yourDomain}/api/v2/connections/{connectionId}" \
-H 'Content-Type: application/json' \
-H 'Accept: application/json' \
-H "Authorization: Bearer " \
-d '{"connected_accounts":{"active":true}}'
```
## Connected Accounts のアクセストークンを取得する
Connected Accounts のリクエストを開始する前に、Connected Accounts のスコープが付与された My Account API の[アクセストークンを取得](/docs/ja-jp/manage-users/my-account-api#scope)します。
以下のセクションでは、[Multi-Resource Refresh Token (MRRT)](/docs/ja-jp/secure/tokens/refresh-tokens/multi-resource-refresh-token) を使用して、My Account API のアクセストークンを取得する方法を説明します。
### リフレッシュトークンを取得する
クライアントアプリケーションで [MRRT を設定](#configure-multi-resource-refresh-token)した後、認可コードフローを開始し、取得した認可コードをリフレッシュトークンに交換します。
以下は、My Account API の API 識別子 `https://{yourDomain}/me/` に対して、リフレッシュトークンを返すための `offline_scope` と、1 回限り使用できる認可コードを含む、機密クライアント向けの認可コードフローのリクエストです。
```bash lines theme={null}
open "https://{yourDomain}/authorize?client_id=&response_type=code&prompt=login&scope=openid%20profile%20offline_access&redirect_uri=&state=&audience=https://my-example-api.com"
```
`/token`エンドポイントで、1回限りの認可コードをリフレッシュトークンに交換します:
```bash lines theme={null}
curl -s --request POST \
--url "https://{yourDomain}/oauth/token" \
--header 'Content-Type: application/json' \
--data-binary @- <",
"client_id": "",
"client_secret": "",
"redirect_uri": ""
}
EOF
```
### リフレッシュトークンを My Account API のアクセストークンに交換する
リフレッシュトークンを取得したら、リフレッシュトークンのグラントタイプを使用して、Connected Accounts のスコープを持つ My Account API のアクセストークンに交換します。
```bash lines theme={null}
curl -s -X POST "https://{yourDomain}/oauth/token" \
-H "Content-Type: application/x-www-form-urlencoded" \
--data-urlencode "grant_type=refresh_token" \
--data-urlencode "client_id=" \
--data-urlencode "client_secret=" \
--data-urlencode "refresh_token=" \
--data-urlencode "audience=https://{yourDomain}/me/" \
--data-urlencode "scope=openid profile offline_access create:me:connected_accounts read:me:connected_accounts delete:me:connected_accounts"
```
## Connected Accounts リクエストを開始する
Connected Accounts リクエストを開始するには、次のパラメーターを指定して、My Account API の `/me/v1/connected-accounts/connect` エンドポイントに `POST` リクエストを送信します。
Google のソーシャル接続を使用する場合は、接続の設定時に Auth0 Dashboard で `offline_access` を選択していることを確認してください。これは、クライアントアプリケーションが Auth0 Authorization Server からリフレッシュトークンを取得するために必要です。
| Parameter | Description |
| -------------- | -------------------------------------------------------------------------------------------------------------------------------------------------------------------------------------------------------------------------------------------------- |
| `connection` | 接続名です。Google のソーシャル接続の場合は、`google-oauth2` に設定します。 |
| `redirect_uri` | クライアントアプリケーションのコールバック URL です。 |
| `state` | 攻撃を防ぐためにリクエストに関連付けられる、一意のランダムな文字列です。 |
| `scopes` | (任意) 外部プロバイダーに渡す スコープ で、文字列の配列として指定します。
Google のソーシャル接続に スコープ を渡す場合は、少なくとも `openid` と `profile` を含めてください。実行時には、接続で必要とされ、Auth0 Dashboard で有効になっている `offline_access` を除き、`scopes` パラメーターに含まれる スコープ が Auth0 Dashboard で選択した スコープ より優先されます。 |
```bash lines theme={null}
curl --request POST "https://{yourDomain}/me/v1/connected-accounts/connect" \
--header 'Content-Type: application/json' \
--header "Authorization: Bearer " \
--data '{
"connection": "google-oauth2",
"redirect_uri": "",
"state": "",
"scopes": ["openid","profile"] // 渡されたスコープは、Auth0 Dashboardで選択したスコープを上書きします
}'
```
成功すると、My Account API は次のようなレスポンスを返します。
| パラメータ | 説明 |
| ---------------- | ----------------------------------------------------------------------------- |
| `auth_session` | プライマリユーザーの現在の認証済みセッションを表すセッション ID。クライアントアプリケーションは、このセッション ID を後で検証するために保存します。 |
| `connect_uri` | クライアントアプリケーションがユーザーをリダイレクトする先の URL。これにより、外部プロバイダーでの認可を処理するための Web ブラウザーが開きます。 |
| `connect_params` | `connect_uri` に必要な追加パラメータ。My Account API がリクエストの検証に使用する一時的な ticket が含まれます。 |
| `expires_in` | セッションの有効期限 (秒単位) 。 |
```json theme={null}
{
"auth_session": "PKM-CYkdx2FyLb4Oob4ED91cSE7i_XJ4SVJByik0xKQxz9CgUZ5JlYr-aMPty0Xr",
"connect_uri": "https://{yourDomain}.us.auth0.com/connect",
"connect_params": {
"ticket": "9375f326-5846-4b57-ae8b-8042573f7c1f"
},
"expires_in": 300
}
```
Webブラウザーで、`ticket` をクエリパラメータとして付与した `connect_uri` にアクセスします。同意画面でスコープの一覧を承認したら、URL フラグメントから `connect_code` を取り出して保存します。
```bash lines theme={null}
open https://{yourDomain}.us.auth0.com/connected-accounts/connect?ticket={tickedId}
```
## Connected Accounts リクエストの完了
Connected Accounts リクエストを完了するには、以下のパラメーターを指定して `/me/v1/connected-accounts/complete` エンドポイントに `POST` リクエストを送信します。
| Parameter | Description |
| -------------- | ----------------------------------------------------------------------------------------------------------- |
| `auth_session` | プライマリユーザーの現在の認証済みセッションを表すセッション ID。クライアントアプリケーションは、後で検証できるようにこのセッション ID を保存します。 |
| `connect_code` | 外部プロバイダーの認可プロセスで受け取る、短時間のみ有効な使い捨てコード。このコードは、外部 API の最終的なアクセストークンを取得するために、サーバー側で安全に交換されます。 |
| `redirect_uri` | 外部プロバイダーとの接続を正常に認可した後にユーザーがリダイレクトされる、アプリケーションの正確なコールバック URL。この値は、フローの開始に使用した `redirect_uri` と一致している必要があります。 |
```bash lines theme={null}
curl --location "https://{yourDomain}/me/v1/connected-accounts/complete" \
--header 'Content-Type: application/json' \
--header "Authorization: Bearer " \
--data '{
"auth_session": "",
"connect_code": "",
"redirect_uri": ""
}'
```
成功すると、My Account API は次のようなレスポンスを返します。
| Parameter | Description |
| ------------- | --------------------------------------------------------------------------------------------------------- |
| `id` | 接続済みアカウントの一意の識別子。 |
| `connection` | 接続の名前。 |
| `created_at` | 接続済みアカウントが作成され、ユーザープロファイルにリンクされた日時を示すタイムスタンプ。 |
| `scopes` | 外部プロバイダーへの接続時に、ユーザーがアプリケーションに付与した特定の OAuth スコープ (権限) です。これらのスコープによって、アプリケーションが実行できる外部 API の操作が決まります。 |
| `access_type` | 付与されたアクセスの種類を示します。一般的な値は `offline` で、これはリフレッシュトークンが正常に取得・保存され、ユーザーがオフラインのときでもアプリケーションがアクセスを維持できることを意味します。 |
```json theme={null}
{
"id": "cac_6ZqSK7Kj1R8LDZJvSb1tAn",
"connection": "google-oauth2",
"created_at": "2025-10-13T21:09:04.126Z",
"scopes": [
"https://www.googleapis.com/auth/calendar",
"https://www.googleapis.com/auth/calendar.addons.execute",
"https://www.googleapis.com/auth/calendar.events",
"https://www.googleapis.com/auth/calendar.events.readonly",
"https://www.googleapis.com/auth/calendar.settings.readonly",
"https://www.googleapis.com/auth/userinfo.profile",
"openid"
],
"access_type": "offline"
}
```
## Connected Accounts の管理
ユーザーの接続済みアカウントを管理するには、`/me/v1/connected-accounts` コレクションを使用します。
`/connected-accounts` コレクションを使用する前に、[Connected Accounts 用のアクセストークンを取得する](#get-access-token-for-connected-accounts)を参照してください。
### Connected Accounts の接続を照会する
ユーザープロファイルにリンクされている接続の一覧を取得するには、`/me/v1/connected-accounts/connections` エンドポイントに `GET` リクエストを送信します。
```bash lines theme={null}
curl -X GET --location "https://{yourDomain}/me/v1/connected-accounts/connections" \
--header 'Content-Type: application/json' \
--header "Authorization: Bearer "
```
成功した場合、My Accounts API は次のようなレスポンスを返します。
```json theme={null}
{
"connections": [
{
"name": "google-oauth2",
"strategy": "google-oauth2",
"scopes": [
"email",
"profile",
"https://www.googleapis.com/auth/calendar",
"https://www.googleapis.com/auth/calendar.events",
"https://www.googleapis.com/auth/calendar.addons.execute",
"https://www.googleapis.com/auth/calendar.events.readonly",
"https://www.googleapis.com/auth/calendar.settings.readonly",
"openid"
]
},
{
"name": "custom",
"strategy": "oauth2",
"scopes": [
"openid"
]
}
]
}
```
### 接続済みアカウントを取得する
ユーザープロファイルにリンクされた接続済みアカウントの一覧を取得するには、`/me/v1/connected-accounts/accounts` エンドポイントに `GET` リクエストを送信します。
```bash lines theme={null}
curl -X GET --location "https://{yourDomain}/me/v1/connected-accounts/accounts" \
--header 'Content-Type: application/json' \
--header "Authorization: Bearer "
```
成功すると、My Accounts APIは次のようなレスポンスを返します。
```json theme={null}
{
"accounts": [
{
"id": "cac_6ZqSK7Kj1R8LDZJvSb1tAn",
"connection": "google-oauth2",
"access_type": "offline",
"scopes": [
"https://www.googleapis.com/auth/calendar",
"https://www.googleapis.com/auth/calendar.addons.execute",
"https://www.googleapis.com/auth/calendar.events",
"https://www.googleapis.com/auth/calendar.events.readonly",
"https://www.googleapis.com/auth/calendar.settings.readonly",
"https://www.googleapis.com/auth/userinfo.profile",
"openid"
],
"created_at": "2025-10-13T21:09:04.126Z"
},
{
"id": "cac_fH32E6CWN7HcWZN5w9Vieq",
"connection": "custom",
"access_type": "offline",
"scopes": [
"offline_access",
"openid",
"profile"
],
"created_at": "2025-10-13T18:06:47.216Z"
}
]
}
```
また、Management API を使用して、`/users/{userId}/connected-accounts` エンドポイントに `GET` リクエストを送信することで、ユーザープロファイルの接続済みアカウントの一覧を取得することもできます。
```bash lines theme={null}
curl -X GET --location "https://{yourDomain}/api/v2/users/{userId}/connected-accounts" \
--header 'Content-Type: application/json' \
--header "Authorization: Bearer "
```
成功すると、Management API から次のようなレスポンスが返されます。
```json theme={null}
{
"connected_accounts": [
{
"id": "cac_6ZqSK7Kj1R8LDZJvSb1tAn",
"connection": "google-oauth2",
"connection_id": "con_uBbSbbSpqGqOTvRu",
"strategy": "google-oauth2",
"access_type": "offline",
"scopes": [
"https://www.googleapis.com/auth/calendar",
"https://www.googleapis.com/auth/calendar.addons.execute",
"https://www.googleapis.com/auth/calendar.events",
"https://www.googleapis.com/auth/calendar.events.readonly",
"https://www.googleapis.com/auth/calendar.settings.readonly",
"https://www.googleapis.com/auth/userinfo.profile",
"openid"
],
"created_at": "2025-10-13T21:09:04.126Z"
}
]
}
```
### 特定の接続の接続済みアカウントを取得する
`GET` リクエストを `/me/v1/connected-accounts/accounts` エンドポイントに送信し、接続名をクエリパラメータとして渡すと、ユーザープロファイルにリンクされている、指定した接続で絞り込まれた接続済みアカウントの一覧を取得できます。
```bash lines theme={null}
curl -X GET --location "https://{yourDomain}/me/v1/connected-accounts/accounts?connection={connectionName}" \
--header 'Content-Type: application/json' \
--header "Authorization: Bearer "
```
成功すると、My Accounts API は次のようなレスポンスを返します。これは `google-oauth2` の接続でフィルタリングされたものです。
```json theme={null}
{
"accounts": [
{
"id": "cac_6ZqSK7Kj1R8LDZJvSb1tAn",
"connection": "google-oauth2",
"access_type": "offline",
"scopes": [
"https://www.googleapis.com/auth/calendar",
"https://www.googleapis.com/auth/calendar.addons.execute",
"https://www.googleapis.com/auth/calendar.events",
"https://www.googleapis.com/auth/calendar.events.readonly",
"https://www.googleapis.com/auth/calendar.settings.readonly",
"https://www.googleapis.com/auth/userinfo.profile",
"openid"
],
"created_at": "2025-10-13T21:09:04.126Z"
}
]
}
```
### 接続済みアカウントを削除
指定した ID の接続済みアカウントを削除するには、`/me/v1/connected-accounts/accounts/{connectedAccountId}` エンドポイントに `DELETE` リクエストを送信します。
```bash lines theme={null}
curl -X DELETE --location "https://{yourDomain}/me/v1/connected-accounts/accounts/{connectedAccountId}" \
--header 'Content-Type: application/json' \
--header "Authorization: Bearer "
```
接続済みアカウントを削除すると、Auth0 は外部プロバイダーのアクセストークンとリフレッシュトークンを Token Vault から削除します。ただし、これによって外部プロバイダーのトークンが自動的に取り消されるわけではなく、リフレッシュトークンを使って新しいアクセストークンを取得できる可能性は残ります。トークンが別の場所で共有またはコピーされている場合は、外部プロバイダーのトークンを手動で取り消す必要があります。
成功すると、My Accounts API は次のようなレスポンスを返します。
```
HTTP/1.1 204 No Content
```