> ## Documentation Index
> Fetch the complete documentation index at: https://translations.mintlify.site/llms.txt
> Use this file to discover all available pages before exploring further.
> auth0.js または Auth0 API を使用して、ログイン時に独自のカスタム UI を利用する場合に、同意に関する情報を取得する方法を説明します。
# GDPR: カスタム UI で同意を記録する
export const AuthCodeGroup = ({children, dropdown}) => {
const [processedChildren, setProcessedChildren] = useState(children);
useEffect(() => {
let unsubscribe = null;
function init() {
unsubscribe = window.autorun(() => {
const processChildren = node => {
if (typeof node === "string") {
let processedNode = node;
for (const [key, value] of window.rootStore.variableStore.values.entries()) {
const escapedKey = key.replaceAll(/[.*+?^${}()|[\]\\]/g, (String.raw)`\$&`);
processedNode = processedNode.replaceAll(new RegExp(escapedKey, "g"), value);
}
return processedNode;
} else if (Array.isArray(node)) {
return node.map(processChildren);
} else if (node && node.props && node.props.children) {
return {
...node,
props: {
...node.props,
children: processChildren(node.props.children)
}
};
}
return node;
};
setProcessedChildren(processChildren(children));
});
}
if (window.rootStore) {
init();
} else {
window.addEventListener("adu:storeReady", init);
}
return () => {
window.removeEventListener("adu:storeReady", init);
unsubscribe?.();
};
}, [children]);
return {processedChildren};
};
export const AuthCodeBlock = ({filename, icon, language, highlight, children}) => {
const [displayText, setDisplayText] = useState(children);
const [copyText, setCopyText] = useState(children);
const wrapperRef = React.useRef(null);
useEffect(() => {
let unsubscribe = null;
function init() {
if (!window.autorun || !window.rootStore) {
return;
}
unsubscribe = window.autorun(() => {
let processedChildrenForDisplay = children;
let processedChildrenForCopy = children;
for (const [key, value] of window.rootStore.variableStore.values.entries()) {
const escapedKey = key.replaceAll(/[.*+?^${}()|[\]\\]/g, (String.raw)`\$&`);
let displayValue = value;
if (key === "{yourClientSecret}" && value !== "{yourClientSecret}") {
displayValue = value.substring(0, 3) + "*****MASKED*****";
}
processedChildrenForDisplay = processedChildrenForDisplay.replaceAll(new RegExp(escapedKey, "g"), displayValue);
processedChildrenForCopy = processedChildrenForCopy.replaceAll(new RegExp(escapedKey, "g"), value);
}
setDisplayText(processedChildrenForDisplay);
setCopyText(processedChildrenForCopy);
});
}
if (window.rootStore) {
init();
} else {
window.addEventListener("adu:storeReady", init);
}
return () => {
window.removeEventListener("adu:storeReady", init);
unsubscribe?.();
};
}, [children]);
useEffect(() => {
if (!wrapperRef.current) return;
const originalWriteText = navigator.clipboard.writeText.bind(navigator.clipboard);
let isOverriding = false;
const handleClick = e => {
const button = e.target.closest('[data-testid="copy-code-button"]');
if (!button || !wrapperRef.current.contains(button)) return;
isOverriding = true;
navigator.clipboard.writeText = text => {
if (isOverriding) {
isOverriding = false;
navigator.clipboard.writeText = originalWriteText;
return originalWriteText(copyText);
}
return originalWriteText(text);
};
setTimeout(() => {
if (isOverriding) {
isOverriding = false;
navigator.clipboard.writeText = originalWriteText;
}
}, 100);
};
const wrapper = wrapperRef.current;
wrapper.addEventListener('click', handleClick, true);
return () => {
wrapper.removeEventListener('click', handleClick, true);
if (navigator.clipboard.writeText !== originalWriteText) {
navigator.clipboard.writeText = originalWriteText;
}
};
}, [copyText]);
return
{displayText}
;
};
このチュートリアルでは、auth0.js または Auth0 API を使用して同意情報を取得し、その入力内容をユーザーのメタデータに保存する方法を説明します。詳しくは、[ユーザープロファイルにおけるメタデータの仕組みを理解する](/docs/ja-jp/manage-users/user-accounts/metadata)をご覧ください。
代わりに Lock を使用して同意を追跡する場合は、[GDPR: Lock で同意を追跡する](/docs/ja-jp/secure/data-privacy-and-compliance/gdpr/gdpr-track-consent-with-lock)をご覧ください。
このドキュメントの内容は**法的助言を目的としたものではなく**、また、法的支援の代わりとなるものでもありません。GDPR を理解し、これを遵守する最終的な責任はお客様にありますが、Auth0 は可能な限り GDPR 要件への対応を支援します。
これらのドキュメントの内容は法的助言を目的としたものではなく、また、法的支援の代わりとなるものでもありません。GDPR を理解し、これを遵守する最終的な責任はお客様にありますが、Auth0 は可能な限り GDPR 要件への対応を支援します。
## 概要
さまざまなシナリオで同意に関する情報を取得し、これをユーザーのメタデータに保存します。
すべてのシナリオで、ユーザーのメタデータに次のプロパティが保存されます。
* `consentGiven` (true/false) は、ユーザーが同意したかどうかを示します (true は同意済み、false は未同意)
* `consentTimestamp` (Unix timestamp) は、ユーザーが同意した日時を示します
例:
```json lines theme={null}
{
"consentGiven": "true"
"consentTimestamp": "1525101183"
}
```
これについては、次の 4 つの実装を見ていきます。
1. フラグを表示し、データベース接続で動作し、`auth0.js` ライブラリを使ってユーザーを作成する実装です (シングルページアプリケーションで使用) 。詳しくは、[Auth0.js Reference](/docs/ja-jp/libraries/auth0js) をご覧ください。
2. フラグを表示し、データベース接続で動作し、Authentication API を使ってユーザーを作成する実装です (Regular Web Apps で使用)
3. フラグを表示し、ソーシャル接続で動作し、Management API を使ってユーザー情報を更新する実装です (SPA または Regular Web Apps で使用)
4. 別のページにリダイレクトし、そこで利用規約やプライバシーポリシーの内容を確認したうえで、同意情報を提供できる実装です (SPA または Regular Web Apps で使用)
## オプション 1: auth0.js を使用する
このセクションでは、シンプルなシングルページアプリケーションを使い、ログインウィジェットをカスタマイズして、ユーザーが同意情報を提供できるようにするためのフラグを追加します。アプリを一から構築する代わりに、[Auth0 の JavaScript Quickstart サンプル](/docs/ja-jp/quickstart/spa/vanillajs)を使用します。また、アプリケーションにログインを埋め込むのではなく Universal Login を実装できるように、Auth0 のUniversal Loginページも使用します。Universal Login の詳細については、[Auth0 Universal Login](/docs/ja-jp/authenticate/login/auth0-universal-login)をご覧ください。Universal Login と組み込みログインの違いについては、[Centralized Universal Login vs. Embedded Login](/docs/ja-jp/authenticate/login/universal-vs-embedded-login)をご覧ください。
これは**データベース接続**で**のみ**機能します (独自のデータベースを設定する代わりに、Auth0 のインフラストラクチャを使用します) 。
1. [Auth0 Dashboard > アプリケーション > アプリケーション](https://manage.auth0.com/#/applications)に移動し、新しいアプリケーションを作成します。タイプとして`Single Web Page Applications`を選択します。**Settings**に移動し、**Allowed Callback URLs**を`http://localhost:3000`に設定します。
このフィールドには、ユーザーの認証後に Auth0 がリダイレクトを許可する URL の一覧を設定します。サンプルアプリは`http://localhost:3000`で実行されるため、この値を設定します。
2. **Client Id**と**Domain**の値をコピーします。これらは後ほど必要になります。
3. [Auth0 Dashboard > Authentication > Database](https://manage.auth0.com/#/connections/database)に移動し、新しい接続を作成します。**Create DB Connection**をクリックし、新しい接続名を設定してから、**Save**をクリックします。接続の**アプリケーション**タブに移動し、新しく作成したアプリケーションが有効になっていることを確認します。
4. [JavaScript SPA Sample をダウンロード](/docs/ja-jp/quickstart/spa/vanillajs)します。
5. [Client ID と Domain の値を設定](https://github.com/auth0-samples/auth0-javascript-samples/tree/master/01-Login#set-the-client-id-and-domain)します。
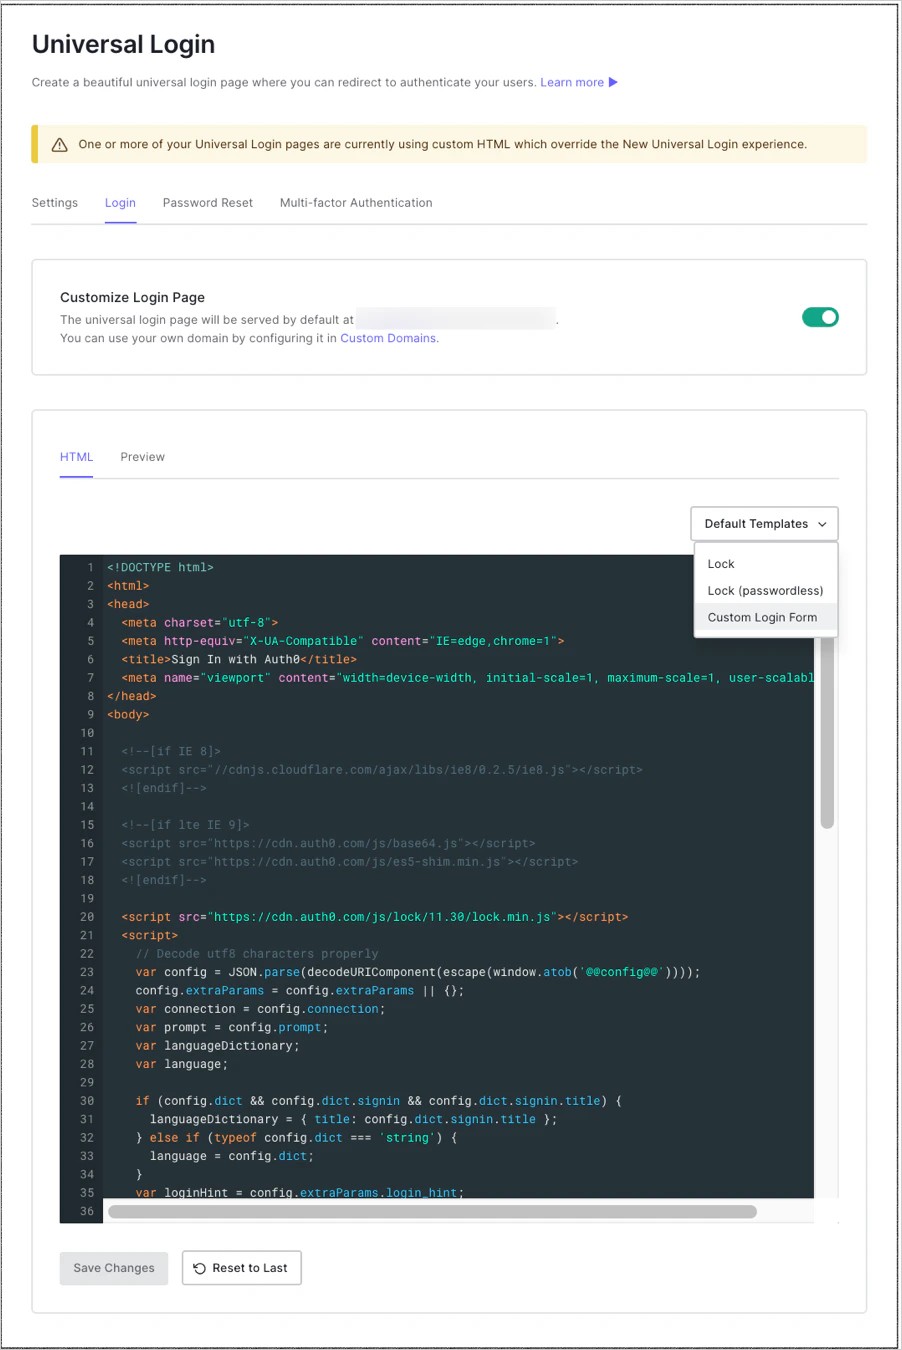
6. [Auth0 Dashboard > Branding > Universal Login](https://manage.auth0.com/#/login_settings)に移動します。**Login**タブでトグルを有効にします。
7. **Default Templates**ドロップダウンで、`Custom Login Form`が選択されていることを確認します。コードはあらかじめ入力されています。
8. `databaseConnection`変数の値を、アプリケーションで使用しているデータベース接続名に設定します。
```javascript lines theme={null}
//簡潔にするため一部のコードを省略
var databaseConnection = 'test-db';
//簡潔にするため一部のコードを省略
```
9. `consentGiven`メタデータ用のフィールドを追加するには、フォームにチェックボックスを追加します。この例では、チェックボックスはデフォルトでオンにし、ユーザーがチェックを外せないよう無効化しています。必要に応じて、ビジネス要件に合わせて調整してください。
```javascript lines theme={null}
//簡潔にするため一部のコードを省略
//簡潔にするため一部のコードを省略
```
10. メタデータを設定するように signup 関数を編集します。メタデータの値には、ブール値ではなく`true`という値を持つ文字列を設定しており、数値を文字列に変換するために`toString`を使用している点に注意してください。これは、値として文字列しか受け付けない Authentication API の[**Signup** endpoint](https://auth0.com/docs/api/authentication#signup)の制約によるものです。
```text lines theme={null}
//簡潔にするため一部のコードを省略
webAuth.redirect.signupAndLogin({
connection: databaseConnection,
email: email,
password: password,
user_metadata: { consentGiven: 'true', consentTimestamp: Date.now().toString() }
}, function(err) {
if (err) displayError(err);
});
//簡潔にするため一部のコードを省略
```
11. ログインウィジェットがどのように表示されるか確認するには、**Preview**タブをクリックします。
 1. この設定をテストするには、アプリケーションを実行して `http://localhost:3000` にアクセスします。新しいユーザーとしてサインアップします。次に、[Auth0 Dashboard > User Management > Users](https://manage.auth0.com/#/users) に移動し、新しく作成したユーザーを検索します。**User Details** を開き、**メタデータ** セクションまでスクロールします。`user_metadata` のテキストエリアに、`consentGiven` メタデータが `true` に設定されていることが表示されるはずです。
## オプション 2: API を使用する (データベース)
ログインページを自社のサーバーで提供している場合は、ユーザーのサインアップ完了後に Authentication API の [**Signup** endpoint](https://auth0.com/docs/api/authentication#signup) を直接呼び出すことができます。
ここまで説明してきたのと同じシナリオでは、新規ユーザーのサインアップ後に、次のスニペットを使用して Auth0 にユーザーを作成し、メタデータを設定できます。`consentTimestamp` リクエストパラメータの値は、ユーザーが同意を行った時点のタイムスタンプに置き換えることを忘れないでください。
```bash cURL theme={null}
curl --request POST \
--url 'https://{yourDomain}/dbconnections/signup' \
--header 'content-type: application/json' \
--data '{"client_id": "{yourClientId}","email": "YOUR_USER_EMAIL","password": "YOUR_USER_PASSWORD","user_metadata": {"consentGiven": "true", "consentTimestamp": "1525101183" }}'
```
```csharp C# theme={null}
var client = new RestClient("https://{yourDomain}/dbconnections/signup");
var request = new RestRequest(Method.POST);
request.AddHeader("content-type", "application/json");
request.AddParameter("application/json", "{"client_id": "{yourClientId}","email": "YOUR_USER_EMAIL","password": "YOUR_USER_PASSWORD","user_metadata": {"consentGiven": "true", "consentTimestamp": "1525101183" }}", ParameterType.RequestBody);
IRestResponse response = client.Execute(request);
```
```go Go theme={null}
package main
import (
"fmt"
"strings"
"net/http"
"io/ioutil"
)
func main() {
url := "https://{yourDomain}/dbconnections/signup"
payload := strings.NewReader("{"client_id": "{yourClientId}","email": "YOUR_USER_EMAIL","password": "YOUR_USER_PASSWORD","user_metadata": {"consentGiven": "true", "consentTimestamp": "1525101183" }}")
req, _ := http.NewRequest("POST", url, payload)
req.Header.Add("content-type", "application/json")
res, _ := http.DefaultClient.Do(req)
defer res.Body.Close()
body, _ := ioutil.ReadAll(res.Body)
fmt.Println(res)
fmt.Println(string(body))
}
```
```java Java theme={null}
HttpResponse response = Unirest.post("https://{yourDomain}/dbconnections/signup")
.header("content-type", "application/json")
.body("{"client_id": "{yourClientId}","email": "YOUR_USER_EMAIL","password": "YOUR_USER_PASSWORD","user_metadata": {"consentGiven": "true", "consentTimestamp": "1525101183" }}")
.asString();
```
```javascript Node.JS theme={null}
var axios = require("axios").default;
var options = {
method: 'POST',
url: 'https://{yourDomain}/dbconnections/signup',
headers: {'content-type': 'application/json'},
data: {
client_id: '{yourClientId}',
email: 'YOUR_USER_EMAIL',
password: 'YOUR_USER_PASSWORD',
user_metadata: {consentGiven: 'true', consentTimestamp: '1525101183'}
}
};
axios.request(options).then(function (response) {
console.log(response.data);
}).catch(function (error) {
console.error(error);
});
```
```php PHP theme={null}
$curl = curl_init();
curl_setopt_array($curl, [
CURLOPT_URL => "https://{yourDomain}/dbconnections/signup",
CURLOPT_RETURNTRANSFER => true,
CURLOPT_ENCODING => "",
CURLOPT_MAXREDIRS => 10,
CURLOPT_TIMEOUT => 30,
CURLOPT_HTTP_VERSION => CURL_HTTP_VERSION_1_1,
CURLOPT_CUSTOMREQUEST => "POST",
CURLOPT_POSTFIELDS => "{"client_id": "{yourClientId}","email": "YOUR_USER_EMAIL","password": "YOUR_USER_PASSWORD","user_metadata": {"consentGiven": "true", "consentTimestamp": "1525101183" }}",
CURLOPT_HTTPHEADER => [
"content-type: application/json"
],
]);
$response = curl_exec($curl);
$err = curl_error($curl);
curl_close($curl);
if ($err) {
echo "cURL Error #:" . $err;
} else {
echo $response;
}
```
```python Python theme={null}
import http.client
conn = http.client.HTTPSConnection("")
payload = "{"client_id": "{yourClientId}","email": "YOUR_USER_EMAIL","password": "YOUR_USER_PASSWORD","user_metadata": {"consentGiven": "true", "consentTimestamp": "1525101183" }}"
headers = { 'content-type': "application/json" }
conn.request("POST", "/{yourDomain}/dbconnections/signup", payload, headers)
res = conn.getresponse()
data = res.read()
print(data.decode("utf-8"))
```
```ruby Ruby theme={null}
require 'uri'
require 'net/http'
require 'openssl'
url = URI("https://{yourDomain}/dbconnections/signup")
http = Net::HTTP.new(url.host, url.port)
http.use_ssl = true
http.verify_mode = OpenSSL::SSL::VERIFY_PEER
request = Net::HTTP::Post.new(url)
request["content-type"] = 'application/json'
request.body = "{"client_id": "{yourClientId}","email": "YOUR_USER_EMAIL","password": "YOUR_USER_PASSWORD","user_metadata": {"consentGiven": "true", "consentTimestamp": "1525101183" }}"
response = http.request(request)
puts response.read_body
```
メタデータの値は、ブール値ではなく、値 `true` を持つ文字列として設定している点に注意してください。これは、API の制限により、値として受け付けられるのは文字列のみで、ブール値は受け付けられないためです。
ブール値の設定が必要な場合は、代わりに Management API を使用できます。この場合は、通常どおりユーザーをサインアップした後、Management API の [**Update User** エンドポイント](https://auth0.com/docs/api/management/v2#!/Users/patch_users_by_id) を呼び出して、ユーザー作成後に必要なメタデータを設定します。具体的な方法については、このまま読み進めてください。次の段落では、そのエンドポイントを使用します。
## オプション 3: API を使用する (ソーシャル)
ソーシャル接続を使用している場合、そのエンドポイントはデータベース接続でしか機能しないため、Authentication API を使って Auth0 にユーザーを作成することはできません。
代わりに、ユーザーにソーシャルプロバイダーでサインアップしてもらいます (これにより Auth0 にユーザーレコードが作成されます) 。その後、Management API を使ってユーザー情報を更新します。
Management API を呼び出す前に、有効なトークンを取得する必要があります。詳しくは、[Get Management API Access Tokens for Production](/docs/ja-jp/secure/tokens/access-tokens/management-api-access-tokens/get-management-api-access-tokens-for-production) を参照してください。
リンク先の記事では、トークンの取得に Client Credentials Flow を使用していますが、これはブラウザー上で実行されるアプリでは使用できません。代わりに使用できるのは Implicit Flow です。Client Credentials Flow の詳細については、[Client Credentials Flow](/docs/ja-jp/get-started/authentication-and-authorization-flow/client-credentials-flow) を参照してください。Implicit Flow の詳細については、[Implicit Flow](/docs/ja-jp/get-started/authentication-and-authorization-flow/implicit-flow-with-form-post) を参照してください。
**audience** リクエストパラメータを `https://YOUR_DOMAIN/api/v2/` に設定し、**scope** パラメータを scope `create:current_user_metadata` に設定します。レスポンスで取得した Access Token を使って、Management API の [**Update User** endpoint](https://auth0.com/docs/api/management/v2#!/Users/patch_users_by_id) を呼び出せます。
有効なトークンを取得したら、次のスニペットを使ってユーザーのメタデータを更新します。
```bash cURL theme={null}
curl --request POST \
--url 'https://{yourDomain}/api/v2/users/%7BUSER_ID%7D' \
--header 'authorization: Bearer YOUR_ACCESS_TOKEN' \
--header 'content-type: application/json' \
--data '{"user_metadata": {"consentGiven":true, "consentTimestamp": "1525101183"}}'
```
```csharp C# theme={null}
var client = new RestClient("https://{yourDomain}/api/v2/users/%7BUSER_ID%7D");
var request = new RestRequest(Method.POST);
request.AddHeader("authorization", "Bearer YOUR_ACCESS_TOKEN");
request.AddHeader("content-type", "application/json");
request.AddParameter("application/json", "{"user_metadata": {"consentGiven":true, "consentTimestamp": "1525101183"}}", ParameterType.RequestBody);
IRestResponse response = client.Execute(request);
```
```go Go theme={null}
package main
import (
"fmt"
"strings"
"net/http"
"io/ioutil"
)
func main() {
url := "https://{yourDomain}/api/v2/users/%7BUSER_ID%7D"
payload := strings.NewReader("{"user_metadata": {"consentGiven":true, "consentTimestamp": "1525101183"}}")
req, _ := http.NewRequest("POST", url, payload)
req.Header.Add("authorization", "Bearer YOUR_ACCESS_TOKEN")
req.Header.Add("content-type", "application/json")
res, _ := http.DefaultClient.Do(req)
defer res.Body.Close()
body, _ := ioutil.ReadAll(res.Body)
fmt.Println(res)
fmt.Println(string(body))
}
```
```java Java theme={null}
HttpResponse response = Unirest.post("https://{yourDomain}/api/v2/users/%7BUSER_ID%7D")
.header("authorization", "Bearer YOUR_ACCESS_TOKEN")
.header("content-type", "application/json")
.body("{"user_metadata": {"consentGiven":true, "consentTimestamp": "1525101183"}}")
.asString();
```
```javascript Node.JS theme={null}
var axios = require("axios").default;
var options = {
method: 'POST',
url: 'https://{yourDomain}/api/v2/users/%7BUSER_ID%7D',
headers: {authorization: 'Bearer YOUR_ACCESS_TOKEN', 'content-type': 'application/json'},
data: {user_metadata: {consentGiven: true, consentTimestamp: '1525101183'}}
};
axios.request(options).then(function (response) {
console.log(response.data);
}).catch(function (error) {
console.error(error);
});
```
```php PHP theme={null}
$curl = curl_init();
curl_setopt_array($curl, [
CURLOPT_URL => "https://{yourDomain}/api/v2/users/%7BUSER_ID%7D",
CURLOPT_RETURNTRANSFER => true,
CURLOPT_ENCODING => "",
CURLOPT_MAXREDIRS => 10,
CURLOPT_TIMEOUT => 30,
CURLOPT_HTTP_VERSION => CURL_HTTP_VERSION_1_1,
CURLOPT_CUSTOMREQUEST => "POST",
CURLOPT_POSTFIELDS => "{"user_metadata": {"consentGiven":true, "consentTimestamp": "1525101183"}}",
CURLOPT_HTTPHEADER => [
"authorization: Bearer YOUR_ACCESS_TOKEN",
"content-type: application/json"
],
]);
$response = curl_exec($curl);
$err = curl_error($curl);
curl_close($curl);
if ($err) {
echo "cURL Error #:" . $err;
} else {
echo $response;
}
```
```python Python theme={null}
import http.client
conn = http.client.HTTPSConnection("")
payload = "{"user_metadata": {"consentGiven":true, "consentTimestamp": "1525101183"}}"
headers = {
'authorization': "Bearer YOUR_ACCESS_TOKEN",
'content-type': "application/json"
}
conn.request("POST", "/{yourDomain}/api/v2/users/%7BUSER_ID%7D", payload, headers)
res = conn.getresponse()
data = res.read()
print(data.decode("utf-8"))
```
```ruby Ruby theme={null}
require 'uri'
require 'net/http'
require 'openssl'
url = URI("https://{yourDomain}/api/v2/users/%7BUSER_ID%7D")
http = Net::HTTP.new(url.host, url.port)
http.use_ssl = true
http.verify_mode = OpenSSL::SSL::VERIFY_PEER
request = Net::HTTP::Post.new(url)
request["authorization"] = 'Bearer YOUR_ACCESS_TOKEN'
request["content-type"] = 'application/json'
request.body = "{"user_metadata": {"consentGiven":true, "consentTimestamp": "1525101183"}}"
response = http.request(request)
puts response.read_body
```
この呼び出しを行うには、一意の`user_id`を把握しておく必要があることに注意してください。レスポンスから取得している場合は、ID トークンの`sub`クレームからこれを取得できます。詳しくは、[ID トークン](/docs/ja-jp/secure/tokens/id-tokens)をお読みください。あるいは、メールアドレスしかわからない場合は、Management API の別のエンドポイントを呼び出して Id を取得できます。詳しくは、[User Search Best Practices](/docs/ja-jp/manage-users/user-search/user-search-best-practices)をお読みください。
## オプション 4: 別のページにリダイレクトする
ユーザーにさらに詳しい情報を表示したい場合は、Signup 時に別のページへリダイレクトして、そこで同意や追加情報の入力を求めたうえで、元のフローに戻して認証トランザクションを完了させることができます。これはリダイレクト ルールで実現できます。また、同じルールを使ってユーザーのメタデータに同意情報を保存しておけば、この情報を記録でき、次回のログイン時に再度同意を求めずに済みます。詳しくは、[ルール内からユーザーをリダイレクトする](/docs/ja-jp/customize/rules/redirect-users)を参照してください。
このフォームはどこかでホストする必要があり、その URL は公開アクセス可能でなければなりません。このチュートリアルの後の手順で、フォームにアクセスできる URL を Auth0 に指定する必要があります。
1. リダイレクト ルールを追加します。[Auth0 Dashboard > Auth Pipeline > Rules](https://manage.auth0.com/#/rules) に移動し、**Create Rule** をクリックします。**Rules Templates** で **empty rule** を選択します。デフォルトのルール名 `empty rule` を、わかりやすい名前 (例: `Redirect to consent form`) に変更します。
2. 次の JavaScript コードをスクリプトエディターに追加し、変更を **Save** します。
```js lines theme={null}
exports.onExecutePostLogin = async (event, api) => {
const { consentGiven } = event.user.user_metadata || {};
// ユーザーがまだ同意していない場合は、同意フォームにリダイレクトする
if (!consentGiven && api.redirect.canRedirect()) {
const options = {
query: {
auth0_domain: `${event.tenant.id}.auth0.com`,
},
};
api.redirect.sendUserTo(event.secrets.CONSENT_FORM_URL, options);
}
};
// ユーザーが同意フォームで 'I agree' をクリックした場合は、再度求められないようその情報をプロファイルに保存する
exports.onContinuePostLogin = async (event, api) => {
if (event.request.body.confirm === "yes") {
api.user.setUserMetadata("consentGiven", true);
api.user.setUserMetadata("consentTimestamp", Date.now());
return;
} else {
return api.access.deny("User did not consent");
}
};
```
3. [Auth0 Dashboard > Auth0 Pipeline > Rules](https://manage.auth0.com/#/rules) に戻り、ページ下部の **設定** セクションまでスクロールします。次のようにキーと値の組を作成します。
1. **キー**: `CONSENT_FORM_URL`
2. **値**: `your-consent-form-url.com`
同意フォームにアクセスできる公開 URL を必ず指定してください。
Production 環境で使用する同意フォームへのリダイレクトを設定する際は、セキュリティ上の注意点について [Trusted Callback URLs](https://github.com/auth0/rules/tree/master/redirect-rules/simple#trusted-callback-urls) と [Data Integrity](https://github.com/auth0/rules/tree/master/redirect-rules/simple#data-integrity) を必ず確認してください。
たとえば保護者の同意のような特別な同意プロンプトが必要な場合は、独自のカスタム同意フォームを作成する必要があります。法律は国によって異なるため、その点に注意してください。
設定はこれで完了です。テストしてみましょう!
## 設定をテストする
1. アプリケーションを実行し、`https://localhost:3000` にアクセスします。
2. 新しいユーザーとしてサインアップします。すると、同意フォームにリダイレクトされます。
3. **I agree** フラグにチェックを入れ、**Submit** をクリックします。
4. [Auth0 Dashboard > User Management > Users](https://manage.auth0.com/#/users) に移動し、新しいユーザーを検索します。
5. **User Details** に移動し、**メタデータ** セクションまでスクロールします。
6. **user\_metadata** テキストエリアに、`consentGiven` メタデータが `true` に設定され、`consentTimestamp` にはユーザーが同意した時点の Unix タイムスタンプが設定されているはずです。
以上で完了です。