> ## Documentation Index
> Fetch the complete documentation index at: https://translations.mintlify.site/llms.txt
> Use this file to discover all available pages before exploring further.
> Auth0 のリスク評価と総合信頼度スコアに基づいて、信頼度の低いログインに対して Adaptive MFA を有効にする方法を説明します。
# Adaptive MFA を有効にする
* Adaptive MFA アドオン付きの Enterprise プランに加入します。詳細は [Auth0 Pricing](https://auth0.com/pricing/) を参照してください。
* Database または Active Directory 接続を設定して有効にします。
* 少なくとも 1 つの MFA 認証要素を設定して有効にします。
Auth0 がログイン試行にリスクがあると判断した場合に Adaptive MFA を使用して MFA を要求し、すべてのログイントランザクションのリスク評価をテナントログに記録します。
## Adaptive MFA を有効にする
Auth0 Dashboard または Auth0 の Management API で Adaptive MFA を有効にできます。
1. [**Auth0 Dashboard > Security > Multi-factor Auth**](https://manage.auth0.com/#/security/mfa) に移動します。
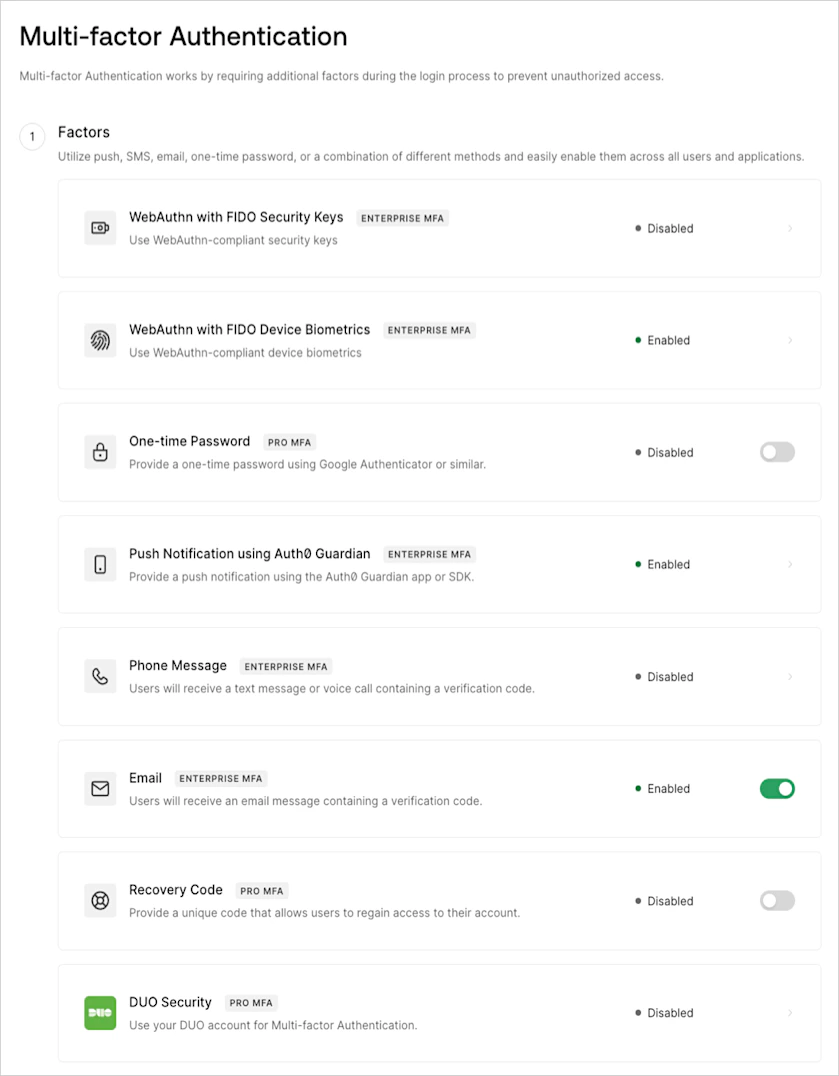 2. **Factors** セクションで、少なくとも 1 つの MFA 認証要素を有効にして設定します。詳しくは、[多要素認証の認証要素](/docs/ja-jp/secure/multi-factor-authentication/multi-factor-authentication-factors) をご覧ください。
3. **Define policies** セクションで **Require Multi-factor Auth** を見つけ、**Use Adaptive MFA** を選択します。リスク評価は自動的に有効になり、テナントログに記録されます。
4. **Device Trust Duration** フィールドで、ユーザーが MFA での認証を再度求められるまで、デバイスを信頼済みとして扱う日数を設定します。デフォルトの期間は 30 日ですが、ユーザーに対するチャレンジの回数は増減できます。
デバイスの記憶期間を Okta の標準推奨設定より長く変更したことによりセキュリティ体制が低下した場合、その責任は Auth0 のお客様が負うものとします。
* 信頼済みデバイスの期間は 1 日から 365 日の範囲で設定できます。
* 期間を変更した場合、新しい期間の値は、ユーザーが次回ログインしたときにそのユーザーのデバイスに適用されます。
5. **Save** を選択します。
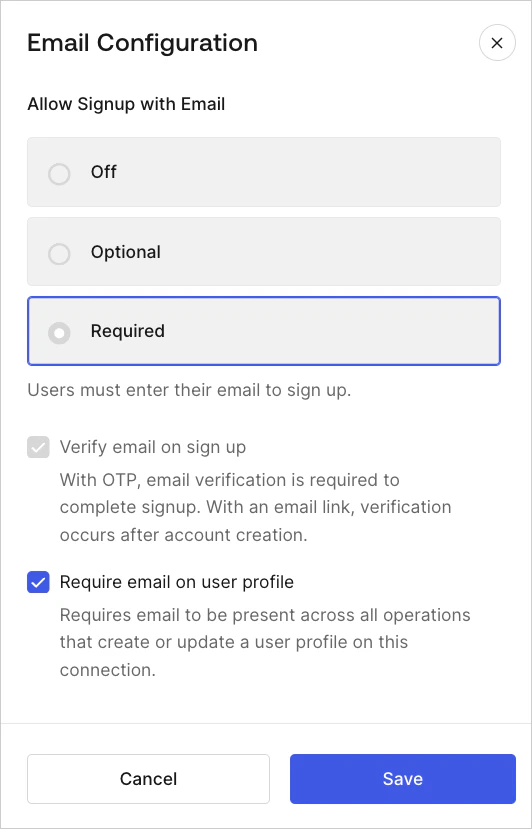
[Identifier First Authentication](/docs/ja-jp/authenticate/login/auth0-universal-login/identifier-first) の認証要素 `email` を使用している場合は、[Auth0 Dashboard > Database Connections > Authentication Methods](https://manage.auth0.com/#/connections/database) でメール属性を更新する必要があります。メール設定タブで、メール属性が有効になっていることを確認してください。次に、**Allow Signup** を **Required** に設定し、ユーザープロファイルで email の **Require** を有効にします。
2. **Factors** セクションで、少なくとも 1 つの MFA 認証要素を有効にして設定します。詳しくは、[多要素認証の認証要素](/docs/ja-jp/secure/multi-factor-authentication/multi-factor-authentication-factors) をご覧ください。
3. **Define policies** セクションで **Require Multi-factor Auth** を見つけ、**Use Adaptive MFA** を選択します。リスク評価は自動的に有効になり、テナントログに記録されます。
4. **Device Trust Duration** フィールドで、ユーザーが MFA での認証を再度求められるまで、デバイスを信頼済みとして扱う日数を設定します。デフォルトの期間は 30 日ですが、ユーザーに対するチャレンジの回数は増減できます。
デバイスの記憶期間を Okta の標準推奨設定より長く変更したことによりセキュリティ体制が低下した場合、その責任は Auth0 のお客様が負うものとします。
* 信頼済みデバイスの期間は 1 日から 365 日の範囲で設定できます。
* 期間を変更した場合、新しい期間の値は、ユーザーが次回ログインしたときにそのユーザーのデバイスに適用されます。
5. **Save** を選択します。
[Identifier First Authentication](/docs/ja-jp/authenticate/login/auth0-universal-login/identifier-first) の認証要素 `email` を使用している場合は、[Auth0 Dashboard > Database Connections > Authentication Methods](https://manage.auth0.com/#/connections/database) でメール属性を更新する必要があります。メール設定タブで、メール属性が有効になっていることを確認してください。次に、**Allow Signup** を **Required** に設定し、ユーザープロファイルで email の **Require** を有効にします。
 1. `update:mfa_policies` スコープを持つ [Management API アクセストークン](/docs/ja-jp/secure/tokens/access-tokens/management-api-access-tokens/get-management-api-access-tokens-for-production) を取得します。
2. 適切なペイロードを使用して、Management API の [Set the multi-factor authentication policies](https://auth0.com/docs/api/management/v2/guardian/put-policies) エンドポイントを呼び出します。
3. **Device Trust Duration** をデフォルトの 30 日から変更する場合は、[Update New Device Accessor](https://auth0.com/docs/api/management/v2/risk-assessments/patch-new-device) を呼び出します。Management API アクセストークンには、次のスコープを追加する必要があります。
* `read:attack_protection`
* `update:attack_protection`
デバイスの記憶期間を Okta の標準推奨設定より長く変更したことによりセキュリティ体制が低下した場合、その責任は Auth0 のお客様が負うものとします。
1. `update:mfa_policies` スコープを持つ [Management API アクセストークン](/docs/ja-jp/secure/tokens/access-tokens/management-api-access-tokens/get-management-api-access-tokens-for-production) を取得します。
2. 適切なペイロードを使用して、Management API の [Set the multi-factor authentication policies](https://auth0.com/docs/api/management/v2/guardian/put-policies) エンドポイントを呼び出します。
3. **Device Trust Duration** をデフォルトの 30 日から変更する場合は、[Update New Device Accessor](https://auth0.com/docs/api/management/v2/risk-assessments/patch-new-device) を呼び出します。Management API アクセストークンには、次のスコープを追加する必要があります。
* `read:attack_protection`
* `update:attack_protection`
デバイスの記憶期間を Okta の標準推奨設定より長く変更したことによりセキュリティ体制が低下した場合、その責任は Auth0 のお客様が負うものとします。
## Adaptive MFA リスク評価を有効にする
Adaptive MFA をまだ有効にする段階ではないものの、ログイン時の挙動を分析できるように学習を開始したい場合は、Adaptive MFA リスク評価だけを個別に有効にできます。
1. [Auth0 Dashboard > Security > Multi-factor Auth](https://manage.auth0.com/#/security/mfa) に移動します。
2. **Define policies** セクションを探します。
3. **MFA Risk Assessors** で、**Enable Adaptive MFA Risk Assessment** を選択します。
4. **Save** を選択します。
## Adaptive MFA のカスタマイズ
セキュリティを確保しながらユーザーに最適な体験を提供できるよう、Adaptive MFA の動作をカスタマイズできます。詳しくは、[Adaptive MFA のカスタマイズ](/docs/ja-jp/secure/multi-factor-authentication/adaptive-mfa/customize-adaptive-mfa) をご覧ください。
MFA をトリガーする Actions は、デフォルトの Adaptive MFA の動作よりも優先されます。
## 制限事項
テナントログで評価情報を利用できるのは、対話型フローのみです。Auth0 は、Adaptive MFA が有効になっていない リソース所有者 Password Grant (ROPG) フローの評価情報の記録をサポートしていません。認証フローの制限事項の詳細については、[Adaptive MFA](/docs/ja-jp/secure/multi-factor-authentication/adaptive-mfa) をご覧ください。
## 詳細はこちら
* [Adaptive MFA のカスタマイズ](/docs/ja-jp/secure/multi-factor-authentication/adaptive-mfa/customize-adaptive-mfa)
* [Adaptive MFA のログイベント](/docs/ja-jp/secure/multi-factor-authentication/adaptive-mfa/adaptive-mfa-log-events)
* [多要素認証の認証要素](/docs/ja-jp/secure/multi-factor-authentication/multi-factor-authentication-factors)