> ## Documentation Index
> Fetch the complete documentation index at: https://translations.mintlify.site/llms.txt
> Use this file to discover all available pages before exploring further.
> Auth0 Dashboard で多要素認証 (MFA) を有効にする方法を説明します。
# 多要素認証を有効にする
多要素認証 (MFA) は、Auth0 Dashboard でテナントに対して有効にできます。
MFA を有効にする際は、ユーザーが利用できる認証要素 (プッシュ通知や電話メッセージなど) を選択し、それらによる認証をどのタイミングで必須にするかを決めるポリシーを定義します。
## 認証要素を選択
Auth0 は、ユーザーが認証を完了するために利用できる、さまざまな認証要素に対応しています。
### 独立した認証要素
テナント内のユーザーにMFAを必須にするには、少なくとも1つの独立した認証要素を有効にして設定する必要があります。必要に応じて、複数の独立した認証要素を同時に有効にできます。
利用可能な独立した認証要素は次のとおりです。
* [FIDO Security Keys を使用した WebAuthn](/docs/ja-jp/secure/multi-factor-authentication/fido-authentication-with-webauthn/configure-webauthn-security-keys-for-mfa)
* [ワンタイムパスワード (OTP) ](/docs/ja-jp/secure/multi-factor-authentication/multi-factor-authentication-factors/configure-otp-notifications-for-mfa)
* [Auth0 Guardian を使用したプッシュ通知](/docs/ja-jp/secure/multi-factor-authentication/multi-factor-authentication-factors/configure-push-notifications-for-mfa)
* [電話メッセージ](/docs/ja-jp/secure/multi-factor-authentication/multi-factor-authentication-factors/configure-sms-voice-notifications-mfa)
* [Cisco Duo Security](/docs/ja-jp/secure/multi-factor-authentication/configure-cisco-duo-for-mfa)
### 従属認証要素
テナント内のユーザー向けに、少なくとも 1 つの独立した認証要素をすでに有効化して設定している場合は、1 つ以上の従属認証要素を有効にできます。
利用可能な従属認証要素は次のとおりです。
* [FIDO 生体認証を使用する WebAuthn](/docs/ja-jp/secure/multi-factor-authentication/fido-authentication-with-webauthn/configure-webauthn-device-biometrics-for-mfa)
* [Email](/docs/ja-jp/secure/multi-factor-authentication/multi-factor-authentication-factors/configure-email-notifications-for-mfa)
* [リカバリーコード](/docs/ja-jp/secure/multi-factor-authentication/configure-recovery-codes-for-mfa)
## Auth0 Dashboard で MFA を有効にする
1. [Auth0 Dashboard > Security > Multi-factor Auth](https://manage.auth0.com/#/security/mfa) に移動します。
2. **Factors** セクションで、ユーザーが利用できるようにする認証要素を有効にし、設定します。
3. **Define policies** セクションで、ユーザーに MFA を求めるタイミングを決めるポリシーを選択します。
* **Never**: すべてのログインで MFA は不要です。
* **Use Adaptive MFA**: Auth0 のリスク判定に基づいて MFA が必要になります。詳しくは、[Enable Adaptive MFA](/docs/ja-jp/secure/multi-factor-authentication/adaptive-mfa) をご覧ください。
* **Always**: すべてのログインで MFA が必要です。
4. **Never** または **Always** ポリシーを選択すると、**MFA Risk Assessors** セクションが表示されます。デフォルトでは、**Enable Adaptive MFA Risk Assessment** 設定は無効になっています。このトグルを有効にすると、テナントログ内のすべてのログイントランザクションについてリスクを評価して記録します。
5. **Additional Settings** セクションで、必要に応じて次のオプションを設定します。
* **Show Multi-factor Authentication options:** このトグルを有効にすると、登録時にユーザーが認証要素を選択できるようになります。無効にすると、登録時に Auth0 が最も安全な認証要素を自動的に提示します。
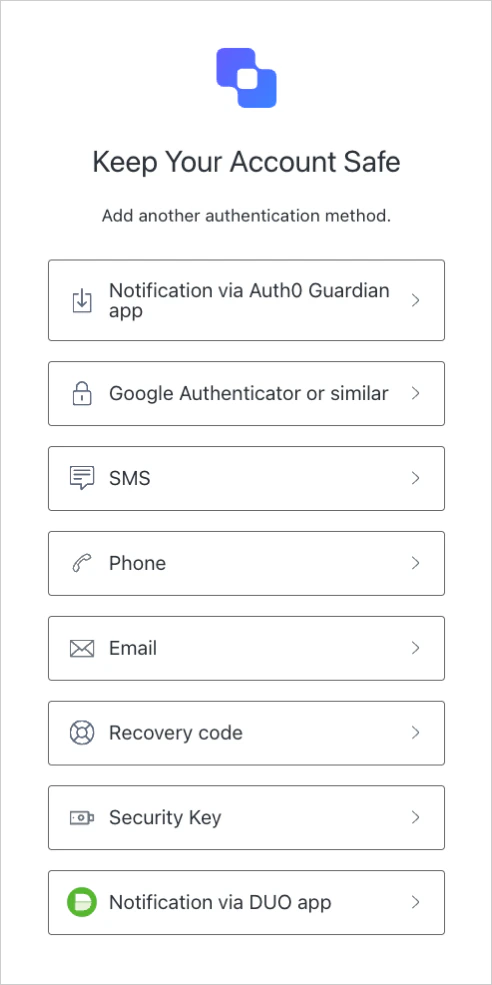 * **Customize MFA Factors using Actions**: このトグルを有効にすると、`post-login` [Actions](/docs/ja-jp/customize/actions) を使用して MFA フローをカスタマイズできます。これにより、特定の認証要素または一連の認証要素でユーザーに認証を求めたり、コンテキスト情報を使ってより個別化された体験を提供したりできます。詳しくは、[Customize MFA Selection for Universal Login](/docs/ja-jp/secure/multi-factor-authentication/customize-mfa/customize-mfa-selection-universal-login) をご覧ください。
6. **Save** をクリックします。
* **Customize MFA Factors using Actions**: このトグルを有効にすると、`post-login` [Actions](/docs/ja-jp/customize/actions) を使用して MFA フローをカスタマイズできます。これにより、特定の認証要素または一連の認証要素でユーザーに認証を求めたり、コンテキスト情報を使ってより個別化された体験を提供したりできます。詳しくは、[Customize MFA Selection for Universal Login](/docs/ja-jp/secure/multi-factor-authentication/customize-mfa/customize-mfa-selection-universal-login) をご覧ください。
6. **Save** をクリックします。
## MFAフローをカスタマイズする
Auth0 Actions を使用すると、テナント内のユーザーに対する MFA フローをカスタマイズできます。たとえば、特定の状況で MFA を必須にする Action を作成したり、特定の認証要素の使用を強制したりできます。
詳しくは、[Adaptive MFA をカスタマイズする](/docs/ja-jp/secure/multi-factor-authentication/adaptive-mfa/customize-adaptive-mfa) をご覧ください。
## 詳しくはこちら
* [多要素認証のプッシュ通知を設定する](/docs/ja-jp/secure/multi-factor-authentication/multi-factor-authentication-factors/configure-push-notifications-for-mfa)
* [多要素認証の OTP 通知を設定する](/docs/ja-jp/secure/multi-factor-authentication/multi-factor-authentication-factors/configure-otp-notifications-for-mfa)
* [多要素認証の SMS 通知と音声通知を設定する](/docs/ja-jp/secure/multi-factor-authentication/multi-factor-authentication-factors/configure-sms-voice-notifications-mfa)
* [多要素認証のメール通知を設定する](/docs/ja-jp/secure/multi-factor-authentication/multi-factor-authentication-factors/configure-email-notifications-for-mfa)
* [Cisco Duo Security を多要素認証用に設定する](/docs/ja-jp/secure/multi-factor-authentication/configure-cisco-duo-for-mfa)
* [多要素認証ページをカスタマイズする](/docs/ja-jp/secure/multi-factor-authentication/customize-mfa)