> ## Documentation Index
> Fetch the complete documentation index at: https://translations.mintlify.site/llms.txt
> Use this file to discover all available pages before exploring further.

> Découvrez comment configurer un formulaire de profil progressif à l’aide de Forms pour Actions

# Cas d’utilisation : Configurer un formulaire de profil progressif à l’aide de Forms

<Card title="Avant de commencer">
  1. Créez une [application Machine-to-Machine](/fr-CA/docs/get-started/auth0-overview/create-applications/machine-to-machine-apps) avec les scopes suivants activés :

  * `read:users`
  * `update:users`
  * `create:users`
  * `read:users_app_metadata`
  * `update:users_app_metadata`
  * `create:users_app_metadata`

  2. Ajoutez une [connexion Vault](/fr-CA/docs/customize/forms/vault) à l’aide des identifiants de l’application M2M.
</Card>

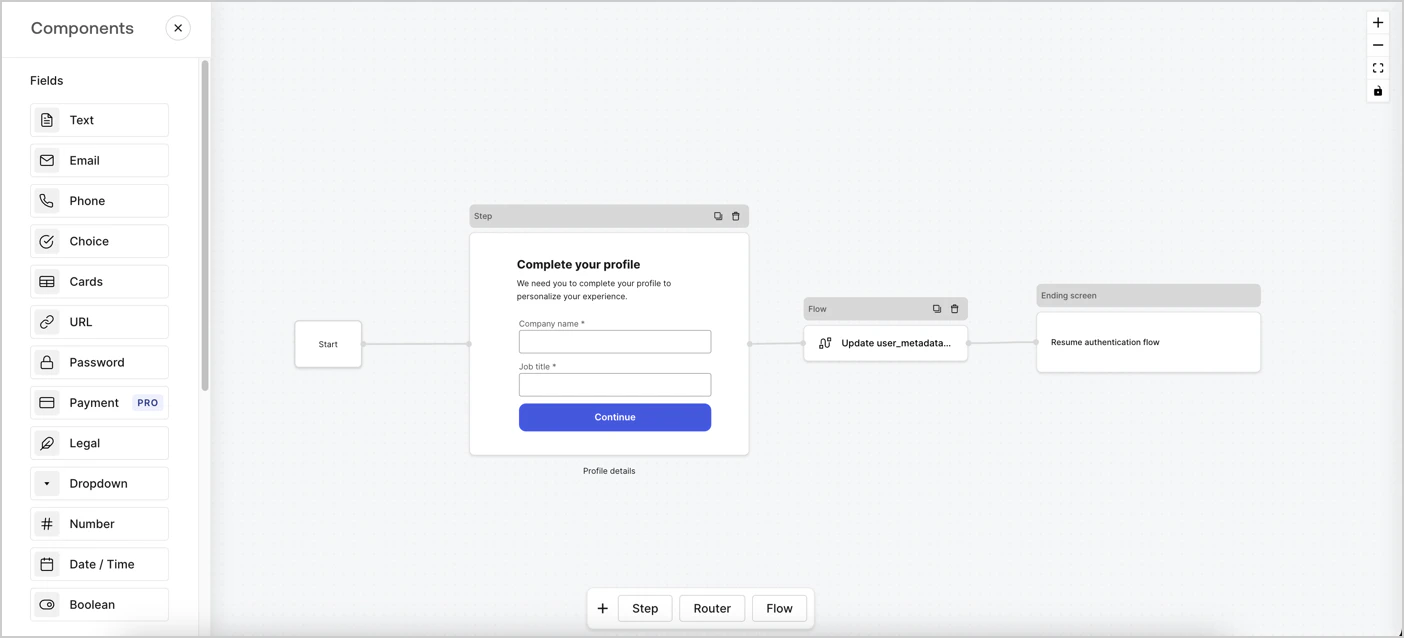
Forms pour Actions vous permet de créer des flux de profilage progressif afin de déterminer à quel moment demander aux utilisateurs de fournir les renseignements manquants, comme le nom de leur entreprise et leur titre de poste, puis de les stocker dans des attributs `user_metadata`.
<Frame>
  <img src="https://mintcdn.com/translations/xwVvTWJUElMm5YAK/docs/images/cdy7uua7fh8z/xUx9YmnHvnAqL19JvNtNP/60dae88f893d4ebe8e3523421e960596/Progressive-profle-overview.png?fit=max&auto=format&n=xwVvTWJUElMm5YAK&q=85&s=52fb99b3d1c63b74179017ee2ebb56a6" alt="Dashboard > Actions > Forms > Form" data-og-width="1404" width="1404" data-og-height="638" height="638" data-path="docs/images/cdy7uua7fh8z/xUx9YmnHvnAqL19JvNtNP/60dae88f893d4ebe8e3523421e960596/Progressive-profle-overview.png" data-optimize="true" data-opv="3" srcset="https://mintcdn.com/translations/xwVvTWJUElMm5YAK/docs/images/cdy7uua7fh8z/xUx9YmnHvnAqL19JvNtNP/60dae88f893d4ebe8e3523421e960596/Progressive-profle-overview.png?w=280&fit=max&auto=format&n=xwVvTWJUElMm5YAK&q=85&s=ed63db8d171c3c75034430ef281a1e57 280w, https://mintcdn.com/translations/xwVvTWJUElMm5YAK/docs/images/cdy7uua7fh8z/xUx9YmnHvnAqL19JvNtNP/60dae88f893d4ebe8e3523421e960596/Progressive-profle-overview.png?w=560&fit=max&auto=format&n=xwVvTWJUElMm5YAK&q=85&s=5769197ae0a52917089f1478abaedc6f 560w, https://mintcdn.com/translations/xwVvTWJUElMm5YAK/docs/images/cdy7uua7fh8z/xUx9YmnHvnAqL19JvNtNP/60dae88f893d4ebe8e3523421e960596/Progressive-profle-overview.png?w=840&fit=max&auto=format&n=xwVvTWJUElMm5YAK&q=85&s=20223f2d84b7bb418ba137d91d07c5c1 840w, https://mintcdn.com/translations/xwVvTWJUElMm5YAK/docs/images/cdy7uua7fh8z/xUx9YmnHvnAqL19JvNtNP/60dae88f893d4ebe8e3523421e960596/Progressive-profle-overview.png?w=1100&fit=max&auto=format&n=xwVvTWJUElMm5YAK&q=85&s=7597ff87472aaf5eb92a47c9630cbc6f 1100w, https://mintcdn.com/translations/xwVvTWJUElMm5YAK/docs/images/cdy7uua7fh8z/xUx9YmnHvnAqL19JvNtNP/60dae88f893d4ebe8e3523421e960596/Progressive-profle-overview.png?w=1650&fit=max&auto=format&n=xwVvTWJUElMm5YAK&q=85&s=f97f442da6818fedfc3a63ca957f1e5a 1650w, https://mintcdn.com/translations/xwVvTWJUElMm5YAK/docs/images/cdy7uua7fh8z/xUx9YmnHvnAqL19JvNtNP/60dae88f893d4ebe8e3523421e960596/Progressive-profle-overview.png?w=2500&fit=max&auto=format&n=xwVvTWJUElMm5YAK&q=85&s=b2c1c3d65edb994a8a4b15e215fdd359 2500w" />
</Frame>

Les sections ci-dessous expliquent comment créer un formulaire de profil progressif à l’aide de nœuds et de flux, ainsi que les étapes à suivre pour ajouter votre formulaire à une [Action Post Login](/fr-CA/docs/customize/actions/explore-triggers/signup-and-login-triggers/login-trigger).

<div id="create-a-form-from-scratch">
  ## Créer un formulaire à partir de zéro
</div>

Suivez ces étapes pour créer un formulaire et recueillir des renseignements :

1. Ouvrez l’éditeur de formulaires en sélectionnant **Auth0 Dashboard > Actions > Forms.**
2. Sélectionnez **Créer un formulaire** > **Partir de zéro**.

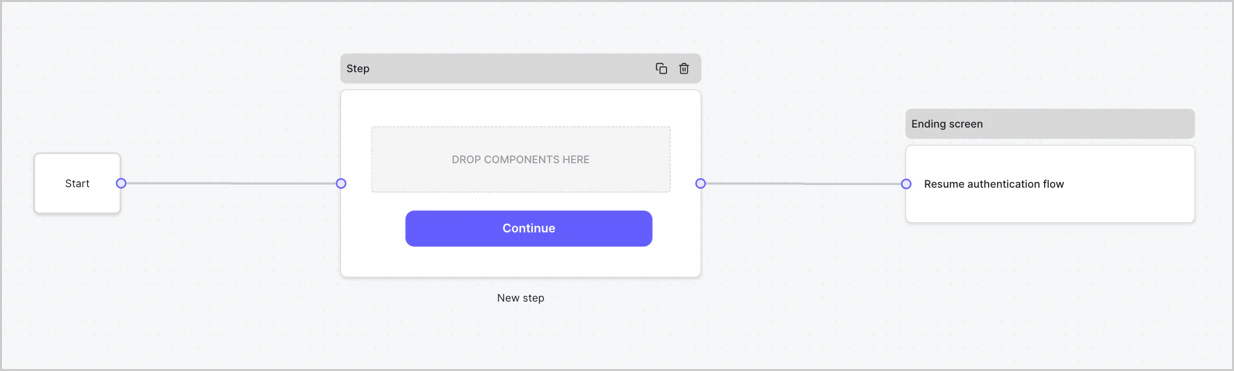
Par défaut, un nouveau formulaire contient un nœud Start, un nœud Step et un nœud d’écran de fin.
<Frame>
  <img src="https://mintcdn.com/translations/Dcx0M11uuptU53TX/docs/images/cdy7uua7fh8z/2TZ9jSjgEcARFpULI6hz4R/a4319a1bd482f2ee5cc23100fdb2f42c/New-form-Forms-for-action-use-case.png?fit=max&auto=format&n=Dcx0M11uuptU53TX&q=85&s=9d84cbac3e62af2aa02cfe1a79d88e89" alt="Dashboard > Forms > Use Cases > Form" data-og-width="1234" width="1234" data-og-height="371" height="371" data-path="docs/images/cdy7uua7fh8z/2TZ9jSjgEcARFpULI6hz4R/a4319a1bd482f2ee5cc23100fdb2f42c/New-form-Forms-for-action-use-case.png" data-optimize="true" data-opv="3" srcset="https://mintcdn.com/translations/Dcx0M11uuptU53TX/docs/images/cdy7uua7fh8z/2TZ9jSjgEcARFpULI6hz4R/a4319a1bd482f2ee5cc23100fdb2f42c/New-form-Forms-for-action-use-case.png?w=280&fit=max&auto=format&n=Dcx0M11uuptU53TX&q=85&s=90f658e64ee4db52dd801b0b3a9cc5f1 280w, https://mintcdn.com/translations/Dcx0M11uuptU53TX/docs/images/cdy7uua7fh8z/2TZ9jSjgEcARFpULI6hz4R/a4319a1bd482f2ee5cc23100fdb2f42c/New-form-Forms-for-action-use-case.png?w=560&fit=max&auto=format&n=Dcx0M11uuptU53TX&q=85&s=0142cb0e6b542f3f6fb28a86564966e7 560w, https://mintcdn.com/translations/Dcx0M11uuptU53TX/docs/images/cdy7uua7fh8z/2TZ9jSjgEcARFpULI6hz4R/a4319a1bd482f2ee5cc23100fdb2f42c/New-form-Forms-for-action-use-case.png?w=840&fit=max&auto=format&n=Dcx0M11uuptU53TX&q=85&s=a387dbdcff51c1414d133a7a0ecc22e5 840w, https://mintcdn.com/translations/Dcx0M11uuptU53TX/docs/images/cdy7uua7fh8z/2TZ9jSjgEcARFpULI6hz4R/a4319a1bd482f2ee5cc23100fdb2f42c/New-form-Forms-for-action-use-case.png?w=1100&fit=max&auto=format&n=Dcx0M11uuptU53TX&q=85&s=47295de6a4fc2408153380510492809e 1100w, https://mintcdn.com/translations/Dcx0M11uuptU53TX/docs/images/cdy7uua7fh8z/2TZ9jSjgEcARFpULI6hz4R/a4319a1bd482f2ee5cc23100fdb2f42c/New-form-Forms-for-action-use-case.png?w=1650&fit=max&auto=format&n=Dcx0M11uuptU53TX&q=85&s=bb15314f7f7017c91d0450e80273d964 1650w, https://mintcdn.com/translations/Dcx0M11uuptU53TX/docs/images/cdy7uua7fh8z/2TZ9jSjgEcARFpULI6hz4R/a4319a1bd482f2ee5cc23100fdb2f42c/New-form-Forms-for-action-use-case.png?w=2500&fit=max&auto=format&n=Dcx0M11uuptU53TX&q=85&s=4431480842db7e65b5ee761a61702d7e 2500w" />
</Frame>

<div id="configure-the-step-node">
  ### Configurer le nœud Step
</div>

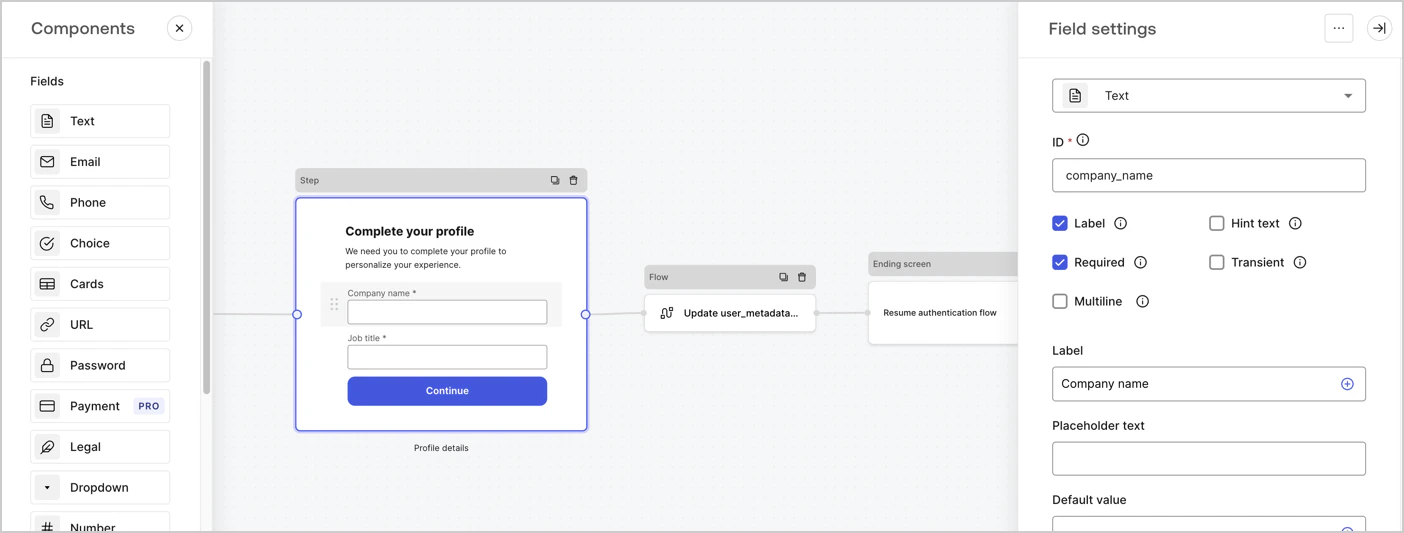
Le nœud Step est l’interface graphique que les utilisateurs voient. Ajoutez des [champs](/fr-CA/docs/customize/forms/nodes-and-components) au nœud Step pour recueillir le nom de l’entreprise de l’utilisateur et son titre de poste en suivant les étapes ci-dessous :

1. Faites glisser un champ **Rich text** du **menu Components** dans le nœud **Step**.

   * **Rich text** : Entrez un message personnalisé.

     * **Exemple** : `Complete your profile! We need you to complete your profile to personalize your experience.`
   * Sélectionnez **Save**.
2. Faites glisser un champ **Text** dans le nœud **Step**.

   * **ID** : Entrez `company_name`.
   * **Label** : Cochez la case.
   * **Label** : Entrez `Company name`.
   * **Required** : Cochez la case.
   * Sélectionnez **Save**.
3. Faites glisser un champ **Text** dans le nœud **Step**.

   1. **ID** : Entrez `job_title`.
   2. **Label** : Entrez `Job title`.
   3. **Label** : Cochez la case.
   4. **Required** : Cochez la case.
   5. Sélectionnez **Save**.
4. Sélectionnez **Publish** pour enregistrer.
<Frame>
  <img src="https://mintcdn.com/translations/6GE5Z24GDCZehiJ9/docs/images/cdy7uua7fh8z/6H1lRzwKyYioQyQJ9MtIoM/aa248e92fc028a68a5b92ff361a11644/progressive-profile-step.png?fit=max&auto=format&n=6GE5Z24GDCZehiJ9&q=85&s=45eebdb293a786f725075e0571aeffc1" alt="Auth0 Dashboard > Actions > Forms > Form > nœud Step" data-og-width="1404" width="1404" data-og-height="533" height="533" data-path="docs/images/cdy7uua7fh8z/6H1lRzwKyYioQyQJ9MtIoM/aa248e92fc028a68a5b92ff361a11644/progressive-profile-step.png" data-optimize="true" data-opv="3" srcset="https://mintcdn.com/translations/6GE5Z24GDCZehiJ9/docs/images/cdy7uua7fh8z/6H1lRzwKyYioQyQJ9MtIoM/aa248e92fc028a68a5b92ff361a11644/progressive-profile-step.png?w=280&fit=max&auto=format&n=6GE5Z24GDCZehiJ9&q=85&s=37d45b95958a00c274db827292612139 280w, https://mintcdn.com/translations/6GE5Z24GDCZehiJ9/docs/images/cdy7uua7fh8z/6H1lRzwKyYioQyQJ9MtIoM/aa248e92fc028a68a5b92ff361a11644/progressive-profile-step.png?w=560&fit=max&auto=format&n=6GE5Z24GDCZehiJ9&q=85&s=54e9108a1a6c92e66b4080620879d99f 560w, https://mintcdn.com/translations/6GE5Z24GDCZehiJ9/docs/images/cdy7uua7fh8z/6H1lRzwKyYioQyQJ9MtIoM/aa248e92fc028a68a5b92ff361a11644/progressive-profile-step.png?w=840&fit=max&auto=format&n=6GE5Z24GDCZehiJ9&q=85&s=b3e68876873f9c69c4dbddbf2bc6acbb 840w, https://mintcdn.com/translations/6GE5Z24GDCZehiJ9/docs/images/cdy7uua7fh8z/6H1lRzwKyYioQyQJ9MtIoM/aa248e92fc028a68a5b92ff361a11644/progressive-profile-step.png?w=1100&fit=max&auto=format&n=6GE5Z24GDCZehiJ9&q=85&s=089c8b1865e43c52278d08eab7cb1ddd 1100w, https://mintcdn.com/translations/6GE5Z24GDCZehiJ9/docs/images/cdy7uua7fh8z/6H1lRzwKyYioQyQJ9MtIoM/aa248e92fc028a68a5b92ff361a11644/progressive-profile-step.png?w=1650&fit=max&auto=format&n=6GE5Z24GDCZehiJ9&q=85&s=9026bcfb86dfc696e419c9b5442507b8 1650w, https://mintcdn.com/translations/6GE5Z24GDCZehiJ9/docs/images/cdy7uua7fh8z/6H1lRzwKyYioQyQJ9MtIoM/aa248e92fc028a68a5b92ff361a11644/progressive-profile-step.png?w=2500&fit=max&auto=format&n=6GE5Z24GDCZehiJ9&q=85&s=47a2d77c750038c566b12cc6ca6defe4 2500w" />
</Frame>

<div id="configure-the-flow-node">
  ### Configurer le nœud Flow
</div>

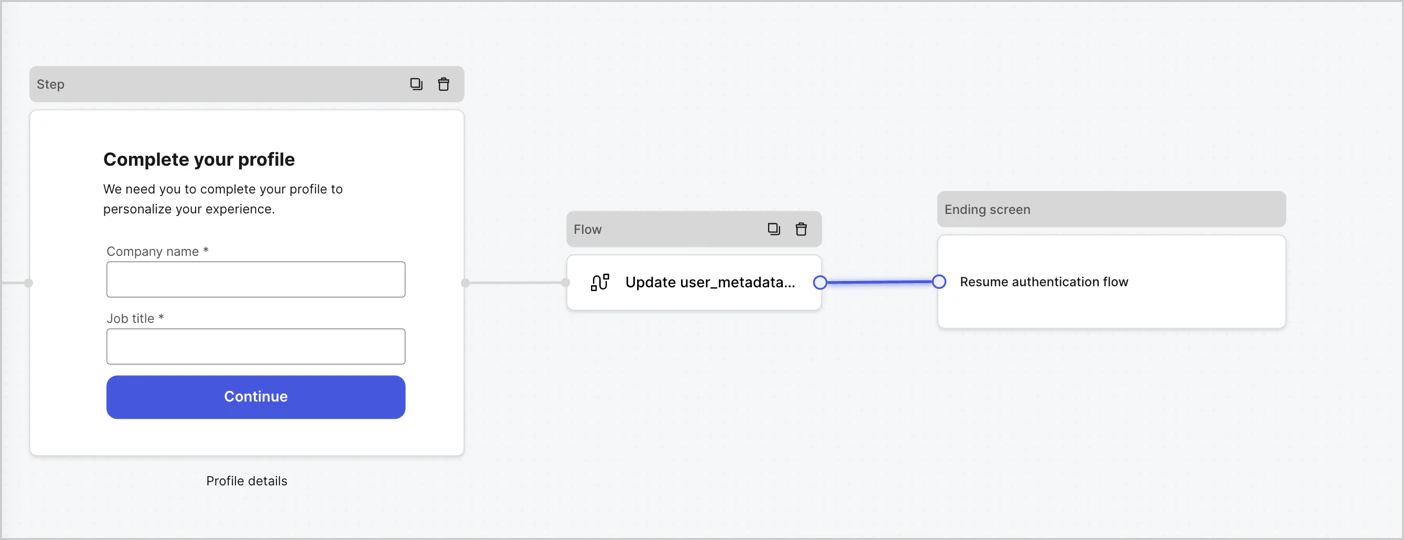
Ajoutez un nœud **Flow** après le nœud **Step** pour mettre à jour `user_metadata` et reprendre le flux d’authentification en suivant ces étapes :

1. Sélectionnez **Flow** au bas du **éditeur de formulaire**.
2. Supprimez le lien existant entre les nœuds **Step** et **Ending Screen**.
3. Sélectionnez le nouveau **Flow** > **Click to add a flow** > **Create a new flow.**

   * Saisissez `Update user_metadata` dans le champ **Name**.
   * Sélectionnez **Create**.
   * Sélectionnez **Save**.
4. Liez le nœud **Flow** aux nœuds **Step** et **Ending Screen**, comme illustré ci-dessous.
5. Sélectionnez **Publish** pour enregistrer.
<Frame>
  <img src="https://mintcdn.com/translations/MV7tE-x71x8RWRES/docs/images/cdy7uua7fh8z/5C91DaWn4LGtJT9BF87ssu/095171d0c452a287c44bfde12fd6d13f/link-nodes.png?fit=max&auto=format&n=MV7tE-x71x8RWRES&q=85&s=07f4e1019ea8ff699ea79251ccc5bb2b" alt="Dashboard > Actions > Forms > Form" data-og-width="1404" width="1404" data-og-height="540" height="540" data-path="docs/images/cdy7uua7fh8z/5C91DaWn4LGtJT9BF87ssu/095171d0c452a287c44bfde12fd6d13f/link-nodes.png" data-optimize="true" data-opv="3" srcset="https://mintcdn.com/translations/MV7tE-x71x8RWRES/docs/images/cdy7uua7fh8z/5C91DaWn4LGtJT9BF87ssu/095171d0c452a287c44bfde12fd6d13f/link-nodes.png?w=280&fit=max&auto=format&n=MV7tE-x71x8RWRES&q=85&s=6acf5a54b11e8af9100825ee3f66e450 280w, https://mintcdn.com/translations/MV7tE-x71x8RWRES/docs/images/cdy7uua7fh8z/5C91DaWn4LGtJT9BF87ssu/095171d0c452a287c44bfde12fd6d13f/link-nodes.png?w=560&fit=max&auto=format&n=MV7tE-x71x8RWRES&q=85&s=db3313a21b099c75cabad756fd162b3d 560w, https://mintcdn.com/translations/MV7tE-x71x8RWRES/docs/images/cdy7uua7fh8z/5C91DaWn4LGtJT9BF87ssu/095171d0c452a287c44bfde12fd6d13f/link-nodes.png?w=840&fit=max&auto=format&n=MV7tE-x71x8RWRES&q=85&s=544d30eaa8bf19b93f9069f7534d6760 840w, https://mintcdn.com/translations/MV7tE-x71x8RWRES/docs/images/cdy7uua7fh8z/5C91DaWn4LGtJT9BF87ssu/095171d0c452a287c44bfde12fd6d13f/link-nodes.png?w=1100&fit=max&auto=format&n=MV7tE-x71x8RWRES&q=85&s=8d41d2745ffdddd9211cbdbae0e7c6b7 1100w, https://mintcdn.com/translations/MV7tE-x71x8RWRES/docs/images/cdy7uua7fh8z/5C91DaWn4LGtJT9BF87ssu/095171d0c452a287c44bfde12fd6d13f/link-nodes.png?w=1650&fit=max&auto=format&n=MV7tE-x71x8RWRES&q=85&s=81de5afd8aa300a864e9d241a53ae658 1650w, https://mintcdn.com/translations/MV7tE-x71x8RWRES/docs/images/cdy7uua7fh8z/5C91DaWn4LGtJT9BF87ssu/095171d0c452a287c44bfde12fd6d13f/link-nodes.png?w=2500&fit=max&auto=format&n=MV7tE-x71x8RWRES&q=85&s=d49035ac065c3dda504067adeedba7c9 2500w" />
</Frame>

Ajoutez une action Auth0 de mise à jour de l’utilisateur au flux en suivant ces étapes :

1. Sélectionnez le flux **Update user\_metadata**, puis sélectionnez **Edit Flow** pour ouvrir le **Flow editor** dans un nouvel onglet.
2. Sous l’action **Start**, sélectionnez l’icône **+** pour ajouter une action **Update user**. Remplissez les champs ci-dessous, puis sélectionnez **Save** pour continuer.

   * **Connexion** : Dans la liste déroulante, sélectionnez la connexion Vault de votre application M2M.

   * **ID utilisateur** : Saisissez `{{context.user.user_id}}`.

   * **Body** : Copiez-collez le code suivant pour mettre à jour `user_metadata` avec les propriétés `job_title` et `company_name`.

     ```json lines theme={null}
     {
        "user_metadata": {
           "job_title": "{{fields.job_title}}",
           "company_name": "{{fields.company_name}}"
        }
     }
     ```

   * Sélectionnez **Save**.
3. Sélectionnez **Publish** pour enregistrer.

<Frame>
  <img src="https://mintcdn.com/translations/6GE5Z24GDCZehiJ9/docs/images/cdy7uua7fh8z/65Jx4W5oIZJyyvA8z4HqIx/0661b1a8ca6361c54fc4fef07ba59f0b/update-user.png?fit=max&auto=format&n=6GE5Z24GDCZehiJ9&q=85&s=7e1caaf5ea4560476575b73cecb6df2e" alt="Dashboard > Actions > Forms > Flows" data-og-width="1404" width="1404" data-og-height="244" height="244" data-path="docs/images/cdy7uua7fh8z/65Jx4W5oIZJyyvA8z4HqIx/0661b1a8ca6361c54fc4fef07ba59f0b/update-user.png" data-optimize="true" data-opv="3" srcset="https://mintcdn.com/translations/6GE5Z24GDCZehiJ9/docs/images/cdy7uua7fh8z/65Jx4W5oIZJyyvA8z4HqIx/0661b1a8ca6361c54fc4fef07ba59f0b/update-user.png?w=280&fit=max&auto=format&n=6GE5Z24GDCZehiJ9&q=85&s=c344529f19a221599f7d96cec4906b19 280w, https://mintcdn.com/translations/6GE5Z24GDCZehiJ9/docs/images/cdy7uua7fh8z/65Jx4W5oIZJyyvA8z4HqIx/0661b1a8ca6361c54fc4fef07ba59f0b/update-user.png?w=560&fit=max&auto=format&n=6GE5Z24GDCZehiJ9&q=85&s=b727276b5ae17bd7891a2f98dbedb3dd 560w, https://mintcdn.com/translations/6GE5Z24GDCZehiJ9/docs/images/cdy7uua7fh8z/65Jx4W5oIZJyyvA8z4HqIx/0661b1a8ca6361c54fc4fef07ba59f0b/update-user.png?w=840&fit=max&auto=format&n=6GE5Z24GDCZehiJ9&q=85&s=762bf30f089067212f11c0ac2d987689 840w, https://mintcdn.com/translations/6GE5Z24GDCZehiJ9/docs/images/cdy7uua7fh8z/65Jx4W5oIZJyyvA8z4HqIx/0661b1a8ca6361c54fc4fef07ba59f0b/update-user.png?w=1100&fit=max&auto=format&n=6GE5Z24GDCZehiJ9&q=85&s=6de81ef141aba0be2e9bcd51e185cdd9 1100w, https://mintcdn.com/translations/6GE5Z24GDCZehiJ9/docs/images/cdy7uua7fh8z/65Jx4W5oIZJyyvA8z4HqIx/0661b1a8ca6361c54fc4fef07ba59f0b/update-user.png?w=1650&fit=max&auto=format&n=6GE5Z24GDCZehiJ9&q=85&s=473ae41d6a1c9a4ca0a2a33d45c73b71 1650w, https://mintcdn.com/translations/6GE5Z24GDCZehiJ9/docs/images/cdy7uua7fh8z/65Jx4W5oIZJyyvA8z4HqIx/0661b1a8ca6361c54fc4fef07ba59f0b/update-user.png?w=2500&fit=max&auto=format&n=6GE5Z24GDCZehiJ9&q=85&s=68049e0b45fe8db2e4e7010392b842cb 2500w" />
</Frame>

<div id="retrieve-the-form-render-code">
  ### Récupérer le code de rendu du formulaire
</div>

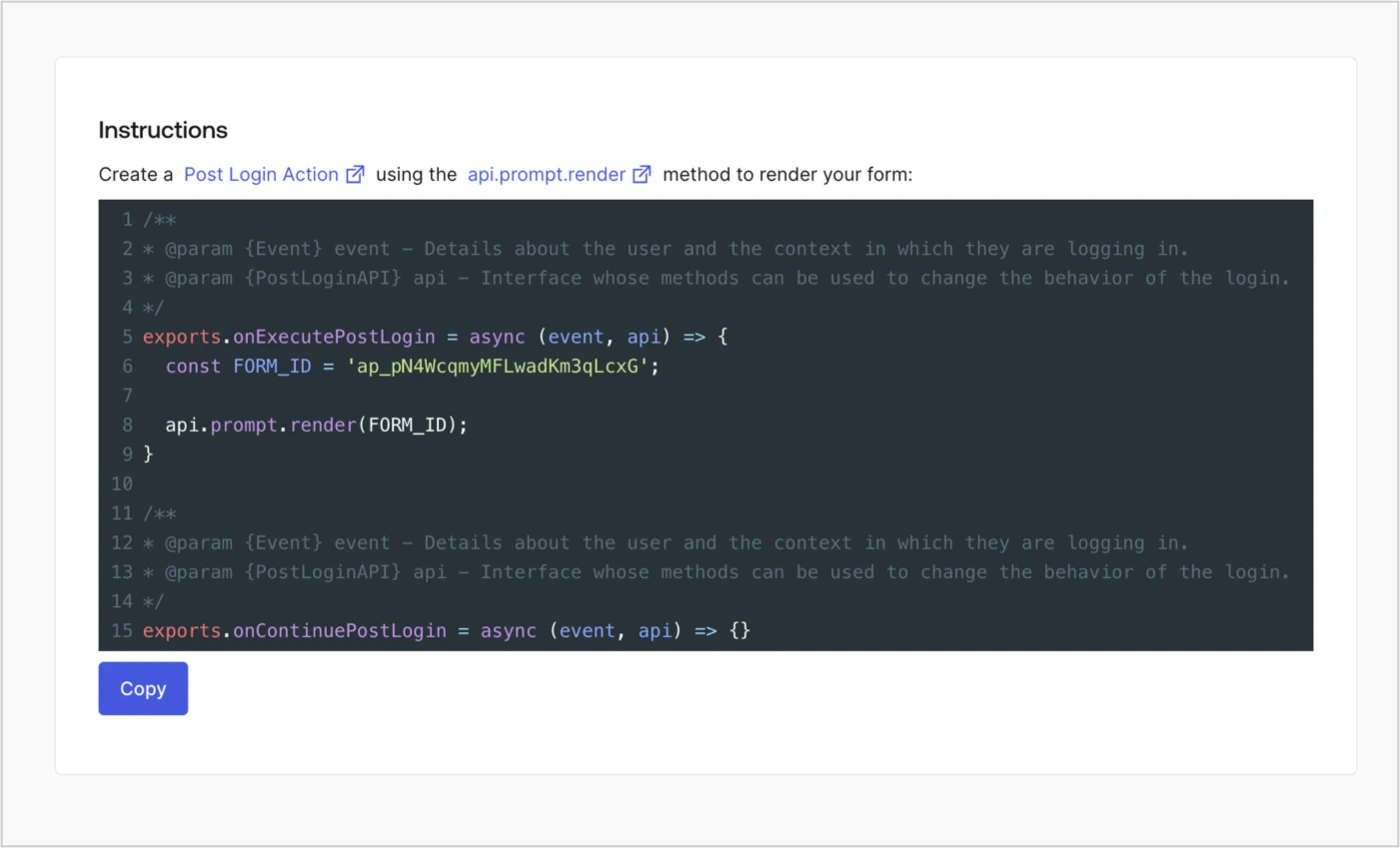
Récupérez le code de rendu du formulaire pour afficher le formulaire avec une Action Post Login personnalisée en suivant les étapes suivantes :

* Dans l’éditeur de formulaires, sélectionnez **`<> Render`**.
* Sélectionnez **Copier**.
<Frame>
  <img src="https://mintcdn.com/translations/Dcx0M11uuptU53TX/docs/images/cdy7uua7fh8z/2EIUzc539sq9lwoTKbjoJv/496a864c0fc44a782c9cadca119dbfb0/embed.png?fit=max&auto=format&n=Dcx0M11uuptU53TX&q=85&s=384ef6b70c700b214d699187cdbf7eea" alt="Auth0 Dashboard > Actions > Forms > Form > Intégrer" data-og-width="1400" width="1400" data-og-height="848" height="848" data-path="docs/images/cdy7uua7fh8z/2EIUzc539sq9lwoTKbjoJv/496a864c0fc44a782c9cadca119dbfb0/embed.png" data-optimize="true" data-opv="3" srcset="https://mintcdn.com/translations/Dcx0M11uuptU53TX/docs/images/cdy7uua7fh8z/2EIUzc539sq9lwoTKbjoJv/496a864c0fc44a782c9cadca119dbfb0/embed.png?w=280&fit=max&auto=format&n=Dcx0M11uuptU53TX&q=85&s=e4395c30ca530056bf8b7451b6deb334 280w, https://mintcdn.com/translations/Dcx0M11uuptU53TX/docs/images/cdy7uua7fh8z/2EIUzc539sq9lwoTKbjoJv/496a864c0fc44a782c9cadca119dbfb0/embed.png?w=560&fit=max&auto=format&n=Dcx0M11uuptU53TX&q=85&s=ac6fa0252e068609208572dcbf489baf 560w, https://mintcdn.com/translations/Dcx0M11uuptU53TX/docs/images/cdy7uua7fh8z/2EIUzc539sq9lwoTKbjoJv/496a864c0fc44a782c9cadca119dbfb0/embed.png?w=840&fit=max&auto=format&n=Dcx0M11uuptU53TX&q=85&s=907c448e7fe5ade5aed859f4d343f834 840w, https://mintcdn.com/translations/Dcx0M11uuptU53TX/docs/images/cdy7uua7fh8z/2EIUzc539sq9lwoTKbjoJv/496a864c0fc44a782c9cadca119dbfb0/embed.png?w=1100&fit=max&auto=format&n=Dcx0M11uuptU53TX&q=85&s=283450a49e31012d3c5c21790d7a8336 1100w, https://mintcdn.com/translations/Dcx0M11uuptU53TX/docs/images/cdy7uua7fh8z/2EIUzc539sq9lwoTKbjoJv/496a864c0fc44a782c9cadca119dbfb0/embed.png?w=1650&fit=max&auto=format&n=Dcx0M11uuptU53TX&q=85&s=4e518c8ad8926b9edde551a9e5f44b97 1650w, https://mintcdn.com/translations/Dcx0M11uuptU53TX/docs/images/cdy7uua7fh8z/2EIUzc539sq9lwoTKbjoJv/496a864c0fc44a782c9cadca119dbfb0/embed.png?w=2500&fit=max&auto=format&n=Dcx0M11uuptU53TX&q=85&s=02e887a11021cbbd64e79b09401489b9 2500w" />
</Frame>

<div id="create-a-post-login-action">
  ## Créer une Action Post-Login
</div>

Créez une Action Post-Login pour afficher votre formulaire en suivant ces étapes :

1. Accédez à **Auth0 Dashboard > Actions > Flows > Login.**
2. Sélectionnez l’icône **+**, puis **Build from scratch** :

   * **Nom** : Entrez `Render Progressive Profile Form`.
   * **Déclencheur** : Sélectionnez `Login / Post Login`.
   * **Environnement d’exécution** : Sélectionnez la version recommandée.
3. Sélectionnez **Create**.

Pour configurer l’Action Post-Login :

1. Supprimez le code existant dans l’éditeur de code.
2. Collez le code d’intégration du formulaire dans l’éditeur de code.
3. Modifiez le code pour définir la logique conditionnelle qui affichera le formulaire.

   ```javascript lines theme={null}
   /**
   * @param {Event} event - Détails sur l’utilisateur et le contexte dans lequel il se connecte.
   * @param {PostLoginAPI} api - Interface dont les méthodes peuvent être utilisées pour modifier le comportement du processus de connexion.
   */
   exports.onExecutePostLogin = async (event, api) => {
     const FORM_ID = 'REPLACE_WITH_YOUR_FORM_ID';

     if (
       event.stats.logins_count > 2 &&
       !event.user.user_metadata.company_name &&
       !event.user.user_metadata.job_title
     ) {
       api.prompt.render(FORM_ID);
     }
   }

   exports.onContinuePostLogin = async (event, api) => { }
   ```

   <Callout icon="file-lines" color="#0EA5E9" iconType="regular">
     L’exemple de code ci-dessus affichera le formulaire lorsqu’un utilisateur s’est connecté plus de deux fois et que les propriétés `company_name` et `job_title` sont absentes des métadonnées utilisateur.
   </Callout>
4. Sélectionnez **Deploy.**
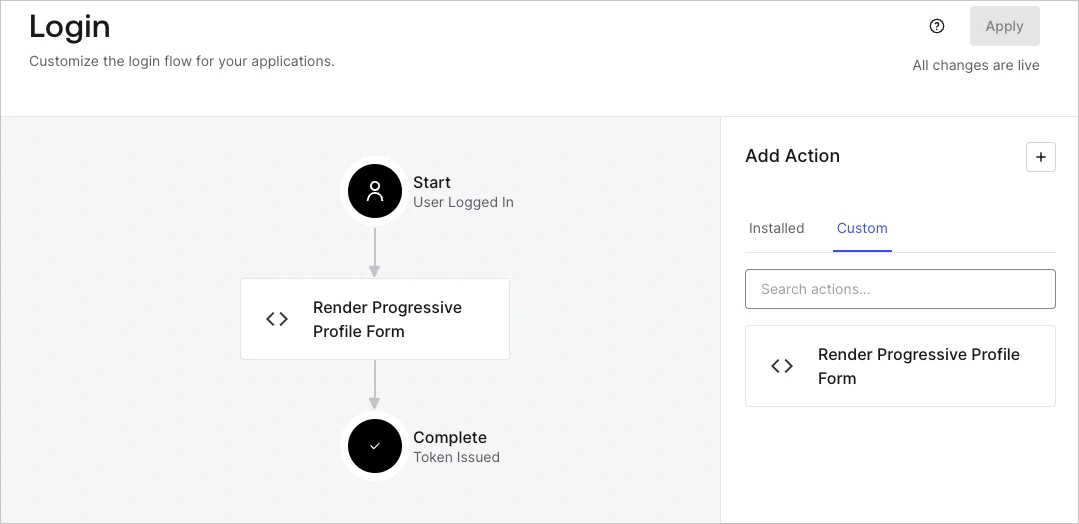
5. Faites glisser l’Action **Render Progressive Profile Form** dans le flux **Login**.
   <Frame>
     <img src="https://mintcdn.com/translations/eVsQcTnbClN-oB7d/docs/images/cdy7uua7fh8z/1QjjZdpTqTxx012UDN4xk9/99fba5ef4068a5688f1762eea7f42976/renderprogessiveprofile.png?fit=max&auto=format&n=eVsQcTnbClN-oB7d&q=85&s=a54028f6317267607f645bbb2324cfb0" alt="Dashboard > Forms > Use Cases Progressive Profile Login Action" data-og-width="1079" width="1079" data-og-height="524" height="524" data-path="docs/images/cdy7uua7fh8z/1QjjZdpTqTxx012UDN4xk9/99fba5ef4068a5688f1762eea7f42976/renderprogessiveprofile.png" data-optimize="true" data-opv="3" srcset="https://mintcdn.com/translations/eVsQcTnbClN-oB7d/docs/images/cdy7uua7fh8z/1QjjZdpTqTxx012UDN4xk9/99fba5ef4068a5688f1762eea7f42976/renderprogessiveprofile.png?w=280&fit=max&auto=format&n=eVsQcTnbClN-oB7d&q=85&s=b25c0a58909331b8aeb550013b99073a 280w, https://mintcdn.com/translations/eVsQcTnbClN-oB7d/docs/images/cdy7uua7fh8z/1QjjZdpTqTxx012UDN4xk9/99fba5ef4068a5688f1762eea7f42976/renderprogessiveprofile.png?w=560&fit=max&auto=format&n=eVsQcTnbClN-oB7d&q=85&s=83b4c974d7e06391f143abbd0d8e7892 560w, https://mintcdn.com/translations/eVsQcTnbClN-oB7d/docs/images/cdy7uua7fh8z/1QjjZdpTqTxx012UDN4xk9/99fba5ef4068a5688f1762eea7f42976/renderprogessiveprofile.png?w=840&fit=max&auto=format&n=eVsQcTnbClN-oB7d&q=85&s=bc003dfaa778b52e55a98948b617fc3d 840w, https://mintcdn.com/translations/eVsQcTnbClN-oB7d/docs/images/cdy7uua7fh8z/1QjjZdpTqTxx012UDN4xk9/99fba5ef4068a5688f1762eea7f42976/renderprogessiveprofile.png?w=1100&fit=max&auto=format&n=eVsQcTnbClN-oB7d&q=85&s=c9fa0b379b7743acebd0f0d78207d71b 1100w, https://mintcdn.com/translations/eVsQcTnbClN-oB7d/docs/images/cdy7uua7fh8z/1QjjZdpTqTxx012UDN4xk9/99fba5ef4068a5688f1762eea7f42976/renderprogessiveprofile.png?w=1650&fit=max&auto=format&n=eVsQcTnbClN-oB7d&q=85&s=d79f7a9ecfd5bddddd318bd409b26783 1650w, https://mintcdn.com/translations/eVsQcTnbClN-oB7d/docs/images/cdy7uua7fh8z/1QjjZdpTqTxx012UDN4xk9/99fba5ef4068a5688f1762eea7f42976/renderprogessiveprofile.png?w=2500&fit=max&auto=format&n=eVsQcTnbClN-oB7d&q=85&s=fd88d96bb14c3ef81fd09a9e4dc6e658 2500w" />
   </Frame>
6. Sélectionnez **Apply**.

<div id="test-implementation">
  ### Tester l’implémentation
</div>

Testez l’implémentation en suivant ces étapes :

1. Connectez-vous avec un utilisateur existant dont le nombre de connexions est supérieur à 2 et dont les attributs `user_metadata` `company_name` et `job_title` sont vides.
2. L’Action Post-Login dans le flux de connexion affichera le formulaire et demandera ces renseignements.
3. Sélectionnez **Auth0 Dashboard > Gestion des utilisateurs > Utilisateurs,** repérez l’utilisateur et vérifiez que les attributs `user_metadata` `company_name` et `job_title` contiennent des renseignements.
