> ## Documentation Index
> Fetch the complete documentation index at: https://translations.mintlify.site/llms.txt
> Use this file to discover all available pages before exploring further.

> Décrit comment installer, configurer et utiliser les options du SDK Auth0 Guardian pour Android.

# SDK Guardian pour Android

Le [SDK Guardian pour Android](https://github.com/auth0/Guardian.Android) vous aide à créer des applications Android dotées des fonctionnalités de Guardian, en offrant un accès sécurisé à l’<Tooltip tip="Authentification multifacteur (MFA) : processus d’authentification de l’utilisateur qui utilise un facteur en plus du nom d’utilisateur et du mot de passe, comme un code reçu par SMS." cta="Voir le glossaire" href="/fr-CA/docs/glossary?term=multi-factor+authentication">authentification multifacteur</Tooltip> (MFA) grâce aux notifications push. Avec cet ensemble d’outils, vous pouvez créer votre propre version personnalisée de l’application Guardian, adaptée à l’apparence et à l’expérience de votre organisation. Pour en savoir plus, consultez [Configurer les notifications push pour la MFA](/fr-CA/docs/secure/multi-factor-authentication/multi-factor-authentication-factors/configure-push-notifications-for-mfa#configure-push-notifications-for-apple-using-apn-).

Le niveau d’API Android 15 ou supérieur est requis pour utiliser le SDK Guardian pour Android.

<div id="install-guardian-android-sdk">
  ## Installer le SDK Android Guardian
</div>

Guardian est disponible dans [Maven Central](http://search.maven.org/) et [JCenter](https://bintray.com/auth0/android/guardian).

1. Pour utiliser Guardian, ajoutez les lignes suivantes au fichier de dépendances `build.gradle` :
   `implementation 'com.auth0.android:guardian:0.4.0'`
   Vous pouvez consulter la version la plus récente dans l’onglet [Releases](https://github.com/auth0/GuardianSDK.Android/releases) du dépôt, dans [Maven](http://search.maven.org/#search%7Cgav%7C1%7Cg%3A%22com.auth0.android%22%20AND%20a%3A%22guardian%22) ou dans [JCenter](https://bintray.com/auth0/android/guardian).
2. Après avoir ajouté la dépendance Gradle, assurez-vous de synchroniser votre projet avec le fichier Gradle.

<div id="enable-guardian-push-notifications">
  ### Activer les notifications push de Guardian
</div>

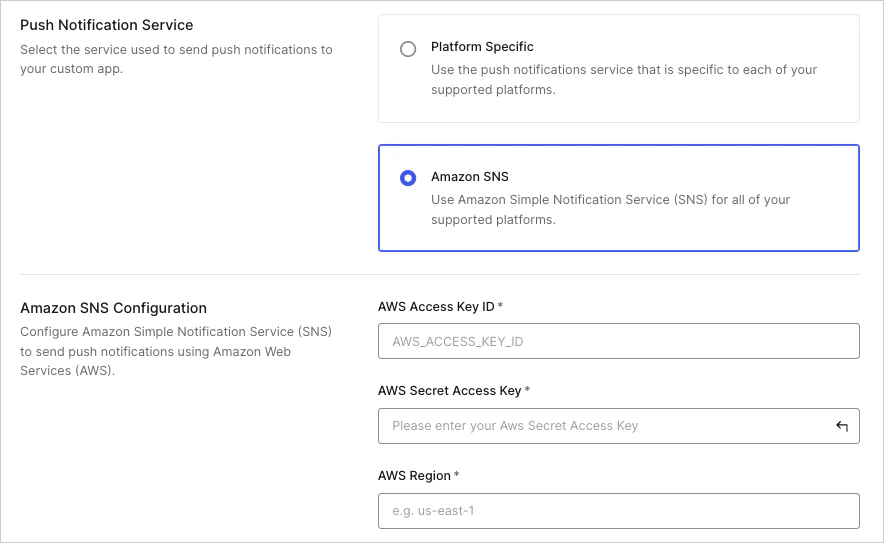
1. Accédez à [Dashboard > Security > Multifactor Auth > Push via Auth0 Guardian.](https://manage.auth0.com/#/security/mfa/guardian)
2. Activez le bouton bascule en haut de la page.

<Frame>
  <img src="https://mintcdn.com/translations/6GE5Z24GDCZehiJ9/docs/images/cdy7uua7fh8z/6PKSyH99GJ2CalJoG38sfZ/fbe7229dcc6f7d303a582520001b3dc1/Amazon_SNS.png?fit=max&auto=format&n=6GE5Z24GDCZehiJ9&q=85&s=6ec9f9594533c0d1f9eae8b306b89e49" alt="Auth0 Dashboard > Security > Multi-factor Auth > Guardian > Custom > Amazon SNS" data-og-width="884" width="884" data-og-height="543" height="543" data-path="docs/images/cdy7uua7fh8z/6PKSyH99GJ2CalJoG38sfZ/fbe7229dcc6f7d303a582520001b3dc1/Amazon_SNS.png" data-optimize="true" data-opv="3" srcset="https://mintcdn.com/translations/6GE5Z24GDCZehiJ9/docs/images/cdy7uua7fh8z/6PKSyH99GJ2CalJoG38sfZ/fbe7229dcc6f7d303a582520001b3dc1/Amazon_SNS.png?w=280&fit=max&auto=format&n=6GE5Z24GDCZehiJ9&q=85&s=cfa6a909a8ba0abe304c79f13146d197 280w, https://mintcdn.com/translations/6GE5Z24GDCZehiJ9/docs/images/cdy7uua7fh8z/6PKSyH99GJ2CalJoG38sfZ/fbe7229dcc6f7d303a582520001b3dc1/Amazon_SNS.png?w=560&fit=max&auto=format&n=6GE5Z24GDCZehiJ9&q=85&s=2de3d428b048412d6f48f39687dfd428 560w, https://mintcdn.com/translations/6GE5Z24GDCZehiJ9/docs/images/cdy7uua7fh8z/6PKSyH99GJ2CalJoG38sfZ/fbe7229dcc6f7d303a582520001b3dc1/Amazon_SNS.png?w=840&fit=max&auto=format&n=6GE5Z24GDCZehiJ9&q=85&s=808bbb10d23e2652bea6db44a7b79d8b 840w, https://mintcdn.com/translations/6GE5Z24GDCZehiJ9/docs/images/cdy7uua7fh8z/6PKSyH99GJ2CalJoG38sfZ/fbe7229dcc6f7d303a582520001b3dc1/Amazon_SNS.png?w=1100&fit=max&auto=format&n=6GE5Z24GDCZehiJ9&q=85&s=433c28028f54d0ac9051967d752ed014 1100w, https://mintcdn.com/translations/6GE5Z24GDCZehiJ9/docs/images/cdy7uua7fh8z/6PKSyH99GJ2CalJoG38sfZ/fbe7229dcc6f7d303a582520001b3dc1/Amazon_SNS.png?w=1650&fit=max&auto=format&n=6GE5Z24GDCZehiJ9&q=85&s=56e6faa22bbde1748b7d84ccdfbea399 1650w, https://mintcdn.com/translations/6GE5Z24GDCZehiJ9/docs/images/cdy7uua7fh8z/6PKSyH99GJ2CalJoG38sfZ/fbe7229dcc6f7d303a582520001b3dc1/Amazon_SNS.png?w=2500&fit=max&auto=format&n=6GE5Z24GDCZehiJ9&q=85&s=155f76556a99a078740cdd68420a32f4 2500w" />
</Frame>

3. [Configurez les notifications push](/fr-CA/docs/secure/multi-factor-authentication/multi-factor-authentication-factors/configure-push-notifications-for-mfa#configure-push-notifications-for-android-using-fcm).

<div id="use-sdk">
  ## Utiliser le SDK
</div>

Guardian est au cœur du SDK. Vous devrez créer une instance de cette classe pour l’URL propre à votre locataire.

```java lines theme={null}
Uri url = Uri.parse("https://<tenant>.<region>.auth0.com");

Guardian guardian = new Guardian.Builder()
    .url(url)
    .build();
```

ou

```java lines theme={null}
String domain = "<tenant>.<region>.auth0.com";

Guardian guardian = new Guardian.Builder()
    .domain(domain)
    .build();
```

<div id="enroll">
  ### Inscrire
</div>

Le lien entre le second facteur (une instance de votre application sur un appareil) et un compte Auth0 correspond à une **inscription**.

Vous pouvez créer une inscription à l’aide de la fonction `Guardian.enroll`, mais vous devez d’abord générer une nouvelle paire de clés RSA. La clé privée servira à signer les requêtes permettant d’autoriser ou de refuser une connexion. La clé publique sera envoyée pendant le processus d’inscription afin que le serveur puisse ensuite vérifier la signature de la requête.

```java lines theme={null}
KeyPairGenerator keyPairGenerator = KeyPairGenerator.getInstance("RSA");
keyPairGenerator.initialize(2048); // vous DEVEZ utiliser des clés d'au moins 2048 bits
KeyPair keyPair = keyPairGenerator.generateKeyPair();
```

Ensuite, obtenez les informations d’inscription en numérisant le code QR Guardian, puis utilisez-les pour inscrire le compte :

```java lines theme={null}
Uri enrollmentUriFromQr = ...; // l'URI obtenu à partir d'un code QR Guardian

CurrentDevice device = new CurrentDevice(context, "fcmToken", "deviceName");

Enrollment enrollment = guardian
    .enroll(enrollmentUriFromQr, device, keyPair)
    .execute();
```

Vous pouvez également exécuter la requête dans un thread en arrière-plan :

```java lines theme={null}
guardian
    .enroll(enrollmentUriFromQr, device, keyPair)
    .start(new Callback<Enrollment> {
        @Override
        void onSuccess(Enrollment enrollment) {
            // nous avons les données d'inscription
        }

        @Override
        void onFailure(Throwable exception) {
            // quelque chose a échoué
        }
    });
```

Vous devez fournir les données suivantes :

| Variable     | Description                                                                                                                                                                                              |
| ------------ | -------------------------------------------------------------------------------------------------------------------------------------------------------------------------------------------------------- |
| `deviceName` | Nom associé à l’inscription, affiché à l’utilisateur lorsque le deuxième facteur est requis.                                                                                                             |
| `fcmToken`   | Jeton du service de notifications push Firebase Cloud Messaging (FCM). Consultez [Sample Register](https://firebase.google.com/docs/cloud-messaging/android/client#sample-register) pour en savoir plus. |

<div id="unenroll">
  ### Désinscrire
</div>

Pour désactiver le MFA, vous pouvez supprimer l’inscription :

```java lines theme={null}
guardian
    .delete(enrollment)
    .execute(); // ou start(new Callback<> ...)
```

<div id="allow-login-requests">
  ### Autoriser les demandes de connexion
</div>

Une fois l’inscription en place, vous recevrez une notification push FCM chaque fois que l’utilisateur aura besoin d’une authentification multifacteur.

Guardian fournit une méthode pour analyser les données `Map<String, String>` contenues dans le [RemoteMessage](https://firebase.google.com/docs/reference/android/com/google/firebase/messaging/RemoteMessage) reçu de FCM et renvoyer une instance `Notification` prête à l’emploi.

```javascript lines theme={null}
// au listener FCM vous recevez un RemoteMessage
@Override
public void onMessageReceived(RemoteMessage message) {
    Notification notification = Guardian.parseNotification(message.getData());
    if (notification != null) {
        // vous avez reçu une notification Guardian, traitez-la
        handleGuardianNotification(notification);
        return;
    }

    /* gérez les autres notifications push que vous pourriez utiliser ... */
}
```

Une fois que vous avez l’instance de la notification, vous pouvez utiliser la méthode `allow` pour approuver la demande d’authentification. Vous aurez aussi besoin de l’inscription obtenue précédemment. S’il y a plusieurs inscriptions, assurez-vous d’utiliser celle dont le `id` correspond à celui de la notification (propriété `enrollmentId`).

```java lines theme={null}
guardian
    .allow(notification, enrollment)
    .execute(); // ou start(new Callback<> ...)
```

<div id="reject-login-requests">
  ### Rejeter les demandes de connexion
</div>

Pour refuser une requête d’authentification, utilisez plutôt `reject`. Vous pouvez aussi ajouter un motif facultatif de refus, qui sera accessible dans les journaux Guardian.

```java lines theme={null}
guardian
    .reject(notification, enrollment) // ou reject(notification, enrollment, reason)
    .execute(); // ou start(new Callback<> ...)
```

<div id="set-up-mobile-only-otp-enrollment">
  ### Configurer l’inscription OTP sur mobile seulement
</div>

Vous pouvez activer les mots de passe à usage unique (OTP) comme facteur MFA à l’aide de <Tooltip tip="Auth0 Dashboard : principal produit Auth0 pour configurer vos services." cta="Voir le glossaire" href="/fr-CA/docs/glossary?term=Auth0+Dashboard">Auth0 Dashboard</Tooltip> ou de <Tooltip tip="Management API : produit permettant aux clients d’effectuer des tâches administratives." cta="Voir le glossaire" href="/fr-CA/docs/glossary?term=Management+API">Management API</Tooltip>. Cette option ne nécessite pas de code QR et permet aux utilisateurs de s’inscrire manuellement.

Pour inviter un utilisateur à s’inscrire, accédez à [Auth0 Dashboard > User Management > Users](https://manage.auth0.com/#/users) et sélectionnez un utilisateur. Accédez ensuite à son onglet Details, puis utilisez la section Multi-Factor Authentication pour envoyer une invitation à l’inscription.

<div id="connect-a-resource">
  #### Connecter une ressource
</div>

Vous pouvez connecter une ressource à l’aide de l’Auth0 Dashboard ou du SDK Guardian.

<div id="use-auth0-dashboard">
  ##### Utiliser Auth0 Dashboard
</div>

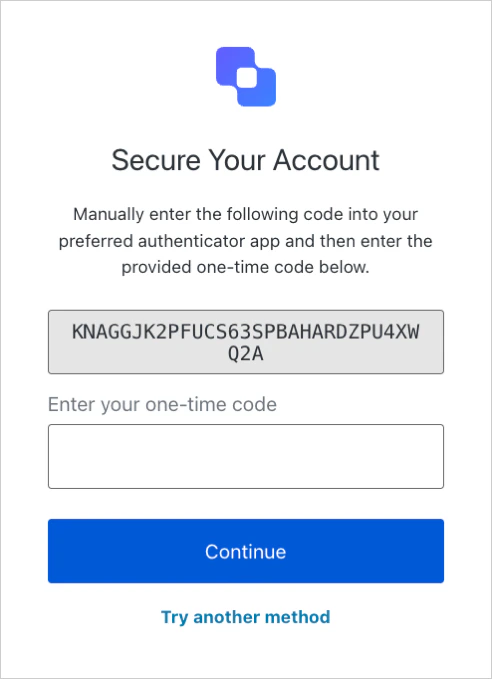
1. Accédez à l’invite de connexion d’Auth0 et copiez le code fourni, ou une clé semblable encodée en base32 obtenue d’une autre source.
   <Frame>
     <img src="https://mintcdn.com/translations/eVsQcTnbClN-oB7d/docs/images/cdy7uua7fh8z/1yoqiIuERVTwCU8yfx6IM8/047513dfe1d40a22ce811b131d5ea289/OTP_Challenge_2_-_English.png?fit=max&auto=format&n=eVsQcTnbClN-oB7d&q=85&s=128a02f4c7f65e7a1d82640b1b9842f6" alt="Exemple d’écran de connexion affichant un code à usage unique" width="492" height="679" data-path="docs/images/cdy7uua7fh8z/1yoqiIuERVTwCU8yfx6IM8/047513dfe1d40a22ce811b131d5ea289/OTP_Challenge_2_-_English.png" />
   </Frame>
2. Après avoir obtenu votre code, ajoutez-le au SDK Guardian :

**Java**

`public String copiedCode = "{copiedCode}";`

**Kotlin**

`val copiedCode: String = "{copiedCode}"`

<div id="use-guardian-sdk">
  ##### Utilisez le SDK Guardian
</div>

Ajoutez d’abord la classe `LoginCodeGenerator` à votre projet. Ensuite, utilisez `getCode (String copiedCode) to` pour générer un code à usage unique dans votre application.

**Java**

```java lines expandable theme={null}
public class LoginCodeGenerator {

   private static final int TOTP_LENGTH = 6;

   private static final int TOTP_DURATION = 30;

   private static final String TOTP_ALGORITHM = "SHA1";

   public String getCode(String copedCode) {

       byte[] key = new byte[0];

       try {

           key = Base32.decode(copedCode);

       } catch (Base32.DecodingException ex) {

//            gérer l'exception

       }

       TOTP totp = new TOTP(TOTP_ALGORITHM, key, TOTP_LENGTH, TOTP_DURATION);

       return totp.generate();

   }

}
```

**Kotlin**

```kotlin lines expandable theme={null}
class LoginCodeGenerator {

   fun getCode(copiedCode: String): String {

       var key: ByteArray? = ByteArray(0)

       try {

           key = Base32.decode(copiedCode)

       } catch (ex: Base32.DecodingException) {

//            gérer l'exception

       }

       val totp = TOTP(TOTP_ALGORITHM, key, TOTP_LENGTH, TOTP_DURATION)

       return totp.generate()

   }

   companion object {

       private const val TOTP_LENGTH = 6

       private const val TOTP_DURATION = 30

       private const val TOTP_ALGORITHM = "SHA1"

   }

}
```

<div id="enter-one-time-code">
  #### Saisir le code à usage unique
</div>

Entrez le code à usage unique généré par `getCode()` dans l’invite de connexion Auth0.

<Frame>
  <img src="https://mintcdn.com/translations/eVsQcTnbClN-oB7d/docs/images/cdy7uua7fh8z/1yoqiIuERVTwCU8yfx6IM8/047513dfe1d40a22ce811b131d5ea289/OTP_Challenge_2_-_English.png?fit=max&auto=format&n=eVsQcTnbClN-oB7d&q=85&s=128a02f4c7f65e7a1d82640b1b9842f6" alt="Exemple d’invite de connexion affichant un code à usage unique" width="492" height="679" data-path="docs/images/cdy7uua7fh8z/1yoqiIuERVTwCU8yfx6IM8/047513dfe1d40a22ce811b131d5ea289/OTP_Challenge_2_-_English.png" />
</Frame>

Après avoir sélectionné Continuer, un message s’affiche indiquant que votre application a été ajoutée comme facteur d’authentification pour le compte utilisateur.

<div id="log-in-with-your-app">
  #### Connectez-vous avec votre application
</div>

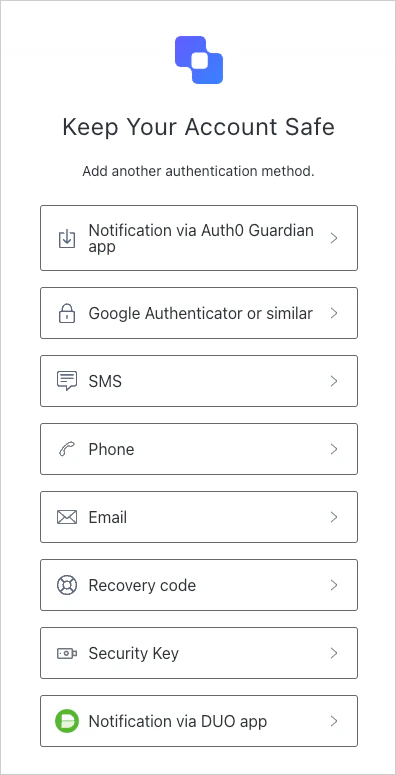
Une fois le facteur inscrit, l’utilisateur peut se connecter à l’aide de votre application. Choisissez d’abord l’application Guardian comme méthode d’authentification.
<Frame>
  <img src="https://mintcdn.com/translations/eVsQcTnbClN-oB7d/docs/images/cdy7uua7fh8z/1k7IsU9kfP5mrXU2jfGHuT/d61e0dcd09b633dbeb2cb54e1fd49018/2025-01-27_14-47-32.png?fit=max&auto=format&n=eVsQcTnbClN-oB7d&q=85&s=8688ecf3a0d42d92a6479adea541793d" alt="L’écran de sélection de la méthode d’authentification" width="396" height="775" data-path="docs/images/cdy7uua7fh8z/1k7IsU9kfP5mrXU2jfGHuT/d61e0dcd09b633dbeb2cb54e1fd49018/2025-01-27_14-47-32.png" />
</Frame>

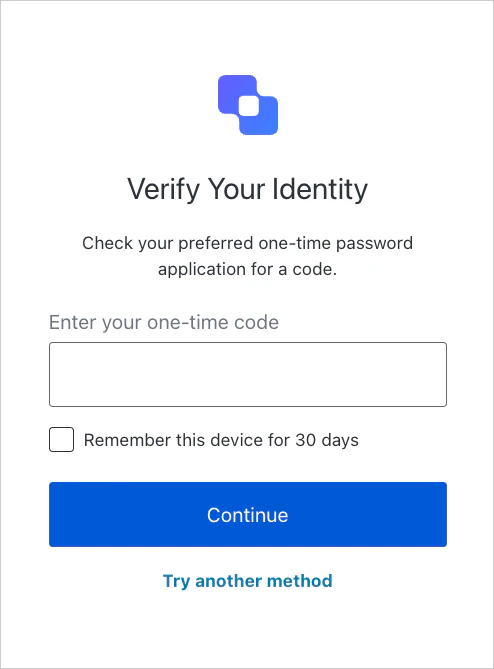
Pour générer le code à usage unique, appelez `getCode(copedCode: String)` avec le code que vous avez copié depuis l’invite de connexion Auth0.

Ensuite, saisissez le code à usage unique dans l’invite de connexion pour vérifier votre identité.
<Frame>
  <img src="https://mintcdn.com/translations/mMSz-RNYLuOm2GmQ/docs/images/cdy7uua7fh8z/S6uTieLjtuNUrQRMh8uch/21f1671d21ae9f61b63154ffaa21b5a2/OTP_Challenge_-_English.png?fit=max&auto=format&n=mMSz-RNYLuOm2GmQ&q=85&s=5db00906087d0b3d46e36cddc464d667" alt="L’écran Vérifiez votre identité demandant à l’utilisateur de saisir un code à usage unique" width="494" height="669" data-path="docs/images/cdy7uua7fh8z/S6uTieLjtuNUrQRMh8uch/21f1671d21ae9f61b63154ffaa21b5a2/OTP_Challenge_-_English.png" />
</Frame>

<div id="learn-more">
  ## En savoir plus
</div>

* [Configurer les notifications push pour MFA](/fr-CA/docs/secure/multi-factor-authentication/multi-factor-authentication-factors/configure-push-notifications-for-mfa)
