> ## Documentation Index
> Fetch the complete documentation index at: https://translations.mintlify.site/llms.txt
> Use this file to discover all available pages before exploring further.
> Action を Custom Token Profile に関連付けて、Custom Token Exchange を設定する方法を説明します。
# Custom Token Exchange を設定する
export const ReleaseStageNotice = ({feature, stage, plans, contact, terms}) => {
const stageTextMap = {
"beta": "ベータ",
"ea": "早期アクセス"
};
const stageText = stageTextMap[stage] || "製品リリース段階";
const prsLink = "/docs/troubleshoot/product-lifecycle/product-release-stages";
const linkify = (text, url) => {
return {text};
};
const includeDetails = (plans, contact, terms) => {
const hasDetails = terms || plans || contact;
if (!hasDetails) return null;
return
{plans && <>この機能は、{linkify(`${plans}プラン`, "https://auth0.com/pricing")}で利用できます。 }
{contact && "参加するには、" + contact + " までお問い合わせください。 "}
{terms && <>この機能を使用すると、Okta の{linkify("Master Subscription Agreement", "https://www.okta.com/legal")}に定める該当する無料トライアル条件に同意したものとみなされます。}
;
};
return
{feature} 機能は現在、{linkify(stageText, prsLink)}です。
{includeDetails(plans, contact, terms)}
;
};
アプリケーションで Custom Token Exchange を設定するには、次の作業が必要です。
* [前提条件を満たす](#prerequisites)
* [アプリケーションで Custom Token Exchange を有効にする](#enable-custom-token-exchange-for-your-application)
* Custom Token Exchange Profile を[設定](#configure-custom-token-exchange-profile)し、[管理](#manage-custom-token-exchange-profile)する
## 前提条件
Custom Token Exchange を設定する前に、アプリケーションが次の前提条件を満たしていることを確認してください。
* ファーストパーティ クライアントである
* OIDC 準拠である
アプリケーションを設定するには、Auth0 Dashboard で **[Applications > Advanced Settings > OAuth](https://auth0.com/docs/get-started/applications/application-settings#oauth)** に移動します。
## アプリケーションで Custom Token Exchange を有効にする
Custom Token Exchange を有効にするには、[新しいアプリケーションを作成](/ja/docs/get-started/auth0-overview/create-applications)するか、Auth0 Dashboard または Management API を使用して既存のアプリケーションを更新します。Custom Token Exchange で使用するアプリケーションは複数作成できます。
新しいアプリケーションを作成する場合:
1. デフォルトでは、Custom Token Exchange は無効になっています。Custom Token Exchange を有効にするには、Management API を使用して [Create a Client](https://auth0.com/docs/api/management/v2/clients/post-clients) に `POST` リクエストを送信するか、[Update a Client](https://auth0.com/docs/api/management/v2/clients/patch-clients-by-id) に `PATCH` リクエストを送信します。`token_exchange` の `allow_any_profile_of_type` 属性を `["custom_authentication"]` に設定します:
```json lines theme={null}
{
"token_exchange": {
"allow_any_profile_of_type": ["custom_authentication"]
}
}
```
2. アプリケーションで、Custom Token Exchange に使用する接続を有効にします。
3. アプリケーションが [ファーストパーティ](/ja/docs/get-started/applications/first-party-and-third-party-applications) として設定されており、**[Dashboard > Applications > Advanced Settings > OAuth](/ja/docs/get-started/applications/application-settings#oauth)** で OIDC 準拠 として構成されていることを確認します。
インポートモードが `ON` の Custom DB でサポートされるのは、`setUserById()` 操作のみです。
アプリケーションを作成したら、後で `/oauth/token` エンドポイントを呼び出すときに使用する `client_id` と `client_secret` を控えておきます。
## Custom Token Exchange Profile を設定する
各 Custom Token Exchange Profile は、`subject_token_type` と Action を 1 対 1 で対応付けます。Action には、特定のユースケース向けのロジックが含まれます。
特定の `subject_token_type` 値を指定して `/oauth/token` エンドポイントに送信された Custom Token Exchange リクエストは、対応する Custom Token Exchange Profile にマッピングされ、処理のために関連付けられた Action にルーティングされます。
Custom Token Exchange Profile を作成するには、次の手順を実行します。
1. [プロファイル用の Action を作成する](#create-action-for-the-profile)
2. [Custom Token Exchange Profile を作成する](#create-custom-token-exchange-profile)
3. [Custom Token Exchange Profile を管理する](#manage-custom-token-exchange-profile)
### プロファイル用の Action を作成する
Custom Token Exchange の Event オブジェクトと API オブジェクトを使用して、次の処理を行う Action を作成します。
* `subject_token_type` に基づいて `subject_token` をデコードおよび検証します。これにより、このトランザクションにおけるユーザーに関する情報を取得できます。
* トランザクションに必要な認可ポリシーを適用します。
トランザクションを続行できることを確認したら、ユーザーを設定します。すると Auth0 は、ユーザー認証の一環として、このユーザーに対するアクセストークン、ID トークン、リフレッシュトークンを発行します。
Custom Token Exchange の Action の例については、[ユースケースの例とコードサンプル](/ja/docs/authenticate/custom-token-exchange/cte-example-use-cases)を参照してください。
Action を作成したら、Auth0 Dashboard で追加してデプロイします。
1. **Actions > Library** に移動します。
2. **Create Action > Build from Scratch** を選択します。
3. **Create Action** ダイアログで、名前を入力し、ドロップダウンから **Custom Token Exchange** トリガーを選択します。
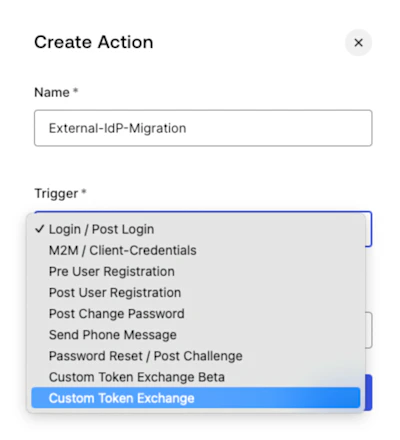 4. **Create** を選択します。
5. Action を **Deploy** します。
4. **Create** を選択します。
5. Action を **Deploy** します。
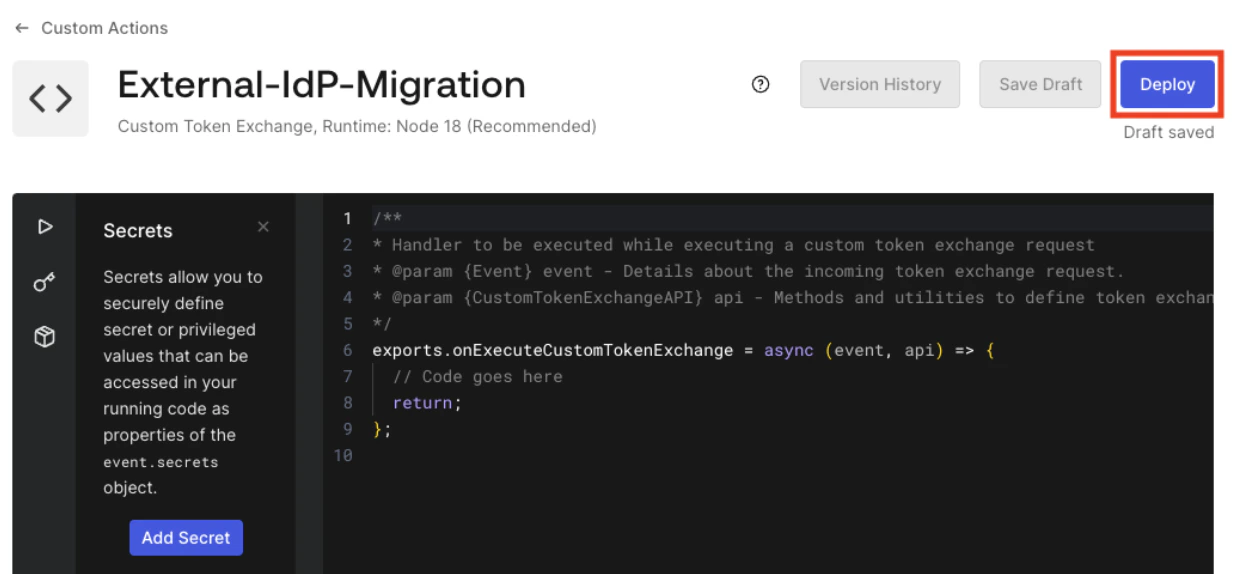 Action をデプロイしたら、Auth0 によって割り当てられた Action ID をコピーします。Action にはまだ独自のロジックを追加する必要があります。まず、Custom Token Exchange Profile を作成するために Action ID を取得します。
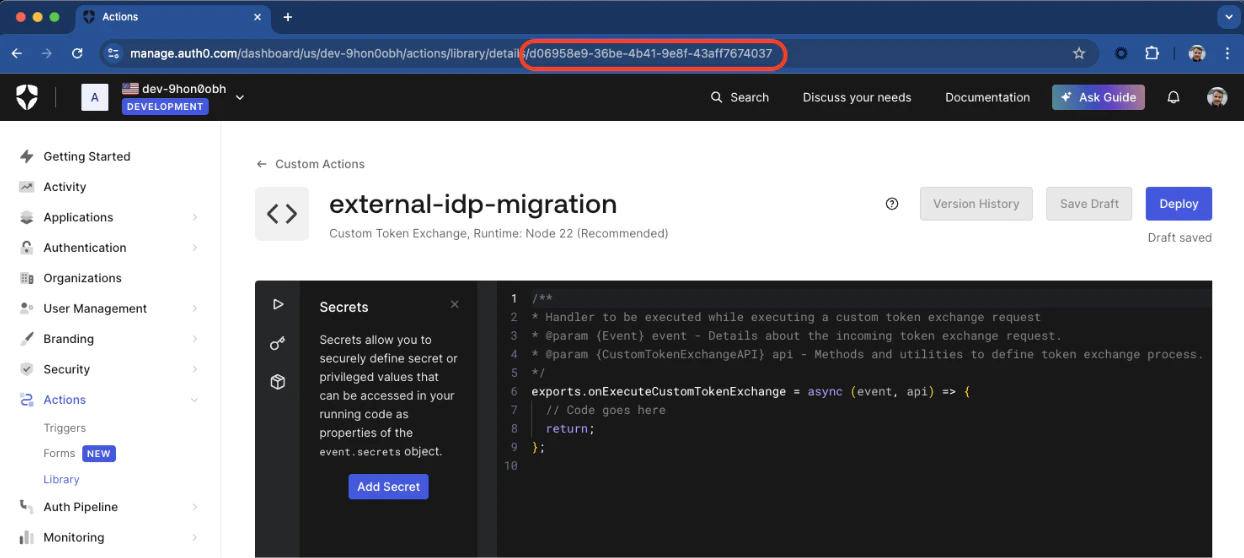
6. Auth0 Dashboard で Action ID を取得するには、ブラウザーウィンドウの URL を確認します。次の画像に示すように、Action ID は URL の最後の部分です。
Action をデプロイしたら、Auth0 によって割り当てられた Action ID をコピーします。Action にはまだ独自のロジックを追加する必要があります。まず、Custom Token Exchange Profile を作成するために Action ID を取得します。
6. Auth0 Dashboard で Action ID を取得するには、ブラウザーウィンドウの URL を確認します。次の画像に示すように、Action ID は URL の最後の部分です。
 Management API を使用して Action ID を取得することもできます。まず、API を利用するための Management API トークンを取得します。次に、`/actions` エンドポイントに対して次の `GET` リクエストを実行します。
```bash lines theme={null}
curl --location 'https://{yourDomain}/api/v2/actions/actions?actionName={yourActionName}' \
--header 'Authorization: Bearer ' \
```
レスポンス本文の `actions[0].id.` に Action ID が返されます。Custom Token Exchange Profile を作成するには、この Action ID が必要です。
Management API を使用して Action ID を取得することもできます。まず、API を利用するための Management API トークンを取得します。次に、`/actions` エンドポイントに対して次の `GET` リクエストを実行します。
```bash lines theme={null}
curl --location 'https://{yourDomain}/api/v2/actions/actions?actionName={yourActionName}' \
--header 'Authorization: Bearer ' \
```
レスポンス本文の `actions[0].id.` に Action ID が返されます。Custom Token Exchange Profile を作成するには、この Action ID が必要です。
### Custom Token Exchange Profile を作成する
Custom Token Exchange Profile を作成するには、Management API を使用して `/token-exchange-profiles` エンドポイントに対し、次のパラメーターを指定した `POST` リクエストを送信します。
```bash lines theme={null}
curl --location 'https://{yourDomain}/api/v2/token-exchange-profiles' \
--header 'Content-Type: application/json' \
--header 'Authorization: Bearer ' \
--data '{
"name": "",
"subject_token_type": "",
"action_id": "",
"type": "custom_authentication"
}'
```
| パラメーター | 説明 |
| -------------------- | ----------------------------------------------------------------------------------------------------------------------------------------------------------------------------------------------------------------------------------------------------------------------------- |
| `subject_token_type` | `https://` または `urn` で始まる一意のプロファイルトークンタイプ URI
次の名前空間は予約されているため、使用できません。
- `http://auth0.com`
- `https://auth0.com`
- `http://okta.com`
- `https://okta.com`
- `urn:ietf`
- `urn:auth0`
- `urn:okta`
|
| `action_id` | Custom Token Profile に関連付けられた Action の ID。 |
| `type` | `custom_authentication` に設定する必要があります。 |
Custom Token Exchange Profile の作成に成功すると、次のようなレスポンスが返されます。
```json lines theme={null}
{
"id":"tep_9xqewuejpa2RTltf",
"name":"",
"type":"custom_authentication",
"subject_token_type":"",
"action_id":"",
"created_at":"2025-01-30T13:19:00.616Z",
"updated_at":"2025-01-30T13:19:00.616Z"
}
```
### Custom Token Exchange Profile を管理する
Custom Token Exchange Profile を管理するには、Management API を使用して `/token-exchange-profiles` エンドポイントにリクエストを送信します。
すべての Custom Token Exchange Profile を取得するには、`/token-exchange-profiles` エンドポイントに対して次の `GET` リクエストを送信します。複数のプロファイルがある場合、`/token-exchange-profiles` エンドポイントではチェックポイントページネーションを使用できます。
```bash lines theme={null}
curl --location 'https://{yourDomain}/api/v2/token-exchange-profiles' \
--header 'Authorization: Bearer ' \
```
既存のプロファイルの名前または `subject_token_type` を更新するには、`/token-exchange-profiles` エンドポイントに対して次の `PATCH` リクエストを送信します。
Action を作成した後は、Action ID を変更できません。
```bash lines theme={null}
curl --location --request PATCH 'https://{yourDomain}/api/v2/token-exchange-profiles/{yourProfileId}' \
--header 'Content-Type: application/json' \
--header 'Authorization: Bearer ' \
--data '{
"name": "external-idp-migration",
"subject_token_type": "urn:partner0:external-idp-migration"
}'
```
Custom Token Exchange Profile を削除するには、`/token-exchange-profiles` エンドポイントに対して次の `DELETE` リクエストを送信します。
```bash lines theme={null}
curl --location --request DELETE 'https://{yourDomain}/api/v2/token-exchange-profiles/{yourProfileId}' \
--header 'Authorization: Bearer ' \
--data ''
```