> ## Documentation Index
> Fetch the complete documentation index at: https://translations.mintlify.site/llms.txt
> Use this file to discover all available pages before exploring further.
> Auth0 アプリケーションのユーザーのパスワードをリセットする複数の方法について説明します。
# ユーザーのパスワードを変更
export const AuthCodeGroup = ({children, dropdown}) => {
const [processedChildren, setProcessedChildren] = useState(children);
useEffect(() => {
let unsubscribe = null;
function init() {
unsubscribe = window.autorun(() => {
const processChildren = node => {
if (typeof node === "string") {
let processedNode = node;
for (const [key, value] of window.rootStore.variableStore.values.entries()) {
const escapedKey = key.replaceAll(/[.*+?^${}()|[\]\\]/g, (String.raw)`\$&`);
processedNode = processedNode.replaceAll(new RegExp(escapedKey, "g"), value);
}
return processedNode;
} else if (Array.isArray(node)) {
return node.map(processChildren);
} else if (node && node.props && node.props.children) {
return {
...node,
props: {
...node.props,
children: processChildren(node.props.children)
}
};
}
return node;
};
setProcessedChildren(processChildren(children));
});
}
if (window.rootStore) {
init();
} else {
window.addEventListener("adu:storeReady", init);
}
return () => {
window.removeEventListener("adu:storeReady", init);
unsubscribe?.();
};
}, [children]);
return {processedChildren};
};
export const AuthCodeBlock = ({filename, icon, language, highlight, children}) => {
const [displayText, setDisplayText] = useState(children);
const [copyText, setCopyText] = useState(children);
const wrapperRef = React.useRef(null);
useEffect(() => {
let unsubscribe = null;
function init() {
if (!window.autorun || !window.rootStore) {
return;
}
unsubscribe = window.autorun(() => {
let processedChildrenForDisplay = children;
let processedChildrenForCopy = children;
for (const [key, value] of window.rootStore.variableStore.values.entries()) {
const escapedKey = key.replaceAll(/[.*+?^${}()|[\]\\]/g, (String.raw)`\$&`);
let displayValue = value;
if (key === "{yourClientSecret}" && value !== "{yourClientSecret}") {
displayValue = value.substring(0, 3) + "*****マスク済み*****";
}
processedChildrenForDisplay = processedChildrenForDisplay.replaceAll(new RegExp(escapedKey, "g"), displayValue);
processedChildrenForCopy = processedChildrenForCopy.replaceAll(new RegExp(escapedKey, "g"), value);
}
setDisplayText(processedChildrenForDisplay);
setCopyText(processedChildrenForCopy);
});
}
if (window.rootStore) {
init();
} else {
window.addEventListener("adu:storeReady", init);
}
return () => {
window.removeEventListener("adu:storeReady", init);
unsubscribe?.();
};
}, [children]);
useEffect(() => {
if (!wrapperRef.current) return;
const originalWriteText = navigator.clipboard.writeText.bind(navigator.clipboard);
let isOverriding = false;
const handleClick = e => {
const button = e.target.closest('[data-testid="copy-code-button"]');
if (!button || !wrapperRef.current.contains(button)) return;
isOverriding = true;
navigator.clipboard.writeText = text => {
if (isOverriding) {
isOverriding = false;
navigator.clipboard.writeText = originalWriteText;
return originalWriteText(copyText);
}
return originalWriteText(text);
};
setTimeout(() => {
if (isOverriding) {
isOverriding = false;
navigator.clipboard.writeText = originalWriteText;
}
}, 100);
};
const wrapper = wrapperRef.current;
wrapper.addEventListener('click', handleClick, true);
return () => {
wrapper.removeEventListener('click', handleClick, true);
if (navigator.clipboard.writeText !== originalWriteText) {
navigator.clipboard.writeText = originalWriteText;
}
};
}, [copyText]);
return
{displayText}
;
};
主なポイント
* Auth0 Dashboard または Management API を使用して、パスワードリセットを開始できます。
このトピックでは、データベース内のユーザーのパスワードをリセットするさまざまな方法について説明します。パスワードを変更できるのは、[データベース接続](/ja/docs/authenticate/database-connections) のユーザーのみです。[ソーシャル](/ja/docs/authenticate/identity-providers/social-identity-providers) 接続または [エンタープライズ](/ja/docs/authenticate/identity-providers/enterprise-identity-providers) 接続でサインインするユーザーは、IDプロバイダー (Google や Facebook など) でパスワードをリセットする必要があります。また、以下の手順は、ユーザーのメールアドレスがわかっている場合にのみ使用できます。
ユーザーのパスワードを変更する基本的な方法は 2 つあります。
* [インタラクティブなパスワードリセットフローを開始する](#trigger-an-interactive-password-reset-flow): ユーザーにメールでリンクを送信します。このリンクを開くと Auth0 のパスワードリセットページが表示され、ユーザーは新しいパスワードを入力できます。
* [新しいパスワードを直接設定する](#directly-set-the-new-password): Auth0 の Management API または Auth0 Dashboard を使用します。
ユーザーのパスワードをリセットすると、そのユーザーのセッションは期限切れになります。
* カスタムの Password Reset ページを設定するには、[Password Reset ページをカスタマイズする](/ja/docs/customize/login-pages/classic-login/customize-password-reset-page) を参照してください。
* パスワード変更後のカスタム動作を実装するには、[Actions トリガー: post-change-password](/ja/docs/customize/actions/explore-triggers/password-reset-triggers/post-change-password-trigger) を参照してください。
* 個人の Auth0 ユーザーアカウントのパスワードをリセットするには、[アカウントパスワードをリセットする](/ja/docs/troubleshoot/customer-support/reset-account-passwords) を参照してください。
## インタラクティブなパスワードリセットフローを開始する
ユースケースに応じて、インタラクティブなパスワードリセットフローを開始する方法は 2 つあります。Universal Login ページ経由で行う方法と、Authentication API を使用する方法です。
### Universal Login ページ
アプリケーションで Universal Login を使用している場合、ユーザーはログイン画面の Lock ウィジェットから、パスワードリセット用のメールを送信できます。Universal Login では、ユーザーは **パスワードを思い出せませんか?** リンクをクリックしてメールアドレスを入力できます。これにより、Auth0 に POST リクエストが送信され、パスワードリセット処理が開始されます。ユーザーは[パスワードリセットメールを受信します](#password-reset-email)。
### Authentication API
アプリケーションで Authentication API を介したインタラクティブなパスワードリセットフローを使用している場合は、`POST` リクエストを送信します。`email` フィールドには、パスワードを変更する必要があるユーザーのメールアドレスを指定します。呼び出しが成功すると、ユーザーに[パスワードリセットメールが送信されます](#password-reset-email)。
ブラウザーから API を呼び出す場合は、オリジン URL が許可されていることを確認してください。
[Auth0 Dashboard > Applications > Applications](https://manage.auth0.com/#/applications/\{yourClientId}/settings) に移動し、その URL を **Allowed Origins (CORS)** リストに追加します。
接続がカスタムデータベースの場合は、`changePassword` 用に Authentication API を呼び出す前に、そのユーザーがデータベースに存在することを確認してください。
```bash cURL theme={null}
curl --request POST \
--url 'https://{yourDomain}/dbconnections/change_password' \
--header 'content-type: application/json' \
--data '{"client_id": "{yourClientId}","email": "","connection": "Username-Password-Authentication"}'
```
```csharp C# theme={null}
var client = new RestClient("https://{yourDomain}/dbconnections/change_password");
var request = new RestRequest(Method.POST);
request.AddHeader("content-type", "application/json");
request.AddParameter("application/json", "{"client_id": "{yourClientId}","email": "","connection": "Username-Password-Authentication"}", ParameterType.RequestBody);
IRestResponse response = client.Execute(request);
```
```go Go theme={null}
package main
import (
"fmt"
"strings"
"net/http"
"io/ioutil"
)
func main() {
url := "https://{yourDomain}/dbconnections/change_password"
payload := strings.NewReader("{"client_id": "{yourClientId}","email": "","connection": "Username-Password-Authentication"}")
req, _ := http.NewRequest("POST", url, payload)
req.Header.Add("content-type", "application/json")
res, _ := http.DefaultClient.Do(req)
defer res.Body.Close()
body, _ := ioutil.ReadAll(res.Body)
fmt.Println(res)
fmt.Println(string(body))
}
```
```java Java theme={null}
HttpResponse response = Unirest.post("https://{yourDomain}/dbconnections/change_password")
.header("content-type", "application/json")
.body("{"client_id": "{yourClientId}","email": "","connection": "Username-Password-Authentication"}")
.asString();
```
```javascript Node.JS theme={null}
var axios = require("axios").default;
var options = {
method: 'POST',
url: 'https://{yourDomain}/dbconnections/change_password',
headers: {'content-type': 'application/json'},
data: {
client_id: '{yourClientId}',
email: '',
connection: 'Username-Password-Authentication'
}
};
axios.request(options).then(function (response) {
console.log(response.data);
}).catch(function (error) {
console.error(error);
});
```
```php PHP theme={null}
$curl = curl_init();
curl_setopt_array($curl, [
CURLOPT_URL => "https://{yourDomain}/dbconnections/change_password",
CURLOPT_RETURNTRANSFER => true,
CURLOPT_ENCODING => "",
CURLOPT_MAXREDIRS => 10,
CURLOPT_TIMEOUT => 30,
CURLOPT_HTTP_VERSION => CURL_HTTP_VERSION_1_1,
CURLOPT_CUSTOMREQUEST => "POST",
CURLOPT_POSTFIELDS => "{"client_id": "{yourClientId}","email": "","connection": "Username-Password-Authentication"}",
CURLOPT_HTTPHEADER => [
"content-type: application/json"
],
]);
$response = curl_exec($curl);
$err = curl_error($curl);
curl_close($curl);
if ($err) {
echo "cURL Error #:" . $err;
} else {
echo $response;
}
```
```python Python theme={null}
import http.client
conn = http.client.HTTPSConnection("")
payload = "{"client_id": "{yourClientId}","email": "","connection": "Username-Password-Authentication"}"
headers = { 'content-type': "application/json" }
conn.request("POST", "/{yourDomain}/dbconnections/change_password", payload, headers)
res = conn.getresponse()
data = res.read()
print(data.decode("utf-8"))
```
```ruby Ruby theme={null}
require 'uri'
require 'net/http'
require 'openssl'
url = URI("https://{yourDomain}/dbconnections/change_password")
http = Net::HTTP.new(url.host, url.port)
http.use_ssl = true
http.verify_mode = OpenSSL::SSL::VERIFY_NONE
request = Net::HTTP::Post.new(url)
request["content-type"] = 'application/json'
request.body = "{"client_id": "{yourClientId}","email": "","connection": "Username-Password-Authentication"}"
response = http.request(request)
puts response.read_body
```
### パスワードリセットメール
パスワードリセットのプロセスがどのように開始されたかにかかわらず、ユーザーにはパスワードをリセットするためのリンクが記載されたメールが送信されます。
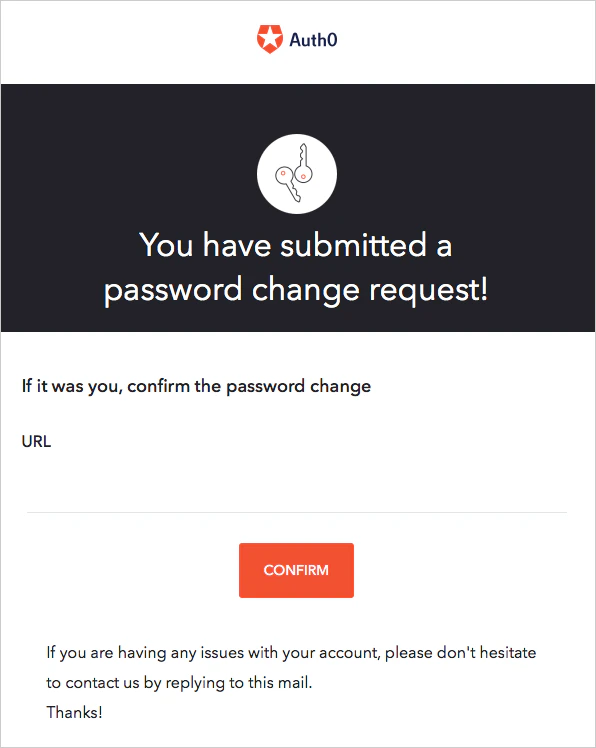 リンクをクリックすると、ユーザーは[パスワードリセットページ](/ja/docs/customize/login-pages/classic-login/customize-password-reset-page)に移動します。
新しいパスワードを送信すると、新しい認証情報でログインできることを示す確認メッセージが表示されます。
パスワードリセットに関する注意事項:
* メール内のパスワードリセットリンクは、1 回しか使用できません。
* ユーザーが複数のパスワードリセットメールを受信した場合、有効なのは最新のメールに記載されたリンクだけです。
* **URL Lifetime** フィールドで、リンクの有効期間を指定します。Auth0 Dashboard では、[Change Password メールをカスタマイズ](/ja/docs/customize/email/email-templates)したり、[リンクの有効期間を変更](https://auth0.com/docs/api/authentication/reference#change-password)したりできます。
* Auth0 Actions を使用すると、別の要素を追加してパスワードリセットフローを拡張できます。詳しくは、[Password Reset Flow](/ja/docs/customize/actions/explore-triggers/password-reset-triggers)を参照してください。
[Classic Login](/ja/docs/authenticate/login/auth0-universal-login/universal-login-vs-classic-login/classic-experience) では、パスワードリセット完了後にユーザーをリダイレクトする URL を設定できます。この URL には、成功インジケーターとメッセージが渡されます。詳しくは、[Customize Email Templates](/ja/docs/customize/email/email-templates) の「Configuring the Redirect-To URL」セクションを参照してください。
[Universal Login](/ja/docs/authenticate/login/auth0-universal-login/universal-login-vs-classic-login/universal-experience) では、成功するとユーザーは[デフォルトのログインルート](/ja/docs/authenticate/login/auth0-universal-login/configure-default-login-routes)にリダイレクトされ、エラー時の処理は Universal Login フローの一部として行われます。このエクスペリエンスでは、メールテンプレート内の Redirect URL は無視されます。
Management API には、パスワードリセットメールに含まれるものと同様の URL を生成する [Create a Password Change Ticket](https://auth0.com/docs/api/management/v2#!/Tickets/post_password_change) エンドポイントがあります。メール配信の方法が適切でない場合は、生成された URL を使用できます。ただし、デフォルトのフローでは、メール配信によってユーザーの本人確認が行われる点に注意してください。 (なりすましであれば、メール受信トレイにアクセスできません。) チケット URL を使用する場合は、別の方法でユーザーの本人確認を行う責任をアプリケーションが負います。
リンクをクリックすると、ユーザーは[パスワードリセットページ](/ja/docs/customize/login-pages/classic-login/customize-password-reset-page)に移動します。
新しいパスワードを送信すると、新しい認証情報でログインできることを示す確認メッセージが表示されます。
パスワードリセットに関する注意事項:
* メール内のパスワードリセットリンクは、1 回しか使用できません。
* ユーザーが複数のパスワードリセットメールを受信した場合、有効なのは最新のメールに記載されたリンクだけです。
* **URL Lifetime** フィールドで、リンクの有効期間を指定します。Auth0 Dashboard では、[Change Password メールをカスタマイズ](/ja/docs/customize/email/email-templates)したり、[リンクの有効期間を変更](https://auth0.com/docs/api/authentication/reference#change-password)したりできます。
* Auth0 Actions を使用すると、別の要素を追加してパスワードリセットフローを拡張できます。詳しくは、[Password Reset Flow](/ja/docs/customize/actions/explore-triggers/password-reset-triggers)を参照してください。
[Classic Login](/ja/docs/authenticate/login/auth0-universal-login/universal-login-vs-classic-login/classic-experience) では、パスワードリセット完了後にユーザーをリダイレクトする URL を設定できます。この URL には、成功インジケーターとメッセージが渡されます。詳しくは、[Customize Email Templates](/ja/docs/customize/email/email-templates) の「Configuring the Redirect-To URL」セクションを参照してください。
[Universal Login](/ja/docs/authenticate/login/auth0-universal-login/universal-login-vs-classic-login/universal-experience) では、成功するとユーザーは[デフォルトのログインルート](/ja/docs/authenticate/login/auth0-universal-login/configure-default-login-routes)にリダイレクトされ、エラー時の処理は Universal Login フローの一部として行われます。このエクスペリエンスでは、メールテンプレート内の Redirect URL は無視されます。
Management API には、パスワードリセットメールに含まれるものと同様の URL を生成する [Create a Password Change Ticket](https://auth0.com/docs/api/management/v2#!/Tickets/post_password_change) エンドポイントがあります。メール配信の方法が適切でない場合は、生成された URL を使用できます。ただし、デフォルトのフローでは、メール配信によってユーザーの本人確認が行われる点に注意してください。 (なりすましであれば、メール受信トレイにアクセスできません。) チケット URL を使用する場合は、別の方法でユーザーの本人確認を行う責任をアプリケーションが負います。
## 新しいパスワードを直接設定する
パスワードリセットメールを送信せずにユーザーの新しいパスワードを直接設定するには、[Management API](#use-the-management-api) または [Auth0 Dashboard](#manually-set-users-passwords-using-the-auth0-dashboard) を使用します。
ユーザーには、パスワードを変更しても通知されません。
### Management API を使用する
独自のパスワードリセットフローを実装する場合は、サーバーから Management API にリクエストを送信して、ユーザーのパスワードを直接変更できます。[Update a User endpoint](https://auth0.com/docs/api/management/v2#!/Users/patch_users_by_id) に対して `PATCH` リクエストを実行します。
Management API を使用して [Update a User endpoint](https://auth0.com/docs/api/management/v2#!/Users/patch_users_by_id) 経由でユーザーのパスワードを設定または更新する場合は、Auth0 Dashboard で設定したパスワード強度ポリシーが適用されます。
```bash cURL theme={null}
curl --request PATCH \
--url 'https://{yourDomain}/api/v2/users/%7BuserId%7D' \
--header 'authorization: Bearer {yourMgmtApiAccessToken}' \
--header 'content-type: application/json' \
--data '{"password": "newPassword","connection": "connectionName"}'
```
```csharp C# theme={null}
var client = new RestClient("https://{yourDomain}/api/v2/users/%7BuserId%7D");
var request = new RestRequest(Method.PATCH);
request.AddHeader("content-type", "application/json");
request.AddHeader("authorization", "Bearer {yourMgmtApiAccessToken}");
request.AddParameter("application/json", "{"password": "newPassword","connection": "connectionName"}", ParameterType.RequestBody);
IRestResponse response = client.Execute(request);
```
```go Go theme={null}
package main
import (
"fmt"
"strings"
"net/http"
"io/ioutil"
)
func main() {
url := "https://{yourDomain}/api/v2/users/%7BuserId%7D"
payload := strings.NewReader("{"password": "newPassword","connection": "connectionName"}")
req, _ := http.NewRequest("PATCH", url, payload)
req.Header.Add("content-type", "application/json")
req.Header.Add("authorization", "Bearer {yourMgmtApiAccessToken}")
res, _ := http.DefaultClient.Do(req)
defer res.Body.Close()
body, _ := ioutil.ReadAll(res.Body)
fmt.Println(res)
fmt.Println(string(body))
}
```
```java Java theme={null}
HttpResponse response = Unirest.patch("https://{yourDomain}/api/v2/users/%7BuserId%7D")
.header("content-type", "application/json")
.header("authorization", "Bearer {yourMgmtApiAccessToken}")
.body("{"password": "newPassword","connection": "connectionName"}")
.asString();
```
```javascript Node.JS theme={null}
var axios = require("axios").default;
var options = {
method: 'PATCH',
url: 'https://{yourDomain}/api/v2/users/%7BuserId%7D',
headers: {
'content-type': 'application/json',
authorization: 'Bearer {yourMgmtApiAccessToken}'
},
data: {password: 'newPassword', connection: 'connectionName'}
};
axios.request(options).then(function (response) {
console.log(response.data);
}).catch(function (error) {
console.error(error);
});
```
```php PHP theme={null}
$curl = curl_init();
curl_setopt_array($curl, [
CURLOPT_URL => "https://{yourDomain}/api/v2/users/%7BuserId%7D",
CURLOPT_RETURNTRANSFER => true,
CURLOPT_ENCODING => "",
CURLOPT_MAXREDIRS => 10,
CURLOPT_TIMEOUT => 30,
CURLOPT_HTTP_VERSION => CURL_HTTP_VERSION_1_1,
CURLOPT_CUSTOMREQUEST => "PATCH",
CURLOPT_POSTFIELDS => "{"password": "newPassword","connection": "connectionName"}",
CURLOPT_HTTPHEADER => [
"authorization: Bearer {yourMgmtApiAccessToken}",
"content-type: application/json"
],
]);
$response = curl_exec($curl);
$err = curl_error($curl);
curl_close($curl);
if ($err) {
echo "cURL Error #:" . $err;
} else {
echo $response;
}
```
```python Python theme={null}
import http.client
conn = http.client.HTTPSConnection("")
payload = "{"password": "newPassword","connection": "connectionName"}"
headers = {
'content-type': "application/json",
'authorization': "Bearer {yourMgmtApiAccessToken}"
}
conn.request("PATCH", "/{yourDomain}/api/v2/users/%7BuserId%7D", payload, headers)
res = conn.getresponse()
data = res.read()
print(data.decode("utf-8"))
```
```ruby Ruby theme={null}
require 'uri'
require 'net/http'
require 'openssl'
url = URI("https://{yourDomain}/api/v2/users/%7BuserId%7D")
http = Net::HTTP.new(url.host, url.port)
http.use_ssl = true
http.verify_mode = OpenSSL::SSL::VERIFY_NONE
request = Net::HTTP::Patch.new(url)
request["content-type"] = 'application/json'
request["authorization"] = 'Bearer {yourMgmtApiAccessToken}'
request.body = "{"password": "newPassword","connection": "connectionName"}"
response = http.request(request)
puts response.read_body
```
### Auth0 Dashboard を使用してユーザーのパスワードを手動で設定する
Auth0 テナントの管理者権限を持つユーザーは、[Auth0 Dashboard > User Management > Users](https://manage.auth0.com/#/users) でユーザーのパスワードを手動で変更できます。
1. パスワードを変更するユーザーの名前を選択します。
2. ページ下部にある **Danger Zone** を見つけます。
3. 赤い **Change Password** ボックスで、**Change** を選択します。
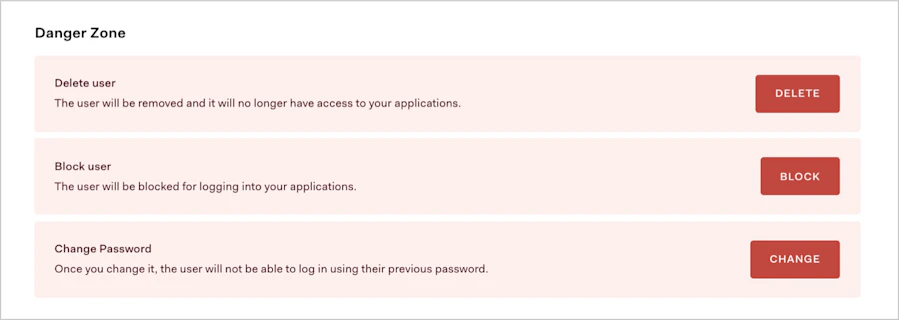 4. 新しいパスワードを入力し、**Save** を選択します。