> ## Documentation Index
> Fetch the complete documentation index at: https://translations.mintlify.site/llms.txt
> Use this file to discover all available pages before exploring further.
> ユーザーのログイン後に Auth0 が保存したアップストリームのアクセストークンを使用して、Auth0 アプリケーションからソーシャルまたはエンタープライズのIDプロバイダー API を呼び出します。
# IDプロバイダー API を呼び出す
export const AuthCodeGroup = ({children, dropdown}) => {
const [processedChildren, setProcessedChildren] = useState(children);
useEffect(() => {
let unsubscribe = null;
function init() {
unsubscribe = window.autorun(() => {
const processChildren = node => {
if (typeof node === "string") {
let processedNode = node;
for (const [key, value] of window.rootStore.variableStore.values.entries()) {
const escapedKey = key.replaceAll(/[.*+?^${}()|[\]\\]/g, (String.raw)`\$&`);
processedNode = processedNode.replaceAll(new RegExp(escapedKey, "g"), value);
}
return processedNode;
} else if (Array.isArray(node)) {
return node.map(processChildren);
} else if (node && node.props && node.props.children) {
return {
...node,
props: {
...node.props,
children: processChildren(node.props.children)
}
};
}
return node;
};
setProcessedChildren(processChildren(children));
});
}
if (window.rootStore) {
init();
} else {
window.addEventListener("adu:storeReady", init);
}
return () => {
window.removeEventListener("adu:storeReady", init);
unsubscribe?.();
};
}, [children]);
return {processedChildren};
};
export const AuthCodeBlock = ({filename, icon, language, highlight, children}) => {
const [displayText, setDisplayText] = useState(children);
const [copyText, setCopyText] = useState(children);
const wrapperRef = React.useRef(null);
useEffect(() => {
let unsubscribe = null;
function init() {
if (!window.autorun || !window.rootStore) {
return;
}
unsubscribe = window.autorun(() => {
let processedChildrenForDisplay = children;
let processedChildrenForCopy = children;
for (const [key, value] of window.rootStore.variableStore.values.entries()) {
const escapedKey = key.replaceAll(/[.*+?^${}()|[\]\\]/g, (String.raw)`\$&`);
let displayValue = value;
if (key === "{yourClientSecret}" && value !== "{yourClientSecret}") {
displayValue = value.substring(0, 3) + "*****マスク済み*****";
}
processedChildrenForDisplay = processedChildrenForDisplay.replaceAll(new RegExp(escapedKey, "g"), displayValue);
processedChildrenForCopy = processedChildrenForCopy.replaceAll(new RegExp(escapedKey, "g"), value);
}
setDisplayText(processedChildrenForDisplay);
setCopyText(processedChildrenForCopy);
});
}
if (window.rootStore) {
init();
} else {
window.addEventListener("adu:storeReady", init);
}
return () => {
window.removeEventListener("adu:storeReady", init);
unsubscribe?.();
};
}, [children]);
useEffect(() => {
if (!wrapperRef.current) return;
const originalWriteText = navigator.clipboard.writeText.bind(navigator.clipboard);
let isOverriding = false;
const handleClick = e => {
const button = e.target.closest('[data-testid="copy-code-button"]');
if (!button || !wrapperRef.current.contains(button)) return;
isOverriding = true;
navigator.clipboard.writeText = text => {
if (isOverriding) {
isOverriding = false;
navigator.clipboard.writeText = originalWriteText;
return originalWriteText(copyText);
}
return originalWriteText(text);
};
setTimeout(() => {
if (isOverriding) {
isOverriding = false;
navigator.clipboard.writeText = originalWriteText;
}
}, 100);
};
const wrapper = wrapperRef.current;
wrapper.addEventListener('click', handleClick, true);
return () => {
wrapper.removeEventListener('click', handleClick, true);
if (navigator.clipboard.writeText !== originalWriteText) {
navigator.clipboard.writeText = originalWriteText;
}
};
}, [copyText]);
return
{displayText}
;
};
接続で [Token Vault](/ja/docs/secure/tokens/token-vault) を有効にしている場合、アクセストークンとリフレッシュトークンはユーザーの `identities` 配列には保存されなくなります。代わりに、Token Vault 内の安全な tokenset に保存されます。Token Vault を有効にするには、[Configure Token Vault](/ja/docs/secure/tokens/token-vault/configure-token-vault) を参照してください。
Facebook や GitHub などの外部 IDプロバイダー (IdP) でユーザーを正常に認証すると、IdP は Auth0 に返すユーザープロファイルに アクセストークン を含めることがよくあります。
このトークンを取得して、IdP の API を呼び出す際に使用できます。
この記事では、選択した IdP との接続がすでに設定されていることを前提としています。まだ設定していない場合は、[Identity Providers Supported by Auth0](/ja/docs/authenticate/identity-providers/social-identity-providers) に移動し、使用する IdP を選択して設定手順に従ってください。
以降の手順は、コードがバックエンドとフロントエンドのどちらで実行されるかによって異なります。
* コードがバックエンドで実行される場合、サーバーはシークレットを安全に保存できる信頼された環境であるとみなせます (後述するように、バックエンドのシナリオではシークレットを使用します) 。その場合は、この記事の[バックエンドのセクション](#from-the-backend)に進んでください。
* コードがフロントエンドで実行される場合 (たとえば、SPA、ネイティブデスクトップアプリ、モバイルアプリなど) 、アプリで認証情報を安全に保持することはできないため、別の方法に従う必要があります。この場合は、この記事の[フロントエンドのセクション](#from-the-frontend)に進んでください。
## バックエンドから
ユーザーを認証すると、IdP は Auth0 に返すユーザープロファイルにアクセストークンを含めることがあります。
セキュリティおよびコンプライアンス上の理由から、Auth0 はこのトークンをユーザープロファイルの一部としてアプリケーションに送信しません。これを取得するには、Auth0 の Management API にアクセスし、ユーザーの完全なプロファイルを取得する必要があります。
1. [Auth0 Management API](https://auth0.com/docs/api/management/v2) を呼び出すためのアクセストークンを取得します。
2. 手順 1 で取得したアクセストークンを使用して、Auth0 Management API の [Get Users by ID endpoint](https://auth0.com/docs/api/management/v2#!/Users/get_users_by_id) を呼び出します。このエンドポイントは、IdP アクセストークンを含むユーザーの完全なプロファイルを返します。
3. レスポンスから IdP アクセストークンを取り出し、それを使用して IdP の API を呼び出します。
### ステップ 1: トークンを取得する
[Management API](https://auth0.com/docs/api/management/v2)を呼び出すには、アクセストークンが必要です。
#### Management API 用のテストアプリケーションを作成する
[Management APIv2 Token](https://auth0.com/docs/api/management/v2/tokens) をリクエストするのが初めての場合は、Management API の呼び出しに使用するアプリケーションを作成して設定する必要があります。
1. [Auth0 Dashboard > Applications > APIs](https://manage.auth0.com/#/apis) に移動し、[Auth0 Management API](https://manage.auth0.com/#/apis/management/authorized-clients) を選択します。
2. **API Explorer** ビューを選択し、**Create & Authorize a Test Application** をクリックします。
これにより新しいアプリケーションが作成され、Management API のすべてのスコープが付与されます。つまり、このアプリケーション用に生成されたトークンで、Management API のすべてのエンドポイントにアクセスできるようになります。
このボタンが表示されない場合は、Management API に対して認可済みのアプリケーションがすでに 1 つ以上あることを意味します。この場合は、既存のアプリケーションのスコープを更新して使用するか、次の手順で新しいアプリケーションを作成できます。
1. [Auth0 Dashboard > Applications > Applications](https://manage.auth0.com/#/applications) に移動し、**Create Application** を選択します。
2. **Machine to Machine Applications** を選択し、**Create** を選択します。
3. **Select an API** ドロップダウンから `Auth0 Management API` を選択します。
4. 必要なスコープを有効にし、**Authorize** を選択します。
5. **APIs** ビューを選択し、**Auth0 Management API** のトグルを有効にします。
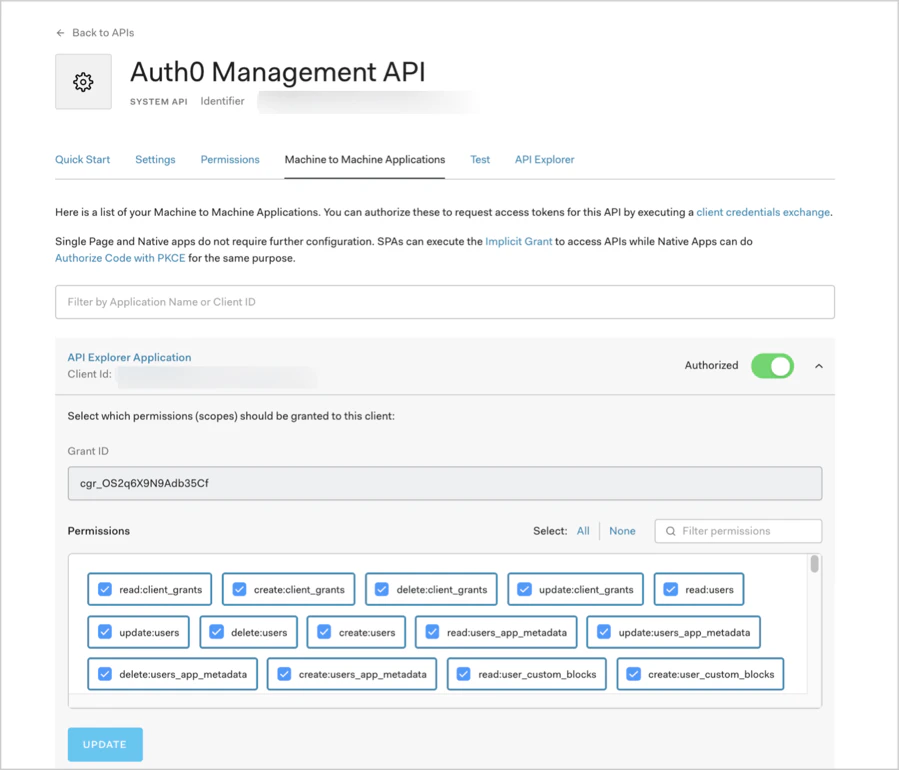
セキュリティ上の理由から、使用するアプリケーションには必要なスコープだけを割り当てることをお勧めします。このケースで必要なスコープは、`read:users`、`read:user_idp_tokens` です。必要なスコープは、[Management API Explorer](https://auth0.com/docs/api/management/v2) の各エンドポイントに記載されています。
[登録済みの Auth0 Management API](https://manage.auth0.com/#/apis/management/authorized-clients) に対してスコープを付与または削除するには、[**Machine to Machine Applications** ビュー](https://manage.auth0.com/#/apis/management/authorized-clients) を選択します。
#### Management API トークンを取得する
これで設定は完了し、Management API トークンを取得する準備が整いました。
1. [登録済みの Auth0 Management API](https://manage.auth0.com/#/apis/management/authorized-clients) で、[**Test** ビュー](https://manage.auth0.com/#/apis/management/test)を選択します。
2. **Application** ドロップダウンからアプリケーションを選択すると、すぐに使えるスニペットにカスタマイズされた変数が自動入力されます。
3. スニペットの言語を選択し、コピーして実行します。
4. レスポンスから `access_token` プロパティを取り出します。これを使用して Management API にアクセスします。
スニペットは、**OAuth 2.0 Client Credentials grant** を使用して、[Auth0 Authentication API の `/oauth/token` エンドポイント](https://auth0.com/docs/api/authentication#client-credentials)に `POST` リクエストを送信します。これは、マシンツーマシンのプロセスが API にアクセスするために使用するグラントです。フローの詳細については、[Client Credentials Flow](/ja/docs/get-started/authentication-and-authorization-flow/client-credentials-flow)を参照してください。
#### トークンの有効期限
デフォルトでは、取得したトークンは 24 時間 (86,400 秒) で期限切れになります。これを変更するには、次の手順に従います。
1. [Auth0 Dashboard > Applications > APIs](https://manage.auth0.com/#/apis) に移動し、[Auth0 Management API](https://manage.auth0.com/#/apis/management/authorized-clients) を選択します。
2. **Settings** ビューを開き、**Token Expiration (Seconds)** フィールドに新しい値を入力して、**Save** をクリックします。設定できる最大値は 2,592,000 秒 (30 日) ですが、デフォルト値のまま使用することを推奨します。
次回生成するトークンには、更新後の有効期限が適用されます。
これらのトークンは**失効できません**。リスクを最小限に抑えるため、有効期間の短いトークンを発行し、各アプリケーションには必要なスコープのみを付与することを推奨します。本番環境では、古いトークンの期限が切れたときに新しいトークンを取得するシンプルな CLI を構成できます。
### ステップ 2: 完全なユーザープロファイルを取得する
ユーザーのプロファイルを取得するには、前のセクションで抽出したアクセストークンを使用して、Management API の [Get a User エンドポイント](https://auth0.com/docs/api/management/v2#!/Users/get_users_by_id) を呼び出します。
```bash cURL theme={null}
curl --request GET \
--url 'https://{yourDomain}/api/v2/users/%7BuserId%7D' \
--header 'authorization: Bearer {yourAccessToken}'
```
```csharp C# theme={null}
var client = new RestClient("https://{yourDomain}/api/v2/users/%7BuserId%7D");
var request = new RestRequest(Method.GET);
request.AddHeader("authorization", "Bearer {yourAccessToken}");
IRestResponse response = client.Execute(request);
```
```go Go theme={null}
package main
import (
"fmt"
"net/http"
"io/ioutil"
)
func main() {
url := "https://{yourDomain}/api/v2/users/%7BuserId%7D"
req, _ := http.NewRequest("GET", url, nil)
req.Header.Add("authorization", "Bearer {yourAccessToken}")
res, _ := http.DefaultClient.Do(req)
defer res.Body.Close()
body, _ := ioutil.ReadAll(res.Body)
fmt.Println(res)
fmt.Println(string(body))
}
```
```java Java theme={null}
HttpResponse response = Unirest.get("https://{yourDomain}/api/v2/users/%7BuserId%7D")
.header("authorization", "Bearer {yourAccessToken}")
.asString();
```
```javascript Node.JS theme={null}
var axios = require("axios").default;
var options = {
method: 'GET',
url: 'https://{yourDomain}/api/v2/users/%7BuserId%7D',
headers: {authorization: 'Bearer {yourAccessToken}'}
};
axios.request(options).then(function (response) {
console.log(response.data);
}).catch(function (error) {
console.error(error);
});
```
```php PHP theme={null}
$curl = curl_init();
curl_setopt_array($curl, [
CURLOPT_URL => "https://{yourDomain}/api/v2/users/%7BuserId%7D",
CURLOPT_RETURNTRANSFER => true,
CURLOPT_ENCODING => "",
CURLOPT_MAXREDIRS => 10,
CURLOPT_TIMEOUT => 30,
CURLOPT_HTTP_VERSION => CURL_HTTP_VERSION_1_1,
CURLOPT_CUSTOMREQUEST => "GET",
CURLOPT_HTTPHEADER => [
"authorization: Bearer {yourAccessToken}"
],
]);
$response = curl_exec($curl);
$err = curl_error($curl);
curl_close($curl);
if ($err) {
echo "cURL Error #:" . $err;
} else {
echo $response;
}
```
```python Python theme={null}
import http.client
conn = http.client.HTTPSConnection("")
headers = { 'authorization': "Bearer {yourAccessToken}" }
conn.request("GET", "/{yourDomain}/api/v2/users/%7BuserId%7D", headers=headers)
res = conn.getresponse()
data = res.read()
print(data.decode("utf-8"))
```
```ruby Ruby theme={null}
require 'uri'
require 'net/http'
require 'openssl'
url = URI("https://{yourDomain}/api/v2/users/%7BuserId%7D")
http = Net::HTTP.new(url.host, url.port)
http.use_ssl = true
http.verify_mode = OpenSSL::SSL::VERIFY_NONE
request = Net::HTTP::Get.new(url)
request["authorization"] = 'Bearer {yourAccessToken}'
response = http.request(request)
puts response.read_body
```
次の値を置き換えてください。
* `{userId}`: IdP の API を呼び出す対象ユーザーの ID。
* `{yourAccessToken}`: 前のセクションで抽出したアクセストークン。
- テスト用途では、[Auth0 Dashboard > User Management > Users](https://manage.auth0.com/#/users) でユーザー ID を確認できます。対象のユーザーを見つけて、**user\_id** フィールドの値をコピーしてください。
- 実装では、[IDトークン](/ja/docs/secure/tokens/id-tokens) の `sub` クレームからユーザー ID を抽出することも、Authentication API の [/userinfo エンドポイント](https://auth0.com/docs/api/authentication#get-user-info) を呼び出してレスポンスプロパティ `user_id` から抽出することもできます。
IdP の API 呼び出しに使用されるアクセストークンは、ユーザーの `identities` 配列内の `user.identities[0].access_token` にあります。
一部のIDプロバイダーでは、Auth0 はリフレッシュトークンも保存します。これを使用して、IdP の新しいアクセストークンを取得できます。これは、BitBucket、Google (OAuth 2.0)、OAuth 2.0、SharePoint、Azure AD で利用できます。詳しくは、[Identity Provider Access Tokens](/ja/docs/secure/tokens/access-tokens/identity-provider-access-tokens) を参照してください。
ほとんどの場合、ユーザーが持つ ID は 1 つだけですが、異なる接続を通じて複数回サインインし、[account linking](/ja/docs/manage-users/user-accounts/user-account-linking/link-user-accounts) を使用している場合は、複数になることがあります。
このサンプルレスポンスでは、ユーザーの ID は `google-oauth2` の 1 つだけであることがわかります。
```json lines expandable theme={null}
{
"email": "john.doe@test.com",
"email_verified": true,
"name": "John Doe",
"given_name": "John",
"family_name": "Doe",
"picture": "https://myavatar/photo.jpg",
"gender": "male",
"locale": "en",
"updated_at": "2017-03-15T07:14:32.451Z",
"user_id": "google-oauth2|111199914890750704174",
"nickname": "john.doe",
"identities": [
{
"provider": "google-oauth2",
"access_token": "ya29.GlsPBCS6ahokDlgCYnVLnDKNE71HBXPEzNhAPoKJLAGKDSe1De3_xclahNcdZXoU-26hCpa8h6240TV86dtaEQ4ZWoeeZduHDq_yeu9QyQqUr--S9B2CR9YJrLTD",
"expires_in": 3599,
"user_id": "111199914890750704174",
"connection": "google-oauth2",
"isSocial": true
}
],
"created_at": "2017-03-15T07:13:41.134Z",
"last_ip": "127.0.0.1",
"last_login": "2017-03-15T07:14:32.451Z",
"logins_count": 99
}
```
これで IdP の API を呼び出す準備ができました。具体的な手順については、IdP のドキュメントを参照してください。
IdP トークンをクライアント側アプリケーションに公開しないでください。アプリケーションがパブリックな場合は、この記事の[フロントエンドのセクション](#from-the-frontend)を参照してください。
IDプロバイダーのアクセストークンに対して特定のスコープをリクエストする方法について詳しくは、[IDプロバイダーの API を呼び出すためのスコープ/権限を追加する](/ja/docs/authenticate/identity-providers/adding-scopes-for-an-external-idp)を参照してください。
## フロントエンドから
公開アプリケーション (SPA、ネイティブデスクトップアプリ、モバイルアプリ) を扱っている場合は、このセクションを参照してください。
フロントエンドアプリでは、IdP API を呼び出すプロセスはバックエンドの場合とは異なります。これは、フロントエンドアプリが**認証情報を安全に保持できない**公開アプリケーションだからです。SPA のコードは閲覧や改変が可能であり、ネイティブアプリやモバイルアプリは逆コンパイルや解析が可能なため、シークレットキーやパスワードのような機密情報を安全に保持できるものとしては信頼できません。
具体的には、バックエンドプロセスの最初のステップで `/oauth/token` を呼び出す際に使用する Machine to Machine Application の\*\*クライアントシークレット\*\*を安全に保持できません。
その代わり、バックエンド用のプロキシを構築し、それを API としてアプリケーションに公開する必要があります。
### プロキシを構築する
まず、このページの[バックエンドのセクション](#from-the-backend)に含まれる手順を実装するプロセスをバックエンドに構築し、アプリケーションから API として利用できるようにします。
同じバックエンドプロセスから IdP の API を呼び出すため、アクセストークンが公開アプリケーションに公開されることはありません。
次に、公開アプリケーションから[Authorization Code Flow with Proof Key for Code Exchange (PKCE)](/ja/docs/get-started/authentication-and-authorization-flow/authorization-code-flow-with-pkce)を使用して、このプロキシ API を呼び出します。
まだこれを実装したことがない場合は、[Single-page Applications (SPA) with API](/ja/docs/get-started/architecture-scenarios/spa-api)アーキテクチャシナリオが参考になるかもしれません。扱うシナリオは異なりますが、Auth0 の設定方法、SPA から API を呼び出す方法、API の検証を実装する方法を説明しています。[Angular 2](https://github.com/auth0-samples/auth0-pnp-exampleco-timesheets/tree/master/timesheets-spa/angular)と[Node.js](https://github.com/auth0-samples/auth0-pnp-exampleco-timesheets/tree/master/timesheets-api/node)を使用したサンプルもあります。
また、[Mobile Applications with API](/ja/docs/get-started/architecture-scenarios/mobile-api)のバリエーションも提供しています (サンプルでは[Android](https://github.com/auth0-samples/auth0-pnp-exampleco-timesheets/tree/master/timesheets-mobile/android)と[Node.js](https://github.com/auth0-samples/auth0-pnp-exampleco-timesheets/tree/master/timesheets-api/node)を使用しています) 。