> ## Documentation Index
> Fetch the complete documentation index at: https://translations.mintlify.site/llms.txt
> Use this file to discover all available pages before exploring further.
> Auth0 の接続に対するグローバルトークン失効の設定方法について説明します。
# Universal Logout
Auth0 は、Okta Workforce Identity との Universal Logout 統合をサポートしています。これにより、管理上またはセキュリティ上のイベントが発生したときに、ユーザーをアプリケーションからログアウトできます。
Universal Logout は、[Global Token Revocation](https://www.ietf.org/archive/id/draft-parecki-oauth-global-token-revocation-02.html) 仕様を実装しています。これは、確立された OpenID Connect のバックチャネルログアウト標準に加えて、ユーザーセッションだけでなく リフレッシュトークン も失効させます。 この包括的なログアウトソリューションは、リフレッシュトークン、アプリケーションセッション、新しいトークンの取得やユーザーのログイン状態の維持に使われる IDプロバイダー セッションを組み合わせて利用する従来の Web アプリケーション、シングルページアプリケーション (SPA) 、ネイティブアプリケーションに対応します。
Workforce Identity とフェデレーションするために [Okta](/ja/docs/authenticate/identity-providers/enterprise-identity-providers/okta)、[SAML](/ja/docs/authenticate/identity-providers/enterprise-identity-providers/saml)、または [OpenID Connect](/ja/docs/authenticate/identity-providers/enterprise-identity-providers/oidc) の接続タイプを使用している場合は、Okta Universal Logout と連携するための [グローバルトークン失効](https://developer.okta.com/docs/guides/oin-universal-logout-overview/) エンドポイントを独自に構築する必要はありません。代わりに、Auth0 の接続固有のエンドポイント URL を Okta Workforce 管理者に提供し、必要に応じて Auth0 の [OpenID Connect Back-Channel Logout](/ja/docs/authenticate/login/logout/back-channel-logout) を使用してアプリケーションセッションを終了できます。
## 仕組み
Auth0 のグローバルトークン失効エンドポイントは、[Build Logout for your app](https://developer.okta.com/docs/guides/oin-universal-logout-overview/) に記載されているプロファイルに従います。ログアウトリクエストでユーザーを識別するために `iss_sub` 形式を使用し、URL 形式は次のとおりです。
`https://{yourDomain}/oauth/global-token-revocation/connection/{yourConnectionName}`
Auth0 がユーザーのログアウトリクエストを受信すると、Okta Workforce Identity から発行された IDトークン または SAML アサーションの検証に使用するものと同じ鍵セットで、そのリクエストを検証します。続いて、そのユーザーのすべての [Auth0 セッション](/ja/docs/manage-users/sessions/session-layers) を終了し、Auth0 が発行した [リフレッシュトークン](/ja/docs/secure/tokens/refresh-tokens) を失効させ、設定されている場合は [OpenID Connect Back-Channel Logout](/ja/docs/authenticate/login/logout/back-channel-logout) をトリガーしてアプリケーションセッションを失効させます。
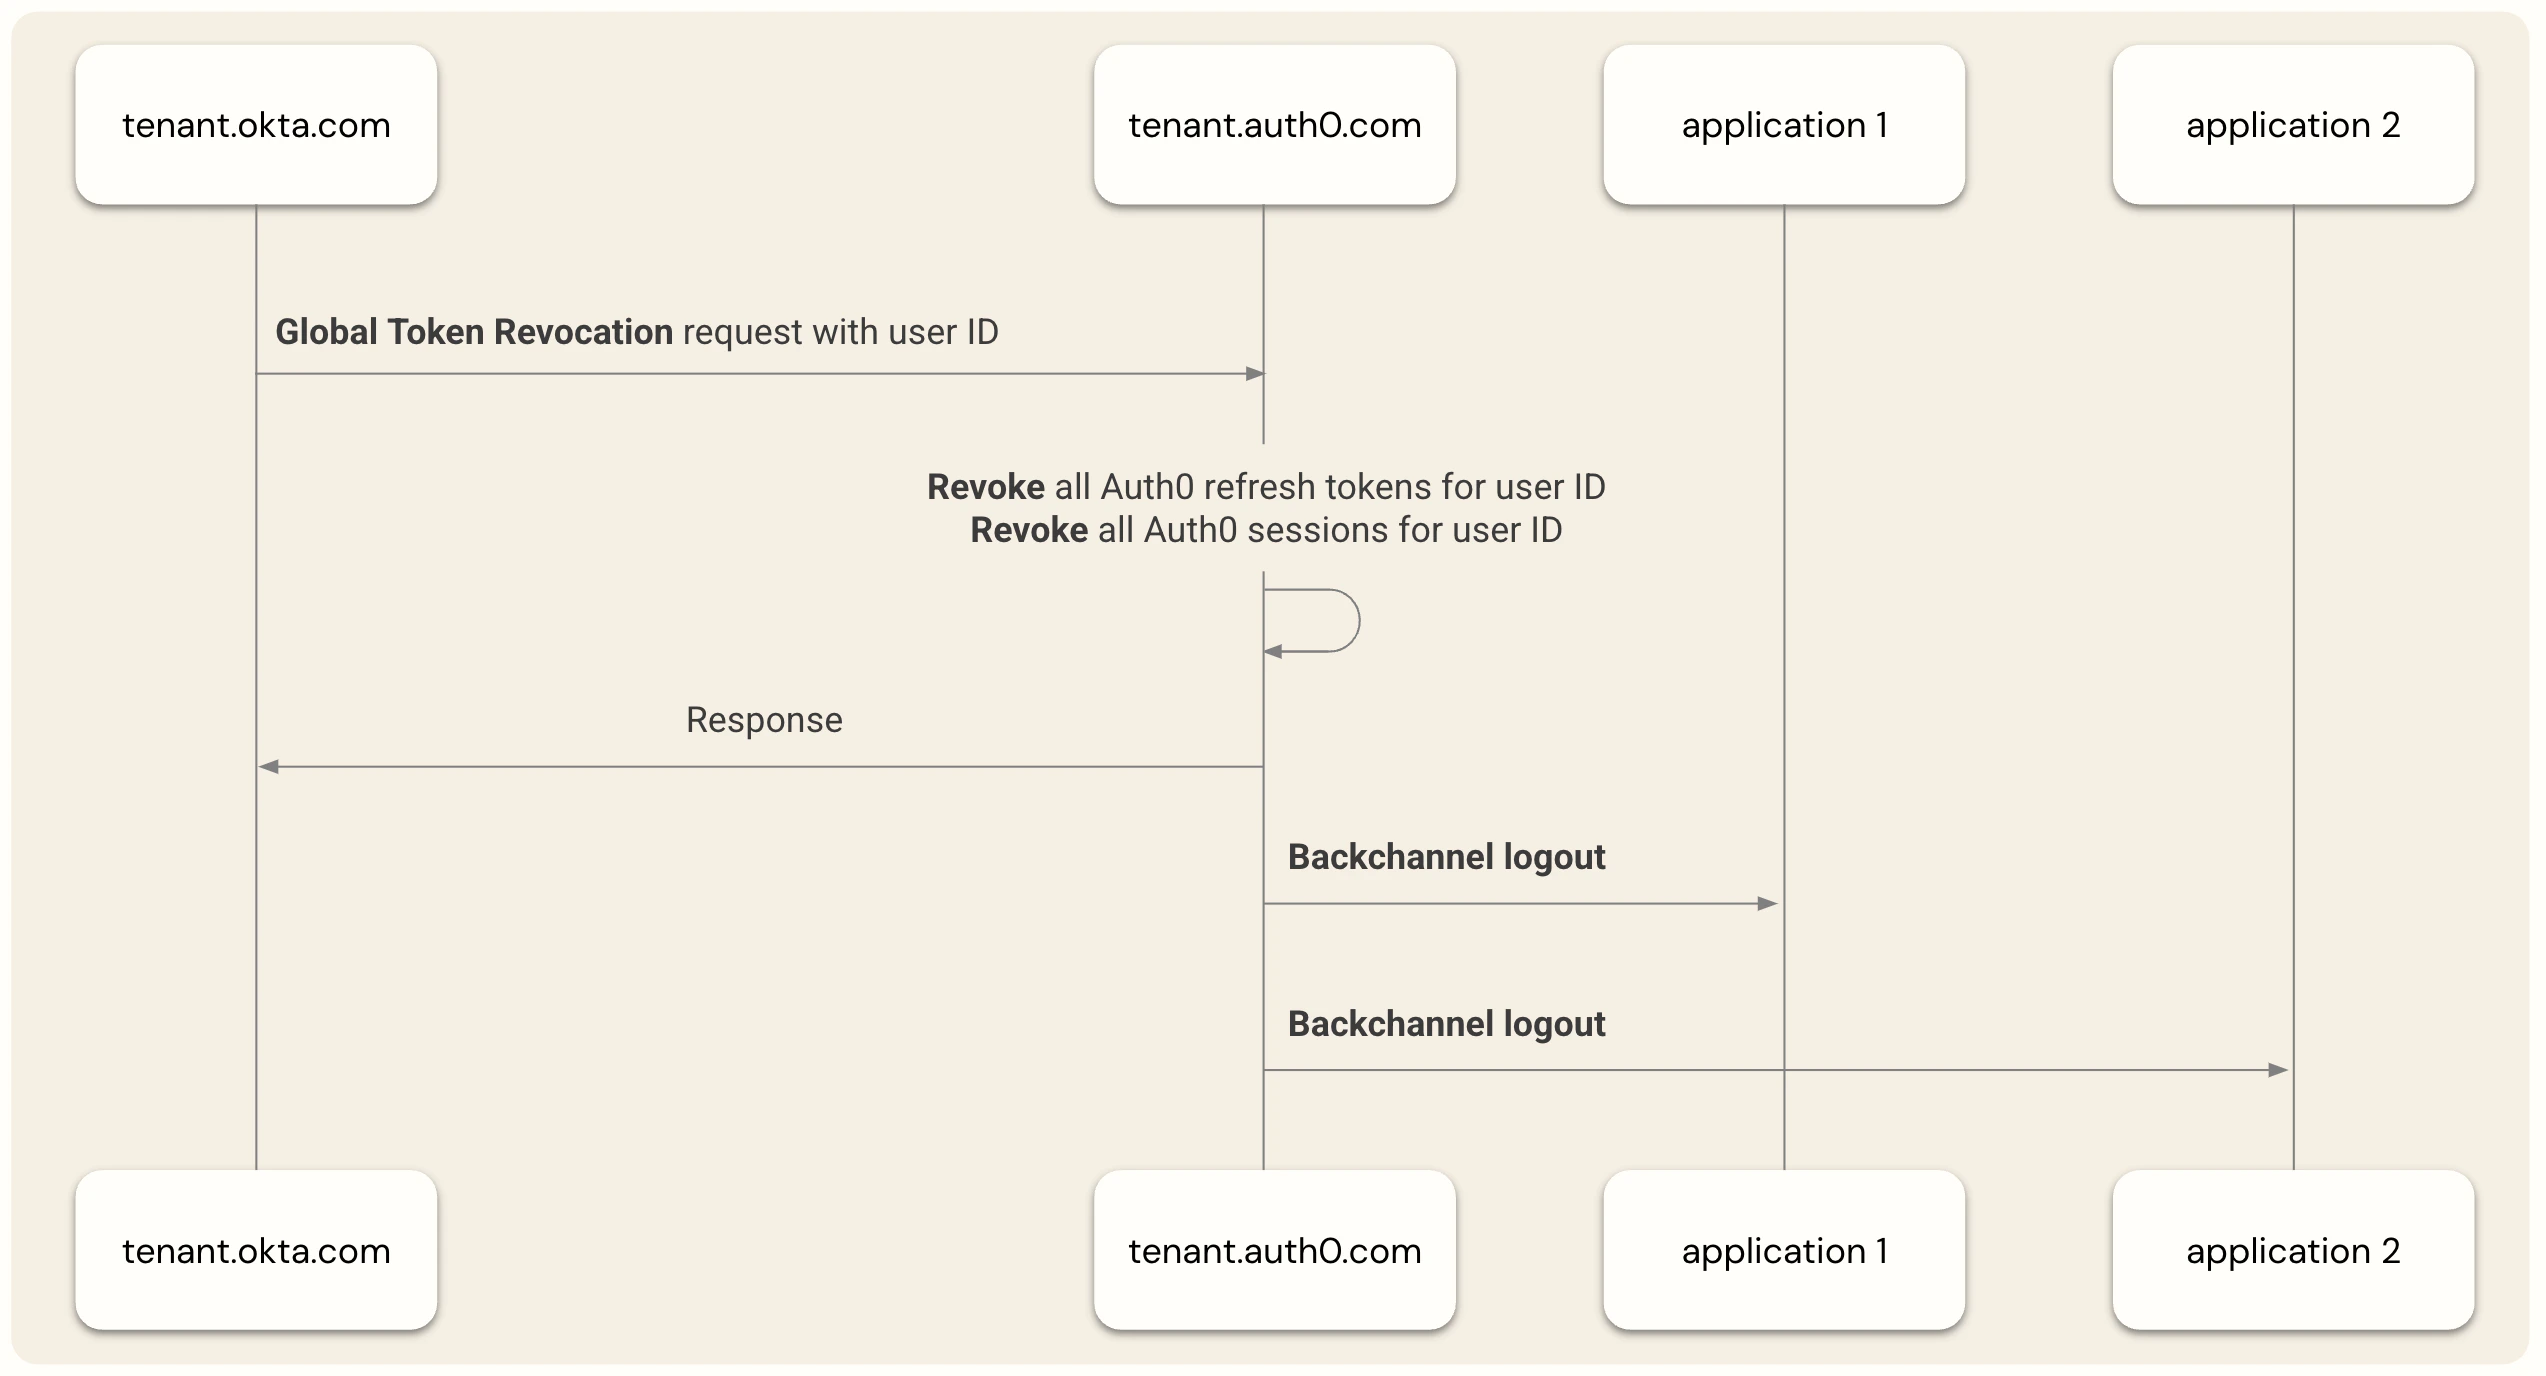 アプリケーションのユーザーがアクセスを失うまでにかかる時間は、アプリケーションの種類と Auth0 との統合方法によって異なります。Auth0 は、OIDC および OAuth 2.0 のアイデンティティ標準と、Auth0 の [Quickstarts と SDKs](/ja/docs/quickstarts) のサポートを通じて、幅広い [アプリケーションアーキテクチャ](/ja/docs/get-started/applications) をサポートしています。具体的には、次のようなものがあります。
* 独自の [アプリケーションセッション](/ja/docs/manage-users/sessions/session-layers) を作成する従来型の Web アプリケーションは、セキュアなバックエンド経由で API にアクセスするために、リフレッシュトークンと アクセストークン を使用する場合があります。
* [Auth0 セッションレイヤー](/ja/docs/authenticate/login/configure-silent-authentication) を活用したり、[リフレッシュトークンローテーション](/ja/docs/secure/tokens/refresh-tokens/refresh-token-rotation) のような手法を使用したりして、Web ブラウザー内で API へのアクセスに必要なアクセストークンを取得する、ブラウザーベースの JavaScript アプリケーション。
* Web ブラウザー上では実行されず、ユーザーのサインイン状態を維持する主な手段としてリフレッシュトークンとアクセストークンを使用する、ネイティブアプリケーションまたはモバイルアプリケーション。
アプリケーションのユーザーがアクセスを失うまでにかかる時間は、アプリケーションの種類と Auth0 との統合方法によって異なります。Auth0 は、OIDC および OAuth 2.0 のアイデンティティ標準と、Auth0 の [Quickstarts と SDKs](/ja/docs/quickstarts) のサポートを通じて、幅広い [アプリケーションアーキテクチャ](/ja/docs/get-started/applications) をサポートしています。具体的には、次のようなものがあります。
* 独自の [アプリケーションセッション](/ja/docs/manage-users/sessions/session-layers) を作成する従来型の Web アプリケーションは、セキュアなバックエンド経由で API にアクセスするために、リフレッシュトークンと アクセストークン を使用する場合があります。
* [Auth0 セッションレイヤー](/ja/docs/authenticate/login/configure-silent-authentication) を活用したり、[リフレッシュトークンローテーション](/ja/docs/secure/tokens/refresh-tokens/refresh-token-rotation) のような手法を使用したりして、Web ブラウザー内で API へのアクセスに必要なアクセストークンを取得する、ブラウザーベースの JavaScript アプリケーション。
* Web ブラウザー上では実行されず、ユーザーのサインイン状態を維持する主な手段としてリフレッシュトークンとアクセストークンを使用する、ネイティブアプリケーションまたはモバイルアプリケーション。
### リフレッシュトークンと Auth0 ユーザーセッションを失効させる
リフレッシュトークンを使用しているアプリケーション、または Auth0 セッションを利用しているアプリケーションでは、Universal Logout 統合を有効にすると、次のセキュリティ上のメリットが得られます。
* [Auth0 セッション](/ja/docs/authenticate/login/configure-silent-authentication)を利用するブラウザベースのアプリでは、アプリケーションが次回 [Auth0 セッションをポーリング](/ja/docs/authenticate/login/configure-silent-authentication#poll-with-checksession-)するとユーザーはアクセスできなくなり、リダイレクトされると Auth0 によって再度サインインを求められます
* リフレッシュトークンを使用するアプリでは、現在のアクセストークンの有効期限が切れ次第、ユーザーはアクセスできなくなります。この有効期限は、数秒から Auth0 で設定された [アクセストークンの最大有効期間](/ja/docs/secure/tokens/access-tokens/update-access-token-lifetime) までの範囲です。
### アプリケーションのユーザーセッションを無効化する
Web アプリケーションで作成されたセッションについては、Universal Logout によって Auth0 のユーザーセッションが終了された際に、それらのセッションも終了されるよう、Auth0 の既存の [OpenID Connect Back-Channel Logout](/ja/docs/authenticate/login/logout/back-channel-logout/configure-back-channel-logout) 機能を使用してください。詳細は、[Auth0 SDK の実装例](/ja/docs/authenticate/login/logout/back-channel-logout#auth0-sdks) を参照してください。
## Auth0 で Universal Logout を設定する
Auth0 の接続タイプ別に Universal Logout を設定します。
### Okta Workforce
1. [Auth0 テナントを Okta Workforce Identity に接続します](/ja/docs/authenticate/identity-providers/enterprise-identity-providers/okta)。
2. Auth0 Dashboard で、[**Authentication > Enterprise > Okta Workforce**](https://manage.auth0.com/#/connections/enterprise/okta) に移動します。対象の接続を選択し、**Settings** をクリックします。
3. Okta Workforce の管理者に渡す **Revocation Endpoint URL** をコピーします。
### OpenID Connect
新しい OpenID Connect 統合には、専用の **Okta Workforce** 接続タイプを使用することを強く推奨します。ただし、古い統合でも、Auth0 Dashboard の OpenID Connect **Settings** で汎用の OpenID Connect 接続タイプを使用すれば、引き続き Universal Logout を有効にできます。
1. Auth0 Dashboard で、[**Authentication > Enterprise > OpenID Connect**](https://manage.auth0.com/#/connections/enterprise/oidc)**.** に移動します。対象の接続を選択し、**Settings** を選択します。
2. Okta Workforce 管理者に提供する **Revocation Endpoint URL** をコピーします。
### SAML
1. [Okta を SAML IDプロバイダーとして設定する](/ja/docs/authenticate/protocols/saml/saml-sso-integrations/configure-auth0-saml-service-provider/configure-okta-as-saml-identity-provider)。
2. Auth0 Dashboard で [**Authentication > Enterprise > SAML**](https://manage.auth0.com/#/connections/enterprise/samlp) に移動します。対象の接続を選択し、**Settings** をクリックします。
3. **Subject** には、Okta Workforce Identity に登録された SAML アプリケーションの Application ID を入力します。例: `0oagcc12354688xxxx`。詳細については、[How to Obtain an Application ID](https://support.okta.com/help/s/article/How-to-obtain-an-application-ID?language=en_US) を参照してください。
4. **Issuer** には、Okta Workforce Identity の組織で登録された SAML アプリケーションに移動し、[issuer URI](https://developer.okta.com/docs/guides/oin-universal-logout-overview/#endpoint-authentication) をコピーします。
この値を取得するには、WIC 管理者は Okta ポータルの **Applications** > **Applications > \[Application] > Authentication > Sign-on settings > Sign-on methods > SAML 2.0 > More details** に移動します。
5. **Revocation Endpoint URL** をコピーします。この URL は Okta Workforce の管理者に提供します。
## Okta Workforce Identity で Universal Logout を設定する
Okta Workforce Identity で Universal Logout を設定して、Auth0 接続を介してアプリケーションにログアウトシグナルを送信します。この操作は Okta 管理者が実行する必要があります。
### 前提条件
以下が必要です。
* [Identity Threat Protection](https://www.okta.com/products/identity-threat-protection/) が有効になっている Okta Workforce Identity 組織、または [無料トライアル](https://www.okta.com/free-trial/)。
* Okta Workforce Identity 組織で、Generic SAML アプリおよび OIDC アプリ向け Universal Logout の EA を有効にする必要があります。詳細については、[サポート対象アプリ向け Universal Logout を設定する](https://help.okta.com/oie/en-us/content/topics/itp/config-universal-logout.htm)を参照してください。
### Okta を設定する
Auth0 の接続について、[Okta Workforce 組織](/ja/docs/authenticate/identity-providers/enterprise-identity-providers/okta) で Universal Logout を有効にします。
1. Okta ポータルで、**Applications** > **Applications** を選択します。
2. Auth0 連携用に登録したアプリケーションを選択します。
3. **General** タブで、**Logout > Edit** を選択します。
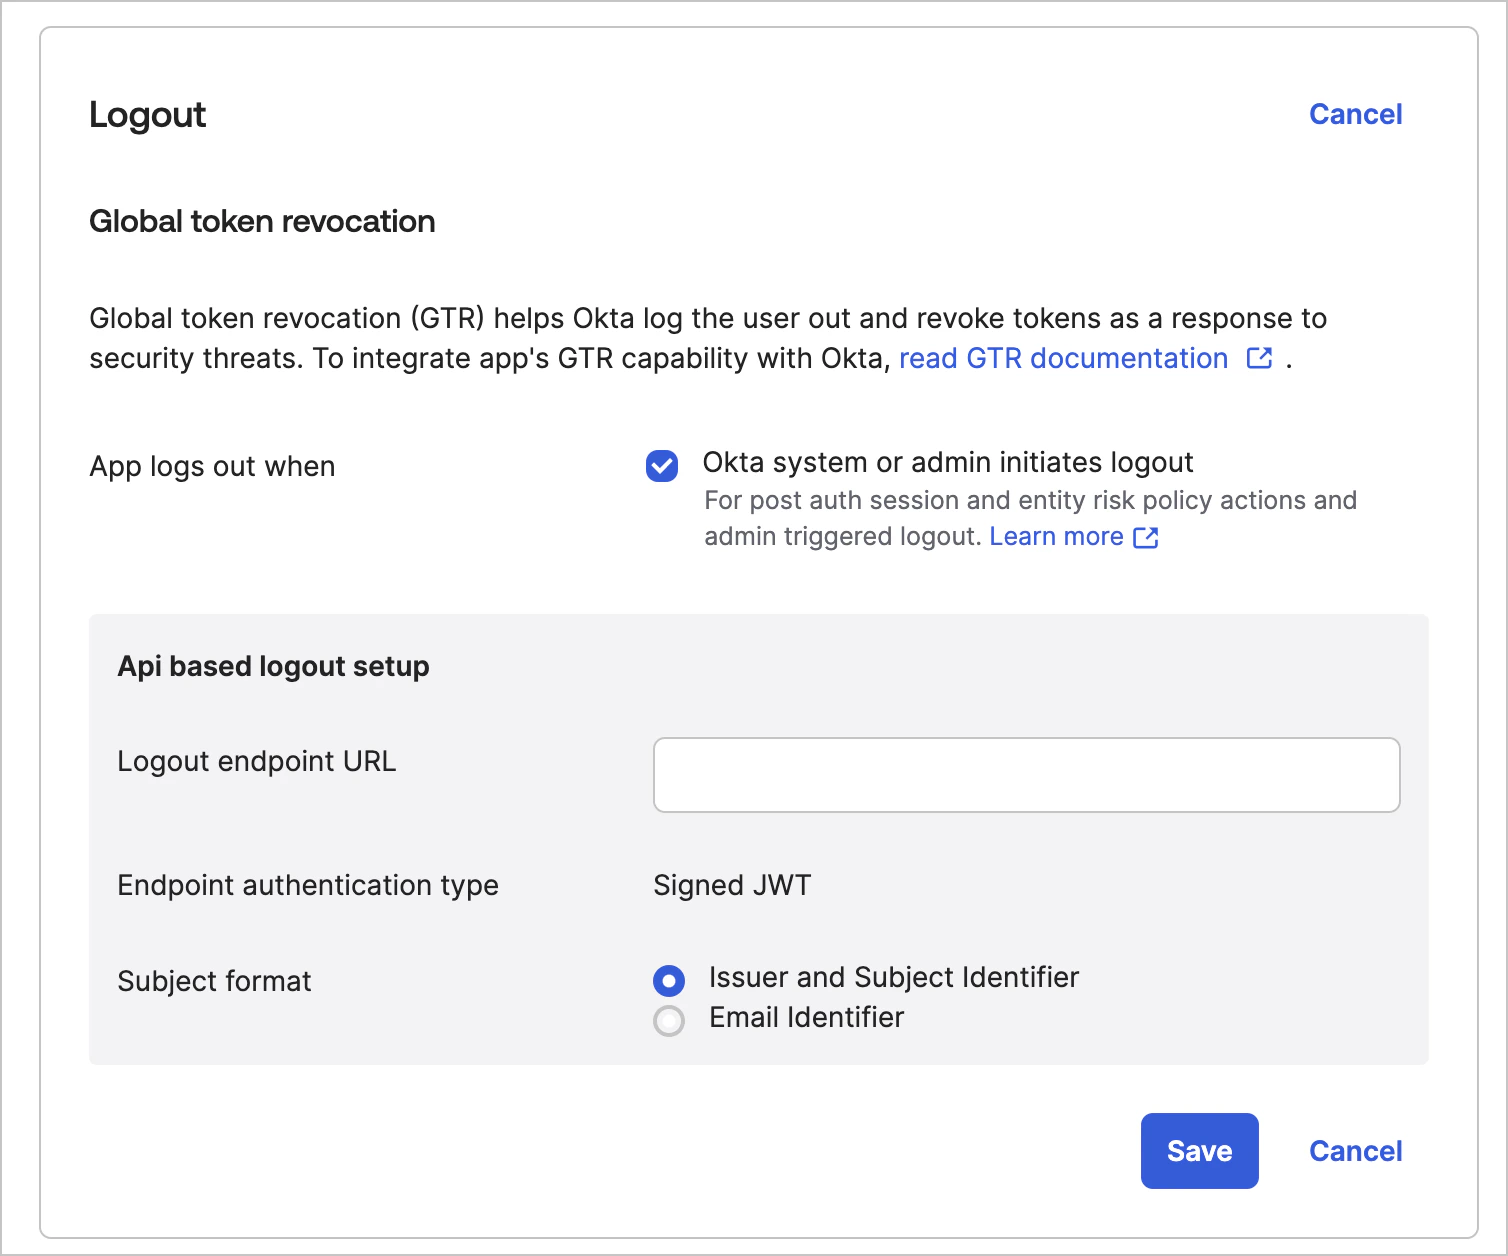 4. **Okta system or admin initiates logout** を選択します。
5. Auth0 からコピーした URL を **Logout Endpoint URL** に入力します。
6. **Subject Format** で **Issuer and Subject Identifier** を選択します。
7. **Save** を選択します。
4. **Okta system or admin initiates logout** を選択します。
5. Auth0 からコピーした URL を **Logout Endpoint URL** に入力します。
6. **Subject Format** で **Issuer and Subject Identifier** を選択します。
7. **Save** を選択します。
### Universal Logout をテストする
選択したユーザーのセッションを無効化して、Okta Workforce Identity で Universal Logout をテストします。
1. Okta ポータルで、**Directory > People** を選択します。
2. Auth0 アプリケーションにサインインしているユーザーを選択します。
3. **More Actions > Clear User Sessions** を選択します。
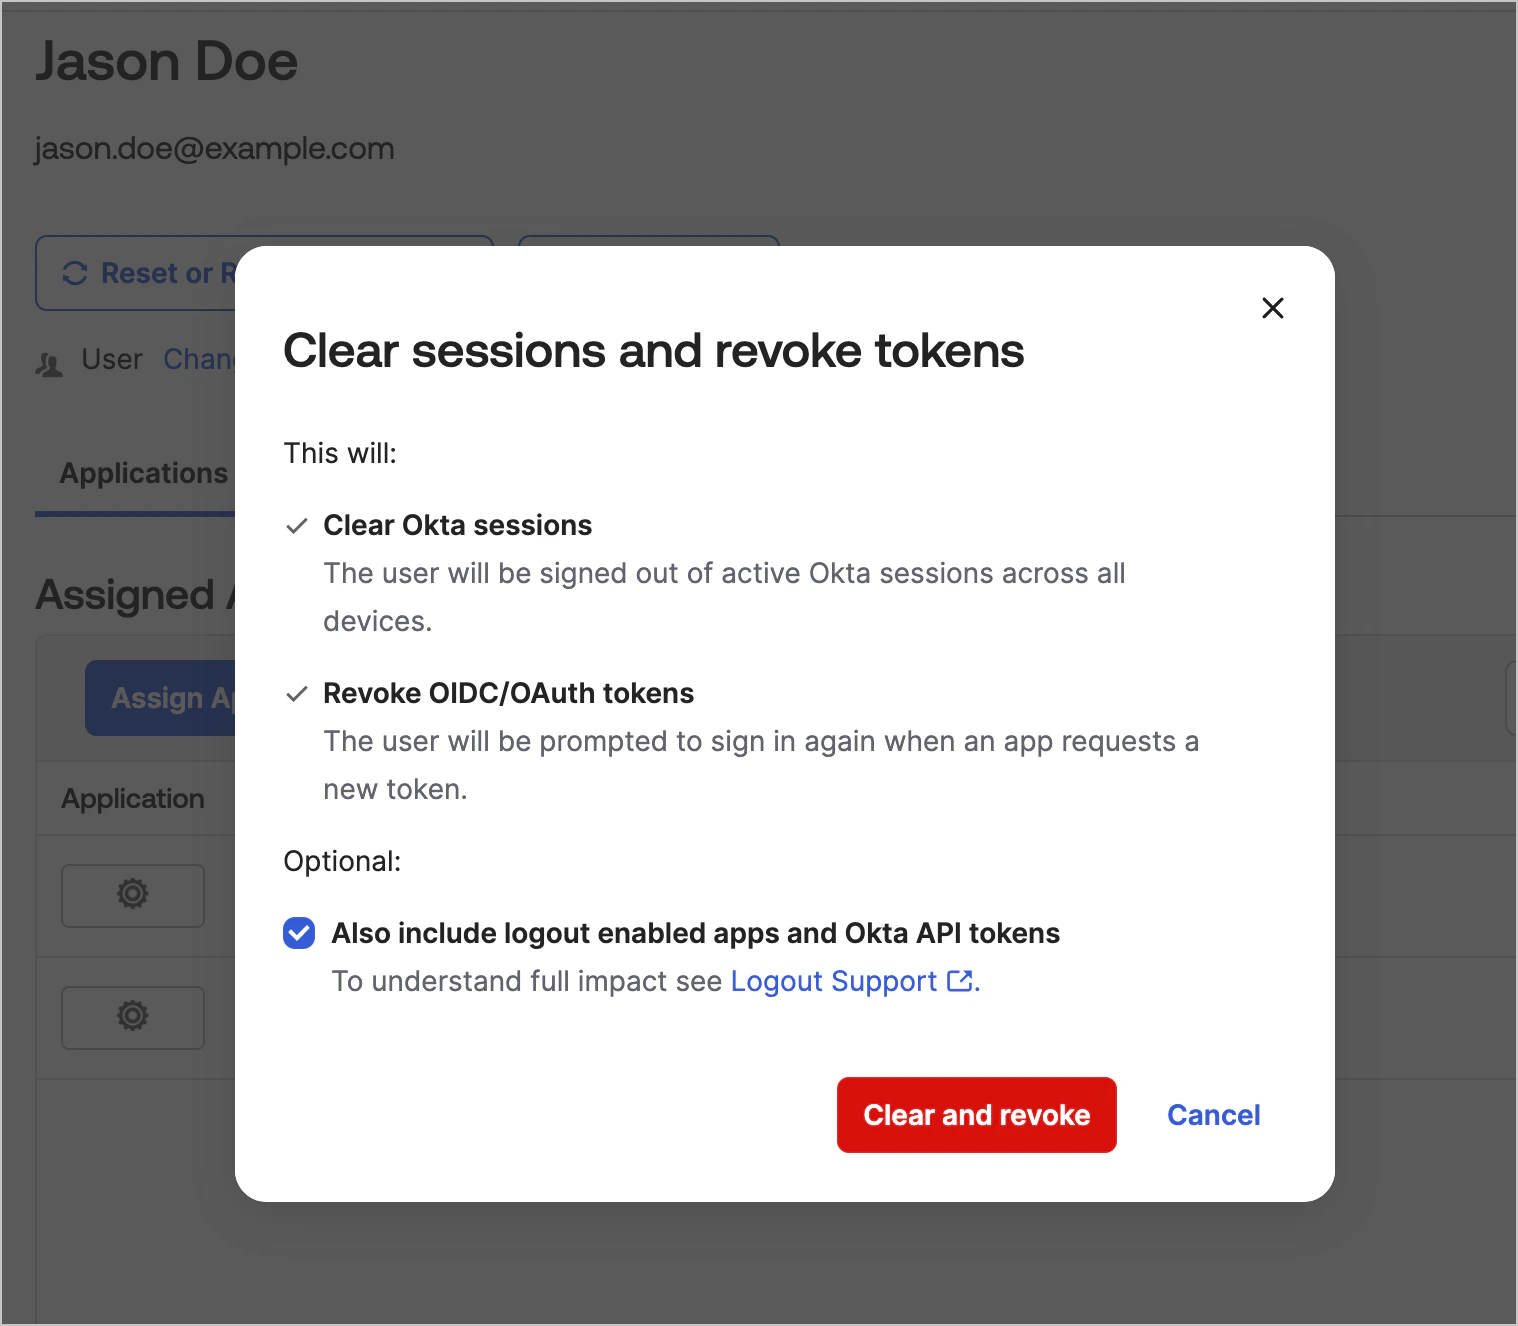 4. ダイアログで、**Also include logout enabled apps and Okta API tokens** を選択します。
5. **Clear and Revoke** を選択します。
4. ダイアログで、**Also include logout enabled apps and Okta API tokens** を選択します。
5. **Clear and Revoke** を選択します。
## ログと通知
Auth0テナントの管理者は、Auth0 が受信した各 Universal Logout リクエストのステータスと詳細を、[Auth0 Dashboard > Monitoring > Logs](https://manage.auth0.com/#/*/logs) で確認できます。Universal Logout で出力されるログイベントタイプについては、[Log Event Type Codes](/ja/docs/deploy-monitor/logs/log-event-type-codes) を参照してください。
また、[Custom Log Streams](/ja/docs/customize/log-streams) と連携して、Universal Logout イベントが発生したときに外部システムへ通知することもできます。
## Management API
[Management API](https://auth0.com/docs/api/management/v2) を使用して、Universal Logout をプログラムで設定することもできます。これは、設定を自動化する場合や、Auth0 Dashboard の外部で独自の設定を構築する場合に便利です。
Okta Workforce および OpenID 接続では、Okta Workforce の管理者に提示する必要があるのは Auth0 のグローバル トークン失効エンドポイントのみであるため、Management API への入力は不要です。
SAML 接続の場合、エンドポイント URL の共有に加えて、`connection` オブジェクトに次の属性を設定して Universal Logout を構成する必要があります。
* **options.global\_token\_revocation\_jwt\_iss** - Okta Workforce Identity に登録された SAML アプリケーションの[issuer ID](https://developer.okta.com/docs/guides/oin-universal-logout-overview/#endpoint-authentication)。値の例: `http://www.okta.com/exkhwkmkwhZUnuA6xxxx`。
* **options.global\_token\_revocation\_jwt\_sub** - Okta Workforce Identity に登録された SAML アプリケーションの[Application ID](https://support.okta.com/help/s/article/How-to-obtain-an-application-ID?language=en_US)。値の例: `0oagcc12354688xxxx`。
これらの属性は、Management API 呼び出しで SAML 接続を[更新](https://auth0.com/docs/api/management/v2#!/Connections/patch_connections_by_id)または[作成](https://auth0.com/docs/api/management/v2/connections/post-connections)する際に使用できます。リクエストを作成するには、次の JSON 例を参照してください。
```json JSON lines theme={null}
{
"strategy": "samlp",
"name": "CONNECTION_NAME",
"options": {
"global_token_revocation_jwt_iss": "ISS_VALUE",
"global_token_revocation_jwt_sub": "SUB_VALUE",
"signInEndpoint": "SIGN_IN_ENDPOINT_URL",
"signOutEndpoint": "SIGN_OUT_ENDPOINT_URL",
"signatureAlgorithm": "rsa-sha256",
"digestAlgorithm": "sha256",
"fieldsMap": {
...
},
"signingCert": "BASE64_SIGNING_CERT"
}
}
```
詳細は、[Management API を使用してエンタープライズ接続を作成する](/ja/docs/authenticate/identity-providers/enterprise-identity-providers/saml#create-an-enterprise-connection-using-the-management-api)を参照してください。