> ## Documentation Index
> Fetch the complete documentation index at: https://translations.mintlify.site/llms.txt
> Use this file to discover all available pages before exploring further.
> OpenID SCIM を使用した Azure 接続設定の手順
# Azure AD 接続向けのインバウンド SCIM
Auth0 テナントが [Microsoft Azure AD connection type](/ja/docs/authenticate/identity-providers/enterprise-identity-providers/azure-active-directory/v2) を使用して Azure AD に接続されていることを確認してください。
この統合では、Azure AD に 2 つのアプリケーションを登録する必要があります。1 つは OpenID Connect 統合、もう 1 つは SCIM 統合です。お客様の設定作業を簡素化するには、[Azure Active Directory app gallery にアプリを公開する](https://learn.microsoft.com/en-us/entra/identity/enterprise-apps/v2-howto-app-gallery-listing#submit-your-application)ことを検討してください。
Auth0 は、ユーザー認証に OpenID Connect (OIDC) プロトコルを使用する [Microsoft Azure AD connection type](/ja/docs/authenticate/identity-providers/enterprise-identity-providers/azure-active-directory/v2) によって、Microsoft Azure Active Directory (現在の名称は Microsoft Entra ID) と統合できます。これらの手順は新しい Azure AD 接続を対象としています。ペアワイズ ユーザー識別子 (`sub)`) を使用する古い接続については、[Older Connections](/ja/docs/authenticate/protocols/scim/inbound-scim-for-older-azure-ad-connections) を参照してください。
## Auth0 で SCIM 設定を行う
1. [Auth0 Dashboard](https://manage.auth0.com/#/) を開き、**Authentication > Enterprise > Microsoft Azure AD > \[your-connection] > Settings** に移動します。
2. **User ID Attribute Type** が **User Object Identifier (oid)** に設定され、**Use Common Endpoint** トグルが **Disabled** になっていることを確認します。
3. **Provisioning** タブを選択し、[ログイン時に追加の属性を同期する](/ja/docs/authenticate/protocols/scim/configure-inbound-scim) 必要がない限り、**Sync user profile attributes at each login** を無効にします。
4. 同じセクションで、**Sync user profiles using SCIM** を有効にします。
5. **Mapping** タブで、**SCIM attribute containing the User ID** が **externalId** に設定されていることを確認します。
6. **Additional Mappings** を確認し、拡張 SCIM 属性が使用したい Auth0 属性にマッピングされていることを確認します。詳細は、[属性マッピング](/ja/docs/authenticate/protocols/scim/configure-inbound-scim#attribute-mapping) を参照してください。
## SCIM エンドポイント URL とトークンを取得する
このセクションでは Auth0 Dashboard を使用しますが、これらの手順は Management API でも実行できます。ベストプラクティスについては、[デプロイのガイドライン](/ja/docs/authenticate/protocols/scim/configure-inbound-scim#deployment-guidelines) セクションを参照してください。
1. [Auth0 Dashboard](https://manage.auth0.com/#/) で SCIM の **Setup** タブを開き、**SCIM Endpoint URL** をコピーして安全な場所に保存します。
2. **Generate New Token** をクリックして SCIM トークンを生成し、必要に応じてトークンの有効期限を設定します。
3. 許可するスコープを選択します。Azure AD で必要なデフォルトのスコープは `get:users`、`post:users`、`patch:users`、`delete:users` です。必要に応じて、グループをプロビジョニングするために `get:groups`、`post:groups`、`patch:groups`、`delete:groups` を選択することもできます。
## OIDC アプリ向けに Azure AD で SCIM を構成する
1. [Azure portal](https://portal.azure.com) の **Microsoft Entra ID > App registrations** で、ユーザー認証を処理する OpenID Connect アプリケーションがすでに登録されていることを確認します。
2. OpenID Connect アプリケーションの **Microsoft Entra ID > Enterprise applications > \[your-oidc-app] > Manage > Properties** で **Assignment Required** が **Yes** に設定されており、**Users and Groups** タブでユーザーが割り当てられていることを確認します。
3. 次に、[Azure portal](https://portal.azure.com) で **Microsoft Entra ID > Enterprise applications > New application > Create your own application** の順に移動し、アプリケーション名を入力して **Create** を選択し、新しい **Non-gallery** アプリケーションを登録します。
4. **Users and Groups** タブに移動し、登録済みの OpenID Connect アプリに割り当てられているものと同じ Azure AD のユーザーとグループを割り当てます。
5. **Provisioning** タブを選択し、**Get started** を選択して、**Provisioning Mode** に **Automatic** を指定します。
6. **Admin Credentials** を選択し、前に保存した **SCIM Endpoint URL** の値を **Tenant URL** として入力します。URL の末尾に `?aadOptscim062020` クエリパラメーターを追加して、[こちらで説明されている Azure AD の既知の問題](https://learn.microsoft.com/en-us/azure/active-directory/app-provisioning/application-provisioning-config-problem-scim-compatibility)に対処します。
7. トークンの値を **Secret Token** フィールドに貼り付け、**Save** を選択します。
8. **Mappings** に移動します。
9. 必要に応じてグループをプロビジョニングするには、**Provision Entra ID Groups** が **Enabled** に設定されていることを確認します。そうでない場合は、これを **Disabled** に設定します。
10. **Provision Microsoft Entra ID Users** を選択し、**Attribute Mappings** に移動して、`externalId` と `mailNickname` を含む行の属性を編集します。
11. **Edit Attribute** 画面で、**Source attribute** を **objectId** に変更し、**OK** を選択します。
12. **Attribute Mappings** に戻り、`emails[type eq "work"].value and mail` を含む行を選択します。
13. **Edit Attribute** 画面で、**Match objects using this attribute** を **Yes** に変更し、**Matching precedence** を **2** に設定して **OK** を選択します。追加の SCIM 属性の設定でも引き続き **Attribute Mappings** セクションを使用します。属性マッピング画面は次のようになります。
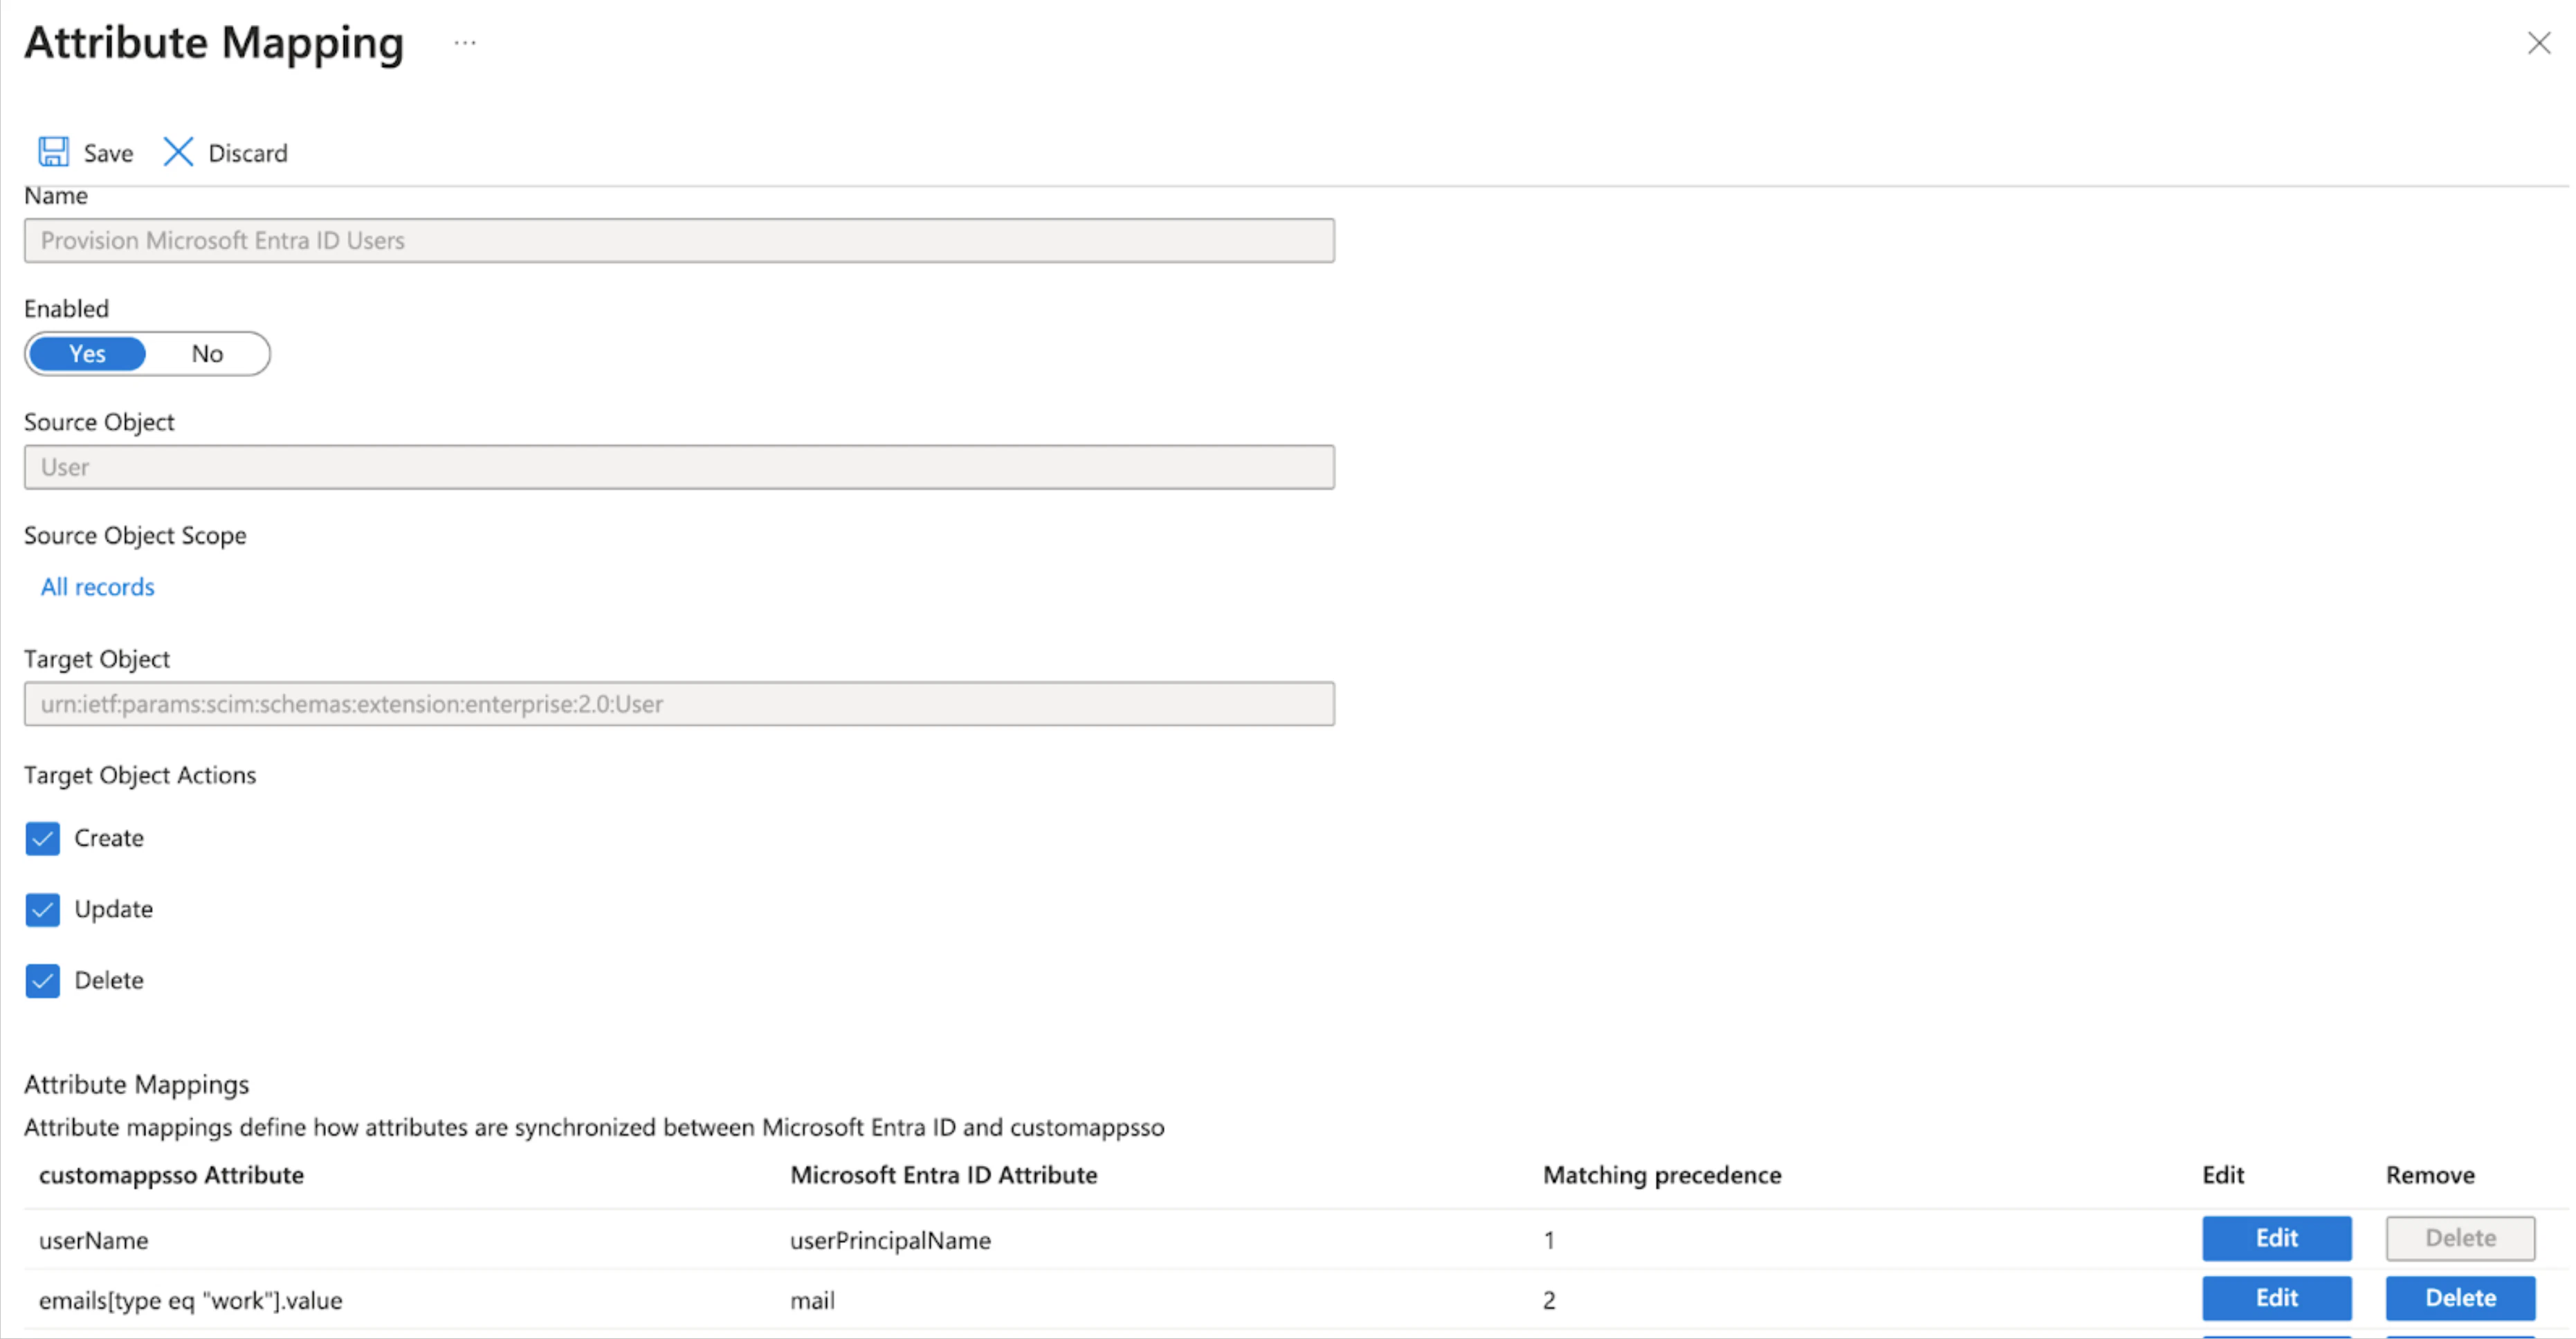 属性マッピングを **Save** し、右上の **X** を選択して **Provisioning** 画面に戻ります。
## テスト
1. Enterprise application の概要画面で **Manage > Provisioning > Provision on Demand** に移動して、SCIM 接続をテストします。
2. **Select a user or group** に移動し、アプリケーションに割り当てたユーザーまたはグループの名前を入力して、その項目を選択し、**Provision** を選択します。これにより、そのユーザーまたはグループが Auth0 テナントに作成されます。
3. 割り当てられているすべてのユーザーとグループを[プロビジョニング](https://learn.microsoft.com/en-us/entra/identity/app-provisioning/configure-automatic-user-provisioning-portal#provisioning-status)するには、**Provisioning Status** を **On** に設定します。