> ## Documentation Index
> Fetch the complete documentation index at: https://translations.mintlify.site/llms.txt
> Use this file to discover all available pages before exploring further.

> Forms for Actions を使用してプログレッシブプロファイルフォームを設定する方法を説明します

# ユースケース: Forms を使用したプログレッシブプロファイルフォームの設定

<Card title="始める前に">
  1. 次のスコープを有効にして、[Machine-to-Machine Application](/ja/docs/get-started/auth0-overview/create-applications/machine-to-machine-apps) を作成します。

  * `read:users`
  * `update:users`
  * `create:users`
  * `read:users_app_metadata`
  * `update:users_app_metadata`
  * `create:users_app_metadata`

  2. M2M アプリケーションの認証情報を使用して、[Vault 接続](/ja/docs/customize/forms/vault) を追加します。
</Card>

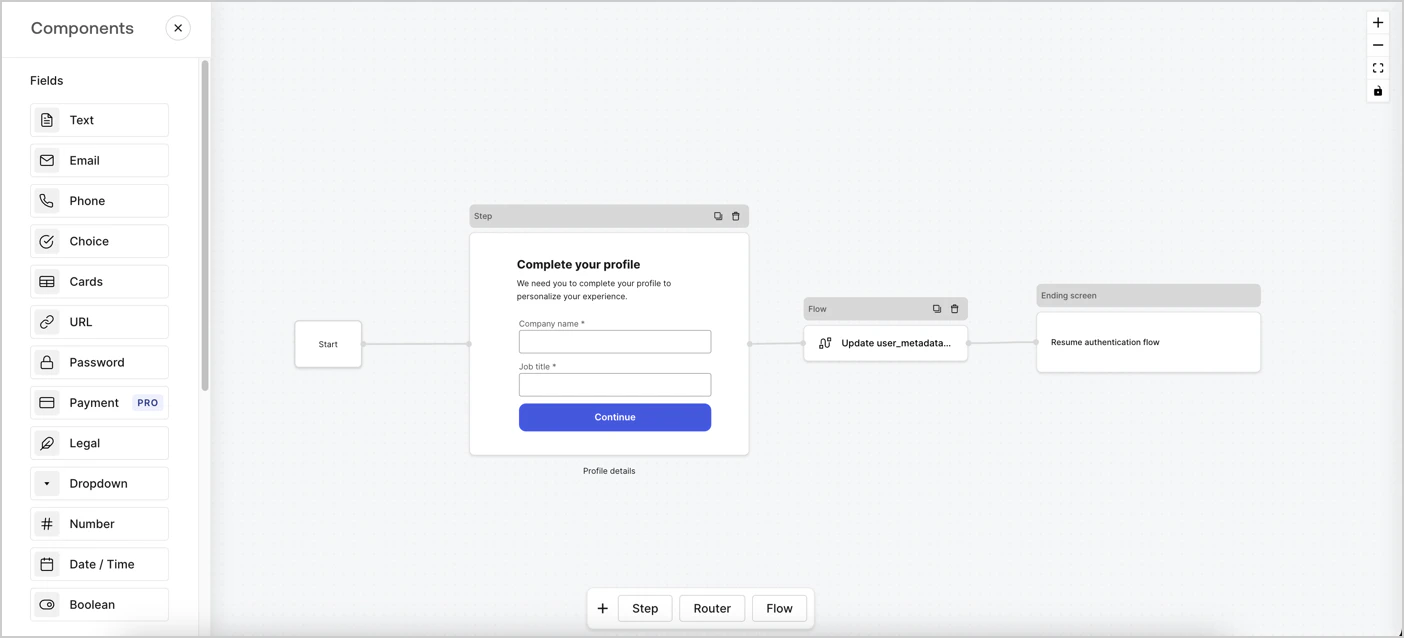
Forms for Actions を使用すると、会社名や役職などの不足している情報を収集するために、どのタイミングでユーザーにプロンプトを表示するかを制御するプログレッシブプロファイリングフローを作成し、それらを `user_metadata` 属性として保存できます。
<Frame>
  <img src="https://mintcdn.com/translations/xwVvTWJUElMm5YAK/docs/images/cdy7uua7fh8z/xUx9YmnHvnAqL19JvNtNP/60dae88f893d4ebe8e3523421e960596/Progressive-profle-overview.png?fit=max&auto=format&n=xwVvTWJUElMm5YAK&q=85&s=52fb99b3d1c63b74179017ee2ebb56a6" alt="Dashboard > Actions > Forms > Form" data-og-width="1404" width="1404" data-og-height="638" height="638" data-path="docs/images/cdy7uua7fh8z/xUx9YmnHvnAqL19JvNtNP/60dae88f893d4ebe8e3523421e960596/Progressive-profle-overview.png" data-optimize="true" data-opv="3" srcset="https://mintcdn.com/translations/xwVvTWJUElMm5YAK/docs/images/cdy7uua7fh8z/xUx9YmnHvnAqL19JvNtNP/60dae88f893d4ebe8e3523421e960596/Progressive-profle-overview.png?w=280&fit=max&auto=format&n=xwVvTWJUElMm5YAK&q=85&s=ed63db8d171c3c75034430ef281a1e57 280w, https://mintcdn.com/translations/xwVvTWJUElMm5YAK/docs/images/cdy7uua7fh8z/xUx9YmnHvnAqL19JvNtNP/60dae88f893d4ebe8e3523421e960596/Progressive-profle-overview.png?w=560&fit=max&auto=format&n=xwVvTWJUElMm5YAK&q=85&s=5769197ae0a52917089f1478abaedc6f 560w, https://mintcdn.com/translations/xwVvTWJUElMm5YAK/docs/images/cdy7uua7fh8z/xUx9YmnHvnAqL19JvNtNP/60dae88f893d4ebe8e3523421e960596/Progressive-profle-overview.png?w=840&fit=max&auto=format&n=xwVvTWJUElMm5YAK&q=85&s=20223f2d84b7bb418ba137d91d07c5c1 840w, https://mintcdn.com/translations/xwVvTWJUElMm5YAK/docs/images/cdy7uua7fh8z/xUx9YmnHvnAqL19JvNtNP/60dae88f893d4ebe8e3523421e960596/Progressive-profle-overview.png?w=1100&fit=max&auto=format&n=xwVvTWJUElMm5YAK&q=85&s=7597ff87472aaf5eb92a47c9630cbc6f 1100w, https://mintcdn.com/translations/xwVvTWJUElMm5YAK/docs/images/cdy7uua7fh8z/xUx9YmnHvnAqL19JvNtNP/60dae88f893d4ebe8e3523421e960596/Progressive-profle-overview.png?w=1650&fit=max&auto=format&n=xwVvTWJUElMm5YAK&q=85&s=f97f442da6818fedfc3a63ca957f1e5a 1650w, https://mintcdn.com/translations/xwVvTWJUElMm5YAK/docs/images/cdy7uua7fh8z/xUx9YmnHvnAqL19JvNtNP/60dae88f893d4ebe8e3523421e960596/Progressive-profle-overview.png?w=2500&fit=max&auto=format&n=xwVvTWJUElMm5YAK&q=85&s=b2c1c3d65edb994a8a4b15e215fdd359 2500w" />
</Frame>

以下のセクションでは、ノードとフローを使用してプログレッシブプロファイルフォームを作成する方法と、そのフォームを [Post Login Action](/ja/docs/customize/actions/explore-triggers/signup-and-login-triggers/login-trigger) に追加する手順について説明します。

<div id="create-a-form-from-scratch">
  ## フォームを最初から作成する
</div>

情報を収集するためのフォームを作成するには、次の手順に従います。

1. **Auth0 Dashboard > Actions > Forms** を選択して、フォームエディターを開きます。
2. **Create Form** > **Start from scratch** を選択します。

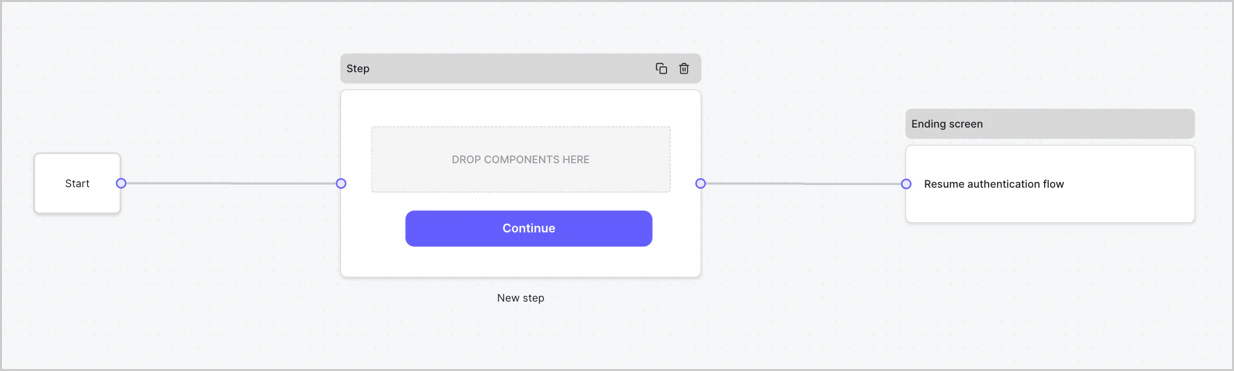
デフォルトでは、新しいフォームには Start ノード、Step ノード、Ending screen ノードが含まれています。
<Frame>
  <img src="https://mintcdn.com/translations/Dcx0M11uuptU53TX/docs/images/cdy7uua7fh8z/2TZ9jSjgEcARFpULI6hz4R/a4319a1bd482f2ee5cc23100fdb2f42c/New-form-Forms-for-action-use-case.png?fit=max&auto=format&n=Dcx0M11uuptU53TX&q=85&s=9d84cbac3e62af2aa02cfe1a79d88e89" alt="Dashboard > Forms > Use Cases > Form" data-og-width="1234" width="1234" data-og-height="371" height="371" data-path="docs/images/cdy7uua7fh8z/2TZ9jSjgEcARFpULI6hz4R/a4319a1bd482f2ee5cc23100fdb2f42c/New-form-Forms-for-action-use-case.png" data-optimize="true" data-opv="3" srcset="https://mintcdn.com/translations/Dcx0M11uuptU53TX/docs/images/cdy7uua7fh8z/2TZ9jSjgEcARFpULI6hz4R/a4319a1bd482f2ee5cc23100fdb2f42c/New-form-Forms-for-action-use-case.png?w=280&fit=max&auto=format&n=Dcx0M11uuptU53TX&q=85&s=90f658e64ee4db52dd801b0b3a9cc5f1 280w, https://mintcdn.com/translations/Dcx0M11uuptU53TX/docs/images/cdy7uua7fh8z/2TZ9jSjgEcARFpULI6hz4R/a4319a1bd482f2ee5cc23100fdb2f42c/New-form-Forms-for-action-use-case.png?w=560&fit=max&auto=format&n=Dcx0M11uuptU53TX&q=85&s=0142cb0e6b542f3f6fb28a86564966e7 560w, https://mintcdn.com/translations/Dcx0M11uuptU53TX/docs/images/cdy7uua7fh8z/2TZ9jSjgEcARFpULI6hz4R/a4319a1bd482f2ee5cc23100fdb2f42c/New-form-Forms-for-action-use-case.png?w=840&fit=max&auto=format&n=Dcx0M11uuptU53TX&q=85&s=a387dbdcff51c1414d133a7a0ecc22e5 840w, https://mintcdn.com/translations/Dcx0M11uuptU53TX/docs/images/cdy7uua7fh8z/2TZ9jSjgEcARFpULI6hz4R/a4319a1bd482f2ee5cc23100fdb2f42c/New-form-Forms-for-action-use-case.png?w=1100&fit=max&auto=format&n=Dcx0M11uuptU53TX&q=85&s=47295de6a4fc2408153380510492809e 1100w, https://mintcdn.com/translations/Dcx0M11uuptU53TX/docs/images/cdy7uua7fh8z/2TZ9jSjgEcARFpULI6hz4R/a4319a1bd482f2ee5cc23100fdb2f42c/New-form-Forms-for-action-use-case.png?w=1650&fit=max&auto=format&n=Dcx0M11uuptU53TX&q=85&s=bb15314f7f7017c91d0450e80273d964 1650w, https://mintcdn.com/translations/Dcx0M11uuptU53TX/docs/images/cdy7uua7fh8z/2TZ9jSjgEcARFpULI6hz4R/a4319a1bd482f2ee5cc23100fdb2f42c/New-form-Forms-for-action-use-case.png?w=2500&fit=max&auto=format&n=Dcx0M11uuptU53TX&q=85&s=4431480842db7e65b5ee761a61702d7e 2500w" />
</Frame>

<div id="configure-the-step-node">
  ### Step ノードを設定する
</div>

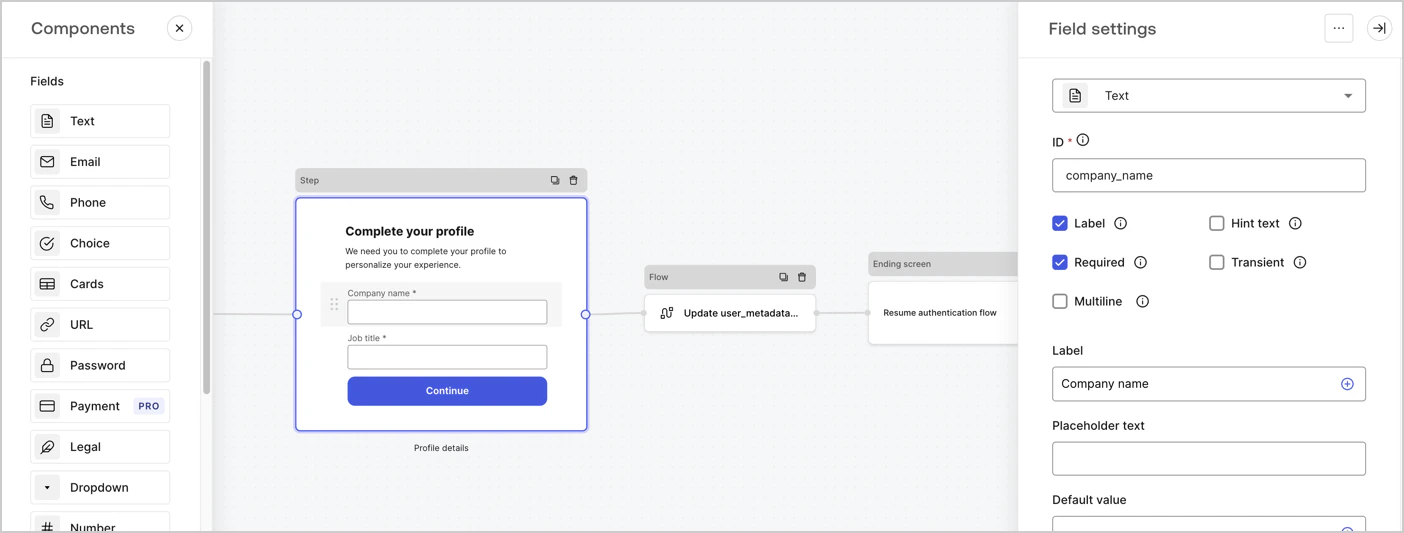
Step ノードは、ユーザーに表示されるグラフィカルインターフェースです。以下の手順に従って [Fields](/ja/docs/customize/forms/nodes-and-components) を Step ノードに追加し、ユーザーの会社名と役職を収集します。

1. **Components menu** から **Rich text** フィールドを **Step** ノードにドラッグします。

   * **Rich text**: カスタムメッセージを入力します。

     * **Example**: `プロフィールを完成させましょう。エクスペリエンスをパーソナライズするために、プロフィール情報の入力が必要です。`
   * **Save** を選択します。
2. **Text** フィールドを **Step** ノードにドラッグします。

   * **ID**: `company_name` を入力します。
   * **Label**: チェックボックスをオンにします。
   * **Label**: `Company name` を入力します。
   * **Required**: チェックボックスをオンにします。
   * **Save** を選択します。
3. **Text** フィールドを **Step** ノードにドラッグします。

   1. **ID**: `job_title` を入力します。
   2. **Label**: `Job title` を入力します。
   3. **Label**: チェックボックスをオンにします。
   4. **Required**: チェックボックスをオンにします。
   5. **Save** を選択します。
4. 保存するには **Publish** を選択します。
<Frame>
  <img src="https://mintcdn.com/translations/6GE5Z24GDCZehiJ9/docs/images/cdy7uua7fh8z/6H1lRzwKyYioQyQJ9MtIoM/aa248e92fc028a68a5b92ff361a11644/progressive-profile-step.png?fit=max&auto=format&n=6GE5Z24GDCZehiJ9&q=85&s=45eebdb293a786f725075e0571aeffc1" alt="Dashboard > Actions > Forms > Form > Step node" data-og-width="1404" width="1404" data-og-height="533" height="533" data-path="docs/images/cdy7uua7fh8z/6H1lRzwKyYioQyQJ9MtIoM/aa248e92fc028a68a5b92ff361a11644/progressive-profile-step.png" data-optimize="true" data-opv="3" srcset="https://mintcdn.com/translations/6GE5Z24GDCZehiJ9/docs/images/cdy7uua7fh8z/6H1lRzwKyYioQyQJ9MtIoM/aa248e92fc028a68a5b92ff361a11644/progressive-profile-step.png?w=280&fit=max&auto=format&n=6GE5Z24GDCZehiJ9&q=85&s=37d45b95958a00c274db827292612139 280w, https://mintcdn.com/translations/6GE5Z24GDCZehiJ9/docs/images/cdy7uua7fh8z/6H1lRzwKyYioQyQJ9MtIoM/aa248e92fc028a68a5b92ff361a11644/progressive-profile-step.png?w=560&fit=max&auto=format&n=6GE5Z24GDCZehiJ9&q=85&s=54e9108a1a6c92e66b4080620879d99f 560w, https://mintcdn.com/translations/6GE5Z24GDCZehiJ9/docs/images/cdy7uua7fh8z/6H1lRzwKyYioQyQJ9MtIoM/aa248e92fc028a68a5b92ff361a11644/progressive-profile-step.png?w=840&fit=max&auto=format&n=6GE5Z24GDCZehiJ9&q=85&s=b3e68876873f9c69c4dbddbf2bc6acbb 840w, https://mintcdn.com/translations/6GE5Z24GDCZehiJ9/docs/images/cdy7uua7fh8z/6H1lRzwKyYioQyQJ9MtIoM/aa248e92fc028a68a5b92ff361a11644/progressive-profile-step.png?w=1100&fit=max&auto=format&n=6GE5Z24GDCZehiJ9&q=85&s=089c8b1865e43c52278d08eab7cb1ddd 1100w, https://mintcdn.com/translations/6GE5Z24GDCZehiJ9/docs/images/cdy7uua7fh8z/6H1lRzwKyYioQyQJ9MtIoM/aa248e92fc028a68a5b92ff361a11644/progressive-profile-step.png?w=1650&fit=max&auto=format&n=6GE5Z24GDCZehiJ9&q=85&s=9026bcfb86dfc696e419c9b5442507b8 1650w, https://mintcdn.com/translations/6GE5Z24GDCZehiJ9/docs/images/cdy7uua7fh8z/6H1lRzwKyYioQyQJ9MtIoM/aa248e92fc028a68a5b92ff361a11644/progressive-profile-step.png?w=2500&fit=max&auto=format&n=6GE5Z24GDCZehiJ9&q=85&s=47a2d77c750038c566b12cc6ca6defe4 2500w" />
</Frame>

<div id="configure-the-flow-node">
  ### Flow ノードを設定する
</div>

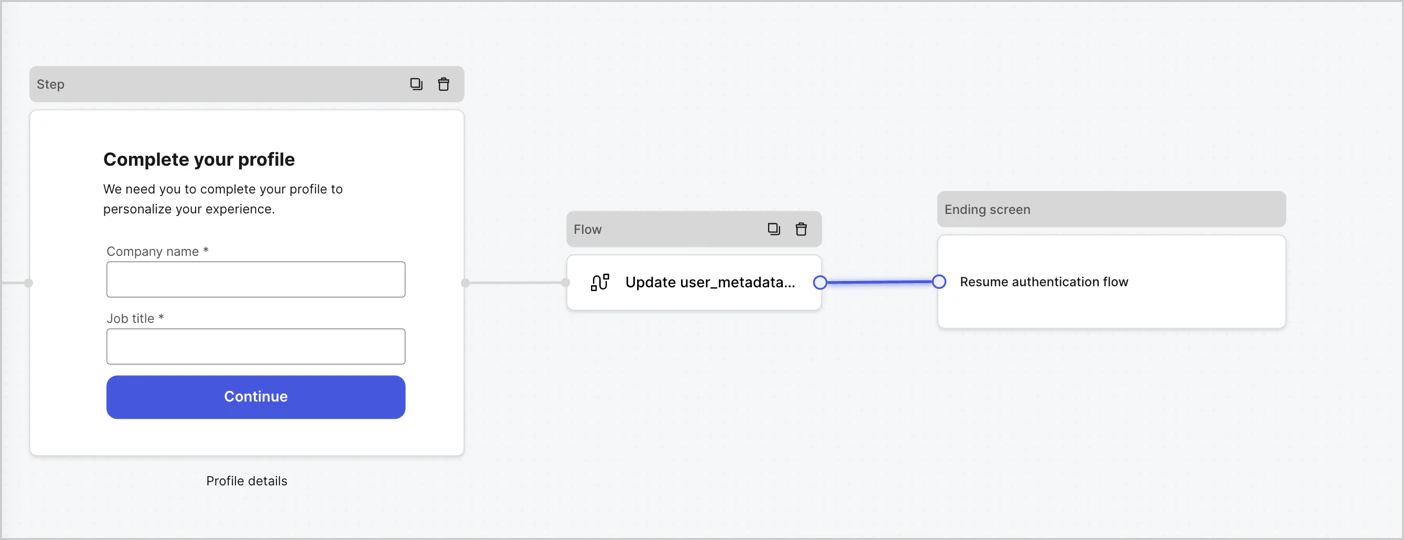
次の手順に従って、`user_metadata` を更新し、認証フローを再開するために、**Step** ノードの後に **Flow** ノードを追加します。

1. フォームエディターの下部で **Flow** を選択します。
2. **Step** ノードと **Ending Screen** ノードの間にある既存のリンクを削除します。
3. 新しい **Flow** > **Click to add a flow** > **Create a new flow.** を選択します。

   * **Name** フィールドに `Update user_metadata` と入力します。
   * **Create** を選択します。
   * **Save** を選択します。
4. 以下の図のように、**Flow** ノードを **Step** ノードと **Ending Screen** ノードに接続します。
5. 保存するには **Publish** を選択します。
<Frame>
  <img src="https://mintcdn.com/translations/MV7tE-x71x8RWRES/docs/images/cdy7uua7fh8z/5C91DaWn4LGtJT9BF87ssu/095171d0c452a287c44bfde12fd6d13f/link-nodes.png?fit=max&auto=format&n=MV7tE-x71x8RWRES&q=85&s=07f4e1019ea8ff699ea79251ccc5bb2b" alt="Dashboard > Actions > Forms > Form" data-og-width="1404" width="1404" data-og-height="540" height="540" data-path="docs/images/cdy7uua7fh8z/5C91DaWn4LGtJT9BF87ssu/095171d0c452a287c44bfde12fd6d13f/link-nodes.png" data-optimize="true" data-opv="3" srcset="https://mintcdn.com/translations/MV7tE-x71x8RWRES/docs/images/cdy7uua7fh8z/5C91DaWn4LGtJT9BF87ssu/095171d0c452a287c44bfde12fd6d13f/link-nodes.png?w=280&fit=max&auto=format&n=MV7tE-x71x8RWRES&q=85&s=6acf5a54b11e8af9100825ee3f66e450 280w, https://mintcdn.com/translations/MV7tE-x71x8RWRES/docs/images/cdy7uua7fh8z/5C91DaWn4LGtJT9BF87ssu/095171d0c452a287c44bfde12fd6d13f/link-nodes.png?w=560&fit=max&auto=format&n=MV7tE-x71x8RWRES&q=85&s=db3313a21b099c75cabad756fd162b3d 560w, https://mintcdn.com/translations/MV7tE-x71x8RWRES/docs/images/cdy7uua7fh8z/5C91DaWn4LGtJT9BF87ssu/095171d0c452a287c44bfde12fd6d13f/link-nodes.png?w=840&fit=max&auto=format&n=MV7tE-x71x8RWRES&q=85&s=544d30eaa8bf19b93f9069f7534d6760 840w, https://mintcdn.com/translations/MV7tE-x71x8RWRES/docs/images/cdy7uua7fh8z/5C91DaWn4LGtJT9BF87ssu/095171d0c452a287c44bfde12fd6d13f/link-nodes.png?w=1100&fit=max&auto=format&n=MV7tE-x71x8RWRES&q=85&s=8d41d2745ffdddd9211cbdbae0e7c6b7 1100w, https://mintcdn.com/translations/MV7tE-x71x8RWRES/docs/images/cdy7uua7fh8z/5C91DaWn4LGtJT9BF87ssu/095171d0c452a287c44bfde12fd6d13f/link-nodes.png?w=1650&fit=max&auto=format&n=MV7tE-x71x8RWRES&q=85&s=81de5afd8aa300a864e9d241a53ae658 1650w, https://mintcdn.com/translations/MV7tE-x71x8RWRES/docs/images/cdy7uua7fh8z/5C91DaWn4LGtJT9BF87ssu/095171d0c452a287c44bfde12fd6d13f/link-nodes.png?w=2500&fit=max&auto=format&n=MV7tE-x71x8RWRES&q=85&s=d49035ac065c3dda504067adeedba7c9 2500w" />
</Frame>

次の手順に従って、フローに Auth0 の Update user アクションを追加します。

1. **Update user\_metadata** フローを選択し、次に **Edit Flow** を選択して、新しいタブで Flow エディタを開きます。
2. **Start** アクションの下にある **+** アイコンを選択して **Update user** アクションを追加します。以下のフィールドを入力し、続行するには **Save** を選択します。

   * **Connection**: ドロップダウンから、M2M アプリケーション用の Vault 接続を選択します。

   * **User ID**: `{{context.user.user_id}}` と入力します。

   * **Body**: 次のコードをコピーして貼り付け、`job_title` と `company_name` プロパティで `user_metadata` を更新します。

     ```json lines theme={null}
     {
        "user_metadata": {
           "job_title": "{{fields.job_title}}",
           "company_name": "{{fields.company_name}}"
        }
     }
     ```

   * **Save** を選択します。
3. 保存するには **Publish** を選択します。

<Frame>
  <img src="https://mintcdn.com/translations/6GE5Z24GDCZehiJ9/docs/images/cdy7uua7fh8z/65Jx4W5oIZJyyvA8z4HqIx/0661b1a8ca6361c54fc4fef07ba59f0b/update-user.png?fit=max&auto=format&n=6GE5Z24GDCZehiJ9&q=85&s=7e1caaf5ea4560476575b73cecb6df2e" alt="Dashboard > Actions > Forms > Flows" data-og-width="1404" width="1404" data-og-height="244" height="244" data-path="docs/images/cdy7uua7fh8z/65Jx4W5oIZJyyvA8z4HqIx/0661b1a8ca6361c54fc4fef07ba59f0b/update-user.png" data-optimize="true" data-opv="3" srcset="https://mintcdn.com/translations/6GE5Z24GDCZehiJ9/docs/images/cdy7uua7fh8z/65Jx4W5oIZJyyvA8z4HqIx/0661b1a8ca6361c54fc4fef07ba59f0b/update-user.png?w=280&fit=max&auto=format&n=6GE5Z24GDCZehiJ9&q=85&s=c344529f19a221599f7d96cec4906b19 280w, https://mintcdn.com/translations/6GE5Z24GDCZehiJ9/docs/images/cdy7uua7fh8z/65Jx4W5oIZJyyvA8z4HqIx/0661b1a8ca6361c54fc4fef07ba59f0b/update-user.png?w=560&fit=max&auto=format&n=6GE5Z24GDCZehiJ9&q=85&s=b727276b5ae17bd7891a2f98dbedb3dd 560w, https://mintcdn.com/translations/6GE5Z24GDCZehiJ9/docs/images/cdy7uua7fh8z/65Jx4W5oIZJyyvA8z4HqIx/0661b1a8ca6361c54fc4fef07ba59f0b/update-user.png?w=840&fit=max&auto=format&n=6GE5Z24GDCZehiJ9&q=85&s=762bf30f089067212f11c0ac2d987689 840w, https://mintcdn.com/translations/6GE5Z24GDCZehiJ9/docs/images/cdy7uua7fh8z/65Jx4W5oIZJyyvA8z4HqIx/0661b1a8ca6361c54fc4fef07ba59f0b/update-user.png?w=1100&fit=max&auto=format&n=6GE5Z24GDCZehiJ9&q=85&s=6de81ef141aba0be2e9bcd51e185cdd9 1100w, https://mintcdn.com/translations/6GE5Z24GDCZehiJ9/docs/images/cdy7uua7fh8z/65Jx4W5oIZJyyvA8z4HqIx/0661b1a8ca6361c54fc4fef07ba59f0b/update-user.png?w=1650&fit=max&auto=format&n=6GE5Z24GDCZehiJ9&q=85&s=473ae41d6a1c9a4ca0a2a33d45c73b71 1650w, https://mintcdn.com/translations/6GE5Z24GDCZehiJ9/docs/images/cdy7uua7fh8z/65Jx4W5oIZJyyvA8z4HqIx/0661b1a8ca6361c54fc4fef07ba59f0b/update-user.png?w=2500&fit=max&auto=format&n=6GE5Z24GDCZehiJ9&q=85&s=68049e0b45fe8db2e4e7010392b842cb 2500w" />
</Frame>

<div id="retrieve-the-form-render-code">
  ### フォームのレンダリングコードを取得する
</div>

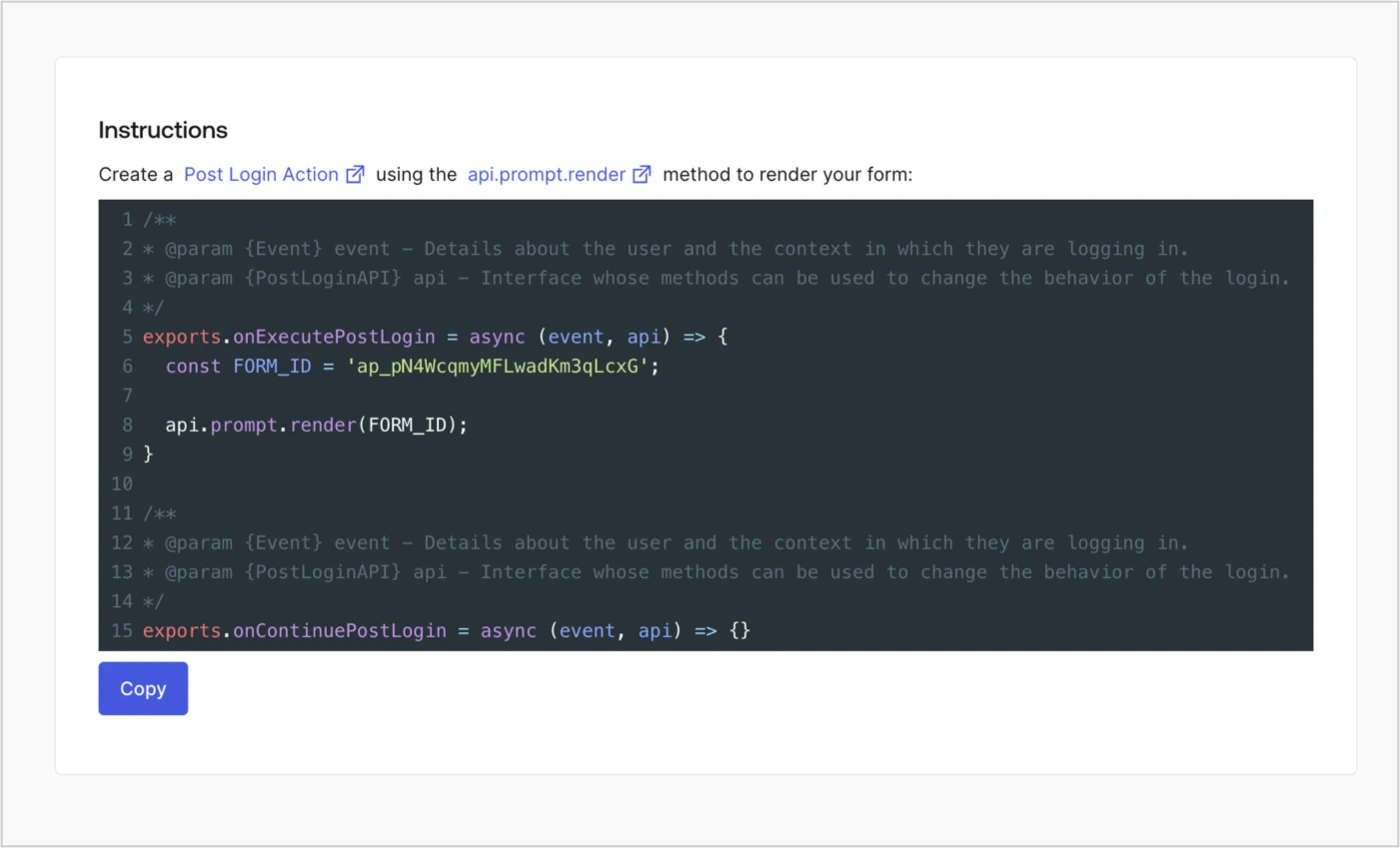
次の手順に従ってフォームのレンダリングコードを取得し、カスタムの Post Login Action でフォームを視覚的にレンダリングします。

* フォームエディターで、**`<> Render`** を選択します。
* **Copy** を選択します。
<Frame>
  <img src="https://mintcdn.com/translations/Dcx0M11uuptU53TX/docs/images/cdy7uua7fh8z/2EIUzc539sq9lwoTKbjoJv/496a864c0fc44a782c9cadca119dbfb0/embed.png?fit=max&auto=format&n=Dcx0M11uuptU53TX&q=85&s=384ef6b70c700b214d699187cdbf7eea" alt="Dashboard > Actions > Forms > Form > Embed" data-og-width="1400" width="1400" data-og-height="848" height="848" data-path="docs/images/cdy7uua7fh8z/2EIUzc539sq9lwoTKbjoJv/496a864c0fc44a782c9cadca119dbfb0/embed.png" data-optimize="true" data-opv="3" srcset="https://mintcdn.com/translations/Dcx0M11uuptU53TX/docs/images/cdy7uua7fh8z/2EIUzc539sq9lwoTKbjoJv/496a864c0fc44a782c9cadca119dbfb0/embed.png?w=280&fit=max&auto=format&n=Dcx0M11uuptU53TX&q=85&s=e4395c30ca530056bf8b7451b6deb334 280w, https://mintcdn.com/translations/Dcx0M11uuptU53TX/docs/images/cdy7uua7fh8z/2EIUzc539sq9lwoTKbjoJv/496a864c0fc44a782c9cadca119dbfb0/embed.png?w=560&fit=max&auto=format&n=Dcx0M11uuptU53TX&q=85&s=ac6fa0252e068609208572dcbf489baf 560w, https://mintcdn.com/translations/Dcx0M11uuptU53TX/docs/images/cdy7uua7fh8z/2EIUzc539sq9lwoTKbjoJv/496a864c0fc44a782c9cadca119dbfb0/embed.png?w=840&fit=max&auto=format&n=Dcx0M11uuptU53TX&q=85&s=907c448e7fe5ade5aed859f4d343f834 840w, https://mintcdn.com/translations/Dcx0M11uuptU53TX/docs/images/cdy7uua7fh8z/2EIUzc539sq9lwoTKbjoJv/496a864c0fc44a782c9cadca119dbfb0/embed.png?w=1100&fit=max&auto=format&n=Dcx0M11uuptU53TX&q=85&s=283450a49e31012d3c5c21790d7a8336 1100w, https://mintcdn.com/translations/Dcx0M11uuptU53TX/docs/images/cdy7uua7fh8z/2EIUzc539sq9lwoTKbjoJv/496a864c0fc44a782c9cadca119dbfb0/embed.png?w=1650&fit=max&auto=format&n=Dcx0M11uuptU53TX&q=85&s=4e518c8ad8926b9edde551a9e5f44b97 1650w, https://mintcdn.com/translations/Dcx0M11uuptU53TX/docs/images/cdy7uua7fh8z/2EIUzc539sq9lwoTKbjoJv/496a864c0fc44a782c9cadca119dbfb0/embed.png?w=2500&fit=max&auto=format&n=Dcx0M11uuptU53TX&q=85&s=02e887a11021cbbd64e79b09401489b9 2500w" />
</Frame>

<div id="create-a-post-login-action">
  ## Post Login Action を作成する
</div>

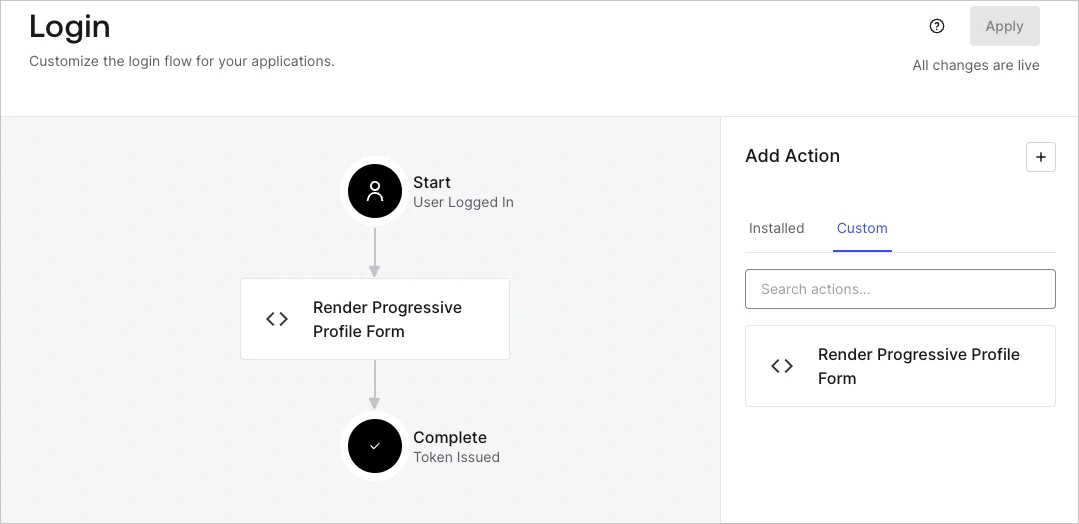
次の手順に従って、フォームを表示する Post Login Action を作成します。

1. **Auth0 Dashboard > Actions > Flows > Login** に移動します。
2. **+** アイコンを選択し、**Build from scratch** を選択します。

   * **名前**: `Render Progressive Profile Form` と入力します。
   * **トリガー**: `Login / Post Login` を選択します。
   * **ランタイム**: 推奨バージョンを選択します。
3. **Create** を選択します。

Post Login Action を設定するには、次の手順を実行します。

1. Code editor から既存のコードを削除します。
2. フォームの埋め込みコードを Code editor に貼り付けます。
3. フォームを表示する条件ロジックを定義するようにコードを編集します。

   ```javascript lines theme={null}
   /**
   * @param {Event} event - ユーザーと、そのユーザーのログイン時のコンテキストに関する詳細。
   * @param {PostLoginAPI} api - ログインの動作を変更するために使用できるメソッドを提供するインターフェース。
   */
   exports.onExecutePostLogin = async (event, api) => {
     const FORM_ID = 'REPLACE_WITH_YOUR_FORM_ID';

     if (
       event.stats.logins_count > 2 &&
       !event.user.user_metadata.company_name &&
       !event.user.user_metadata.job_title
     ) {
       api.prompt.render(FORM_ID);
     }
   }

   exports.onContinuePostLogin = async (event, api) => { }
   ```

   <Callout icon="file-lines" color="#0EA5E9" iconType="regular">
     上記のコード例では、ユーザーのログイン回数が 2 回を超えており、ユーザーメタデータの company\_name プロパティと job\_title プロパティが設定されていない場合にフォームを表示します。
   </Callout>
4. **デプロイ** を選択します。
5. **Render Progressive Profile Form** Action を **Login** フローにドラッグ＆ドロップします。

   <Frame>
     <img src="https://mintcdn.com/translations/eVsQcTnbClN-oB7d/docs/images/cdy7uua7fh8z/1QjjZdpTqTxx012UDN4xk9/99fba5ef4068a5688f1762eea7f42976/renderprogessiveprofile.png?fit=max&auto=format&n=eVsQcTnbClN-oB7d&q=85&s=a54028f6317267607f645bbb2324cfb0" alt="Dashboard > Forms > ユースケース Progressive Profile Login Action" data-og-width="1079" width="1079" data-og-height="524" height="524" data-path="docs/images/cdy7uua7fh8z/1QjjZdpTqTxx012UDN4xk9/99fba5ef4068a5688f1762eea7f42976/renderprogessiveprofile.png" data-optimize="true" data-opv="3" srcset="https://mintcdn.com/translations/eVsQcTnbClN-oB7d/docs/images/cdy7uua7fh8z/1QjjZdpTqTxx012UDN4xk9/99fba5ef4068a5688f1762eea7f42976/renderprogessiveprofile.png?w=280&fit=max&auto=format&n=eVsQcTnbClN-oB7d&q=85&s=b25c0a58909331b8aeb550013b99073a 280w, https://mintcdn.com/translations/eVsQcTnbClN-oB7d/docs/images/cdy7uua7fh8z/1QjjZdpTqTxx012UDN4xk9/99fba5ef4068a5688f1762eea7f42976/renderprogessiveprofile.png?w=560&fit=max&auto=format&n=eVsQcTnbClN-oB7d&q=85&s=83b4c974d7e06391f143abbd0d8e7892 560w, https://mintcdn.com/translations/eVsQcTnbClN-oB7d/docs/images/cdy7uua7fh8z/1QjjZdpTqTxx012UDN4xk9/99fba5ef4068a5688f1762eea7f42976/renderprogessiveprofile.png?w=840&fit=max&auto=format&n=eVsQcTnbClN-oB7d&q=85&s=bc003dfaa778b52e55a98948b617fc3d 840w, https://mintcdn.com/translations/eVsQcTnbClN-oB7d/docs/images/cdy7uua7fh8z/1QjjZdpTqTxx012UDN4xk9/99fba5ef4068a5688f1762eea7f42976/renderprogessiveprofile.png?w=1100&fit=max&auto=format&n=eVsQcTnbClN-oB7d&q=85&s=c9fa0b379b7743acebd0f0d78207d71b 1100w, https://mintcdn.com/translations/eVsQcTnbClN-oB7d/docs/images/cdy7uua7fh8z/1QjjZdpTqTxx012UDN4xk9/99fba5ef4068a5688f1762eea7f42976/renderprogessiveprofile.png?w=1650&fit=max&auto=format&n=eVsQcTnbClN-oB7d&q=85&s=d79f7a9ecfd5bddddd318bd409b26783 1650w, https://mintcdn.com/translations/eVsQcTnbClN-oB7d/docs/images/cdy7uua7fh8z/1QjjZdpTqTxx012UDN4xk9/99fba5ef4068a5688f1762eea7f42976/renderprogessiveprofile.png?w=2500&fit=max&auto=format&n=eVsQcTnbClN-oB7d&q=85&s=fd88d96bb14c3ef81fd09a9e4dc6e658 2500w" />
   </Frame>
6. **Apply** を選択します。

<div id="test-implementation">
  ### 実装をテストする
</div>

次の手順で実装をテストします。

1. ログイン回数が 2 回を超えていて、`user_metadata` 属性の `company_name` と `job_title` に値が設定されていない既存のユーザーでログインします。
2. Login フローの post-login Action によってフォームが表示され、情報の入力を求められます。
3. **Auth0 Dashboard > User Management > Users** を選択し、対象のユーザーを見つけて、`user_metadata` 属性の `company_name` と `job_title` に情報が含まれていることを確認します。