> ## Documentation Index
> Fetch the complete documentation index at: https://translations.mintlify.site/llms.txt
> Use this file to discover all available pages before exploring further.
> Auth0 を使用した Tessel デバイスの認証と認可の方法。
# Auth0 を使用した Tessel デバイスの認証と認可
export const AuthCodeBlock = ({filename, icon, language, highlight, children}) => {
const [displayText, setDisplayText] = useState(children);
const [copyText, setCopyText] = useState(children);
const wrapperRef = React.useRef(null);
useEffect(() => {
let unsubscribe = null;
function init() {
if (!window.autorun || !window.rootStore) {
return;
}
unsubscribe = window.autorun(() => {
let processedChildrenForDisplay = children;
let processedChildrenForCopy = children;
for (const [key, value] of window.rootStore.variableStore.values.entries()) {
const escapedKey = key.replaceAll(/[.*+?^${}()|[\]\\]/g, (String.raw)`\$&`);
let displayValue = value;
if (key === "{yourClientSecret}" && value !== "{yourClientSecret}") {
displayValue = value.substring(0, 3) + "*****マスク済み*****";
}
processedChildrenForDisplay = processedChildrenForDisplay.replaceAll(new RegExp(escapedKey, "g"), displayValue);
processedChildrenForCopy = processedChildrenForCopy.replaceAll(new RegExp(escapedKey, "g"), value);
}
setDisplayText(processedChildrenForDisplay);
setCopyText(processedChildrenForCopy);
});
}
if (window.rootStore) {
init();
} else {
window.addEventListener("adu:storeReady", init);
}
return () => {
window.removeEventListener("adu:storeReady", init);
unsubscribe?.();
};
}, [children]);
useEffect(() => {
if (!wrapperRef.current) return;
const originalWriteText = navigator.clipboard.writeText.bind(navigator.clipboard);
let isOverriding = false;
const handleClick = e => {
const button = e.target.closest('[data-testid="copy-code-button"]');
if (!button || !wrapperRef.current.contains(button)) return;
isOverriding = true;
navigator.clipboard.writeText = text => {
if (isOverriding) {
isOverriding = false;
navigator.clipboard.writeText = originalWriteText;
return originalWriteText(copyText);
}
return originalWriteText(text);
};
setTimeout(() => {
if (isOverriding) {
isOverriding = false;
navigator.clipboard.writeText = originalWriteText;
}
}, 100);
};
const wrapper = wrapperRef.current;
wrapper.addEventListener('click', handleClick, true);
return () => {
wrapper.removeEventListener('click', handleClick, true);
if (navigator.clipboard.writeText !== originalWriteText) {
navigator.clipboard.writeText = originalWriteText;
}
};
}, [copyText]);
return
{displayText}
;
};
[Tessel](https://tessel.io) はすばらしいボードです。優れたハードウェア仕様と高い拡張性を備えているだけでなく、JavaScript でプログラムできます。Kickstarter で発表されたとき、私たちはすぐにサポートを開始し、実機を手にするまで何週間も待ちました。
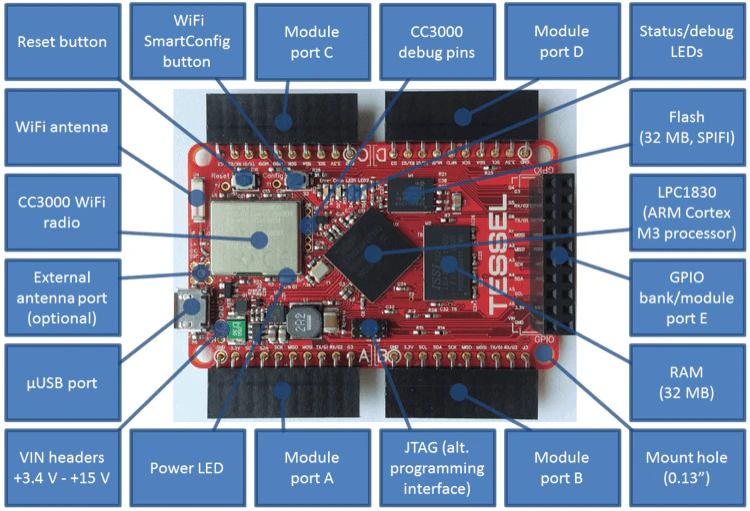 ようやく届いたので、最初のプログラムを書いてみましょう。Auth0 からトークンを取得し、API を呼び出します。
Tessel は JavaScript との完全な互換性を目指しています。Node のコアモジュールの多くも動作しますが、すべてではありません。詳細については、[GitHub の Tessel ドキュメント](https://github.com/tessel/docs/blob/master/compatibility.md) を参照してください。
ようやく届いたので、最初のプログラムを書いてみましょう。Auth0 からトークンを取得し、API を呼び出します。
Tessel は JavaScript との完全な互換性を目指しています。Node のコアモジュールの多くも動作しますが、すべてではありません。詳細については、[GitHub の Tessel ドキュメント](https://github.com/tessel/docs/blob/master/compatibility.md) を参照してください。
## サンプル
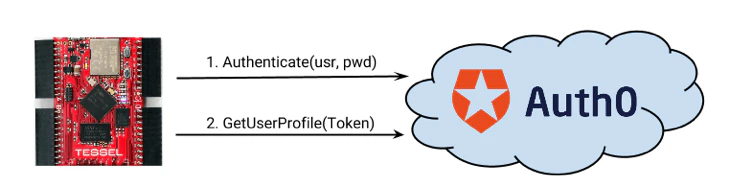
この例の流れはシンプルです。
1. デバイス認証情報を使用して、Auth0 の Resource Owner エンドポイントを呼び出します
2. トークンを取得します
3. そのトークンを使用して API を呼び出します
 export const codeExample = `var http = require('https');
var tessel = require('tessel');
tessel.syncClock(function () {
var device_id = 'tessel-01';
var password = 'TESSEL のパスワード';
authenticate(device_id, password, function(e,token){
if(e) return console.log("エラー: " + e);
getDeviceProfile(token.access_token, function(e, profile){
console.log("デバイス プロファイル:");
console.log(profile);
});
});
function getDeviceProfile(token, done){
request('{yourDomain}',
'/userinfo',
'GET',
{
"Content-type": "application/json",
"Authorization": "Bearer " + token
},
null,
function(e,response){
if(e) return done(e);
done(null, JSON.parse(response));
});
}
function authenticate(device_id, password, done)
{
request('{yourDomain}',
'/oauth/ro',
'POST',
{
"Content-type": "application/json",
},
JSON.stringify({
client_id: '{yourClientId}',
username: device_id,
password: password,
connection: 'devices',
grant_type: "password",
scope: 'openid'
}),
function(e,response){
if(e) return done(e);
done(null, JSON.parse(response));
});
}
function request(host, path, method, headers, body, done){
var options = {
hostname: host,
path: path,
method: method,
headers: headers
};
var req = http.request(options, function(res) {
res.setEncoding('utf8');
var response = "";
res.on('data', function (chunk) {
response += chunk;
});
res.on('end', function(){
done(null, response);
});
});
req.on('error', function(e) {
done(e);
});
if( body ) req.write(body);
req.end();
}
});`;
コードの注目点:
1. これは Node と 99% の互換性があります (デバイス固有のモジュールは `tessel` のみで、これを使うのは、すべての SSL 呼び出しが適切な時刻参照で行われるようにするためだけです。
2. `request` 関数は、`http` モジュールの関数を簡単にラップしたものです。`request` モジュールは現在 Tessel では動作しません。
リソースオーナー エンドポイントでは認証情報 (username/password など) が必要になるため、Auth0 に接続されたバックエンドのユーザーストアはこれをサポートしている必要があります (Database 接続や Active Directory など) 。
export const codeExample = `var http = require('https');
var tessel = require('tessel');
tessel.syncClock(function () {
var device_id = 'tessel-01';
var password = 'TESSEL のパスワード';
authenticate(device_id, password, function(e,token){
if(e) return console.log("エラー: " + e);
getDeviceProfile(token.access_token, function(e, profile){
console.log("デバイス プロファイル:");
console.log(profile);
});
});
function getDeviceProfile(token, done){
request('{yourDomain}',
'/userinfo',
'GET',
{
"Content-type": "application/json",
"Authorization": "Bearer " + token
},
null,
function(e,response){
if(e) return done(e);
done(null, JSON.parse(response));
});
}
function authenticate(device_id, password, done)
{
request('{yourDomain}',
'/oauth/ro',
'POST',
{
"Content-type": "application/json",
},
JSON.stringify({
client_id: '{yourClientId}',
username: device_id,
password: password,
connection: 'devices',
grant_type: "password",
scope: 'openid'
}),
function(e,response){
if(e) return done(e);
done(null, JSON.parse(response));
});
}
function request(host, path, method, headers, body, done){
var options = {
hostname: host,
path: path,
method: method,
headers: headers
};
var req = http.request(options, function(res) {
res.setEncoding('utf8');
var response = "";
res.on('data', function (chunk) {
response += chunk;
});
res.on('end', function(){
done(null, response);
});
});
req.on('error', function(e) {
done(e);
});
if( body ) req.write(body);
req.end();
}
});`;
コードの注目点:
1. これは Node と 99% の互換性があります (デバイス固有のモジュールは `tessel` のみで、これを使うのは、すべての SSL 呼び出しが適切な時刻参照で行われるようにするためだけです。
2. `request` 関数は、`http` モジュールの関数を簡単にラップしたものです。`request` モジュールは現在 Tessel では動作しません。
リソースオーナー エンドポイントでは認証情報 (username/password など) が必要になるため、Auth0 に接続されたバックエンドのユーザーストアはこれをサポートしている必要があります (Database 接続や Active Directory など) 。
## Tessel のセットアップ
* `tessel update` を実行して、SSL をサポートする最新のファームウェアをインストールしてください。
* 当然ながら、Web への接続が必要です。WiFi は `tessel wifi` コマンドで設定できます。
* 認証情報 (`username`/`password` など) は、必ず安全なネットワーク経由で送信してください。
## 概要
Tessel は非常に優れた製品です。大きな可能性を秘めています。このサンプルでは、Auth0 と簡単に連携できることを紹介します。