> ## Documentation Index
> Fetch the complete documentation index at: https://translations.mintlify.site/llms.txt
> Use this file to discover all available pages before exploring further.
> プロバイダーホスト型アプリを SharePoint Online に接続する方法。
# プロバイダーホスト型アプリを SharePoint Online に接続する
export const AuthCodeBlock = ({filename, icon, language, highlight, children}) => {
const [displayText, setDisplayText] = useState(children);
const [copyText, setCopyText] = useState(children);
const wrapperRef = React.useRef(null);
useEffect(() => {
let unsubscribe = null;
function init() {
if (!window.autorun || !window.rootStore) {
return;
}
unsubscribe = window.autorun(() => {
let processedChildrenForDisplay = children;
let processedChildrenForCopy = children;
for (const [key, value] of window.rootStore.variableStore.values.entries()) {
const escapedKey = key.replaceAll(/[.*+?^${}()|[\]\\]/g, (String.raw)`\$&`);
let displayValue = value;
if (key === "{yourClientSecret}" && value !== "{yourClientSecret}") {
displayValue = value.substring(0, 3) + "*****マスク済み*****";
}
processedChildrenForDisplay = processedChildrenForDisplay.replaceAll(new RegExp(escapedKey, "g"), displayValue);
processedChildrenForCopy = processedChildrenForCopy.replaceAll(new RegExp(escapedKey, "g"), value);
}
setDisplayText(processedChildrenForDisplay);
setCopyText(processedChildrenForCopy);
});
}
if (window.rootStore) {
init();
} else {
window.addEventListener("adu:storeReady", init);
}
return () => {
window.removeEventListener("adu:storeReady", init);
unsubscribe?.();
};
}, [children]);
useEffect(() => {
if (!wrapperRef.current) return;
const originalWriteText = navigator.clipboard.writeText.bind(navigator.clipboard);
let isOverriding = false;
const handleClick = e => {
const button = e.target.closest('[data-testid="copy-code-button"]');
if (!button || !wrapperRef.current.contains(button)) return;
isOverriding = true;
navigator.clipboard.writeText = text => {
if (isOverriding) {
isOverriding = false;
navigator.clipboard.writeText = originalWriteText;
return originalWriteText(copyText);
}
return originalWriteText(text);
};
setTimeout(() => {
if (isOverriding) {
isOverriding = false;
navigator.clipboard.writeText = originalWriteText;
}
}, 100);
};
const wrapper = wrapperRef.current;
wrapper.addEventListener('click', handleClick, true);
return () => {
wrapper.removeEventListener('click', handleClick, true);
if (navigator.clipboard.writeText !== originalWriteText) {
navigator.clipboard.writeText = originalWriteText;
}
};
}, [copyText]);
return
{displayText}
;
};
Auth0 を使用すると、SharePoint Apps の認証プロセスを大幅に簡素化できます。Auth0 が、SharePoint API の呼び出しに使用できる アクセストークン の取得を行います。
特別なライブラリは必要ありません。Auth0 がサポートする任意の SDK を使用できます。
## ステップ 1. Auth0 にアプリケーションを登録する
通常どおり、Auth0 で新しいアプリケーションを登録します: **Applications > NEW**。詳しい手順については、利用可能な SDK のいずれかを参照してください。次のステップで必要になるため、`client_id` を控えておいてください。
## ステップ2. アプリケーションのパッケージを作成する
アプリケーションの **クライアントID** と **クライアントシークレット** を取得する必要があります。アプリケーションの登録方法は、想定される用途に応じていくつかあります。
[SharePoint Add-ins を登録する (Microsoft Docs)](https://docs.microsoft.com/en-us/sharepoint/dev/sp-add-ins/register-sharepoint-add-ins) では、SharePoint でアプリケーションを登録するさまざまな方法を説明しています。このチュートリアルでは、この手順で最も簡単な方法、つまり特定のテナント (ご自身のテナント) での自己登録を使用します。
### SharePoint Online を開く
Dashboard の URL は `https://{your Office365 tenant}.sharepoint.com/_layouts/15/appregnew.aspx` です
### クライアントIDとクライアントシークレットを生成します:
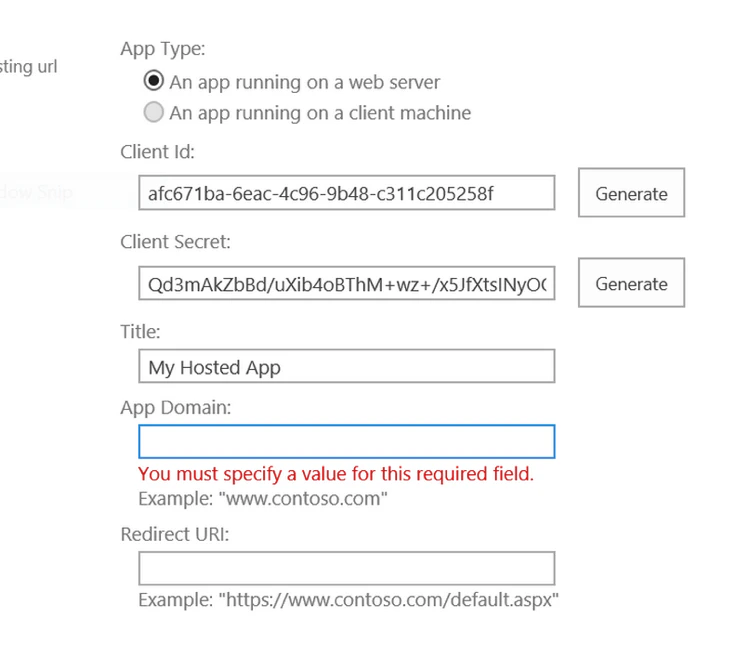
### フォームに情報を入力します。
Auth0 はアプリと Office 365 インフラストラクチャの仲介役となるため、アプリではこの URL を使用する必要があります。
**アプリのドメイン**:
export const codeExample1 = `{yourDomain}`;
**リダイレクトURI**:
export const codeExample2 = `https://{yourDomain}/login/callback?SP_APP_TOKEN&connection=CONNECTION&client_id={yourClientId}&redirect_uri={https://yourApp/callback}`;
* `connection` は、Auth0 の接続で使用する名前です (例: "sharepoint") 。
* `client_id` は、Auth0 でアプリを識別するためのものです (手順 1 で作成) 。
* `redirect_uri` は、すべてのやり取りが完了した後に、ユーザーが最終的にリダイレクトされる実際のアプリ内の場所です。指定しない場合は、Auth0 で定義したアプリのコールバック URL が常に使用されます (localhost の場合もあります)
### アプリをパッケージ化して SharePoint にアップロードする:
Visual Studio でアプリのマニフェスト情報を入力します。
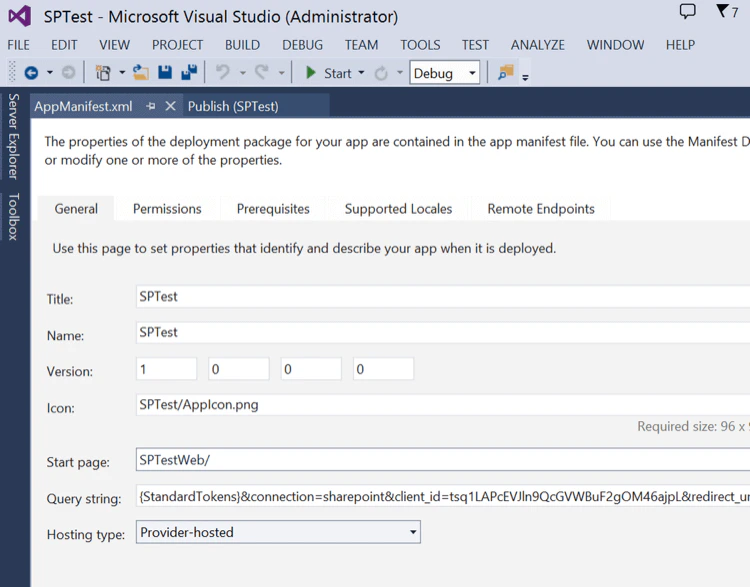 `Query string` は、先ほど設定した `Redirect URI` と完全に同じになります。続いて、プロジェクトを右クリックして `Publish` を選択します。
**Publishing Profile** を作成します (SharePoint の Dashboard で取得した **クライアントID** と **クライアントシークレット** と同じ値を入力する必要があります) 。
**Package** をクリックし、生成されたファイルを SharePoint にアップロードします。
`Query string` は、先ほど設定した `Redirect URI` と完全に同じになります。続いて、プロジェクトを右クリックして `Publish` を選択します。
**Publishing Profile** を作成します (SharePoint の Dashboard で取得した **クライアントID** と **クライアントシークレット** と同じ値を入力する必要があります) 。
**Package** をクリックし、生成されたファイルを SharePoint にアップロードします。
## ステップ 3. Auth0 で接続を作成する
この統合の最後の手順は、Auth0 に SharePoint の接続を追加することです。
必要なものは次のとおりです。
* `Connection Name`。任意の名前です。ステップ 2 で入力したものと一致している必要があります。
* `Client Id` と `Client Secret`。これらもステップ 2 で入力したものと一致している必要があります。
* `Test SharePoint Site Url`。これは接続のテストに使用する SP サイトの URL です (Dashboard で「Try」ボタンを押した場合など) 。これは実行時には使用されません。ユーザーは常に SharePoint 内からサイトへのリンクをたどるためです。
ユーザーは Office Marketplace からアプリをインストールします。リンクをクリックすると Auth0 にリダイレクトされ、Auth0 がアクセストークンの取得を行い、最終的にアプリに転送します。アプリは次のような `ユーザープロファイル` を受け取ります。
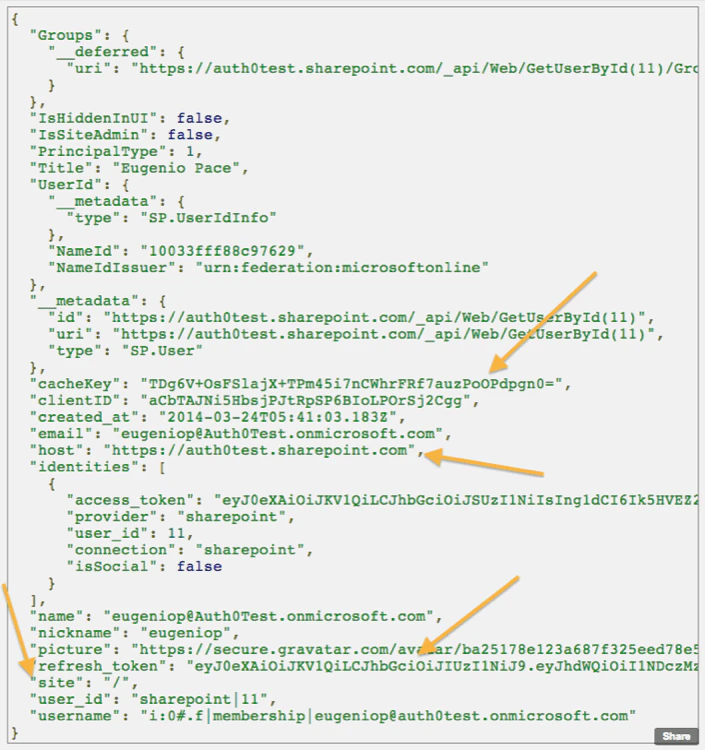 次のプロパティが含まれます: `cacheKey`、`refresh_token`、`host`、`site`。これらにより、SharePoint API (リストなど) を呼び出せるようになります。