> ## Documentation Index
> Fetch the complete documentation index at: https://translations.mintlify.site/llms.txt
> Use this file to discover all available pages before exploring further.
> セットアップ、トラブルシューティング、ログへのアクセス、次のステップを含む、SharePoint 2010/2013 との統合方法。
# SharePoint 2010/2013 との統合
Auth0 を使用すると、SharePoint の認証プロセスを大幅に簡素化できます。このチュートリアルでは、Auth0 を使用して SharePoint に シングルサインオン (SSO) を追加する方法を学びます。ユーザーは、[ソーシャルIDプロバイダー](/ja/docs/authenticate/identity-providers/social-identity-providers) (Facebook、X、Github など) 、[エンタープライズプロバイダー](/ja/docs/authenticate/identity-providers/enterprise-identity-providers) (LDAP、Active Directory、ADFS など) 、またはユーザー名とパスワードを使用してログインできるようになります。
Auth0 は、SharePoint 2010 / 2013 向けの Auth0Claims Provider のサポートを終了しました。このパッケージは既存のテナントでは非推奨であり、新しいテナントでは利用できません。
## 設定
### ステップ 1. アカウントに統合を追加する
まず、Dashboard の [SSO Integrations](https://manage.auth0.com/#/externalapps/create) セクションに移動し、アプリ一覧から **SharePoint** を選択します。
### ステップ 2. Live Documentation に従ってください
SharePoint サーバーがインターネットにアクセスできない場合は、インストール ファイルを手動でダウンロードしてください。([オフライン インストールの詳細](https://github.com/auth0/auth0-sharepoint/tree/master/auth0-authentication-provider))。
**Settings** タブでは、SharePoint Web Application の URL と外部 URL (通常は Alternate Access Mappings のインターネット エンドポイント) を入力する必要があります。
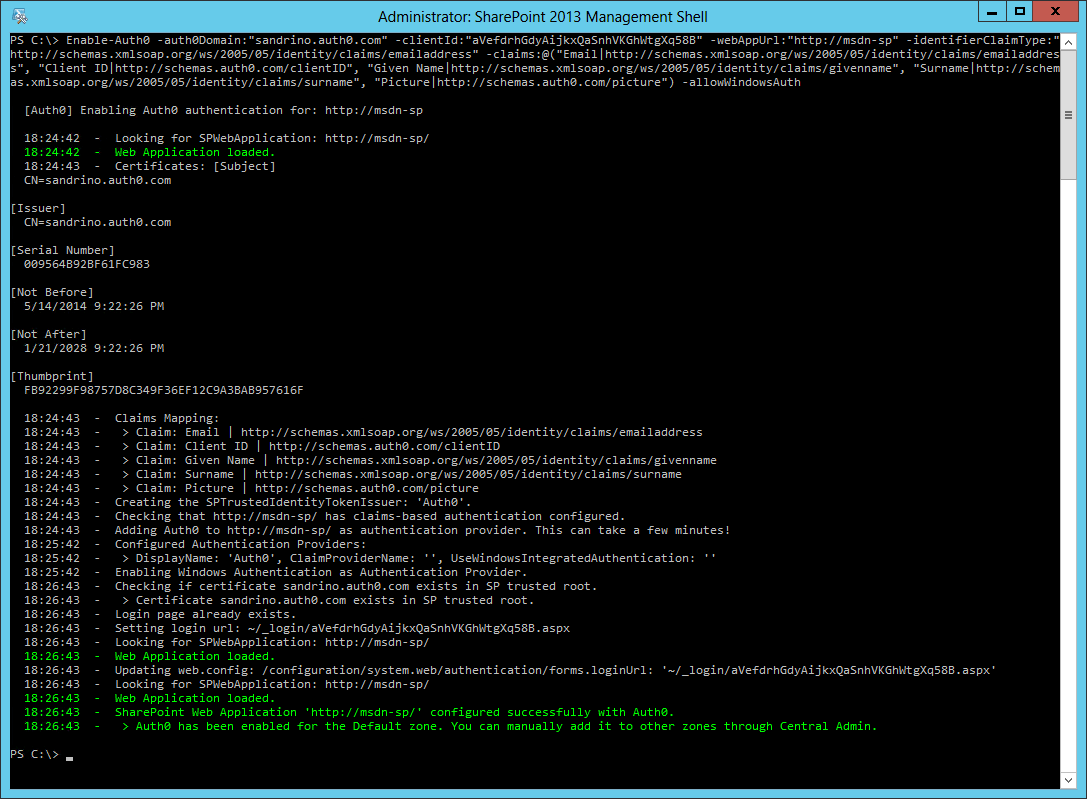
Live Documentation では、まず SharePoint 用の Auth0 CmdLets をインストールします。
 これらをインストールすると、各 Web Application で Auth0 と Claims Provider を有効化または無効化できるようになります。まず、Auth0 による認証を有効にする必要があります。
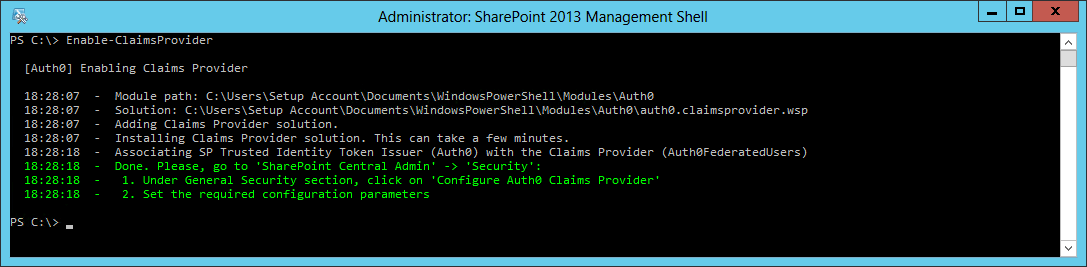
 次に、People Picker とアクセス許可が正しく機能するよう、Claims Provider をインストールします。
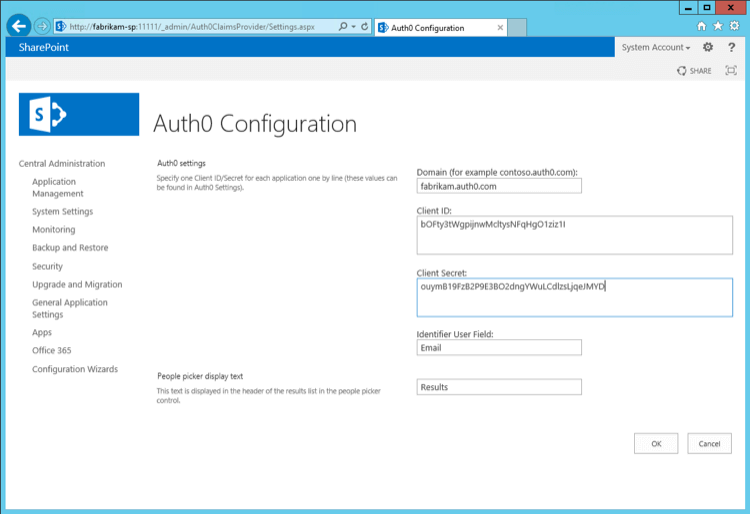
 これらのスクリプトを実行したら、Central Administration で構成を完了します。
 `Enable-Auth0` の呼び出しは、次のように調整できることに注意してください。
* ユーザーの一意の識別子 (メールアドレスやユーザー id など) を変更する
* 追加のクレームを SharePoint に渡せるようにする
* 既定の Windows 認証を有効または無効にする
次の例では、Role クレームもクレーム マッピングに追加し、Windows 認証を許可しています。
```powershell lines theme={null}
Enable-Auth0
-auth0Domain:"fabrikam.auth0.com"
-clientId:"bOFty3tWgpijnwMcltysNFqHgO1ziz1I"
-webAppUrl:"http://fabrikam-sp/"
-identifierClaimType:"http://schemas.xmlsoap.org/ws/2005/05/identity/claims/emailaddress"
-claims:@(
"Email|http://schemas.xmlsoap.org/ws/2005/05/identity/claims/emailaddress",
"Role|http://schemas.microsoft.com/ws/2008/06/identity/claims/role", "Client ID|http://schemas.auth0.com/clientID",
"Given Name|http://schemas.xmlsoap.org/ws/2005/05/identity/claims/givenname",
"Surname|http://schemas.xmlsoap.org/ws/2005/05/identity/claims/surname", "Picture|http://schemas.auth0.com/picture")
-allowWindowsAuth
```
`Enable-Auth0` の呼び出しは、次のように調整できることに注意してください。
* ユーザーの一意の識別子 (メールアドレスやユーザー id など) を変更する
* 追加のクレームを SharePoint に渡せるようにする
* 既定の Windows 認証を有効または無効にする
次の例では、Role クレームもクレーム マッピングに追加し、Windows 認証を許可しています。
```powershell lines theme={null}
Enable-Auth0
-auth0Domain:"fabrikam.auth0.com"
-clientId:"bOFty3tWgpijnwMcltysNFqHgO1ziz1I"
-webAppUrl:"http://fabrikam-sp/"
-identifierClaimType:"http://schemas.xmlsoap.org/ws/2005/05/identity/claims/emailaddress"
-claims:@(
"Email|http://schemas.xmlsoap.org/ws/2005/05/identity/claims/emailaddress",
"Role|http://schemas.microsoft.com/ws/2008/06/identity/claims/role", "Client ID|http://schemas.auth0.com/clientID",
"Given Name|http://schemas.xmlsoap.org/ws/2005/05/identity/claims/givenname",
"Surname|http://schemas.xmlsoap.org/ws/2005/05/identity/claims/surname", "Picture|http://schemas.auth0.com/picture")
-allowWindowsAuth
```
### ステップ 3. SharePoint の設定が完了しました
これで、SharePoint は Auth0 を SSO ブローカーとして使用するよう設定されました。ユーザーがサイトにアクセスすると、そのアプリケーションで有効になっているすべての接続が表示されたログインページが表示されます。
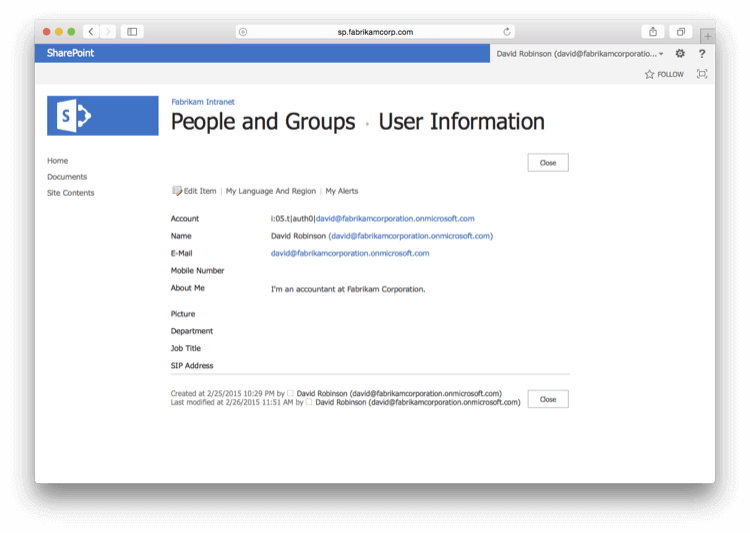
Claims Provider のインストール時にマッピングしたクレームに応じて、以下の追加情報もユーザーの個人設定ページで利用できるようになります。
 `Enable-Auth0` の呼び出しは、次のように調整できます。
* ユーザーの一意識別子を変更する (メールアドレスやユーザー id など)
* 追加のクレームを SharePoint に渡せるようにする
* 既定の Windows 認証 を有効または無効にする
この例では、クレームのマッピングに Role クレームも追加し、Windows 認証 も許可しています。
```powershell lines theme={null}
Enable-Auth0
-auth0Domain:"fabrikam.auth0.com"
-clientId:"bOFty3tWgpijnwMcltysNFqHgO1ziz1I"
-webAppUrl:"http://fabrikam-sp/"
-identifierClaimType:"http://schemas.xmlsoap.org/ws/2005/05/identity/claims/emailaddress"
-claims:@(
"Email|http://schemas.xmlsoap.org/ws/2005/05/identity/claims/emailaddress",
"Role|http://schemas.microsoft.com/ws/2008/06/identity/claims/role", "Client ID|http://schemas.auth0.com/clientID",
"Given Name|http://schemas.xmlsoap.org/ws/2005/05/identity/claims/givenname",
"Surname|http://schemas.xmlsoap.org/ws/2005/05/identity/claims/surname", "Picture|http://schemas.auth0.com/picture")
-allowWindowsAuth
```
SharePoint は今後、SSO ブローカーとして Auth0 を使用するようになります。
`Enable-Auth0` の呼び出しは、次のように調整できます。
* ユーザーの一意識別子を変更する (メールアドレスやユーザー id など)
* 追加のクレームを SharePoint に渡せるようにする
* 既定の Windows 認証 を有効または無効にする
この例では、クレームのマッピングに Role クレームも追加し、Windows 認証 も許可しています。
```powershell lines theme={null}
Enable-Auth0
-auth0Domain:"fabrikam.auth0.com"
-clientId:"bOFty3tWgpijnwMcltysNFqHgO1ziz1I"
-webAppUrl:"http://fabrikam-sp/"
-identifierClaimType:"http://schemas.xmlsoap.org/ws/2005/05/identity/claims/emailaddress"
-claims:@(
"Email|http://schemas.xmlsoap.org/ws/2005/05/identity/claims/emailaddress",
"Role|http://schemas.microsoft.com/ws/2008/06/identity/claims/role", "Client ID|http://schemas.auth0.com/clientID",
"Given Name|http://schemas.xmlsoap.org/ws/2005/05/identity/claims/givenname",
"Surname|http://schemas.xmlsoap.org/ws/2005/05/identity/claims/surname", "Picture|http://schemas.auth0.com/picture")
-allowWindowsAuth
```
SharePoint は今後、SSO ブローカーとして Auth0 を使用するようになります。
## ログインページのカスタマイズ
[Auth0 Universal Login](/ja/docs/authenticate/login/auth0-universal-login) の手順に従って、ログインページをカスタマイズできます。
Auth0 を経由せずに、ユーザーが Windows 認証を使って SharePoint で認証できるようにしたい場合があります。その場合は、ログインページをカスタマイズして、Windows 認証エンドポイントへのリンク (通常は `https://yoursharepointserver/_windows/default.aspx?ReturnUrl=/_layouts/15/Authenticate.aspx` のような URL) を追加します。
その方法の 1 つは、jQuery を使用して Lock ウィジェットをカスタマイズし、Windows 認証エンドポイントへのリンクを追加することです。
カスタマイズしたログインページの `` セクションの先頭に、jQuery の参照を追加する必要があります。
```html wrap lines theme={null}
```
`lock.show()` を呼び出す前に、リンクを追加するための HTML DOM の変更コードを追加します。
```javascript lines expandable theme={null}
// Lockを構築する
// var lock = ...
[...]
// Windows認証ボタンを表示したいSharePointのクライアントIDを1つ以上指定する
var sharepointClientIDs = ['your_sharepoint_client_id'];
if (sharepointClientIDs.indexOf(config.clientID) >= 0) {
lock.on('signin ready', function() {
var getParameterByName = function(name) {
name = name.replace(/[\[]/, "\\\[").replace(/[\]]/, "\\\]");
var regexS = "[\\?&]" + name + "=([^&#]*)";
var regex = new RegExp(regexS);
var results = regex.exec(window.location.search);
if (results == null) return null;
else return results[1];
};
// コールバックURLからホストを取得する
var parser = document.createElement('a');
parser.href = config.callbackURL;
var host = parser.host;
var windowsAuthURL = "https://" + host + "/_windows/default.aspx?ReturnUrl=/_layouts/15/Authenticate.aspx";
var wctx = getParameterByName("wctx");
if (wctx) {
windowsAuthURL += "&Source=" + wctx;
}
$('.auth0-lock-tabs-container')
.after('').attr('href','https://nowhere');
});
}
lock.show();
```
## トラブルシューティング
追加のクレームや認可を扱う際は、現在のユーザーのクレームを確認すると役立つことがあります。Microsoft の専門家 [Liam Clearly](https://helloitsliam.com/) による記事 [Claims Viewer Web Part](https://sharepointobservations.wordpress.com/2013/08/21/sharepoint-2013-and-adfs-2-0-test-with-claims-viewer-web-part/) を使用すると、ユーザーのクレームに関する問題をトラブルシューティングできます。
### SP2010 のログ
エラーと警告は SharePoint の Unified Logging Service に記録されます。Claims Provider の使用時に発生する問題をトラブルシューティングするには、ULS Viewer などのツールを使用できます。
ULS Viewer の詳細と入手方法については、Microsoft のドキュメント [ULS Viewer](https://www.microsoft.com/en-us/download/details.aspx?id=44020) を参照してください。
### SP2013 のログ
SharePoint 2013 では、ログに Unified Logging Service は使用されなくなり、代わりに Event Tracing for Windows を使用しています。これにより、パフォーマンスが向上し、記録されたすべてのイベントを取得する方法も複数利用できます。
ログをリアルタイムで表示するには、GitHub から Auth0 の [Logs Processor](https://github.com/auth0/auth0-sharepoint/releases) をダウンロードできます。このツールを SharePoint Server 上で実行すると、SharePoint が Claims Provider に対して行うすべての呼び出しを確認できます。
## 次のステップ
### 認可
Auth0 から渡される クレーム は、SharePoint での認可にも利用できます。たとえば、Role claim に **Fabrikam HR** が含まれているユーザーには、特定のサイトへのアクセス権を付与したり、そのサイトの共同作成者にしたりできます。
Azure AD を例に見てみましょう。この Cloud Directory では、ユーザーはグループに所属でき、David は Fabrikam HR に所属しています。
David が Azure AD アカウントでログインすると (その接続で Security Groups 属性が有効になっている場合) 、グループ メンバーシップはユーザーのユーザープロファイルの `groups` 属性に格納されます。
これらのグループを SharePoint で Roles として利用できるようにするには、これを SAML 設定に追加する [Rule](https://manage.auth0.com/#/rules) を作成する必要があります。この Rule は、**Fabrikam Intranet (SharePoint)** という名前のアプリケーションに対してのみ実行されます。
```javascript lines theme={null}
function (user, context, callback) {
if (context.clientName === 'Fabrikam Intranet (SharePoint)') {
context.samlConfiguration.mappings = {
'http://schemas.xmlsoap.org/ws/2005/05/identity/claims/nameidentifier': 'user_id',
'http://schemas.xmlsoap.org/ws/2005/05/identity/claims/emailaddress': 'email',
'http://schemas.xmlsoap.org/ws/2005/05/identity/claims/name': 'name',
'http://schemas.xmlsoap.org/ws/2005/05/identity/claims/givenname': 'given_name',
'http://schemas.xmlsoap.org/ws/2005/05/identity/claims/surname': 'family_name',
'http://schemas.xmlsoap.org/ws/2005/05/identity/claims/upn': 'upn',
'http://schemas.microsoft.com/ws/2008/06/identity/claims/role': 'groups'
};
}
callback(null, user, context);
}
```
これにより、`groups` を含む追加の送信クレーム `http://schemas.microsoft.com/ws/2008/06/identity/claims/role` が追加され、SharePoint はこれを認可に使用します。
Claims Provider をインストールする際は、Role クレームが SharePoint に渡されるよう、クレーム mapping list に追加する必要があります。
```powershell lines theme={null}
Enable-Auth0
-auth0Domain:"fabrikam.auth0.com"
...
-claims:@(
"Email|http://schemas.xmlsoap.org/ws/2005/05/identity/claims/emailaddress",
"Role|http://schemas.microsoft.com/ws/2008/06/identity/claims/role",
...)
...
-Verbose
```
既定では、ユーザーはサイトにアクセスできません。
ここで、特定のユーザーを SharePoint Group (例: Contributors) に追加する代わりに、**Role** を SharePoint Group に追加できるようになりました。以下は、"Fabrikam HR" のメンバーを Contributors グループに追加する方法を示す PowerShell スクリプトの例です。
```powershell lines theme={null}
$webName = "http://fabrikam-sp"
$groupName = "Contributors"
$roleClaim = "Fabrikam HR"
$sts = Get-SPTrustedIdentityTokenIssuer "Auth0"
$claimPrincipal = New-SPClaimsPrincipal -ClaimValue $roleClaim -ClaimType "http://schemas.microsoft.com/ws/2008/06/identity/claims/role" -TrustedIdentityTokenIssuer $sts
$web = Get-SPWeb $webName
$user = New-SPUser -UserAlias $claimPrincipal.ToEncodedString() -Web $web
$group = $web.SiteGroups[$groupName]
$group.AddUser($user)
```
このクレーム値を Contributors グループに追加すると、David はサイトにアクセスして内容を編集できるようになります。
### ユーザープロファイルの同期
既定では、SharePoint は Active Directory 由来のユーザープロファイル情報を同期できます。現在は、Auth0 の導入により、ユーザーがさまざまな種類の接続 (ソーシャルからエンタープライズまで) 経由で来る可能性があるため、ユーザープロファイルの同期には別のアプローチが必要になります。
1 つ目のアプローチとしては、数時間おきに実行されるタイマー ジョブを作成し、Auth0 Users Endpoint を照会して、対象ユーザーのユーザープロファイル情報を同期する方法があります。
```csharp lines expandable theme={null}
using System;
using Microsoft.SharePoint;
using Microsoft.SharePoint.Administration;
using Microsoft.Office.Server;
using Microsoft.Office.Server.UserProfiles;
namespace UserProfileSync
{
class Program
{
static void Main(string[] args)
{
// Auth0 Management API を呼び出す - https://docs.auth0.com/api/v2
using (var site = new SPSite("http://servername"))
{
var context = SPServiceContext.GetContext(site);
var profileManager = new UserProfileManager(context);
var accountName = "i:05.t|auth0|john@example.org";
var userProfile = profileManager.GetUserProfile(accountName);
userProfile[PropertyConstants.HomePhone].Value = "+1 594 9392";
userProfile.Commit();
}
}
}
}
```
別の方法として、このロジックはユーザーがログインするたびに実行される HttpModule として実装することもできます:
```csharp lines theme={null}
public class PersistUserClaimsHttpModule : IHttpModule
{
private SPFederationAuthenticationModule FederationModule
{
get { return HttpContext.Current.ApplicationInstance.Modules["FederatedAuthentication"] as SPFederationAuthenticationModule; }
}
public void Init(HttpApplication context)
{
FederationModule.SecurityTokenValidated += OnFederationSecurityTokenValidated;
}
private void OnFederationSecurityTokenValidated(object sender, SecurityTokenValidatedEventArgs e)
{
// e.ClaimsPrincipal を使用する
}
}
```