> ## Documentation Index
> Fetch the complete documentation index at: https://translations.mintlify.site/llms.txt
> Use this file to discover all available pages before exploring further.
# サードパーティアプリケーションの設定
> Auth0 Dashboard または Management API を使用して、サードパーティアプリケーションを作成および設定します。
export const AuthCodeGroup = ({children, dropdown}) => {
const [processedChildren, setProcessedChildren] = useState(children);
useEffect(() => {
let unsubscribe = null;
function init() {
unsubscribe = window.autorun(() => {
const processChildren = node => {
if (typeof node === "string") {
let processedNode = node;
for (const [key, value] of window.rootStore.variableStore.values.entries()) {
const escapedKey = key.replaceAll(/[.*+?^${}()|[\]\\]/g, (String.raw)`\$&`);
processedNode = processedNode.replaceAll(new RegExp(escapedKey, "g"), value);
}
return processedNode;
} else if (Array.isArray(node)) {
return node.map(processChildren);
} else if (node && node.props && node.props.children) {
return {
...node,
props: {
...node.props,
children: processChildren(node.props.children)
}
};
}
return node;
};
setProcessedChildren(processChildren(children));
});
}
if (window.rootStore) {
init();
} else {
window.addEventListener("adu:storeReady", init);
}
return () => {
window.removeEventListener("adu:storeReady", init);
unsubscribe?.();
};
}, [children]);
return {processedChildren};
};
export const AuthCodeBlock = ({filename, icon, language, highlight, children}) => {
const [displayText, setDisplayText] = useState(children);
const [copyText, setCopyText] = useState(children);
const wrapperRef = React.useRef(null);
useEffect(() => {
let unsubscribe = null;
function init() {
if (!window.autorun || !window.rootStore) {
return;
}
unsubscribe = window.autorun(() => {
let processedChildrenForDisplay = children;
let processedChildrenForCopy = children;
for (const [key, value] of window.rootStore.variableStore.values.entries()) {
const escapedKey = key.replaceAll(/[.*+?^${}()|[\]\\]/g, (String.raw)`\$&`);
let displayValue = value;
if (key === "{yourClientSecret}" && value !== "{yourClientSecret}") {
displayValue = value.substring(0, 3) + "*****マスク済み*****";
}
processedChildrenForDisplay = processedChildrenForDisplay.replaceAll(new RegExp(escapedKey, "g"), displayValue);
processedChildrenForCopy = processedChildrenForCopy.replaceAll(new RegExp(escapedKey, "g"), value);
}
setDisplayText(processedChildrenForDisplay);
setCopyText(processedChildrenForCopy);
});
}
if (window.rootStore) {
init();
} else {
window.addEventListener("adu:storeReady", init);
}
return () => {
window.removeEventListener("adu:storeReady", init);
unsubscribe?.();
};
}, [children]);
useEffect(() => {
if (!wrapperRef.current) return;
const originalWriteText = navigator.clipboard.writeText.bind(navigator.clipboard);
let isOverriding = false;
const handleClick = e => {
const button = e.target.closest('[data-testid="copy-code-button"]');
if (!button || !wrapperRef.current.contains(button)) return;
isOverriding = true;
navigator.clipboard.writeText = text => {
if (isOverriding) {
isOverriding = false;
navigator.clipboard.writeText = originalWriteText;
return originalWriteText(copyText);
}
return originalWriteText(text);
};
setTimeout(() => {
if (isOverriding) {
isOverriding = false;
navigator.clipboard.writeText = originalWriteText;
}
}, 100);
};
const wrapper = wrapperRef.current;
wrapper.addEventListener('click', handleClick, true);
return () => {
wrapper.removeEventListener('click', handleClick, true);
if (navigator.clipboard.writeText !== originalWriteText) {
navigator.clipboard.writeText = originalWriteText;
}
};
}, [copyText]);
return
{displayText}
;
};
外部の開発者、パートナー、または AI エージェントが、より強化されたセキュリティ管理のもとで API にアクセスできるように、サードパーティアプリケーションを作成します。
## 前提条件
サードパーティアプリケーションを作成する前に、次の要件を満たしていることを確認してください。
* 少なくとも 1 つの [API (リソースサーバー) ](/ja/docs/get-started/apis) が設定されている Auth0 テナント
* (ユーザー向けフローの場合) 少なくとも 1 つの [接続](/ja/docs/authenticate/identity-providers) が [ドメインレベル](/ja/docs/authenticate/identity-providers/promote-connections-to-domain-level) に昇格されていること
## サードパーティアプリケーションを作成する
Auth0 Dashboard または Management API を使用して、サードパーティアプリケーションを作成します。
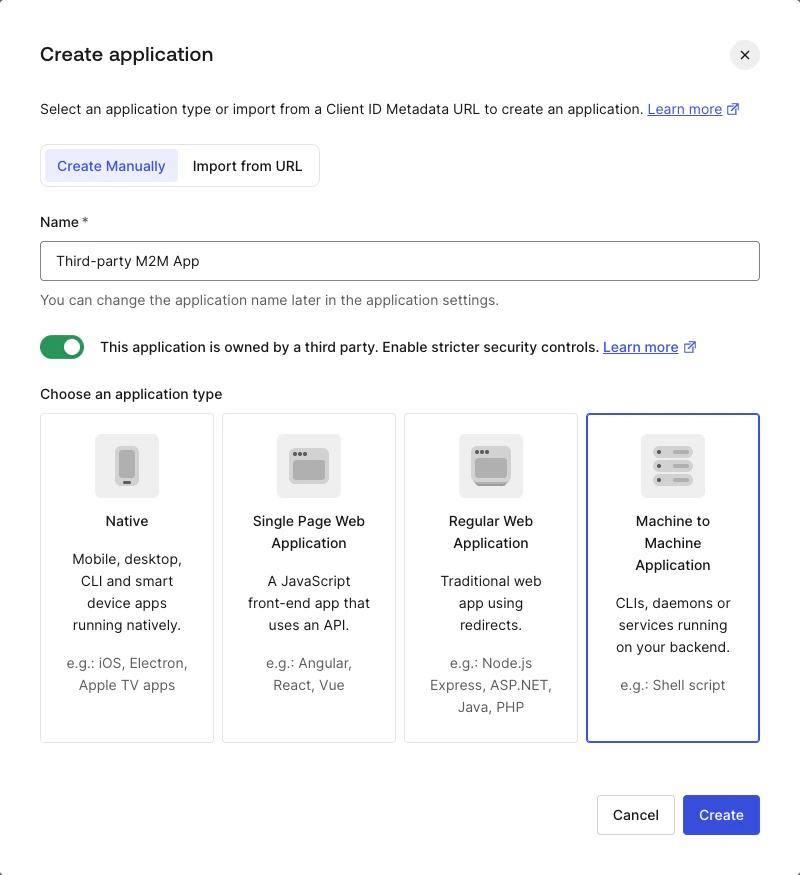
1. **Applications > Applications** に移動します。
2. **Create Application** を選択します。
3. アプリケーションの名前を入力し、アプリケーションのタイプを選択します。
* サーバーサイドの機密クライアントの場合は Regular Web App
* ブラウザベースのパブリッククライアントの場合は Single Page App
* モバイルまたはデスクトップのパブリッククライアントの場合は Native
4. **This application is owned by a third party** トグルをオンにします。
5. **Create** を選択します。
 次のリクエストボディを指定して、`/api/v2/clients` エンドポイントに `POST` リクエストを送信します。
```bash cURL wrap lines theme={null}
curl --request POST \
--url 'https://YOUR_DOMAIN/api/v2/clients' \
--header 'Authorization: Bearer YOUR_MANAGEMENT_API_TOKEN' \
--header 'Content-Type: application/json' \
--data '{
"name": "Partner Application",
"is_first_party": false,
"app_type": "regular_web",
"callbacks": ["https://partner.example.com/callback"],
"grant_types": ["authorization_code", "refresh_token"],
"token_endpoint_auth_method": "client_secret_post"
}'
```
| **Parameter** | **Type** | **Description** |
| ---------------------------- | -------- | ------------------------------------------------------------------------------------------------------------------------------------------------------------------------------------------------------------------------------------------------------------------------- |
| `name` | String | 必須。アプリケーションの名前。 |
| `is_first_party` | Boolean | アプリケーションがファーストパーティ (`true`) かサードパーティ (`false`) かを示します。 |
| `app_type` | String | アプリケーションのタイプ (例: `regular_web`、`native`、`spa`、`non_interactive`) 。 |
| `callbacks` | Array | 認証後のリダイレクトに使用できる許可済みコールバックURLのリスト。 |
| `grant_types` | Array | このクライアントで使用が許可されている OAuth2 グラントタイプのリスト。サードパーティアプリケーションでは `authorization_code`、`refresh_token`、`client_credentials` をサポートします。詳細は、[Security Controls for Third-Party Applications](/ja/docs/get-started/applications/third-party-applications/security-controls) を参照してください。 |
| `token_endpoint_auth_method` | String | トークンエンドポイントの認証方式 (例: `client_secret_post`) 。 |
成功すると、Auth0 は `tpc_` のクライアントIDプレフィックスと `authorization_code` および `refresh_token` のグラントタイプを持つアプリケーションを作成し、`third_party_security_mode` を `strict` に設定します。これは、強化されたセキュリティ制御が有効になっていることを示します。
```json wrap lines theme={null}
{
"client_id": "tpc_aBcDeFgHiJkLmNoPqRsTuV",
"third_party_security_mode": "strict",
"is_first_party": false,
"name": "Partner Application",
"grant_types": ["authorization_code", "refresh_token"],
...
}
```
| **Parameter** | **Type** | **Description** |
| --------------------------- | -------- | -------------------------------------------------------------------------------------------- |
| `client_id` | String | `tpc` プレフィックスを持つアプリケーションの一意の識別子です。このプレフィックスは、strict モードを有効にして作成されたサードパーティアプリケーションであることを示します。 |
| `third_party_security_mode` | String | セキュリティプロファイルを定義します。サードパーティアプリケーションに対して強化されたセキュリティ制約を適用するには、`strict` に設定します。 |
| `is_first_party` | Boolean | アプリをサードパーティとして識別するため、`strict` セキュリティモードを使用する場合は `false` に設定する必要があります。 |
| `name` | String | アプリケーションの表示名。 |
| `grant_types` | Array | このアプリケーションで使用が許可されている OAuth2 グラントタイプ (例: `authorization_code`) 。 |
`third_party_security_mode` プロパティは作成時に設定され、後から変更できません。別のセキュリティモードを使用するには、新しいアプリケーションを作成してください。
次のリクエストボディを指定して、`/api/v2/clients` エンドポイントに `POST` リクエストを送信します。
```bash cURL wrap lines theme={null}
curl --request POST \
--url 'https://YOUR_DOMAIN/api/v2/clients' \
--header 'Authorization: Bearer YOUR_MANAGEMENT_API_TOKEN' \
--header 'Content-Type: application/json' \
--data '{
"name": "Partner Application",
"is_first_party": false,
"app_type": "regular_web",
"callbacks": ["https://partner.example.com/callback"],
"grant_types": ["authorization_code", "refresh_token"],
"token_endpoint_auth_method": "client_secret_post"
}'
```
| **Parameter** | **Type** | **Description** |
| ---------------------------- | -------- | ------------------------------------------------------------------------------------------------------------------------------------------------------------------------------------------------------------------------------------------------------------------------- |
| `name` | String | 必須。アプリケーションの名前。 |
| `is_first_party` | Boolean | アプリケーションがファーストパーティ (`true`) かサードパーティ (`false`) かを示します。 |
| `app_type` | String | アプリケーションのタイプ (例: `regular_web`、`native`、`spa`、`non_interactive`) 。 |
| `callbacks` | Array | 認証後のリダイレクトに使用できる許可済みコールバックURLのリスト。 |
| `grant_types` | Array | このクライアントで使用が許可されている OAuth2 グラントタイプのリスト。サードパーティアプリケーションでは `authorization_code`、`refresh_token`、`client_credentials` をサポートします。詳細は、[Security Controls for Third-Party Applications](/ja/docs/get-started/applications/third-party-applications/security-controls) を参照してください。 |
| `token_endpoint_auth_method` | String | トークンエンドポイントの認証方式 (例: `client_secret_post`) 。 |
成功すると、Auth0 は `tpc_` のクライアントIDプレフィックスと `authorization_code` および `refresh_token` のグラントタイプを持つアプリケーションを作成し、`third_party_security_mode` を `strict` に設定します。これは、強化されたセキュリティ制御が有効になっていることを示します。
```json wrap lines theme={null}
{
"client_id": "tpc_aBcDeFgHiJkLmNoPqRsTuV",
"third_party_security_mode": "strict",
"is_first_party": false,
"name": "Partner Application",
"grant_types": ["authorization_code", "refresh_token"],
...
}
```
| **Parameter** | **Type** | **Description** |
| --------------------------- | -------- | -------------------------------------------------------------------------------------------- |
| `client_id` | String | `tpc` プレフィックスを持つアプリケーションの一意の識別子です。このプレフィックスは、strict モードを有効にして作成されたサードパーティアプリケーションであることを示します。 |
| `third_party_security_mode` | String | セキュリティプロファイルを定義します。サードパーティアプリケーションに対して強化されたセキュリティ制約を適用するには、`strict` に設定します。 |
| `is_first_party` | Boolean | アプリをサードパーティとして識別するため、`strict` セキュリティモードを使用する場合は `false` に設定する必要があります。 |
| `name` | String | アプリケーションの表示名。 |
| `grant_types` | Array | このアプリケーションで使用が許可されている OAuth2 グラントタイプ (例: `authorization_code`) 。 |
`third_party_security_mode` プロパティは作成時に設定され、後から変更できません。別のセキュリティモードを使用するには、新しいアプリケーションを作成してください。
## API アクセスポリシーを設定する
サードパーティアプリケーションが API にアクセスするには、明示的なクライアントグラントが必要です。API アクセスポリシーは、次の方法で設定できます。
* [アプリケーションごとの権限](#per-application-permissions): テナント内の各アプリケーションにきめ細かな権限を適用します。
* [すべてのサードパーティアプリケーションのデフォルト権限](#default-permissions-for-all-third-party-applications): テナント内のすべてのサードパーティアプリケーションにデフォルトの権限を適用します。
同じ API に対して、アプリケーションごとの権限とサードパーティアプリケーション向けのデフォルト権限の両方が設定されている場合は、アプリケーションごとの権限が優先されます。詳細については、[Application Access to APIs: Client Grants](/ja/docs/get-started/applications/application-access-to-apis-client-grants) を参照してください。
### アプリケーションごとの権限
特定のサードパーティアプリケーションに、デフォルトより広いまたは狭いアクセス権を付与するには、そのアプリケーションの `client_id` に対するクライアントグラントを作成します。
1. **Applications > APIs** に移動し、API を選択します。
2. **Settings** タブを開きます。
3. **Application Access Policy** までスクロールし、**User-Delegated Access** と **Client Access** を **Per-app authorization** に設定します。
4. **Save** を選択します。
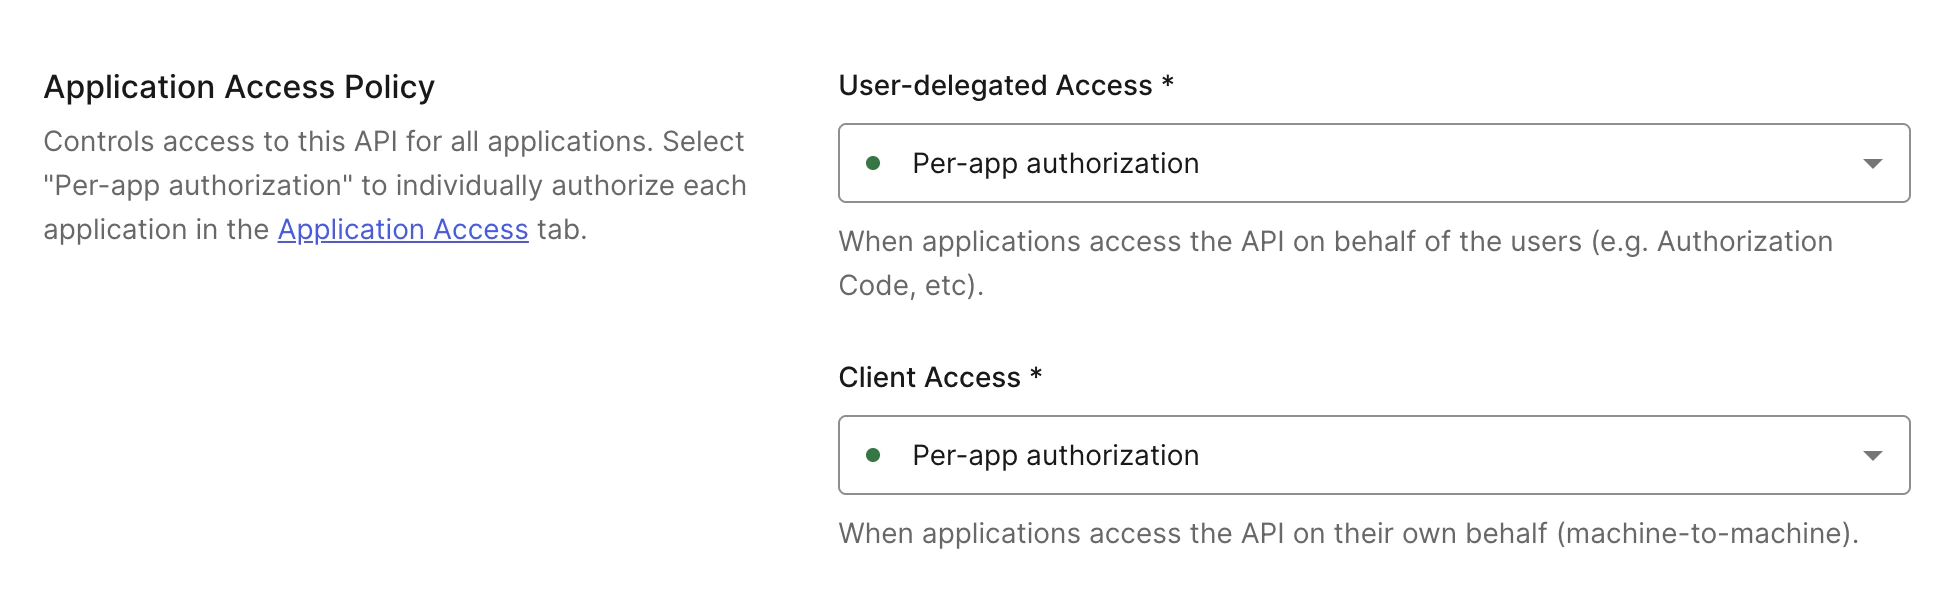 アプリケーションごとの権限を設定する場合は、各アプリケーションの API アクセスを個別に許可する必要があります。
1. **Applications > APIs** に移動し、API を選択します。
2. **Application Access** タブを開きます。
3. 対象のアプリケーションまでスクロールし、**Edit** を選択してから、**User-Delegated Access** および/または **Client Access** の **Grant Access** を選択します。続いて、必要な権限を選択します。
4. **Save** を選択します。
アプリケーションごとの権限を設定する場合は、各アプリケーションの API アクセスを個別に許可する必要があります。
1. **Applications > APIs** に移動し、API を選択します。
2. **Application Access** タブを開きます。
3. 対象のアプリケーションまでスクロールし、**Edit** を選択してから、**User-Delegated Access** および/または **Client Access** の **Grant Access** を選択します。続いて、必要な権限を選択します。
4. **Save** を選択します。
 ```bash cURL wrap lines theme={null}
curl --request POST \
--url 'https://YOUR_DOMAIN/api/v2/client-grants' \
--header 'Authorization: Bearer YOUR_MANAGEMENT_API_TOKEN' \
--header 'Content-Type: application/json' \
--data '{
"client_id": "tpc_aBcDeFgHiJkLmNoPqRsTuV",
"audience": "https://api.example.com",
"scope": ["read:items", "write:items", "delete:items"],
"subject_type": "user"
}'
```
| **パラメーター** | **型** | **説明** |
| -------------- | ------ | ---------------------------------------------------------------------------------------------------------------------------------------------------------------------------------- |
| `client_id` | String | クライアントグラントを作成する対象のアプリケーションを指定します。 |
| `audience` | String | グラントの作成対象である API の一意の識別子 (URI) です。 |
| `scope` | Array | このグラントの一部として許可される権限 (スコープ) の一覧です。 |
| `subject_type` | String | API に対して許可されるアプリケーションアクセスの種類を定義します。
```bash cURL wrap lines theme={null}
curl --request POST \
--url 'https://YOUR_DOMAIN/api/v2/client-grants' \
--header 'Authorization: Bearer YOUR_MANAGEMENT_API_TOKEN' \
--header 'Content-Type: application/json' \
--data '{
"client_id": "tpc_aBcDeFgHiJkLmNoPqRsTuV",
"audience": "https://api.example.com",
"scope": ["read:items", "write:items", "delete:items"],
"subject_type": "user"
}'
```
| **パラメーター** | **型** | **説明** |
| -------------- | ------ | ---------------------------------------------------------------------------------------------------------------------------------------------------------------------------------- |
| `client_id` | String | クライアントグラントを作成する対象のアプリケーションを指定します。 |
| `audience` | String | グラントの作成対象である API の一意の識別子 (URI) です。 |
| `scope` | Array | このグラントの一部として許可される権限 (スコープ) の一覧です。 |
| `subject_type` | String | API に対して許可されるアプリケーションアクセスの種類を定義します。
- `user`: エンドユーザーに関連付けられたトークンを生成するフローに対応する、ユーザー委任アクセスに使用します。
- `client`: Client Credentials Flow などのマシン間アクセスに使用します。
|
### すべてのサードパーティアプリケーション向けのデフォルト権限
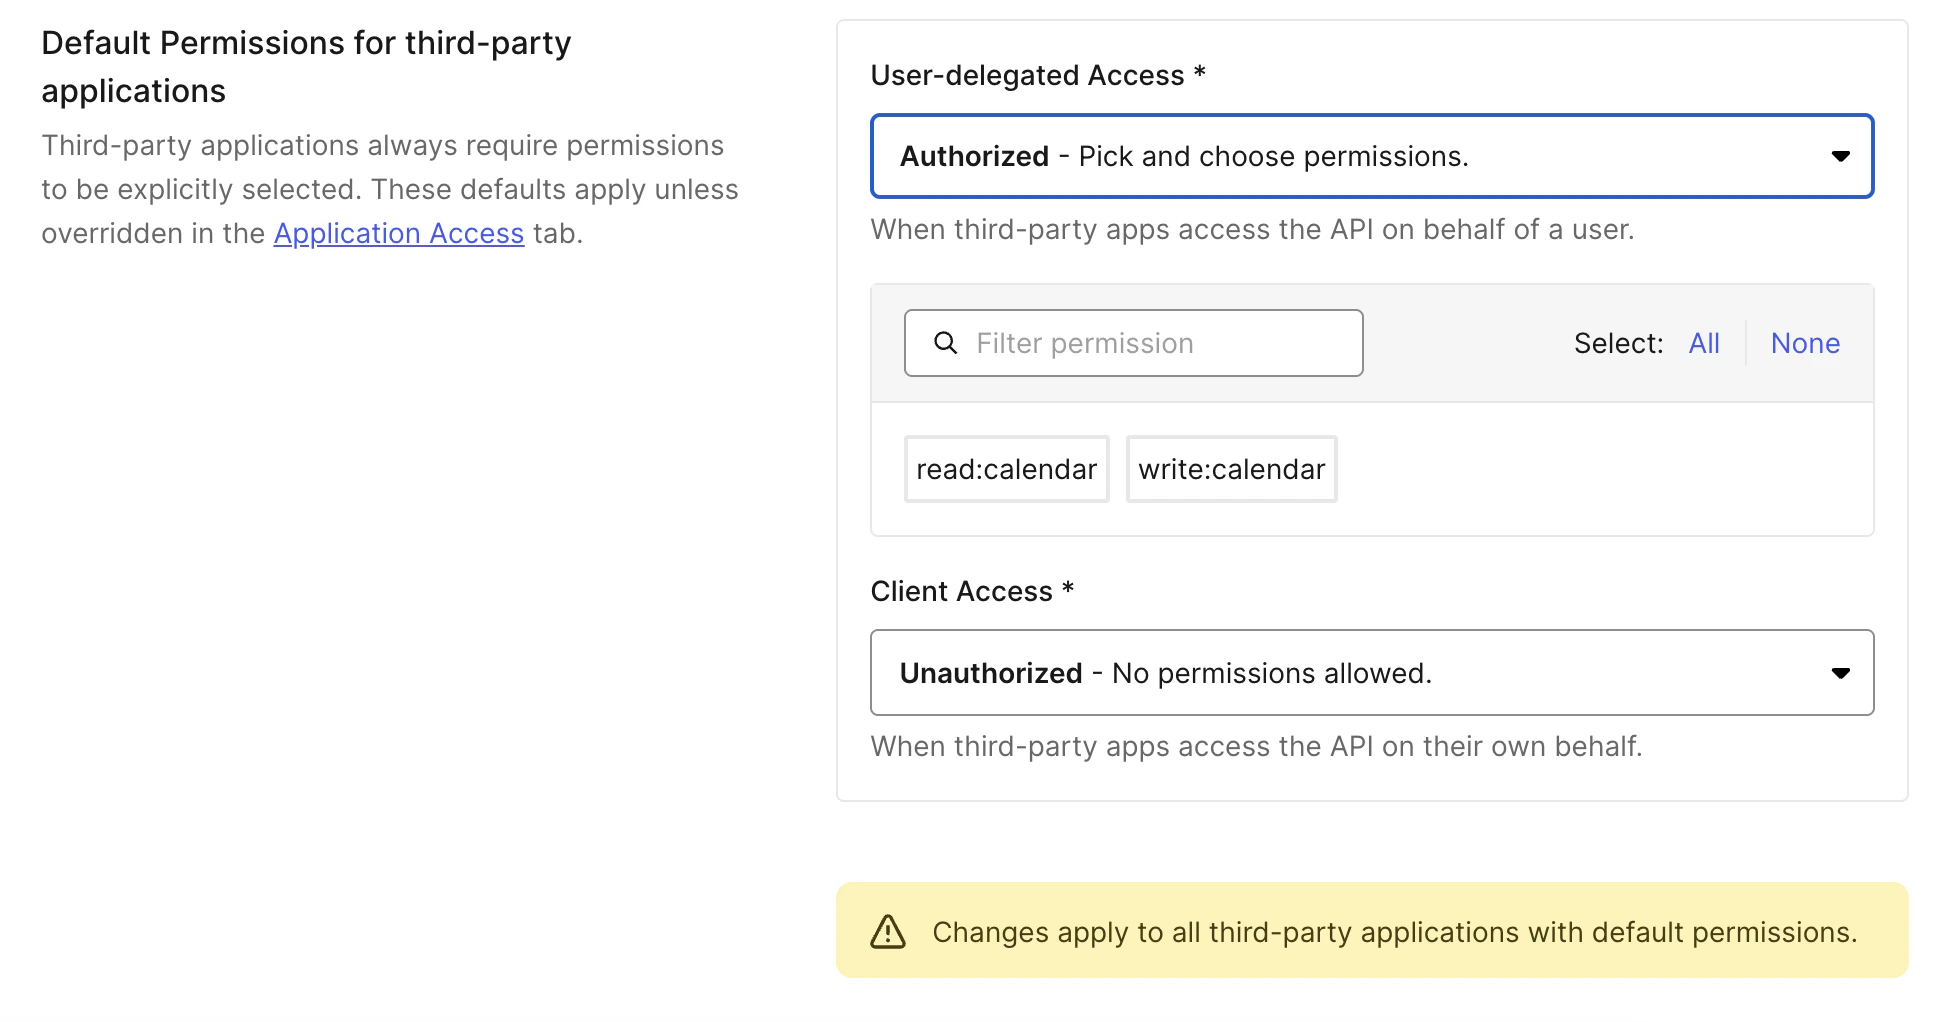
デフォルト権限は、すべてのサードパーティアプリケーションで利用可能な API とスコープの基本セットを定義します。これは、アプリケーションごとに個別にアクセスを設定できない [動的クライアント登録](/ja/docs/get-started/applications/dynamic-client-registration) で必要です。
1. **Applications > APIs** に移動し、API を選択します。
2. **Settings** タブを開きます。
3. **Default Permissions for Third Party Apps** までスクロールします。
4. **User-Delegated Access** または **Client Access** で **Authorized** を選択します。
5. 付与するスコープを選択し、**Save** を選択します。
 次のリクエストボディを指定して、`/api/v2/client-grants` エンドポイントに `POST` リクエストを送信します。
```bash cURL wrap lines theme={null}
curl --request POST \
--url 'https://YOUR_DOMAIN/api/v2/client-grants' \
--header 'Authorization: Bearer YOUR_MANAGEMENT_API_TOKEN' \
--header 'Content-Type: application/json' \
--data '{
"default_for": "third_party_clients",
"audience": "https://api.example.com",
"scope": ["read:items", "write:items"],
"subject_type": "user"
}'
```
| **パラメーター** | **型** | **説明** |
| -------------- | ------ | ---------------------------------------------------------------------------------------------------------------------------------------------------------------------------------- |
| `default_for` | String | このグラントを特定のアプリ種別に自動適用するかどうかを指定します。`third_party_clients` に設定すると、すべてのサードパーティアプリがデフォルトでこの API にアクセスできるようになります。 |
| `audience` | String | グラントの作成対象となる API の一意の識別子 (URI) です。 |
| `scope` | Array | このグラントの一部として許可される権限 (スコープ) のリストです。 |
| `subject_type` | String | API に対して許可されるアプリケーションアクセスの種類を定義します。
次のリクエストボディを指定して、`/api/v2/client-grants` エンドポイントに `POST` リクエストを送信します。
```bash cURL wrap lines theme={null}
curl --request POST \
--url 'https://YOUR_DOMAIN/api/v2/client-grants' \
--header 'Authorization: Bearer YOUR_MANAGEMENT_API_TOKEN' \
--header 'Content-Type: application/json' \
--data '{
"default_for": "third_party_clients",
"audience": "https://api.example.com",
"scope": ["read:items", "write:items"],
"subject_type": "user"
}'
```
| **パラメーター** | **型** | **説明** |
| -------------- | ------ | ---------------------------------------------------------------------------------------------------------------------------------------------------------------------------------- |
| `default_for` | String | このグラントを特定のアプリ種別に自動適用するかどうかを指定します。`third_party_clients` に設定すると、すべてのサードパーティアプリがデフォルトでこの API にアクセスできるようになります。 |
| `audience` | String | グラントの作成対象となる API の一意の識別子 (URI) です。 |
| `scope` | Array | このグラントの一部として許可される権限 (スコープ) のリストです。 |
| `subject_type` | String | API に対して許可されるアプリケーションアクセスの種類を定義します。
- `user`: エンドユーザーに関連付けられたトークンを生成するフローに対応する、ユーザー委任アクセスに使用します。
- `client`: Client Credentials Flow などのマシン間アクセスに使用します。
|
## 接続を設定する
サードパーティアプリケーションは、ドメインレベルの接続を通じてのみユーザーを認証できます。接続をドメインレベルに昇格すると、そのテナント内のすべてのサードパーティアプリケーションで使用できるようになります。
接続をドメインレベルに昇格するには:
1. **Auth0 Dashboard > Authentication** に移動し、接続タイプ (Database、Social、Enterprise) を選択します。
2. サードパーティアプリケーションで使用する接続を選択します。
3. **Promote Connection to Domain Level** トグルを有効にします。
詳細については、[Promote Connections to Domain Level](/ja/docs/authenticate/identity-providers/promote-connections-to-domain-level)を参照してください。
## オープンリダイレクト保護を設定する
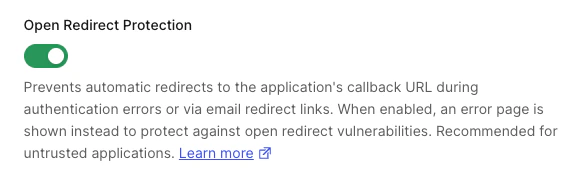
強化されたセキュリティ制御が適用されたサードパーティアプリケーションでは、**Open Redirect Protection** がデフォルトで有効になっています。有効な場合、Auth0 は次の動作を行いません。
* 認証エラー時に、アプリケーションのコールバック URL にリダイレクトする
* メールテンプレートで `application.callback_domain` を公開する
**Open Redirect Protection** を無効にするのは、設定されたコールバック URI を信頼できるサードパーティアプリケーションに限ってください。詳しくは、[Redirect Protection](/ja/docs/get-started/applications/third-party-applications/security-controls#redirect-protection) を参照してください。
1. **Applications > Applications** に移動し、対象のサードパーティアプリケーションを選択します。
2. **Settings** タブを開き、**Open Redirect Protection** までスクロールします。
3. 設定のオン/オフを切り替えます。
4. **Save** を選択します。
 アプリケーションの作成時または更新時に、`redirection_policy` プロパティを設定します。
```bash theme={null}
curl --request PATCH \
--url 'https://{yourDomain}/api/v2/clients/{CLIENT_ID}' \
--header 'Authorization: Bearer {YOUR_MANAGEMENT_API_TOKEN}' \
--header 'Content-Type: application/json' \
--data '{
"redirection_policy": "allow_always"
}'
```
有効にするには `open_redirect_protection` (デフォルト) 、無効にするには `allow_always` を設定します。
アプリケーションの作成時または更新時に、`redirection_policy` プロパティを設定します。
```bash theme={null}
curl --request PATCH \
--url 'https://{yourDomain}/api/v2/clients/{CLIENT_ID}' \
--header 'Authorization: Bearer {YOUR_MANAGEMENT_API_TOKEN}' \
--header 'Content-Type: application/json' \
--data '{
"redirection_policy": "allow_always"
}'
```
有効にするには `open_redirect_protection` (デフォルト) 、無効にするには `allow_always` を設定します。
## 動的クライアント登録
[動的に登録されたクライアント](/ja/docs/get-started/applications/dynamic-client-registration)はすべてサードパーティアプリケーションです。DCR を有効にする前に、動的に登録されたクライアントが API にアクセスできるよう、[デフォルトの API 権限](#default-permissions-for-all-third-party-applications)を設定してください。
## 詳細情報
* [サードパーティアプリケーション](/ja/docs/get-started/applications/third-party-applications)
* [サードパーティアプリケーションのセキュリティ制御](/ja/docs/get-started/applications/third-party-applications/security-controls)
* [ユーザーの同意とサードパーティアプリケーション](/ja/docs/get-started/applications/third-party-applications/user-consent-and-third-party-applications)
* [動的クライアント登録](/ja/docs/get-started/applications/dynamic-client-registration)
* [接続をドメインレベルに昇格させる](/ja/docs/authenticate/identity-providers/promote-connections-to-domain-level)