> ## Documentation Index
> Fetch the complete documentation index at: https://translations.mintlify.site/llms.txt
> Use this file to discover all available pages before exploring further.
> Authorization Code Flowの仕組みと、通常の Web アプリケーションでこれを使用すべき理由を説明します。
# Authorization Code Flow
Authorization Code Flow ([OAuth 2.0 RFC 6749, section 4.1](https://tools.ietf.org/html/rfc6749#section-4.1) で定義) は、認可コードをトークンに交換するフローです。
このフローは、交換時にアプリケーションの認証方式が含まれ、それらを安全に保つ必要があるため、機密クライアントアプリケーション (Regular Web Applications など) でのみ使用できます。
## Authorization Code Flow の仕組み
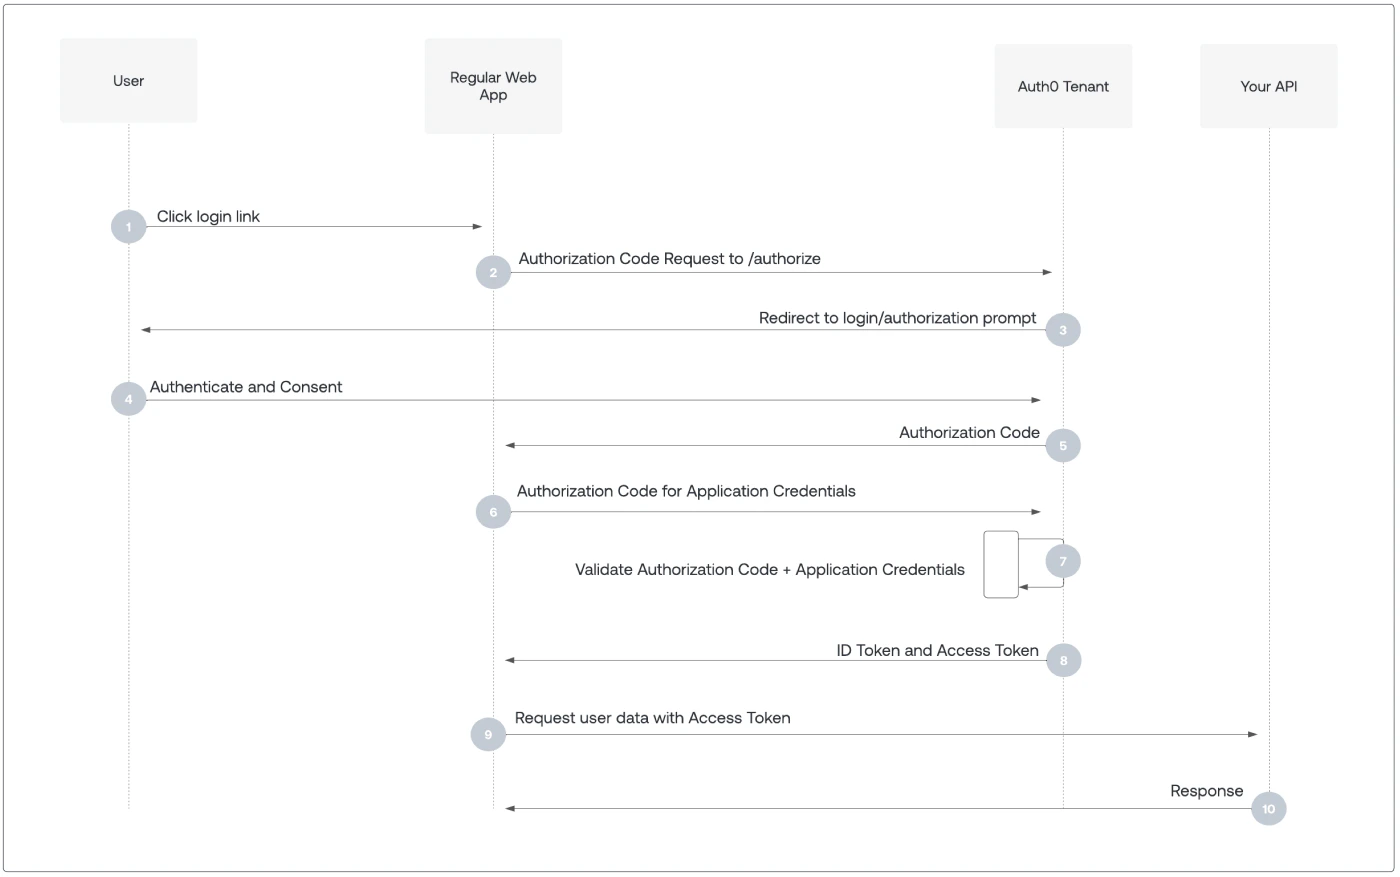 1. ユーザーがアプリケーションで **Login** を選択します。
2. Auth0 の SDK がユーザーを Auth0 認可サーバー ([`/authorize`](https://auth0.com/docs/api/authentication/authorization-code-flow/authorize-application) エンドポイント) にリダイレクトします。
3. Auth0 認可サーバーがユーザーをログインおよび認可のプロンプトにリダイレクトします。
4. ユーザーは設定済みのログインオプションのいずれかを使用して認証し、Auth0 がアプリケーションに付与する権限を一覧表示する同意プロンプトが表示される場合があります。
5. Auth0 認可サーバーが、1 回限り有効な認可コードを付与して、ユーザーをアプリケーションにリダイレクトします。
6. Auth0 の SDK が、認可コード、アプリケーションのクライアントID、およびクライアントシークレットや Private Key JWT などのアプリケーションの認証情報を、Auth0 認可サーバー ([`/oauth/token`](https://auth0.com/docs/api/authentication/authorization-code-flow/get-token) エンドポイント) に送信します。
7. Auth0 認可サーバーが、認可コード、アプリケーションのクライアントID、およびアプリケーションの認証情報を検証します。
8. Auth0 認可サーバーが、IDトークンとアクセストークン (必要に応じてリフレッシュトークンも) を返します。
9. アプリケーションはアクセストークンを使用して API を呼び出し、ユーザーに関する情報にアクセスできます。
10. API が要求されたデータを返します。
1. ユーザーがアプリケーションで **Login** を選択します。
2. Auth0 の SDK がユーザーを Auth0 認可サーバー ([`/authorize`](https://auth0.com/docs/api/authentication/authorization-code-flow/authorize-application) エンドポイント) にリダイレクトします。
3. Auth0 認可サーバーがユーザーをログインおよび認可のプロンプトにリダイレクトします。
4. ユーザーは設定済みのログインオプションのいずれかを使用して認証し、Auth0 がアプリケーションに付与する権限を一覧表示する同意プロンプトが表示される場合があります。
5. Auth0 認可サーバーが、1 回限り有効な認可コードを付与して、ユーザーをアプリケーションにリダイレクトします。
6. Auth0 の SDK が、認可コード、アプリケーションのクライアントID、およびクライアントシークレットや Private Key JWT などのアプリケーションの認証情報を、Auth0 認可サーバー ([`/oauth/token`](https://auth0.com/docs/api/authentication/authorization-code-flow/get-token) エンドポイント) に送信します。
7. Auth0 認可サーバーが、認可コード、アプリケーションのクライアントID、およびアプリケーションの認証情報を検証します。
8. Auth0 認可サーバーが、IDトークンとアクセストークン (必要に応じてリフレッシュトークンも) を返します。
9. アプリケーションはアクセストークンを使用して API を呼び出し、ユーザーに関する情報にアクセスできます。
10. API が要求されたデータを返します。
## Authorization Code Flow の実装
Authorization Code Flow を実装する最も簡単な方法は、[Regular Web App Quickstarts](/ja/docs/quickstart/webapp) に従うことです。
別の方法として、Authentication API を使用して Authorization Code Flow を実装することもできます。詳細については、[Add Login Using the Authorization Code Flow](/ja/docs/get-started/authentication-and-authorization-flow/authorization-code-flow/add-login-auth-code-flow) または [Call Your API Using the Authorization Code Flow](/ja/docs/get-started/authentication-and-authorization-flow/authorization-code-flow/call-your-api-using-the-authorization-code-flow) を参照してください。
Origin ヘッダーを含むブラウザーアプリケーションが `/oauth/token` エンドポイントに `POST` リクエストを送信した場合、アプリケーションで [Allow Refresh Token Rotation](/ja/docs/secure/tokens/refresh-tokens/configure-refresh-token-rotation) が有効になっており、[offline\_access](/ja/docs/secure/tokens/refresh-tokens/configure-refresh-token-rotation#configure-with-the-auth0-spa-sdk) スコープを送信していても、Auth0 はリフレッシュトークンを発行しません。
## 詳しく見る
* [Auth0 Rules](/ja/docs/customize/rules)
* [Auth0 Hooks](/ja/docs/customize/hooks)
* [トークン](/ja/docs/secure/tokens)
* [トークンのベストプラクティス](/ja/docs/secure/tokens/token-best-practices)
* [どの OAuth 2.0 フローを使用すべきか?](/ja/docs/get-started/authentication-and-authorization-flow/which-oauth-2-0-flow-should-i-use)