> ## Documentation Index
> Fetch the complete documentation index at: https://translations.mintlify.site/llms.txt
> Use this file to discover all available pages before exploring further.
> Rich Authorization Requests をクライアント起点バックチャネルフローで使用する方法について説明します。
# CIBA でのユーザー認可
クライアント起点バックチャネル認証 (CIBA) 機能を使用するには、エンタープライズプランまたは適切なアドオンが必要です。詳しくは、[Auth0 Pricing](https://auth0.com/pricing/) を参照してください。
[クライアント起点バックチャネル認証 (CIBA) ](/ja/docs/get-started/authentication-and-authorization-flow/client-initiated-backchannel-authentication-flow) は、開始元のアプリケーションでユーザーによる直接操作を必要とせずに、クライアントアプリケーションが認証および/または 認可フロー を開始できるようにする OAuth 2.0 の仕様です。[Rich Authorization Requests (RAR) ](/ja/docs/get-started/apis/configure-rich-authorization-requests) は OAuth 2.0 の拡張機能で、クライアントアプリケーションが認可リクエストで標準的な OAuth 2.0 スコープを超える、より複雑な権限を要求できるようにします。
CIBA と RAR を組み合わせると、バックチャネルリクエストで きめ細かな認可 データを 認可サーバー に渡せます。`authorization_details` パラメーターには、ユーザーに表示する同意プロンプトでカスタマイズできるリクエストの詳細が含まれます。
CIBA では、次の通知チャネルを使用してユーザーを認可できます。
* Auth0 Guardian アプリと、Auth0 Guardian SDK を統合したカスタムアプリを使用する [モバイルプッシュ通知](/ja/docs/get-started/authentication-and-authorization-flow/client-initiated-backchannel-authentication-flow/mobile-push-notifications-with-ciba)。
* カスタマイズした同意プロンプトの設定が必要な [メール通知](/ja/docs/get-started/authentication-and-authorization-flow/client-initiated-backchannel-authentication-flow/email-notifications-with-ciba)。
## 一般的なユースケース
リソースへのアクセスをよりきめ細かく制御する必要があるユースケースでは、RAR を CIBA フローと組み合わせて使用します。一般的なユースケースには、次のようなものがあります。
1. 支払いアプリが、送金を確認するようユーザーに求めます。`authorization_details` は、トランザクションの詳細を表示するようにカスタマイズできます。
2. AI エージェントが、変更後の診察予約の詳細をユーザーに提示します。`authorization_details` は、新しい日時を表示するようにカスタマイズできます。
## 仕組み
CIBA を使用したユーザー認可フローは、CIBA を使用したユーザー認証フローと似ており、RAR のサポートにより、クライアントは `/bc-authorize` エンドポイントを介して `authorization_details` を認可サーバーに渡すことができます。
次のシーケンス図は、CIBA を使用したユーザー認可フローのエンドツーエンドの流れを示しています。
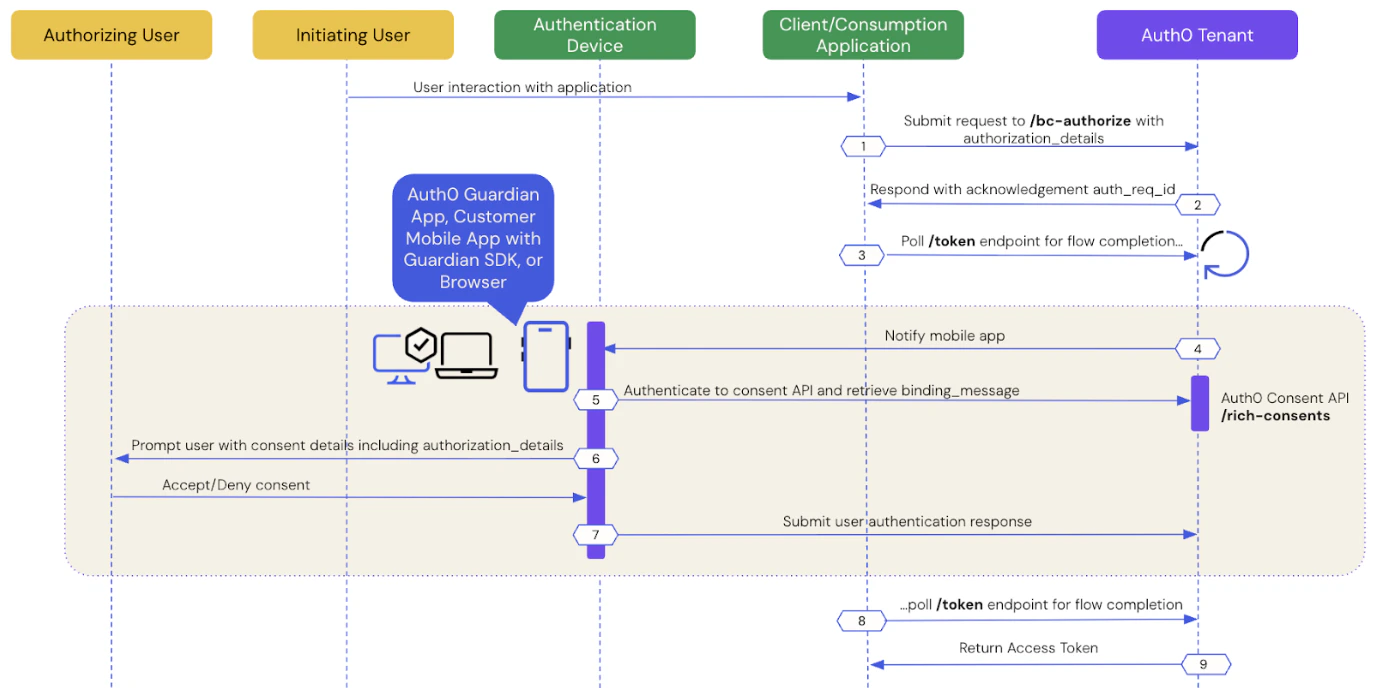 以下のセクションでは、CIBA でのユーザー認可の仕組みを手順ごとに説明します。
* [前提条件](#prerequisites)
* [ステップ 1: クライアントアプリケーションが CIBA リクエストを開始する](#step-1%3A-client-application-initiates-a-ciba-request)
* [ステップ 2: Auth0 テナントが CIBA リクエストへの確認応答を返す](#step-2%3A-auth0-tenant-acknowledges-the-ciba-request)
* [ステップ 3: クライアントアプリケーションがレスポンスをポーリングする](#step-3%3A-client-application-polls-for-a-response)
* [ステップ 4: 認証デバイスがプッシュ通知を受信する](#step-4%3A-authentication-device-receives-the-notification)
* [ステップ 5: 認証デバイスが同意の詳細を取得する](#step-5%3A-authentication-device-retrieves-the-consent-details)
* [ステップ 6: 認証デバイスが同意の詳細をユーザーに提示する](#step-6%3A-authentication-device-presents-the-consent-details-to-the-user)
* [ステップ 7: 認証デバイスがユーザーの応答を Auth0 に送り返す](#step-7%3A-authentication-device-sends-the-user-response-back-to-auth0)
* [ステップ 8: フローの完了後、Auth0 がユーザーの応答を受信する](#step-8%3A-auth0-receives-user-response-after-the-flow-completes)
* [ステップ 9: Auth0 がアクセストークンをクライアントアプリケーションに返す](#step-9%3A-auth0-returns-access-token-to-client-application)
以下のセクションでは、CIBA でのユーザー認可の仕組みを手順ごとに説明します。
* [前提条件](#prerequisites)
* [ステップ 1: クライアントアプリケーションが CIBA リクエストを開始する](#step-1%3A-client-application-initiates-a-ciba-request)
* [ステップ 2: Auth0 テナントが CIBA リクエストへの確認応答を返す](#step-2%3A-auth0-tenant-acknowledges-the-ciba-request)
* [ステップ 3: クライアントアプリケーションがレスポンスをポーリングする](#step-3%3A-client-application-polls-for-a-response)
* [ステップ 4: 認証デバイスがプッシュ通知を受信する](#step-4%3A-authentication-device-receives-the-notification)
* [ステップ 5: 認証デバイスが同意の詳細を取得する](#step-5%3A-authentication-device-retrieves-the-consent-details)
* [ステップ 6: 認証デバイスが同意の詳細をユーザーに提示する](#step-6%3A-authentication-device-presents-the-consent-details-to-the-user)
* [ステップ 7: 認証デバイスがユーザーの応答を Auth0 に送り返す](#step-7%3A-authentication-device-sends-the-user-response-back-to-auth0)
* [ステップ 8: フローの完了後、Auth0 がユーザーの応答を受信する](#step-8%3A-auth0-receives-user-response-after-the-flow-completes)
* [ステップ 9: Auth0 がアクセストークンをクライアントアプリケーションに返す](#step-9%3A-auth0-returns-access-token-to-client-application)
## 前提条件
Auth0 を使用して CIBA リクエストを開始するには、次の設定が必要です。
* テナントとアプリケーションで [クライアント起点バックチャネル認証](/ja/docs/get-started/applications/configure-client-initiated-backchannel-authentication) を設定します。これには、[通知チャネル](/ja/docs/get-started/applications/configure-client-initiated-backchannel-authentication#configure-notification-channel) の設定も含まれます。
* リソースサーバー で [Rich Authorization Requests](/ja/docs/get-started/apis/configure-rich-authorization-requests) を設定します。これには、`authorization_details` タイプの登録が含まれます。
* CIBA と RAR でメール通知を使用している場合は、[カスタマイズした同意プロンプトを設定](/ja/docs/get-started/apis/configure-rich-authorization-requests#set-customized-consent-prompt) します。
## ステップ 1: クライアントアプリケーションが CIBA リクエストを開始する
[User Search APIs](/ja/docs/manage-users/user-search) を使用して、CIBA リクエストを開始する対象の認可を行うユーザーを特定し、そのユーザー ID を取得します。
認可を行うユーザーのユーザー ID を取得したら、[Authentication API](https://auth0.com/docs/api/authentication/login/start-back-channel-login) を使用して、`authorization_details` を含む CIBA リクエストを `/bc-authorize` エンドポイントに送信します。
```bash lines theme={null}
curl --location 'https://{YOUR_DOMAIN}.auth0.com/bc-authorize' \
--request POST \
--header 'Content-Type: application/x-www-form-urlencoded' \
--data-urlencode 'client_id={YOUR_CLIENT_ID}' \
--data-urlencode 'client_secret={YOUR_CLIENT_SECRET}' \
--data-urlencode 'login_hint={ "format": "iss_sub", "iss": "https://{YOUR_DOMAIN}.auth0.com/", "sub":"{USER_ID}"}' \
--data-urlencode 'audience=https://api.example.com' \
--data-urlencode 'binding_message=Confirm payment of 2500' \
--data-urlencode 'authorization_details=[{
"type": "money_transfer",
"instructedAmount": {
"amount": 2500,
"currency": "USD"
},
"sourceAccount": "xxxxxxxxxxx1234",
"destinationAccount": "xxxxxxxxxxx9876",
"beneficiary": "Hanna Herwitz",
"subject": "A Lannister Always Pays His Debts"
}]'
```
| パラメーター | 説明 |
| ----------------------- | ----------------------------------------------------------------------------------------------------------------------------------------------------------------------------------------------------------------------------------------------------------------------------------------------------------------------------------------------------------------------------------------------------- |
| `tenant` | `login_hint` 構造内で渡されるテナント名です。カスタムドメインを指定することもできます。`iss_sub` 形式を使用する場合、テナント名は `iss` クレーム内で渡されます。
**例**: `login_hint={"format": "iss_sub", "iss": "https://{YOUR_DOMAIN}.auth0.com/", "sub":"{USER_ID"}` |
| `client_id` | クライアントアプリケーションの識別子です。 |
| `client_secret` | CIBA でユーザーを認証する際に使用するクライアント認証方式です。たとえば、クライアントシークレット、Private Key JWT、mTLS Authentication などがあります。Private Key JWT または mTLS を使用している場合は、client secret を含める必要はありません。 |
| `scope` | `openid` を含める必要があります。
必要に応じて、リフレッシュトークンをリクエストするために `offline_access` をスコープに含めることもできます。ただし、CIBA フローでトランザクションを 1 回限り認可する場合、リフレッシュトークンは不要であり、このコンテキストでは意味を持ちません。 |
| `user_id` | `login_hint` 構造内で渡される、認可を行うユーザーのユーザー ID です。`iss_sub` 形式を使用する場合、ユーザー ID は `sub` クレーム内で渡されます。
**例**: `login_hint={"format": "iss_sub", "iss": "https://{YOUR_DOMAIN}.auth0.com/", "sub":"{USER_ID}"}`
ユーザー ID の形式は、外部プロバイダーによって異なる場合があります。 |
| `requested_expiry` | CIBA フローの要求有効期限は 1~259200 秒 (72 時間) で、デフォルトは 300 秒です。CIBA フローのカスタム有効期限を設定するには、`requested_expiry` パラメーターを指定します。
`requested_expiry` パラメーターは、CIBA が使用する通知チャネルの判定にも使われます:- `requested_expiry` を 300 秒以下に設定した場合、有効になっていれば CIBA はモバイルのプッシュ通知チャネルを使用します。テナントで MFA が設定されていない場合、CIBA リクエストは失敗します。
- `requested_expiry` を 301~259200 秒に設定した場合、有効になっていれば CIBA はメール通知チャネルを使用します。
|
| `binding_message` | 認証デバイスと利用デバイスの間で CIBA フローを関連付けるために使用される、人が読んで理解できるメッセージです。binding message は必須で、最大 64 文字です。使用できるのは英数字と `+-_.,:#` のみです |
| `audience` | 発行されるトークンのオーディエンスを一意に識別する値です。 |
| `authorization_details` | 認可する permissions を記述する、省略可能な JSON オブジェクト配列です。各オブジェクトの `type` 値は、リソースサーバーの `authorization_details` パラメーターを使用してリソースサーバーに登録する必要があります。詳しくは、[Configure Rich Authorization Requests](/ja/docs/get-started/apis/configure-rich-authorization-requests) を参照してください。 |
## ステップ 2: Auth0 テナントが CIBA リクエストの受領を確認する
Auth0 テナントが `POST` リクエストを正常に受信すると、リクエストを参照する `auth-req-id` を含むレスポンスを受け取ります。
```json lines theme={null}
{
"auth_req_id": "eyJh...",
"expires_in": 300,
"interval": 5
}
```
`auth_req_id` の値は、CIBA フローの完了をポーリングするために `/token` エンドポイントに渡されます。
## ステップ 3: クライアントアプリケーションが応答をポーリングする
[Authentication API](https://auth0.com/docs/api/authentication/login/start-back-channel-login) を使用して、`urn:openid:params:grant-type:ciba` グラントタイプと `/bc-authorize` エンドポイントから受け取った `auth_req_id` を指定し、`/token` エンドポイントを呼び出します。
```bash lines theme={null}
curl --location 'https://{YOUR_DOMAIN}.auth0.com/oauth/token' \
--header 'Content-Type: application/x-www-form-urlencoded' \
--data-urlencode 'client_id={YOUR_CLIENT_ID}' \
--data-urlencode 'client_secret={YOUR_CLIENT_SECRET}' \
--data-urlencode 'auth_req_id={AUTH_REQ_ID}' \
--data-urlencode 'grant_type=urn:openid:params:grant-type:ciba'
```
```csharp lines theme={null}
var token = await authenticationApiClient.GetTokenAsync(
new ClientInitiatedBackchannelAuthorizationTokenRequest()
{
AuthRequestId = response.AuthRequestId,
ClientId = "your-client-id",
ClientSecret = "your-client-secret"
}
);
```
```go lines theme={null}
token, err := authAPI.OAuth.LoginWithGrant(context.Background(),
"urn:openid:params:grant-type:ciba",
url.Values{
"auth_req_id": []string{resp.AuthReqID},
"client_id": []string{clientID},
"client_secret": []string{clientSecret},
},
oauth.IDTokenValidationOptions{})
```
```java lines theme={null}
Request tokenRequest = auth.getBackChannelLoginStatus(authReqId, "grant-type");
BackChannelTokenResponse tokenResponse = tokenRequest.execute().getBody();
```
ユーザーがトランザクションを承認するまで、次のレスポンスが返されます。
```json lines theme={null}
{
"error": "authorization_pending",
"error_description": "エンドユーザーの認証が保留中です"
}
```
ポーリングの間隔は約 5 秒です。頻繁にポーリングしすぎると、次のレスポンスが返されます。description の内容は、バックオフ間隔に応じて異なります。
```json lines theme={null}
{
"error": "slow_down",
"error_description": "You are polling faster than allowed. Try again in 10 seconds."
"interval": 10
}
```
エラーを解消するには、次のポーリング間隔 (秒) まで待ってから、`/token` エンドポイントをポーリングしてください。
## ステップ 4: 認証デバイスが通知を受信する
通知チャネルに応じて、Auth0 は認証デバイスに通知を送信します。
* [モバイルプッシュ通知](/ja/docs/get-started/authentication-and-authorization-flow/client-initiated-backchannel-authentication-flow/mobile-push-notifications-with-ciba#step-4%3A-mobile-application-receives-the-push-notification): Auth0 は Auth0 Guardian アプリ、または Auth0 Guardian SDK を統合したカスタムモバイルアプリに送信します。
* [メール通知](/ja/docs/get-started/authentication-and-authorization-flow/client-initiated-backchannel-authentication-flow/email-notifications-with-ciba#step-4%3A-auth0-sends-a-link-to-the-user’s-email-address): Auth0 はユーザーの確認済みメールアドレスに送信します。
## ステップ 5: 認証デバイスが同意内容を取得する
認証デバイスは、Auth0 Consent API から同意の詳細、つまり `binding_message` の内容を取得します。
* [モバイルプッシュ通知](/ja/docs/get-started/authentication-and-authorization-flow/client-initiated-backchannel-authentication-flow/mobile-push-notifications-with-ciba#step-5%3A-mobile-application-retrieves-the-consent-details): Auth0 Guardian アプリ、または Auth0 Guardian SDK を統合したカスタムアプリが Auth0 Consent API を呼び出し、同意の詳細を取得します。
* [メール通知](/ja/docs/get-started/authentication-and-authorization-flow/client-initiated-backchannel-authentication-flow/email-notifications-with-ciba#step-5%3A-user-authenticates-in-the-browser): ユーザーが確認用リンクをクリックするとブラウザーにリダイレクトされ、そのブラウザーが Auth0 Consent API から同意の詳細を取得します。
## ステップ 6: 認証デバイスがユーザーに同意の詳細を表示する
Auth0 Consent API は、`binding_message`、`scope`、`audience`、および設定されている場合は `authorization_details` を含む同意の詳細を認証デバイスに返します。モバイルアプリケーションに返されるスコープは、RBAC ポリシーに従ってフィルタリングされます。詳しくは、[ロールベースアクセス制御](/ja/docs/manage-users/access-control/rbac) を参照してください。
次のコードサンプルは、Auth0 Consent API からのレスポンス例です。
```json lines theme={null}
{
"id": "cns_2309dsfsd098",
"requested_details": {
"audience": "https://api.example.com",
"scope": ["read:profile", "write:profile"],
"binding_message": "abc123",
"authorization_details": [
{
"type": "money_transfer",
"instructedAmount": {
"amount": 2500,
"currency": "USD"
},
"sourceAccount": "xxxxxxxxxxx1234",
"destinationAccount": "xxxxxxxxxxx9876",
"beneficiary": "Hanna Herwitz",
"subject": "A Lannister Always Pays His Debts"
}
]
},
"created_at": 1632739200,
"expires_at": 1632739200
}
```
認証デバイスは、`authorization_details` を含む同意の詳細をユーザーに表示します。
* [モバイルプッシュ通知](/ja/docs/get-started/authentication-and-authorization-flow/client-initiated-backchannel-authentication-flow/mobile-push-notifications-with-ciba#step-6%3A-mobile-application-presents-the-consent-details-to-the-user): Auth0 Guardian アプリは、プッシュ通知を使用して、同意画面に `authorization_details` をレンダリングします。
* [メール通知](/ja/docs/get-started/authentication-and-authorization-flow/client-initiated-backchannel-authentication-flow/email-notifications-with-ciba#step-6%3A-browser-sends-the-user-response-back-to-auth0): ブラウザーは、カスタム同意画面に `authorization_details` をレンダリングします。同意画面をカスタマイズする方法については、[カスタマイズされた同意プロンプトを設定する](/ja/docs/get-started/apis/configure-rich-authorization-requests#set-customized-consent-prompt)を参照してください。
この時点で、ユーザーは認可リクエストを承諾または拒否できます。
## ステップ 7: 認証デバイスがユーザーの応答を Auth0 に返す
ユーザーが認可リクエストを承認または拒否すると、認証デバイスはその応答を Auth0 に返します。
* [モバイルプッシュ通知](/ja/docs/get-started/authentication-and-authorization-flow/client-initiated-backchannel-authentication-flow/mobile-push-notifications-with-ciba#step-7%3A-mobile-application-sends-the-user-response-back-to-auth0): Auth0 Guardian アプリ、または Auth0 Guardian SDK と統合されたカスタムアプリが、ユーザーの応答を Auth0 に返します。
* [メール通知](/ja/docs/get-started/authentication-and-authorization-flow/client-initiated-backchannel-authentication-flow/email-notifications-with-ciba#step-6%3A-browser-sends-the-user-response-back-to-auth0): ブラウザーがユーザーの応答を Auth0 に返します。
## ステップ 8: フローの完了後、Auth0 がユーザーの応答を受信する
クライアントアプリケーションは、`/token` エンドポイントから応答を受信すると、ポーリングを終了します。CIBA フローでは、認可を行うユーザーからの承認または拒否の応答が常に必要であり、既存のグラントは確認されません。つまり、Auth0 はすべての CIBA リクエストを、認可を行うユーザーによる新たな認可として扱います。
## ステップ9: Auth0 がクライアントアプリケーションにアクセストークンを返す
ユーザーがプッシュリクエストを拒否すると、Auth0 は次のようなエラーレスポンスをクライアントアプリケーションに返します。
```json lines theme={null}
{
"error": "access_denied",
"error_description": "エンドユーザーが認証リクエストを拒否したか、有効期限が切れました"
}
```
ユーザーがプッシュリクエストを承認すると、Auth0 は次のような `authorization_details` を含むアクセストークンをクライアントアプリケーションに返します。
```json lines theme={null}
{
"id_token": "...",
"access_token": "...",
"expires_in": "...",
"scope": "{SCOPES}",
"authorization_details": [{
"type": "money_transfer",
"instructedAmount": {
"amount": 2500,
"currency": "USD"
},
"sourceAccount": "xxxxxxxxxxx1234",
"destinationAccount": "xxxxxxxxxxx9876",
"beneficiary": "Hanna Herwitz",
"subject": "A Lannister Always Pays His Debts"
}]
}
```
`refresh_token` は、最初の `/bc-authorize` リクエストに `offline_access` スコープが含まれていた場合にのみ返されます。
## authorization\_details を照会する
コンパイル時には、JSON を動的にクエリする場合と同様に、同意の詳細から `authorization_details` の型とオブジェクトを型安全に照会できます。
```swift lines theme={null}
let requestedDetails: ConsentRequestedDetails = payload.requestedDetails
let myAuthorizationDetailsTypes = requestedDetails.authorizationDetails[0].objectValue!;
let type = myAuthorizationDetailsTypes["type"]?.stringValue // 事前登録済みの type 値
let stringProperty = myAuthorizationDetailsTypes["string_property"]?.stringValue
let boolProperty = myAuthorizationDetailsTypes["bool_property"]?.boolValue
let numericProperty = myAuthorizationDetailsTypes["numeric_property"]?.doubleValue
let nestedObjectProperty = myAuthorizationDetailsTypes["nested_property"]?.objectValue
let nestedArrayProperty = myAuthorizationDetailsTypes["nested_array_property"]?.arrayValue
```
```kotlin lines theme={null}
RichConsentRequestedDetails requestedDetails = consentDetails.getRequestedDetails();
Map authorizationDetails = requestedDetails.getAuthorizationDetails().get(0);
String type = (String) myAuthorizationDetailsTypes.get("type");
String stringProperty = (String) myAuthorizationDetailsTypes.get("string_property");
boolean booleanProperty = (boolean) myAuthorizationDetailsTypes.get("boolean_property");
int numericProperty = (int) myAuthorizationDetailsTypes.get("numeric_property");
Object nestedObjectProperty = myAuthorizationDetailsTypes.get("nested_property");
List
オブジェクトを表すカスタム型を定義している場合は、`filterAuthorizationDetailsByType()` 関数を使用して、目的の型に一致するすべての `authorization_details` オブジェクトを返すことができます。
次のコードサンプルでは、`payment` 型の `authorization_details` を照会します。
```swift lines theme={null}
// AuthorizationDetailsType を実装する必要があります
struct Payment : AuthorizationDetailsType {
static let type = "payment";
let amount: Double;
let currency: String;
}
...
let requestedDetails: ConsentRequestedDetails = payload.requestedDetails
let payments = requestedDetails.filterAuthorizationDetailsByType(Payment.self)
let firstPayment = payments.first!
let type: String = firstPayment.type // "payment"
let amount: Double = firstPayment.amount
let currency: String = firstPayment.currency
```
```kotlin lines expandable theme={null}
@AuthorizatioDetailsType("payment")
class Payment {
private String type;
private int amount;
private String currency;
public Payment(String type, int amount, String currency) {
this.type = type;
this.amount = amount;
this.currency = currency;
}
public String getType() {
return type;
}
public int getAmount() {
return amount;
}
public String getCurrency() {
return currency;
}
}
...
RichConsentRequestedDetails requestedDetails = consentDetails.getRequestedDetails();
List payments = requestedDetails.filterAuthorizationDetailsByType(Payment.class);
Payment firstPayment = payments.get(0);
String type = firstPayment.getType();
int amount = firstPayment.getAmount();
String currency = firstPayment.getCurrency();
```
`filterAuthorizationDetailsByType()` は、指定した `authorization_details` 型に一致するオブジェクトのみを返します。そのため、リクエストの内容をユーザーが完全に理解できるようにするには、型に関係なく、モバイルアプリケーションですべての関連する `authorization_details` を同意のためにユーザーに提示する必要があります。
AI エージェントまたはアプリケーションがレスポンスを取得するために `/oauth/token` エンドポイントをポーリングするときにも、`authorization_details` を照会できます。
```bash lines theme={null}
curl --request POST \
--url "https://{YOUR_DOMAIN}.auth0.com/oauth/token" \
--header "Content-Type: application/x-www-form-urlencoded" \
--data-urlencode "grant_type=urn:openid:params:grant-type:ciba" \
--data-urlencode "client_id={YOUR_CLIENT_ID}" \
--data-urlencode "client_secret={YOUR_CLIENT_SECRET}" \
--data-urlencode "auth_req_id={AUTH_REQ_ID}"
```
| パラメーター | 説明 |
| --------------- | --------------------------------------------------------- |
| `grant_type` | CIBA グラントタイプ `urn:openid:params:grant-type:ciba` を設定します。 |
| `client_id` | アプリケーションのクライアントIDを設定します。 |
| `client_secret` | アプリケーションのクライアントシークレットを設定します。 |
| `auth_req_id` | Auth0 テナントが CIBA リクエストを受領した際に返されます。CIBA リクエストを参照する ID です。 |
認可を行うユーザーがリクエストを承認すると、Auth0 はユーザーの応答を受信し、CIBA フローが完了して、アクセストークンと `authorization_details` 配列が返されます。
```json lines theme={null}
{
"access_token": "ey...ZQ",
"expires_in": 86400,
"authorization_details": [{
"type": "money_transfer",
"instructedAmount": {
"amount": 2500,
"currency": "USD"
},
"sourceAccount": "xxxxxxxxxxx1234",
"destinationAccount": "xxxxxxxxxxx9876",
"beneficiary": "Hanna Herwitz",
"subject": "A Lannister Always Pays His Debts"
}],
"token_type": "Bearer"
}
```
## 制限事項
Auth0 は以下をサポートしていません。
* CIBA フローの Actions で RAR を変更すること。
* クライアントが検出できるように RAR タイプを公開すること。つまり、クライアントが送信可能な `authorization_details` タイプを事前に登録しておく必要があります。
* API で許可されているタイプに一致する `type` プロパティを持っているかどうかの確認を超える、RAR オブジェクトの検証。`authorization_details` 内の内容の詳細な検証は、リソースサーバー側で行う必要があります。詳しくは、[Configure RAR](/ja/docs/get-started/apis/configure-rich-authorization-requests) を参照してください。
## 詳細
* [Rich Authorization Requests (RAR) を構成する](/ja/docs/get-started/apis/configure-rich-authorization-requests)
* [Rich Authorization Requests (RAR) を使用する Authorization Code Flow](/ja/docs/get-started/authentication-and-authorization-flow/authorization-code-flow/authorization-code-flow-with-rar)
* [クライアント起点バックチャネル認証を構成する](/ja/docs/get-started/applications/configure-client-initiated-backchannel-authentication)