> ## Documentation Index
> Fetch the complete documentation index at: https://translations.mintlify.site/llms.txt
> Use this file to discover all available pages before exploring further.
> カスタムトークン交換フローについて説明します。
# カスタムトークン交換フロー
Custom Token Exchange を使用すると、既存のセキュリティトークン (`subject_token`) を、[RFC 8693](https://datatracker.ietf.org/doc/html/rfc8693) に準拠して `/oauth/token` エンドポイントを呼び出すことで、Auth0 のアクセストークン、ID トークン、リフレッシュトークンに交換できます。
## 仕組み
Custom Token Exchange フローは、単一の専用 [Custom Token Exchange Action](/ja/docs/customize/actions/explore-triggers/signup-and-login-triggers/custom-token-exchange-trigger) によって制御されます。この Action は、受信した `subject_token_type` パラメーターに基づいて一意に選択され、その設定は [Custom Token Exchange Profile](/ja/docs/authenticate/custom-token-exchange/configure-custom-token-exchange) で行います。
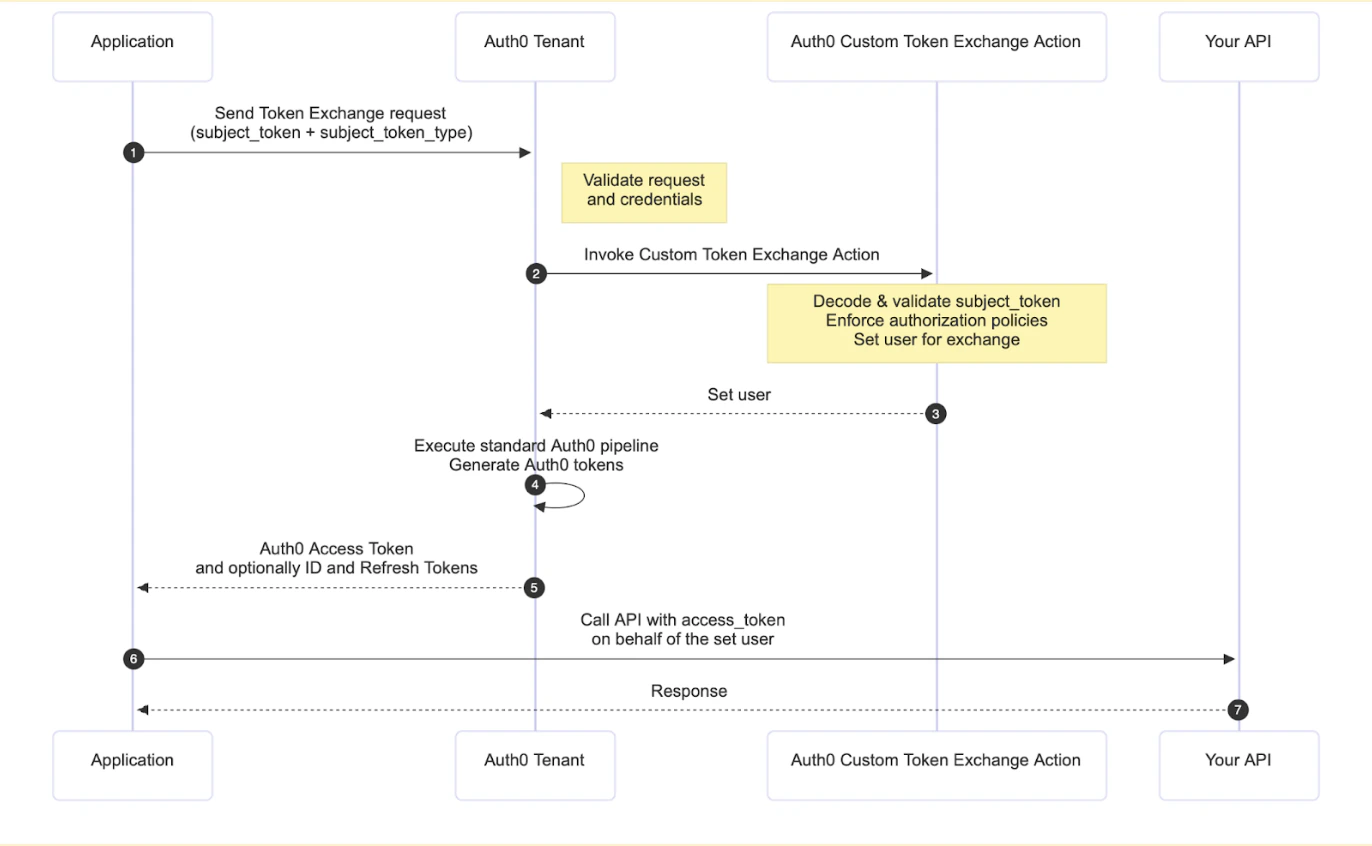 このフローの前提条件として、特定の `subject_token_type` をリクエストを処理する Action にマッピングする [Custom Token Exchange Profile](/ja/docs/authenticate/custom-token-exchange/configure-custom-token-exchange#create-custom-token-exchange-profile) を定義する必要があります。
Custom Token Exchange フローがトリガーされると、次の処理が行われます。
1. アプリケーションは、交換対象のセキュリティトークン (`subject_token`) と対応する `subject_token_type` を含む `POST` リクエストを `/oauth/token` エンドポイントに送信します。必要に応じて、リクエストには `actor_token` と `actor_token_type` を含めることもでき、これによりユーザーに代わって動作する主体を識別できます。
2. Auth0 はクライアントからのリクエストと認証情報を検証します。
3. 関連付けられた Custom Token Exchange Action が実行されます。カスタムコードでは、`subject_token` をデコードして検証し、必要な認可ポリシーを適用し、交換を承認するためにトランザクションのユーザーを設定する必要があります。また、Action は `api.authentication.setActor()` を使用してトランザクションの actor を設定することもできます。これにより、発行されたトークンに `act` クレームが含まれ、ユーザーに代わって動作している主体を識別できます。
4. 続いて、標準の Auth0 パイプラインの残りの処理が実行され、設定されたユーザーに対して Auth0 のアクセストークンと、必要に応じて IDトークンおよびリフレッシュトークンが生成されます。
5. リクエスト元のアプリケーションは、新たに発行されたこれらのトークンを使用して、Action で設定されたユーザーに代わって安全に API を呼び出せます。
このフローの前提条件として、特定の `subject_token_type` をリクエストを処理する Action にマッピングする [Custom Token Exchange Profile](/ja/docs/authenticate/custom-token-exchange/configure-custom-token-exchange#create-custom-token-exchange-profile) を定義する必要があります。
Custom Token Exchange フローがトリガーされると、次の処理が行われます。
1. アプリケーションは、交換対象のセキュリティトークン (`subject_token`) と対応する `subject_token_type` を含む `POST` リクエストを `/oauth/token` エンドポイントに送信します。必要に応じて、リクエストには `actor_token` と `actor_token_type` を含めることもでき、これによりユーザーに代わって動作する主体を識別できます。
2. Auth0 はクライアントからのリクエストと認証情報を検証します。
3. 関連付けられた Custom Token Exchange Action が実行されます。カスタムコードでは、`subject_token` をデコードして検証し、必要な認可ポリシーを適用し、交換を承認するためにトランザクションのユーザーを設定する必要があります。また、Action は `api.authentication.setActor()` を使用してトランザクションの actor を設定することもできます。これにより、発行されたトークンに `act` クレームが含まれ、ユーザーに代わって動作している主体を識別できます。
4. 続いて、標準の Auth0 パイプラインの残りの処理が実行され、設定されたユーザーに対して Auth0 のアクセストークンと、必要に応じて IDトークンおよびリフレッシュトークンが生成されます。
5. リクエスト元のアプリケーションは、新たに発行されたこれらのトークンを使用して、Action で設定されたユーザーに代わって安全に API を呼び出せます。
## はじめに
Custom Token Exchange を使用するには、[Custom Token Exchange Profile を作成](/ja/docs/authenticate/custom-token-exchange/configure-custom-token-exchange#create-custom-token-exchange-profile)する必要があります。一般的なワークフローは、3 つの主要な設定手順を行った後に API を呼び出す流れになります。
1. トークン交換を制御するロジックを含む [Action を作成してデプロイ](/ja/docs/authenticate/custom-token-exchange/configure-custom-token-exchange#create-action-for-the-profile)します。この Action では、次の処理を行うカスタムコードを記述します。
* 受信した `subject_token` を安全にデコードして検証する。
* トランザクションに必要な認可手順を実行する。
* [Custom Token Exchange Actions API Object](/ja/docs/customize/actions/explore-triggers/signup-and-login-triggers/custom-token-exchange-trigger/custom-token-exchange-api-object) で使用可能なメソッドを使って、トランザクションに対応するユーザーを設定する。
2. テナントで [Custom Token Exchange Profile を作成](/ja/docs/authenticate/custom-token-exchange/configure-custom-token-exchange#create-custom-token-exchange-profile)します。このプロファイルにより、リクエストで使用する特定の `subject_token_type` と、先ほど作成した Action が 1 対 1 で対応付けられます。
3. [アプリケーションで Custom Token Exchange を有効にします](/ja/docs/authenticate/custom-token-exchange/configure-custom-token-exchange#enable-custom-token-exchange-for-your-application)。
Custom Token Exchange Profile を作成したら、次の作業を行う準備は完了です。
1. API を呼び出す: 必要なパラメーター (`subject_token` と、設定したプロファイルに対応する `subject_token_type` を含む) を指定して、`/oauth/token` エンドポイントに `POST` リクエストを送信できます。詳細は、[Custom Token Exchange を使用して API を呼び出す](/ja/docs/get-started/authentication-and-authorization-flow/token-exchange-flow/call-your-api-using-the-custom-token-exchange-flow)を参照してください。
## 詳細情報
* [Custom Token Exchange](/ja/docs/authenticate/custom-token-exchange)
* [ユースケースの例](/ja/docs/authenticate/custom-token-exchange/cte-example-use-cases)
* [Custom Token Exchangeを設定する](/ja/docs/authenticate/custom-token-exchange/configure-custom-token-exchange)