
概要

iOS、macOS、tvOS、watchOS 向けの Swift SDK です。Auth0 をアプリにシームレスに統合し、ログインとログアウトの追加、認証情報の安全な保存、ユーザー情報へのアクセスを実現できます。詳しくは GitHub リポジトリv1 から移行する場合は、 移行ガイド を参照してください

ドキュメント

はじめに

要件

  • iOS 13.0+ / macOS 11.0+ / tvOS 13.0+ / watchOS 7.0+
  • Xcode 14.x
  • Swift 5.7+
Xcode、Swift、および各プラットフォームのバージョンのサポート終了が破壊的変更と見なされないタイミングについては、Support Policyを確認してください。

インストール

Swift Package Manager

Xcode で、次のメニュー項目を開きます。 File > Add Packages… Search or Enter Package URL 検索ボックスに、この URL を入力します。
https://github.com/auth0/Auth0.swift
次に、依存関係ルールを選択して、Add Package を押します。

Cocoapods

次の行をPodfileに追加します。
pod 'Auth0', '~> 2.0'
次に、pod install を実行します。

Carthage

Cartfile に次の行を追加します。
github "auth0/Auth0.swift" ~> 2.0
次に、carthage bootstrap --use-xcframeworks を実行します。

SDK を設定する

Auth0 Dashboard に移動し、新しい Native アプリケーションを作成します。 Auth0.swift が Auth0 と通信するには、Auth0 アプリケーションの ドメイン が必要です。これらの詳細は、Auth0 アプリケーションの Settings ページで確認できます。カスタムドメイン を使用している場合は、Settings ページの値ではなく、 の値を使用してください。

plist を使用してクライアントIDとドメインを設定する

次の内容で、アプリバンドル内に Auth0.plist という名前の plist ファイルを作成します。
<?xml version="1.0" encoding="UTF-8"?>
<!DOCTYPE plist PUBLIC "-//Apple//DTD PLIST 1.0//EN" "http://www.apple.com/DTDs/PropertyList-1.0.dtd">
<plist version="1.0">
<dict>
    <key>ClientId</key>
    <string>{yourAuth0ClientId}</string>
    <key>Domain</key>
    <string>{yourAuth0Domain}</string>
</dict>
</plist>

クライアントIDとドメインをプログラムから設定する

Web Auth を使用する場合
Auth0
    .webAuth(clientId: "{yourAuth0ClientID}", domain: "{yourAuth0Domain}")
    // ...
Authentication API クライアントの場合
Auth0
    .authentication(clientId: "{yourAuth0ClientID}", domain: "{yourAuth0Domain}")
    // ...
Management API クライアント (Users) 向け
Auth0
    .users(token: credentials.accessToken, domain: "{yourAuth0Domain}")
    // ...

Web Auth の設定 (iOS / macOS)

コールバックURLとログアウトURLを設定する

コールバックURLとログアウトURLは、Auth0 がアプリケーションへリダイレクトする際に使用する URL です。Auth0 はユーザーの認証後にコールバックURLを使用し、 を削除した後にログアウトURLを使用します。 コールバックURLとログアウトURLは改変される可能性があるため、Auth0 アプリケーションの Settings ページにある Allowed Callback URLs フィールドと Allowed Logout URLs フィールドにこれらの URL を追加する必要があります。これにより、Auth0 はそれらの URL を有効なものとして認識できるようになります。コールバックURLとログアウトURLが設定されていない場合、ユーザーはアプリケーションにログインおよびログアウトできず、エラーが発生します。 Auth0 application の Settings ページに移動し、アプリケーションのプラットフォームに応じて、該当する URL を Allowed Callback URLsAllowed Logout URLs に追加してください。custom domain を使用している場合は、Settings ページの値ではなく、{yourAuth0Domain} をカスタムドメインの値に置き換えてください。
iOS
{yourBundleIdentifier}://{yourAuth0Domain}/ios/{yourBundleIdentifier}/callback
macOS
{yourBundleIdentifier}://{yourAuth0Domain}/macos/{yourBundleIdentifier}/callback
たとえば、iOS のバンドル識別子が com.example.MyApp で、Auth0 のドメインが example.us.auth0.com である場合、この値は次のようになります。
com.example.MyApp://example.us.auth0.com/ios/com.example.MyApp/callback
Token Endpoint Authentication Method の設定が None に設定されていることを確認してください。

カスタムURLスキームを設定する

Xcode で、アプリのターゲット設定にある Info タブを開きます。URL Types セクションで ボタンをクリックし、新しいエントリを追加します。そこで、Identifier フィールドに auth0URL Schemes フィールドに $(PRODUCT_BUNDLE_IDENTIFIER) を入力します。 これにより、バンドル識別子がカスタムURLスキームとして登録され、コールバックURL と ログアウト URL がアプリに戻れるようになります。

Web Auth ログイン (iOS / macOS)

ログインページを表示するファイルに Auth0 モジュールをインポートします。
import Auth0
次に、Login ボタンのアクションで Universal Login ページを表示するようにします。
Auth0
    .webAuth()
    .start { result in
        switch result {
        case .success(let credentials):
            print("Obtained credentials: \(credentials)")
        case .failure(let error):
            print("Failed with: \(error)")
        }
    }

async/await を使用する

do {
    let credentials = try await Auth0.webAuth().start()
    print("Obtained credentials: \(credentials)")
} catch {
    print("Failed with: \(error)")
}

Combine を使用する

Auth0
    .webAuth()
    .start()
    .sink(receiveCompletion: { completion in
        if case .failure(let error) = completion {
            print("Failed with: \(error)")
        }
    }, receiveValue: { credentials in
        print("Obtained credentials: \(credentials)")
    })
    .store(in: &cancellables)

Web Auth でのログアウト (iOS / macOS)

ユーザーをログアウトするには、 のセッションクッキーをクリアし、その後アプリケーションからユーザーの認証情報を削除します。 ログアウト ボタンのアクションで clearSession() メソッドを呼び出します。セッションクッキーがクリアされたら、ユーザーの認証情報を削除します。
Auth0
    .webAuth()
    .clearSession { result in
        switch result {
        case .success:
            print("Session cookie cleared")
            // credentialsを削除する
        case .failure(let error):
            print("Failed with: \(error)")
        }
    }

async/await を使用する

do {
    try await Auth0.webAuth().clearSession()
    print("Session cookie cleared")
    // credentialsを削除する
} catch {
    print("Failed with: \(error)")
}

Combine を使用する

Auth0
    .webAuth()
    .clearSession()
    .sink(receiveCompletion: { completion in
        switch completion {
        case .finished:
            print("Session cookie cleared")
            // credentialsを削除する
        case .failure(let error):
            print("Failed with: \(error)")
        }
    }, receiveValue: {})
    .store(in: &cancellables)

SSO アラートボックス (iOS / macOS)

undefined
Web Auth の使用時にデフォルトで表示されるアラートボックスの詳細については、FAQを参照してください。
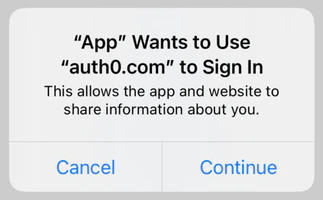
詳しい解説については、How to Create a Seamless Mobile SSO (Single Sign-On) Experience in iOSも参照してください。

次のステップ

主要な機能については、Examples を参照してください。