> ## Documentation Index
> Fetch the complete documentation index at: https://translations.mintlify.site/llms.txt
> Use this file to discover all available pages before exploring further.
> Auth0.swift のインストール方法と使い始め方
# Auth0.swift
iOS、macOS、tvOS、watchOS 向けの Swift SDK です。Auth0 をアプリにシームレスに統合し、ログインとログアウトの追加、認証情報の安全な保存、ユーザー情報へのアクセスを実現できます。
**詳しくは** [**GitHub リポジトリ**](https://github.com/auth0/Auth0.swift)
**v1 から移行する場合は、** [**移行ガイド**](https://github.com/auth0/Auth0.swift/blob/master/V2_MIGRATION_GUIDE.md) **を参照してください**
## ドキュメント
* [クイックスタート](/ja/docs/quickstart/native/ios-swift/interactive): iOS / macOS アプリに Auth0.swift をゼロから統合する方法を紹介します。
* [サンプルアプリ](https://github.com/auth0-samples/auth0-ios-swift-sample/tree/master/Sample-01): 実際に試せる、完全に動作する iOS / macOS アプリです。
* [使用例](https://github.com/auth0/Auth0.swift/blob/master/EXAMPLES.md): 主要な機能の使い方を説明します。
* [API ドキュメント](https://auth0.github.io/Auth0.swift/documentation/auth0): コードコメントから自動生成された、利用可能なすべての機能を説明するドキュメントです。
* [Web Auth](https://auth0.github.io/Auth0.swift/documentation/auth0/webauth)
* [Credentials Manager](https://auth0.github.io/Auth0.swift/documentation/auth0/credentialsmanager)
* [Authentication API クライアント](https://auth0.github.io/Auth0.swift/documentation/auth0/authentication)
* [Management API クライアント (ユーザー)](https://auth0.github.io/Auth0.swift/documentation/auth0/users)
* [FAQ](https://github.com/auth0/Auth0.swift/blob/master/FAQ.md): Auth0.swift に関するよくある質問への回答をまとめています。
* [Auth0 ドキュメント:](https://auth0.com/docs) ドキュメントサイトで、Auth0 の詳細を確認してください。
## はじめに
### 要件
* iOS 13.0+ / macOS 11.0+ / tvOS 13.0+ / watchOS 7.0+
* Xcode 14.x
* Swift 5.7+
Xcode、Swift、および各プラットフォームのバージョンのサポート終了が**破壊的変更**と見なされないタイミングについては、[Support Policy](https://github.com/auth0/Auth0.swift/tree/master#support-policy)を確認してください。
### インストール
#### Swift Package Manager
Xcode で、次のメニュー項目を開きます。
**File > Add Packages...**
**Search or Enter Package URL** 検索ボックスに、この URL を入力します。
```http lines theme={null}
https://github.com/auth0/Auth0.swift
```
次に、依存関係ルールを選択して、**Add Package** を押します。
#### Cocoapods
次の行を`Podfile`に追加します。
```bash lines theme={null}
pod 'Auth0', '~> 2.0'
```
次に、`pod install` を実行します。
#### Carthage
`Cartfile` に次の行を追加します。
```bash lines theme={null}
github "auth0/Auth0.swift" ~> 2.0
```
次に、`carthage bootstrap --use-xcframeworks` を実行します。
### SDK を設定する
[Auth0 Dashboard](https://manage.auth0.com/#/applications/) に移動し、新しい **Native** アプリケーションを作成します。
Auth0.swift が Auth0 と通信するには、Auth0 アプリケーションの **クライアントID** と **ドメイン** が必要です。これらの詳細は、Auth0 アプリケーションの Settings ページで確認できます。[カスタムドメイン](/ja/docs/customize/custom-domains) を使用している場合は、Settings ページの値ではなく、カスタムドメイン の値を使用してください。
#### plist を使用してクライアントIDとドメインを設定する
次の内容で、アプリバンドル内に `Auth0.plist` という名前の `plist` ファイルを作成します。
```xml lines theme={null}
ClientId
{yourAuth0ClientId}
Domain
{yourAuth0Domain}
```
#### クライアントIDとドメインをプログラムから設定する
##### Web Auth を使用する場合
```swift lines theme={null}
Auth0
.webAuth(clientId: "{yourAuth0ClientID}", domain: "{yourAuth0Domain}")
// ...
```
##### Authentication API クライアントの場合
```swift lines theme={null}
Auth0
.authentication(clientId: "{yourAuth0ClientID}", domain: "{yourAuth0Domain}")
// ...
```
##### Management API クライアント (Users) 向け
```swift lines theme={null}
Auth0
.users(token: credentials.accessToken, domain: "{yourAuth0Domain}")
// ...
```
### Web Auth の設定 (iOS / macOS)
#### コールバックURLとログアウトURLを設定する
コールバックURLとログアウトURLは、Auth0 がアプリケーションへリダイレクトする際に使用する URL です。Auth0 はユーザーの認証後にコールバックURLを使用し、セッションクッキー を削除した後にログアウトURLを使用します。
コールバックURLとログアウトURLは改変される可能性があるため、Auth0 アプリケーションの Settings ページにある **Allowed Callback URLs** フィールドと **Allowed Logout URLs** フィールドにこれらの URL を追加する必要があります。これにより、Auth0 はそれらの URL を有効なものとして認識できるようになります。コールバックURLとログアウトURLが設定されていない場合、ユーザーはアプリケーションにログインおよびログアウトできず、エラーが発生します。
[Auth0 application](https://manage.auth0.com/#/applications/) の Settings ページに移動し、アプリケーションのプラットフォームに応じて、該当する URL を **Allowed Callback URLs** と **Allowed Logout URLs** に追加してください。[custom domain](/ja/docs/customize/custom-domains) を使用している場合は、Settings ページの値ではなく、`{yourAuth0Domain}` をカスタムドメインの値に置き換えてください。
##### iOS
```swift wrap lines theme={null}
{yourBundleIdentifier}://{yourAuth0Domain}/ios/{yourBundleIdentifier}/callback
```
##### macOS
```swift wrap lines theme={null}
{yourBundleIdentifier}://{yourAuth0Domain}/macos/{yourBundleIdentifier}/callback
```
たとえば、iOS のバンドル識別子が `com.example.MyApp` で、Auth0 のドメインが `example.us.auth0.com` である場合、この値は次のようになります。
```text wrap lines theme={null}
com.example.MyApp://example.us.auth0.com/ios/com.example.MyApp/callback
```
[**Token Endpoint Authentication Method**](/ja/docs/get-started/applications/confidential-and-public-applications/view-application-type) の設定が `None` に設定されていることを確認してください。
#### カスタムURLスキームを設定する
Xcode で、アプリのターゲット設定にある **Info** タブを開きます。**URL Types** セクションで **+** ボタンをクリックし、新しいエントリを追加します。そこで、**Identifier** フィールドに `auth0`、**URL Schemes** フィールドに `$(PRODUCT_BUNDLE_IDENTIFIER)` を入力します。
これにより、バンドル識別子がカスタムURLスキームとして登録され、コールバックURL と ログアウト URL がアプリに戻れるようになります。
### Web Auth ログイン (iOS / macOS)
ログインページを表示するファイルに `Auth0` モジュールをインポートします。
```swift lines theme={null}
import Auth0
```
次に、**Login** ボタンのアクションで [Universal Login](/ja/docs/authenticate/login/auth0-universal-login) ページを表示するようにします。
```swift lines theme={null}
Auth0
.webAuth()
.start { result in
switch result {
case .success(let credentials):
print("Obtained credentials: \(credentials)")
case .failure(let error):
print("Failed with: \(error)")
}
}
```
#### async/await を使用する
```swift lines theme={null}
do {
let credentials = try await Auth0.webAuth().start()
print("Obtained credentials: \(credentials)")
} catch {
print("Failed with: \(error)")
}
```
#### Combine を使用する
```swift lines theme={null}
Auth0
.webAuth()
.start()
.sink(receiveCompletion: { completion in
if case .failure(let error) = completion {
print("Failed with: \(error)")
}
}, receiveValue: { credentials in
print("Obtained credentials: \(credentials)")
})
.store(in: &cancellables)
```
### Web Auth でのログアウト (iOS / macOS)
ユーザーをログアウトするには、Universal Login のセッションクッキーをクリアし、その後アプリケーションからユーザーの認証情報を削除します。
**ログアウト** ボタンのアクションで `clearSession()` メソッドを呼び出します。セッションクッキーがクリアされたら、[ユーザーの認証情報を削除](https://github.com/auth0/Auth0.swift/blob/master/EXAMPLES.md#clear-stored-credentials)します。
```swift lines theme={null}
Auth0
.webAuth()
.clearSession { result in
switch result {
case .success:
print("Session cookie cleared")
// credentialsを削除する
case .failure(let error):
print("Failed with: \(error)")
}
}
```
#### async/await を使用する
```swift lines theme={null}
do {
try await Auth0.webAuth().clearSession()
print("Session cookie cleared")
// credentialsを削除する
} catch {
print("Failed with: \(error)")
}
```
#### Combine を使用する
```swift lines theme={null}
Auth0
.webAuth()
.clearSession()
.sink(receiveCompletion: { completion in
switch completion {
case .finished:
print("Session cookie cleared")
// credentialsを削除する
case .failure(let error):
print("Failed with: \(error)")
}
}, receiveValue: {})
.store(in: &cancellables)
```
### SSO アラートボックス (iOS / macOS)
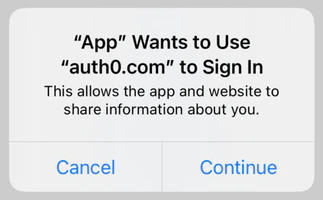 Web Auth の使用時にデフォルトで表示されるアラートボックスの詳細については、[FAQ](https://github.com/auth0/Auth0.swift/blob/master/FAQ.md)を参照してください。
詳しい解説については、[How to Create a Seamless Mobile SSO (Single Sign-On) Experience in iOS](https://developer.okta.com/blog/2022/01/13/mobile-sso)も参照してください。
Web Auth の使用時にデフォルトで表示されるアラートボックスの詳細については、[FAQ](https://github.com/auth0/Auth0.swift/blob/master/FAQ.md)を参照してください。
詳しい解説については、[How to Create a Seamless Mobile SSO (Single Sign-On) Experience in iOS](https://developer.okta.com/blog/2022/01/13/mobile-sso)も参照してください。
## 次のステップ
主要な機能については、[Examples](https://github.com/auth0/Auth0.swift/blob/master/EXAMPLES.md) を参照してください。
* [認証情報を保存する](https://github.com/auth0/Auth0.swift/blob/master/EXAMPLES.md#store-credentials): ユーザーの認証情報を Keychain に安全に保存します。
* [保存済みの認証情報を確認する](https://github.com/auth0/Auth0.swift/blob/master/EXAMPLES.md#check-for-stored-credentials): アプリの起動時に、ユーザーがすでにログインしているかどうかを確認します。
* [保存済みの認証情報を取得する](https://github.com/auth0/Auth0.swift/blob/master/EXAMPLES.md#retrieve-stored-credentials): ユーザーの認証情報を Keychain から取得し、有効期限が切れている場合は自動的に更新します。
* [保存済みの認証情報を削除する](https://github.com/auth0/Auth0.swift/blob/master/EXAMPLES.md#clear-stored-credentials): ログアウト処理を完了するために、ユーザーの認証情報を削除します。
* [ユーザー情報を取得する](https://github.com/auth0/Auth0.swift/blob/master/EXAMPLES.md#retrieve-user-information): `/userinfo` エンドポイントから最新のユーザー情報を取得します。