> ## Documentation Index
> Fetch the complete documentation index at: https://translations.mintlify.site/llms.txt
> Use this file to discover all available pages before exploring further.
> Lock V11 で、複数のログインオプションに応じて異なる接続タイプを選択する方法。
# 複数の接続オプションから選択する
export const AuthCodeBlock = ({filename, icon, language, highlight, children}) => {
const [displayText, setDisplayText] = useState(children);
const [copyText, setCopyText] = useState(children);
const wrapperRef = React.useRef(null);
useEffect(() => {
let unsubscribe = null;
function init() {
if (!window.autorun || !window.rootStore) {
return;
}
unsubscribe = window.autorun(() => {
let processedChildrenForDisplay = children;
let processedChildrenForCopy = children;
for (const [key, value] of window.rootStore.variableStore.values.entries()) {
const escapedKey = key.replaceAll(/[.*+?^${}()|[\]\\]/g, (String.raw)`\$&`);
let displayValue = value;
if (key === "{yourClientSecret}" && value !== "{yourClientSecret}") {
displayValue = value.substring(0, 3) + "*****マスク済み*****";
}
processedChildrenForDisplay = processedChildrenForDisplay.replaceAll(new RegExp(escapedKey, "g"), displayValue);
processedChildrenForCopy = processedChildrenForCopy.replaceAll(new RegExp(escapedKey, "g"), value);
}
setDisplayText(processedChildrenForDisplay);
setCopyText(processedChildrenForCopy);
});
}
if (window.rootStore) {
init();
} else {
window.addEventListener("adu:storeReady", init);
}
return () => {
window.removeEventListener("adu:storeReady", init);
unsubscribe?.();
};
}, [children]);
useEffect(() => {
if (!wrapperRef.current) return;
const originalWriteText = navigator.clipboard.writeText.bind(navigator.clipboard);
let isOverriding = false;
const handleClick = e => {
const button = e.target.closest('[data-testid="copy-code-button"]');
if (!button || !wrapperRef.current.contains(button)) return;
isOverriding = true;
navigator.clipboard.writeText = text => {
if (isOverriding) {
isOverriding = false;
navigator.clipboard.writeText = originalWriteText;
return originalWriteText(copyText);
}
return originalWriteText(text);
};
setTimeout(() => {
if (isOverriding) {
isOverriding = false;
navigator.clipboard.writeText = originalWriteText;
}
}, 100);
};
const wrapper = wrapperRef.current;
wrapper.addEventListener('click', handleClick, true);
return () => {
wrapper.removeEventListener('click', handleClick, true);
if (navigator.clipboard.writeText !== originalWriteText) {
navigator.clipboard.writeText = originalWriteText;
}
};
}, [copyText]);
return
{displayText}
;
};
Auth0 を使用すると、ユーザーに複数の認証方法を提供できます。これは、多数の組織が 1 つのアプリを利用する SaaS やマルチテナントアプリでは重要です。組織ごとに、LDAP、Active Directory、Google Workspace、username/password ストアなど、異なるシステムを使用している場合があります。
Auth0 では、異なる接続 (認証方法) を特定のアプリケーションに関連付けることも、テナントに直接関連付けることもできます ([ドメイン接続](/ja/docs/authenticate/identity-providers/promote-connections-to-domain-level)として) 。ユーザーがログインする際には、使用する接続をこれらの中から 1 つ選択する必要があります。
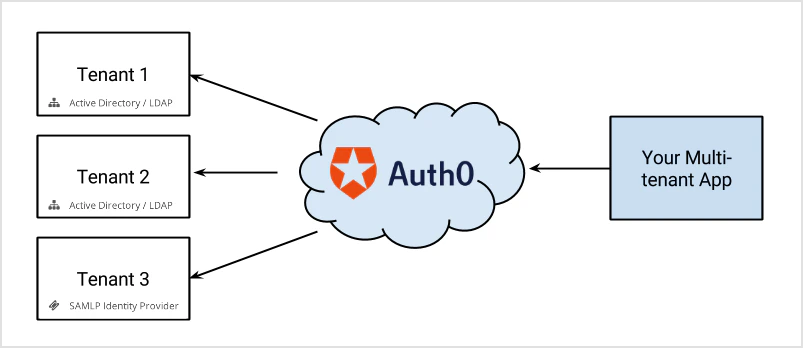 複数の選択肢の中から適切な IDプロバイダー を選ぶことを "Home Realm Discovery" と呼びます。
データベース接続を最大 1 つ、ソーシャル接続を 0 個以上使用する場合、選択プロセスはシンプルです。ユーザーは次のいずれかを行います。
* ソーシャル ID プロバイダーのボタンのいずれかをクリックする (例: "Google でログイン")
* メールアドレスとパスワードを入力する (つまり、"データベース接続を使用する" という意味です) 。
ただし、アプリケーションまたはテナントで他の種類の接続 (エンタープライズ接続や複数のデータベース接続など) が有効になっている場合は、選択プロセスがより複雑になることがあります。複数のデータベース接続が有効な場合、ユーザーが特定のデータベース接続を使いたいことをどのように示せばよいのでしょうか。ユーザーが シングルサインオン (SSO) を使ってログインするために、エンタープライズ接続を利用したい場合はどうでしょうか。
[カスタムログイン UI](/ja/docs/customize/login-pages/classic-login/customize-with-lock-sdk) を実装する場合は、認証フローを完全に制御できます。コンテキスト (指定されたメールアドレスなど) に基づいて接続を選択することも、ユーザーに選ばせたうえで、Auth0.js の [ログインメソッド](/ja/docs/libraries/auth0js) のいずれかに `connection` パラメーターを渡すこともできます。
複数の選択肢の中から適切な IDプロバイダー を選ぶことを "Home Realm Discovery" と呼びます。
データベース接続を最大 1 つ、ソーシャル接続を 0 個以上使用する場合、選択プロセスはシンプルです。ユーザーは次のいずれかを行います。
* ソーシャル ID プロバイダーのボタンのいずれかをクリックする (例: "Google でログイン")
* メールアドレスとパスワードを入力する (つまり、"データベース接続を使用する" という意味です) 。
ただし、アプリケーションまたはテナントで他の種類の接続 (エンタープライズ接続や複数のデータベース接続など) が有効になっている場合は、選択プロセスがより複雑になることがあります。複数のデータベース接続が有効な場合、ユーザーが特定のデータベース接続を使いたいことをどのように示せばよいのでしょうか。ユーザーが シングルサインオン (SSO) を使ってログインするために、エンタープライズ接続を利用したい場合はどうでしょうか。
[カスタムログイン UI](/ja/docs/customize/login-pages/classic-login/customize-with-lock-sdk) を実装する場合は、認証フローを完全に制御できます。コンテキスト (指定されたメールアドレスなど) に基づいて接続を選択することも、ユーザーに選ばせたうえで、Auth0.js の [ログインメソッド](/ja/docs/libraries/auth0js) のいずれかに `connection` パラメーターを渡すこともできます。
## Lock と複数の接続
Lock には、IDプロバイダーを選択するための機能が組み込まれています。ソーシャル接続については、そのアプリで有効になっているすべての接続のロゴが表示されます。また、データベース接続または Active Directory 接続が有効な場合は、username/メールアドレス とパスワードの入力フィールドも表示されます。
ログインボタンが表示されるのは、そのアプリケーションで有効な接続が 1 つだけの場合に限られます ([Classic Universal Login](/ja/docs/authenticate/login/auth0-universal-login/universal-login-vs-classic-login/classic-experience) エクスペリエンスの場合) 。それ以外の場合は、[custom UI](/ja/docs/customize/login-pages/classic-login/customize-with-lock-sdk) または [New Universal Login](/ja/docs/authenticate/login/auth0-universal-login/universal-login-vs-classic-login/universal-experience) を使用する必要があります。これらでは、有効な各ソーシャル接続およびエンタープライズ接続ごとにボタンを表示できます。
## エンタープライズ接続でメールアドレスのドメインを使用する
Lock の追加機能の 1 つとして、メールアドレスのドメインを使用して認証リクエストを振り分けることができます。Auth0 のエンタープライズ接続は `domains` にマッピングできます。たとえば、ADFS または SAML-P IDプロバイダーを設定する場合です。
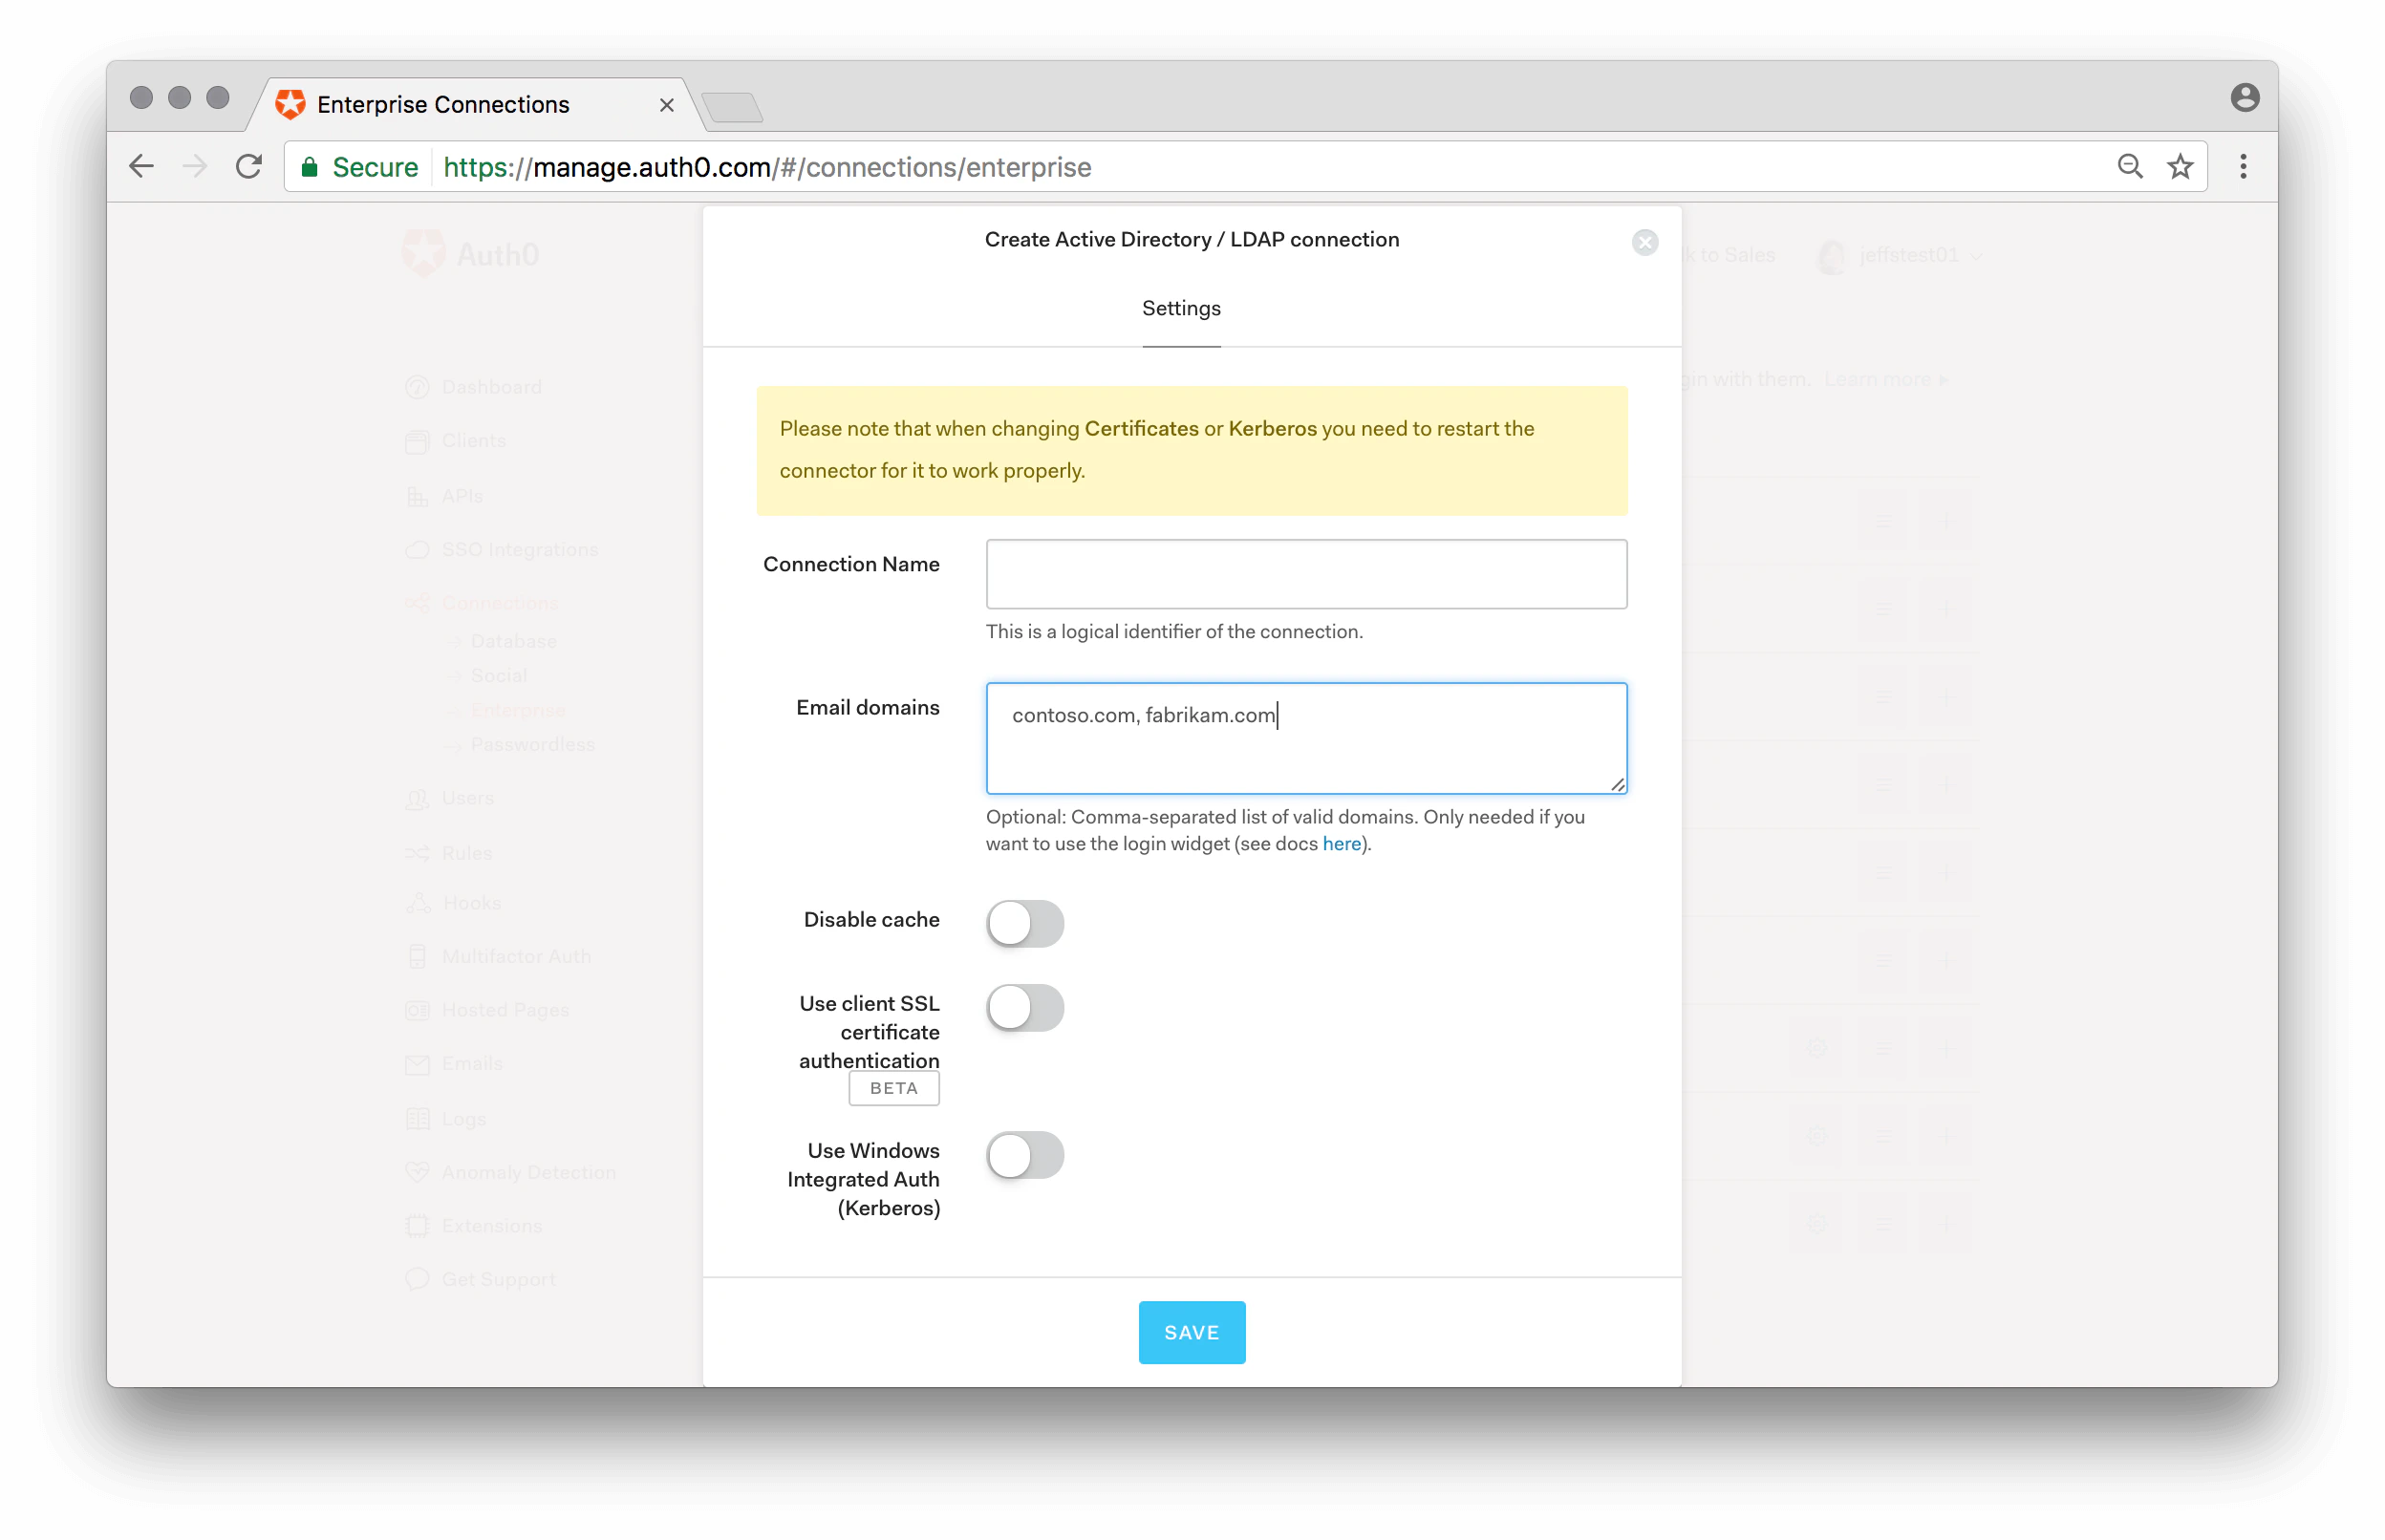 接続にドメインがマッピングされている場合、ユーザーがマッピング済みドメインのメールアドレスを入力すると、パスワード入力フィールドは自動的に無効になります。
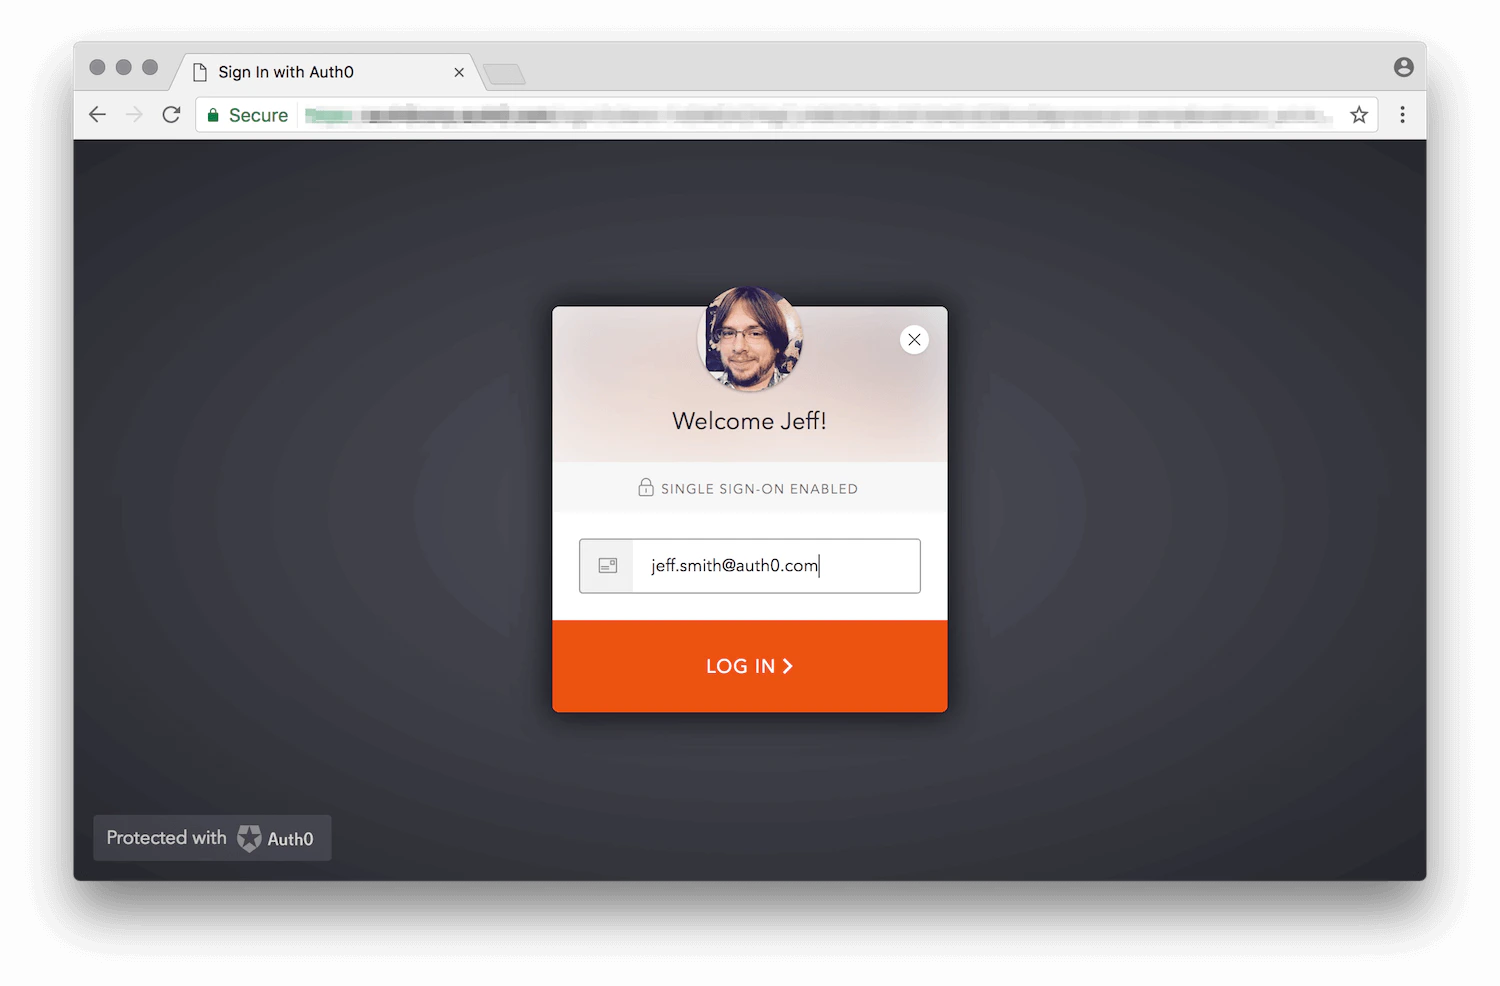 上の例では、ドメイン `auth0.com` がエンタープライズ接続にマッピングされています。
1 つの接続に複数のドメインを関連付けることができます。
上の例では、ドメイン `auth0.com` がエンタープライズ接続にマッピングされています。
1 つの接続に複数のドメインを関連付けることができます。
## 複数のデータベース接続から選択する
アプリケーションで複数のデータベース接続が有効になっている場合、Lock はどの接続を使用するかを把握する必要があります。[`connectionResolver` オプション](https://github.com/auth0/lock#other-options)を指定すると、ユーザー入力とコンテキストに基づいて使用する接続を決定する関数を渡せます。この例では、メールアドレスのドメインが "auth0.com" の場合、別のデータベース接続を使用します。
```js lines theme={null}
var options = {
connectionResolver: function (username, context, cb) {
var domain = username.indexOf('@') !== -1 && username.split('@')[1];
if (domain && domain ==='auth0.com') {
// username が test@auth0.com の場合、使用される接続は `auth0-users` 接続です。
cb({ type: 'database', name: 'auth0-users' });
} else {
// デフォルトの方法で接続を判別する
cb(null);
}
}
}
```
[`defaultDatabaseConnection` オプション](/ja/docs/libraries/lock/lock-configuration#defaultdatabaseconnection-string-)を使用すると、デフォルトで使用するデータベース接続を指定できます。
## 利用可能な接続をプログラムで絞り込む
Lock の [`allowedConnections` オプション](/ja/docs/libraries/lock/lock-configuration#allowedconnections-array-) を使用すると、利用可能な接続のうち、どれをユーザーに選択肢として表示するかを指定できます。
これにより、追加の入力やコンテキストに応じて、ユーザー体験を調整できます (例: 「学生としてログインするにはこちらをクリック、教職員としてログインするにはこちらをクリックしてください」) 。
export const codeExample = `var lock = new Auth0Lock(
'{yourClientId}',
'{yourDomain}',
{
allowedConnections: ['yourConnection'];
}
);`;
ユースケースによっては初期化時に指定するのが適切でない場合、`lock.show()` メソッドに `allowedConnections` オプションを渡すこともできます。詳細については、`show` メソッドの [API ドキュメント](/ja/docs/libraries/lock/lock-api-reference) を参照してください。
## アプリケーションから レルム 情報を送信する
認証を要求するアプリケーションでは、ユーザーが使用する予定の レルム を事前に把握できる場合があります。たとえば、マルチテナントアプリケーションでは、`https://{customer}.yoursite.com` や `https://www.yoursite.com/{customer}` の形式の URL を使用することがあります。ユーザーがその独自 URL でアプリケーションにアクセスした場合は、その `tenant` の値を取得し、`authorize` リクエストの `login_hint` として渡せます。
`https://{yourDomain}/authorize?client_id=[...]&login_hint={customer}`
`login_hint` は、ユーザーがログインに使用する可能性があるものを示すための、認可サーバー (Auth0) へのヒントです。この場合は、ユーザーがアクセスした URL に基づいて、"customer" を レルム として扱います。
デフォルトのホスト型ログインページのコードでは、これを使って Lock のメールアドレス欄を事前入力しますが、実際のメールアドレスではなく realm が指定された場合に使用するデフォルトのデータベース接続を変更するようにコードを修正できます。
```js lines expandable theme={null}
// デフォルトのホスト型ログインページテンプレートより
var config = JSON.parse(decodeURIComponent(escape(window.atob('@@config@@'))));
[...]
var loginHint = config.extraParams.login_hint;
var realmHint;
// ログインヒントがメールアドレスでない場合、レルムヒントとして扱う
if (loginHint && loginHint.indexOf('@') < 0) {
realmHint = loginHint;
loginHint = null;
}
// レルムを実際のデータベースにマッピングする
var defaultDatabaseConnection;
if (realmHint === 'acme') {
defaultDatabaseConnection = 'acme-users';
} else if (realmHint === 'auth0') {
defaultDatabaseConnection = 'auth0-DB';
}
// Lock の設定時に、上記で取得した値を指定する
var lock = new Auth0Lock(config.clientID, config.auth0Domain, {
[...] // その他のオプション
prefill: loginHint ? { email: loginHint, username: loginHint } : null,
defaultDatabaseConnection: defaultDatabaseConnection
}
```
もちろん、上記のコードは単なるサンプルにすぎません。このロジックは、ソーシャル接続を除外したり、メールアドレスが `login_hint` として指定されている場合でも使用するデフォルトの接続を設定したりするように拡張できます。
この例で "customer" を レルム としてマッピングしているのは、あくまで任意の設計上の判断です。ただし一般的には、アプリケーションを Auth0 内で使われる実際の "接続" の概念から切り離し、代わりにより抽象的な "レルム" の概念を使うのがよいでしょう。必要に応じて変更しやすい ホスト型ログインページ 内で、realm から接続へのマッピングを行うこともできます。