## 仕組み
以下の手順では、トークンがどのように取得され、使用されるかを示します。このアプローチでは、従来の[Authorization Code Flow with Proof Key for Code Exchange](/ja/docs/get-started/authentication-and-authorization-flow/authorization-code-flow-with-pkce)の代わりに、[Implicit Flow with Form Post](/ja/docs/get-started/authentication-and-authorization-flow/implicit-flow-with-form-post)を使用します。これは、アクセス先が自分のリソースである場合、Form Post Response Mode のほうがログインの実装が簡単だからです。
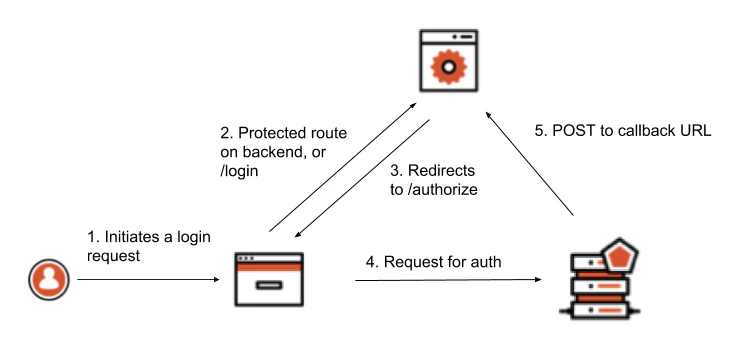
 1. ユーザーがブラウザーで保護されたルートにアクセスするか、認証ステップの開始が必要な操作 (Login ボタンのクリックなど) を行います
2. ブラウザークライアントは、ユーザーの操作内容に応じて、バックエンドの`/login`ルート、または保護されたルートにリダイレクトされます
3. バックエンドは認可サーバーの`/authorize`エンドポイントへのリクエストを作成し、ブラウザークライアントをそこにリダイレクトします
4. ユーザーは、認可サーバーが提示する方法で認証を行います
5. 認可サーバーは、URL エンコードされたフォーム POST として、リダイレクト URI にトークンを POST します。バックエンドは本文データを解析して、それらのトークンを取得できます。
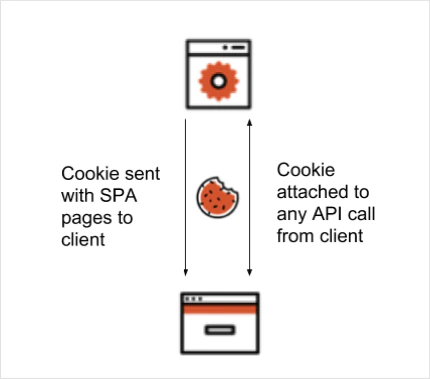
この時点で、ユーザーは認証済みとなり、バックエンドは必要なトークンを取得しています。これで、この状態をクライアント側で表す cookie を作成できます。続いて、クライアントブラウザーは SPA を提供するルートにリダイレクトされ、認証 cookie も受け取ります。
以後、AJAX 呼び出しで API 呼び出しを行う際には、この cookie がクライアントとバックエンドの間でやり取りされます。各リクエストで、バックエンドは cookie が引き続き有効かどうかを検証し、有効であればリクエストの続行を許可します。
1. ユーザーがブラウザーで保護されたルートにアクセスするか、認証ステップの開始が必要な操作 (Login ボタンのクリックなど) を行います
2. ブラウザークライアントは、ユーザーの操作内容に応じて、バックエンドの`/login`ルート、または保護されたルートにリダイレクトされます
3. バックエンドは認可サーバーの`/authorize`エンドポイントへのリクエストを作成し、ブラウザークライアントをそこにリダイレクトします
4. ユーザーは、認可サーバーが提示する方法で認証を行います
5. 認可サーバーは、URL エンコードされたフォーム POST として、リダイレクト URI にトークンを POST します。バックエンドは本文データを解析して、それらのトークンを取得できます。
この時点で、ユーザーは認証済みとなり、バックエンドは必要なトークンを取得しています。これで、この状態をクライアント側で表す cookie を作成できます。続いて、クライアントブラウザーは SPA を提供するルートにリダイレクトされ、認証 cookie も受け取ります。
以後、AJAX 呼び出しで API 呼び出しを行う際には、この cookie がクライアントとバックエンドの間でやり取りされます。各リクエストで、バックエンドは cookie が引き続き有効かどうかを検証し、有効であればリクエストの続行を許可します。
 このアプローチを実装する場合は、認証 Cookie が無効、または存在しないケースを処理する必要があります。クライアントからバックエンドへの API 呼び出しはバックグラウンドで行われるため、ユーザーの再認証が必要であることを示すサーバーからのレスポンスは、クライアント側で処理しなければなりません。
次のサンプルアプリケーションでは、このケースを単純な方法で処理しており、API 呼び出しの結果が 302 Redirect だった場合に、ユーザーに再認証を促します。302 が発生するのは、Cookie の検証に失敗すると、サーバーが
このアプローチを実装する場合は、認証 Cookie が無効、または存在しないケースを処理する必要があります。クライアントからバックエンドへの API 呼び出しはバックグラウンドで行われるため、ユーザーの再認証が必要であることを示すサーバーからのレスポンスは、クライアント側で処理しなければなりません。
次のサンプルアプリケーションでは、このケースを単純な方法で処理しており、API 呼び出しの結果が 302 Redirect だった場合に、ユーザーに再認証を促します。302 が発生するのは、Cookie の検証に失敗すると、サーバーが
## 例
このサンプルアプリケーションでは、Node.js と Express を使用して、上記の概念を説明します。
### 前提条件
* 手順を進める前に、[最新バージョンの Node](https://nodejs.org/en/download/) がインストールされていることを確認してください。
* Node をインストールしたら、[ソースコードをダウンロードまたはクローン](https://github.com/auth0-blog/spa-cookie-demo/) し、ターミナルでプロジェクトフォルダーを開きます。
```bash lines theme={null}
# SSH を使用してチュートリアルのリポジトリをクローンします
git clone git@github.com:auth0-blog/spa-cookie-demo
# ... または、HTTPS を使用する場合:
git clone https://github.com/auth0-blog/spa-cookie-demo.git
# プロジェクトディレクトリに移動します
cd spa-cookie-demo
```
* `master` ブランチは、認証をまだ追加していない状態のアプリケーションを表します。アプリケーションの完成版を参照する場合は、`with-oidc` ブランチをチェックアウトしてください。
`git checkout with-oidc`
### Node.js アプリを初期化する
ターミナルウィンドウで `npm install` を実行し、アプリケーションの依存関係をインストールします。アプリケーションを実行するには、`npm run dev` を使用します。これにより Express サーバーが起動します。ブラウザーで [http://localhost:3000](http://localhost:3000/) にアクセスして、アプリケーションを表示します。
開発サーバーでは `nodemon` を使用しており、ファイルの変更が検出されると自動的に再起動します。
### アプリケーションを確認する
[http://localhost:3000](http://localhost:3000/) でアプリケーションを開き、**Call API** ボタンをクリックします。画面にメッセージが表示されるはずです。
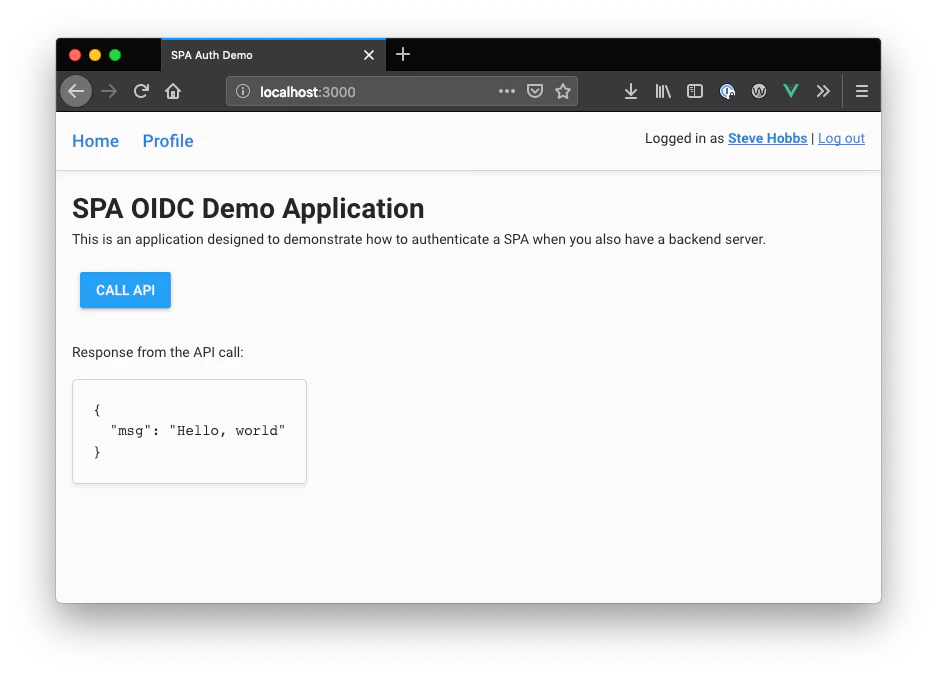 ログインしていなくても API 呼び出しを実行できることがわかります。これを修正するために、API 呼び出しを行う前にユーザーの認証を必須にするミドルウェアを追加しましょう。
### 環境を設定する
アプリケーションで認証を機能させるには、`express-openid-connect` でいくつかの環境変数が必要です。このアプリケーションでは、これらの変数を `.env` ファイルで指定できます。プロジェクトディレクトリのルートに `.env` ファイルを作成し、次の内容を記述します。
```shell .env lines theme={null}
ISSUER_BASE_URL="
### Auth0 でアプリを設定する
1. [Dashboard > Applications > Applications](https://manage.auth0.com/#/applications) に移動し、**Create Application** をクリックします。
2. 新しいアプリに名前を付け、**Regular Web Applications** を選択して、**Create** をクリックします。
3. 新しいアプリの **Settings** で、**Allowed Callback URLs** に `http:/localhost:3000/callback` を追加します。
4. **Allowed Logout URLs** に `http:/localhost:3000` を追加します。
5. **Save Changes** をクリックします。
6. [Dashboard > Authentication > Social](https://manage.auth0.com/#/connections/social) に移動し、いくつかのソーシャル接続を設定します。**Connections** タブの **Application** オプションで、これらをアプリに対して有効にします。この例では、username/password データベース、Facebook、Google、X を使用します。
7. **Settings** 画面で、上部に表示されているドメインとクライアントIDを控えておきます。
8. アプリケーションで設定する必要がある値が 2 つあります。`.env` ファイルを再度開き、これらの値を設定します。
### アプリを実行する
1. サーバーと環境の設定が完了したら、アプリケーションを開いているブラウザーウィンドウを確認します。ブラウザーを閉じてサーバーを停止している場合は、ターミナルで次のコマンドを実行してアプリケーションを再起動します。
`npm run dev`
2. ブラウザーで `http://localhost:3000` を開きます。見た目はこれまでと変わりませんが、今回は **Call API** ボタンをクリックすると、ユーザーがログインしていないという警告が表示されます。また、API 呼び出しが拒否されているため、以前のように "Hello, World" メッセージは表示されません。
3. **Log in now** をクリックしてログインします。認証が完了するとアプリに戻り、ログイン状態が反映された UI が表示されます。再度 **Call API** ボタンを押してサーバーへの API 呼び出しを実行すると、今度は正常に動作します。
4. ページ上部の **Profile** リンクをクリックすると、IDトークンから取得したユーザー情報が表示されます。
## 関連情報
* [Form Post を使用する Implicit Flow](/ja/docs/get-started/authentication-and-authorization-flow/implicit-flow-with-form-post)
* [セキュリティ](/ja/docs/secure)
* [SameSite Cookie 属性の変更](/ja/docs/manage-users/cookies/samesite-cookie-attribute-changes)