> ## Documentation Index
> Fetch the complete documentation index at: https://translations.mintlify.site/llms.txt
> Use this file to discover all available pages before exploring further.
> My Account API を使用して、ユーザーが自身のアカウント情報を管理できるようにする方法について説明します。
# My Account API
export const AuthCodeGroup = ({children, dropdown}) => {
const [processedChildren, setProcessedChildren] = useState(children);
useEffect(() => {
let unsubscribe = null;
function init() {
unsubscribe = window.autorun(() => {
const processChildren = node => {
if (typeof node === "string") {
let processedNode = node;
for (const [key, value] of window.rootStore.variableStore.values.entries()) {
const escapedKey = key.replaceAll(/[.*+?^${}()|[\]\\]/g, (String.raw)`\$&`);
processedNode = processedNode.replaceAll(new RegExp(escapedKey, "g"), value);
}
return processedNode;
} else if (Array.isArray(node)) {
return node.map(processChildren);
} else if (node && node.props && node.props.children) {
return {
...node,
props: {
...node.props,
children: processChildren(node.props.children)
}
};
}
return node;
};
setProcessedChildren(processChildren(children));
});
}
if (window.rootStore) {
init();
} else {
window.addEventListener("adu:storeReady", init);
}
return () => {
window.removeEventListener("adu:storeReady", init);
unsubscribe?.();
};
}, [children]);
return {processedChildren};
};
export const AuthCodeBlock = ({filename, icon, language, highlight, children}) => {
const [displayText, setDisplayText] = useState(children);
const [copyText, setCopyText] = useState(children);
const wrapperRef = React.useRef(null);
useEffect(() => {
let unsubscribe = null;
function init() {
if (!window.autorun || !window.rootStore) {
return;
}
unsubscribe = window.autorun(() => {
let processedChildrenForDisplay = children;
let processedChildrenForCopy = children;
for (const [key, value] of window.rootStore.variableStore.values.entries()) {
const escapedKey = key.replaceAll(/[.*+?^${}()|[\]\\]/g, (String.raw)`\$&`);
let displayValue = value;
if (key === "{yourClientSecret}" && value !== "{yourClientSecret}") {
displayValue = value.substring(0, 3) + "*****マスク済み*****";
}
processedChildrenForDisplay = processedChildrenForDisplay.replaceAll(new RegExp(escapedKey, "g"), displayValue);
processedChildrenForCopy = processedChildrenForCopy.replaceAll(new RegExp(escapedKey, "g"), value);
}
setDisplayText(processedChildrenForDisplay);
setCopyText(processedChildrenForCopy);
});
}
if (window.rootStore) {
init();
} else {
window.addEventListener("adu:storeReady", init);
}
return () => {
window.removeEventListener("adu:storeReady", init);
unsubscribe?.();
};
}, [children]);
useEffect(() => {
if (!wrapperRef.current) return;
const originalWriteText = navigator.clipboard.writeText.bind(navigator.clipboard);
let isOverriding = false;
const handleClick = e => {
const button = e.target.closest('[data-testid="copy-code-button"]');
if (!button || !wrapperRef.current.contains(button)) return;
isOverriding = true;
navigator.clipboard.writeText = text => {
if (isOverriding) {
isOverriding = false;
navigator.clipboard.writeText = originalWriteText;
return originalWriteText(copyText);
}
return originalWriteText(text);
};
setTimeout(() => {
if (isOverriding) {
isOverriding = false;
navigator.clipboard.writeText = originalWriteText;
}
}, 100);
};
const wrapper = wrapperRef.current;
wrapper.addEventListener('click', handleClick, true);
return () => {
wrapper.removeEventListener('click', handleClick, true);
if (navigator.clipboard.writeText !== originalWriteText) {
navigator.clipboard.writeText = originalWriteText;
}
};
}, [copyText]);
return
{displayText}
;
};
My Account API は Early Access で提供されています。アクセスをリクエストするには、Auth0 のアカウントマネージャーに連絡するか、[Auth0 Support](https://support.auth0.com) にお問い合わせください。Auth0 の製品リリースサイクルの詳細については、[Product Release Stages](/ja/docs/troubleshoot/product-lifecycle/product-release-stages) を参照してください。
Auth0 My Account API は、ユーザーが自身のアカウント情報を管理するための専用のエンドポイント群を提供します。お客様はこれらの API を使用して、アプリケーション内にセルフサービス機能を構築したり、ユーザーアカウントに詳細情報を段階的に追加したりできます。
My Account API は、現在ログインしているユーザーのコンテキストで動作し、ユーザー向けアプリケーション内で直接使用できます。
**Auth0 ドメインとカスタムドメインの使い分け**
My Account API では、正規の Auth0 ドメインまたはカスタムドメインを使用できますが、以下を含むプロセス全体で同じドメインを使用する必要があります。
* アクセストークンの取得
* `audience` 値の設定
* My Account API エンドポイントの呼び出し
詳細については、[Custom Domains](/ja/docs/customize/custom-domains) を参照してください。
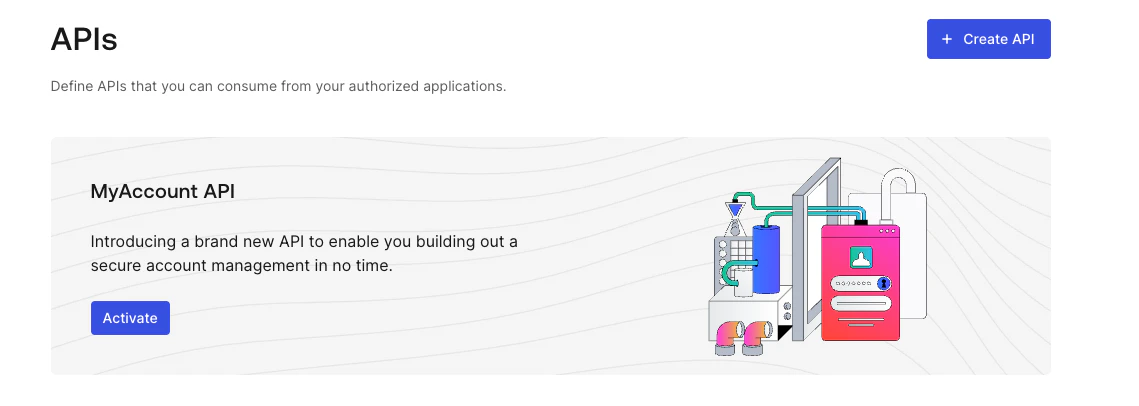
## My Account API を有効にする
Auth0 Dashboard で、テナントの My Account API を有効にできます。
1. **Applications > APIs** に移動します。
2. **MyAccount API** バナーを探します。
3. **Activate** を選択します。
 デフォルトでは、My Account API は次のアプリケーション API アクセスポリシーで作成されます。
* ユーザーフローの場合は `require_client_grant`
* クライアント (マシン間) フローの場合は `deny_all`
アプリケーションがユーザーに代わって My Account API にアクセスするには、そのアプリケーションのクライアントグラントを明示的に作成する必要があります。これにより、そのアプリケーションが要求できる最大スコープを定義できます。あるいは、ユーザーアクセスフローのポリシーを `allow_all` に変更することもできます。これにより、テナント内の任意のアプリケーションが My Account API に対して任意のスコープを要求できるようになります。
Auth0 では、ユーザーアクセスフローに `allow_all` を使用することは推奨していません。My Account API では機微な情報や操作が公開されるためです。アプリケーションが本当に必要なものにのみアクセスできるようにし、潜在的なセキュリティリスクを最小限に抑えるため、My Account API では最小権限の原則に従う必要があります。
アプリケーションに最終的に付与される権限は、アプリケーション API アクセスポリシーで許可されたスコープ、エンドユーザーに割り当てられた Role-Based Access Control (RBAC) の権限、およびユーザーの同意 (該当する場合) の積集合によって決まります。
My Account API へのクライアントアクセス用のアプリケーション API ポリシーは更新できません。つまり、Client Credentials Flow を使用して My Account API にアクセスすることはできません。
アプリケーション API アクセスポリシーと、それに関連付けられたクライアントグラントの管理方法について詳しくは、[Application Access to APIs: Client Grants](/ja/docs/get-started/applications/application-access-to-apis-client-grants) を参照してください。
デフォルトでは、My Account API は次のアプリケーション API アクセスポリシーで作成されます。
* ユーザーフローの場合は `require_client_grant`
* クライアント (マシン間) フローの場合は `deny_all`
アプリケーションがユーザーに代わって My Account API にアクセスするには、そのアプリケーションのクライアントグラントを明示的に作成する必要があります。これにより、そのアプリケーションが要求できる最大スコープを定義できます。あるいは、ユーザーアクセスフローのポリシーを `allow_all` に変更することもできます。これにより、テナント内の任意のアプリケーションが My Account API に対して任意のスコープを要求できるようになります。
Auth0 では、ユーザーアクセスフローに `allow_all` を使用することは推奨していません。My Account API では機微な情報や操作が公開されるためです。アプリケーションが本当に必要なものにのみアクセスできるようにし、潜在的なセキュリティリスクを最小限に抑えるため、My Account API では最小権限の原則に従う必要があります。
アプリケーションに最終的に付与される権限は、アプリケーション API アクセスポリシーで許可されたスコープ、エンドユーザーに割り当てられた Role-Based Access Control (RBAC) の権限、およびユーザーの同意 (該当する場合) の積集合によって決まります。
My Account API へのクライアントアクセス用のアプリケーション API ポリシーは更新できません。つまり、Client Credentials Flow を使用して My Account API にアクセスすることはできません。
アプリケーション API アクセスポリシーと、それに関連付けられたクライアントグラントの管理方法について詳しくは、[Application Access to APIs: Client Grants](/ja/docs/get-started/applications/application-access-to-apis-client-grants) を参照してください。
## デフォルトポリシー設定
**My Account API** の Authentication Assurance は現在、単一オプションのポリシーで提供される Early Access 段階です。この機能を使用すると、Okta の [Master Subscription Agreement](https://www.okta.com/legal) に記載されている該当する Free Trial 条項に同意したものとみなされます。Auth0 の製品リリースサイクルの詳細については、[Product Release Stages](/ja/docs/troubleshoot/product-lifecycle/product-release-stages) を参照してください。プログラムへの参加を希望する場合は、[Auth0 Support](https://support.auth0.com) にお問い合わせください。
デフォルトポリシーは、[Step-up Authentication](/ja/docs/secure/multi-factor-authentication/step-up-authentication) を必須にすることで、My Account API に組み込みの認証保証を提供します。有効にすると、Auth0 はユーザーが直近に認証を行っており、かつ第 2 要素でも認証済みであることを自動的に強制します。
このポリシーでは、15 分以内に実施された 2FA を要求します。Auth0 はこのルールをログイン時と、すべてのリフレッシュトークン交換時に適用します。
* ユーザーに登録済みの MFA 要素がある場合、ログイン時に 2FA を完了している必要があり、さらにトークンの経過時間が 15 分を超えると再度 2FA を完了する必要があります。
* ユーザーに登録可能な要素がない場合、Auth0 は初回アクセスを許可しますが、15 分経過後のリフレッシュトークン交換では `unmet_authentication_requirements` エラーを返します。
デフォルトポリシーは Classic Login と互換性がありません。テナントで Universal Login またはサポートされている埋め込みフロー ([Resource Owner Password Flow](/ja/docs/get-started/authentication-and-authorization-flow/resource-owner-password-flow) または [native passkeys](/ja/docs/authenticate/database-connections/passkeys/native-passkeys-api)) を使用している場合に、この機能を有効にしてください。
### デフォルトポリシー を有効にする
My Account API の デフォルトポリシー を有効にするには、次の手順に従います。
1. [**Applications > APIs**](https://manage.auth0.com/#/apis) に移動し、**My Account API** を選択します。
2. **Settings** タブを選択します。
3. **デフォルトポリシー** で、**Require 2FA** をオンにします。
4. **Save** を選択します。
テナントで デフォルトポリシー が有効になっている場合、新しい My Account API が作成されるたびに自動的に関連付けられます。
### 認証要件の階層
デフォルトポリシーは、テナントレベルの MFA ポリシーと、Actions で定義する MFA ロジックの中間に位置します。
1. **テナントの MFA ポリシー** — テナント内のすべての認証に適用される基本のデフォルト
2. **デフォルトポリシー** — My Account API に対してのみ、テナントレベルの設定を上書きします
3. **Actions** — Actions 内の MFA コマンドは、常にこの両方より優先されます
### デフォルトポリシーの動作
この動作は、ユーザーが登録可能な第2要素を持っているかどうかによって異なります。
**MFA 要素が登録されているユーザー**
TOTP、メールアドレス、またはその他のサポートされている要素を登録しているユーザーの場合:
1. ログイン時に、Auth0 はトークンを発行する前に、登録済みの要素でユーザーに追加認証を求めます。
2. リフレッシュトークンには、認証方法とタイムスタンプ (AMR) が記録されます。
3. 最後の追加認証から 15 分以内にリフレッシュトークンを交換した場合、Auth0 は再度追加認証を求めることなく新しいアクセストークンを発行します。
4. 最後の追加認証から 15 分を過ぎてリフレッシュトークンを交換した場合、Auth0 はトークンを発行する前に再度ユーザーに追加認証を求めます。
**MFA 要素が登録されていないユーザー**
検証済みのメールアドレスがなく、登録済みの要素もないユーザーの場合:
1. ログイン時に、Auth0 は第2要素なしでアクセスを許可します。
2. 15 分以内にリフレッシュトークンを交換した場合、Auth0 は追加認証なしで新しいアクセストークンを発行します。
3. 15 分を過ぎてリフレッシュトークンを交換した場合、Auth0 は `unmet_authentication_requirements` エラーを返します。
リフレッシュトークンの交換時に `unmet_authentication_requirements` が返された場合、そのトークンは更新できません。新しいトークンを取得するには、アプリケーションで認証フロー全体を最初からやり直す必要があります。
15 分経過後にユーザーがポリシーの要件を満たせない場合は、サイレントログイン (`prompt=none`) でも同じエラーが返されます。
## アクセストークンを取得する
My Account API のアクセストークンは、自分で管理する API のアクセストークンを取得する場合と同じ方法で取得できます。
デフォルトポリシー の要件を超える認証保証が必要な場合 (たとえば、特定の認証要素を必須にする、または一部の操作にのみ要件を適用する場合) は、[step-up authentication](/ja/docs/secure/multi-factor-authentication/step-up-authentication) と [Actions](/ja/docs/customize/actions) を使用して、カスタム MFA ロジックを定義できます。なお、Actions は常に デフォルトポリシー より優先されます。
Universal Loginを使用している場合は、次の記事を参照してください。
* [認可コードフローを使用して API を呼び出す](/ja/docs/get-started/authentication-and-authorization-flow/authorization-code-flow/call-your-api-using-the-authorization-code-flow)
* [PKCE を使用する認可コードフローで API を呼び出す](/ja/docs/get-started/authentication-and-authorization-flow/authorization-code-flow-with-pkce/call-your-api-using-the-authorization-code-flow-with-pkce)
埋め込みログインを使用している場合は、次の記事を参照してください。
* [Resource Owner Password Flow を使用して API を呼び出す](/ja/docs/get-started/authentication-and-authorization-flow/resource-owner-password-flow/call-your-api-using-resource-owner-password-flow)
* [Native Passkeys API のログインフロー](/ja/docs/authenticate/database-connections/passkeys/native-passkeys-api#login-flow)
### 対象者
My Account API のオーディエンスは `https://{yourDomain}/me/` です。
### スコープ
My Account API では、次のスコープをサポートしています。
| スコープ | 説明 |
| ---------------------------------- | ---------------------- |
| `create:me:authentication_methods` | ユーザーは新しい認証方法を登録できます。 |
| `read:me:authentication_methods` | ユーザーは既存の認証方法を表示できます。 |
| `update:me:authentication_methods` | ユーザーは既存の認証方法を変更できます。 |
| `delete:me:authentication_methods` | ユーザーは既存の認証方法を変更できます。 |
| `read:me:factors` | ユーザーは登録可能な認証要素を表示できます。 |
[Connected Accounts with Token Vault](/ja/docs/secure/call-apis-on-users-behalf/token-vault/connected-accounts-for-token-vault) では、My Account API は次のスコープをサポートしています。
| スコープ | 説明 |
| ------------------------------ | ----------------------------------------------- |
| `create:me:connected_accounts` | ユーザーは新しいアカウントを自分のユーザープロファイルに接続できます。 |
| `read:me:connected_accounts` | ユーザーは自分のユーザープロファイルにリンクされている既存の接続済みアカウントを表示できます。 |
| `delete:me:connected_accounts` | ユーザーは自分のユーザープロファイルから接続済みアカウントを削除できます。 |
### 例
#### 認可コードフローを使用した Universal Login
##### ステップ 1: 認可コードをリクエストする
```bash cURL theme={null}
curl --request GET \
--url 'https://{yourDomain}/authorize?response_type=code&client_id={yourClientId}&redirect_uri=%7ByourRedirectUri%7D&scope=create%3Ame%3Aauthentication_methods&offline_access=&audience=https%3A%2F%2F{yourDomain}%2Fme%2F'
```
```csharp C# theme={null}
var client = new RestClient("https://{yourDomain}/authorize?response_type=code&client_id={yourClientId}&redirect_uri=%7ByourRedirectUri%7D&scope=create%3Ame%3Aauthentication_methods&offline_access=&audience=https%3A%2F%2F{yourDomain}%2Fme%2F");
var request = new RestRequest(Method.GET);
IRestResponse response = client.Execute(request);
```
```go Go theme={null}
package main
import (
"fmt"
"net/http"
"io/ioutil"
)
func main() {
url := "https://{yourDomain}/authorize?response_type=code&client_id={yourClientId}&redirect_uri=%7ByourRedirectUri%7D&scope=create%3Ame%3Aauthentication_methods&offline_access=&audience=https%3A%2F%2F{yourDomain}%2Fme%2F"
req, _ := http.NewRequest("GET", url, nil)
res, _ := http.DefaultClient.Do(req)
defer res.Body.Close()
body, _ := ioutil.ReadAll(res.Body)
fmt.Println(res)
fmt.Println(string(body))
}
```
```java Java theme={null}
HttpResponse response = Unirest.get("https://{yourDomain}/authorize?response_type=code&client_id={yourClientId}&redirect_uri=%7ByourRedirectUri%7D&scope=create%3Ame%3Aauthentication_methods&offline_access=&audience=https%3A%2F%2F{yourDomain}%2Fme%2F")
.asString();
```
```javascript Node.JS theme={null}
var axios = require("axios").default;
var options = {
method: 'GET',
url: 'https://{yourDomain}/authorize',
params: {
response_type: 'code',
client_id: '{yourClientId}',
redirect_uri: '{yourRedirectUri}',
scope: 'create:me:authentication_methods',
offline_access: '',
audience: 'https://{yourDomain}/me/'
}
};
axios.request(options).then(function (response) {
console.log(response.data);
}).catch(function (error) {
console.error(error);
});
```
```php PHP theme={null}
$curl = curl_init();
curl_setopt_array($curl, [
CURLOPT_URL => "https://{yourDomain}/authorize?response_type=code&client_id={yourClientId}&redirect_uri=%7ByourRedirectUri%7D&scope=create%3Ame%3Aauthentication_methods&offline_access=&audience=https%3A%2F%2F{yourDomain}%2Fme%2F",
CURLOPT_RETURNTRANSFER => true,
CURLOPT_ENCODING => "",
CURLOPT_MAXREDIRS => 10,
CURLOPT_TIMEOUT => 30,
CURLOPT_HTTP_VERSION => CURL_HTTP_VERSION_1_1,
CURLOPT_CUSTOMREQUEST => "GET",
]);
$response = curl_exec($curl);
$err = curl_error($curl);
curl_close($curl);
if ($err) {
echo "cURL Error #:" . $err;
} else {
echo $response;
}
```
```python Python theme={null}
import http.client
conn = http.client.HTTPSConnection("")
conn.request("GET", "/{yourDomain}/authorize?response_type=code&client_id={yourClientId}&redirect_uri=%7ByourRedirectUri%7D&scope=create%3Ame%3Aauthentication_methods&offline_access=&audience=https%3A%2F%2F{yourDomain}%2Fme%2F")
res = conn.getresponse()
data = res.read()
print(data.decode("utf-8"))
```
```ruby Ruby theme={null}
require 'uri'
require 'net/http'
require 'openssl'
url = URI("https://{yourDomain}/authorize?response_type=code&client_id={yourClientId}&redirect_uri=%7ByourRedirectUri%7D&scope=create%3Ame%3Aauthentication_methods&offline_access=&audience=https%3A%2F%2F{yourDomain}%2Fme%2F")
http = Net::HTTP.new(url.host, url.port)
http.use_ssl = true
http.verify_mode = OpenSSL::SSL::VERIFY_NONE
request = Net::HTTP::Get.new(url)
response = http.request(request)
puts response.read_body
```
##### ステップ 2: code をアクセストークンに交換する
```bash cURL theme={null}
curl --request POST \
--url 'https://{yourDomain}/oauth/token' \
--header 'content-type: application/json' \
--data '{"grant_type": "authorization_code","client_id": "{yourClientId}","client_secret": "{yourClientId}","code": "{yourAuthorizationCode}","redirect_uri": "{yourRedirectUri}","audience": "{yourAudience}","scope": "create:me:authentication_methods","offline_access": ""}'
```
```csharp C# theme={null}
var client = new RestClient("https://{yourDomain}/oauth/token");
var request = new RestRequest(Method.POST);
request.AddHeader("content-type", "application/json");
request.AddParameter("application/json", "{"grant_type": "authorization_code","client_id": "{yourClientId}","client_secret": "{yourClientId}","code": "{yourAuthorizationCode}","redirect_uri": "{yourRedirectUri}","audience": "{yourAudience}","scope": "create:me:authentication_methods","offline_access": ""}", ParameterType.RequestBody);
IRestResponse response = client.Execute(request);
```
```go Go theme={null}
package main
import (
"fmt"
"strings"
"net/http"
"io/ioutil"
)
func main() {
url := "https://{yourDomain}/oauth/token"
payload := strings.NewReader("{"grant_type": "authorization_code","client_id": "{yourClientId}","client_secret": "{yourClientId}","code": "{yourAuthorizationCode}","redirect_uri": "{yourRedirectUri}","audience": "{yourAudience}","scope": "create:me:authentication_methods","offline_access": ""}")
req, _ := http.NewRequest("POST", url, payload)
req.Header.Add("content-type", "application/json")
res, _ := http.DefaultClient.Do(req)
defer res.Body.Close()
body, _ := ioutil.ReadAll(res.Body)
fmt.Println(res)
fmt.Println(string(body))
}
```
```java Java theme={null}
HttpResponse response = Unirest.post("https://{yourDomain}/oauth/token")
.header("content-type", "application/json")
.body("{"grant_type": "authorization_code","client_id": "{yourClientId}","client_secret": "{yourClientId}","code": "{yourAuthorizationCode}","redirect_uri": "{yourRedirectUri}","audience": "{yourAudience}","scope": "create:me:authentication_methods","offline_access": ""}")
.asString();
```
```javascript Node.JS theme={null}
var axios = require("axios").default;
var options = {
method: 'POST',
url: 'https://{yourDomain}/oauth/token',
headers: {'content-type': 'application/json'},
data: {
grant_type: 'authorization_code',
client_id: '{yourClientId}',
client_secret: '{yourClientId}',
code: '{yourAuthorizationCode}',
redirect_uri: '{yourRedirectUri}',
audience: '{yourAudience}',
scope: 'create:me:authentication_methods',
offline_access: ''
}
};
axios.request(options).then(function (response) {
console.log(response.data);
}).catch(function (error) {
console.error(error);
});
```
```php PHP theme={null}
$curl = curl_init();
curl_setopt_array($curl, [
CURLOPT_URL => "https://{yourDomain}/oauth/token",
CURLOPT_RETURNTRANSFER => true,
CURLOPT_ENCODING => "",
CURLOPT_MAXREDIRS => 10,
CURLOPT_TIMEOUT => 30,
CURLOPT_HTTP_VERSION => CURL_HTTP_VERSION_1_1,
CURLOPT_CUSTOMREQUEST => "POST",
CURLOPT_POSTFIELDS => "{"grant_type": "authorization_code","client_id": "{yourClientId}","client_secret": "{yourClientId}","code": "{yourAuthorizationCode}","redirect_uri": "{yourRedirectUri}","audience": "{yourAudience}","scope": "create:me:authentication_methods","offline_access": ""}",
CURLOPT_HTTPHEADER => [
"content-type: application/json"
],
]);
$response = curl_exec($curl);
$err = curl_error($curl);
curl_close($curl);
if ($err) {
echo "cURL Error #:" . $err;
} else {
echo $response;
}
```
```python Python theme={null}
import http.client
conn = http.client.HTTPSConnection("")
payload = "{"grant_type": "authorization_code","client_id": "{yourClientId}","client_secret": "{yourClientId}","code": "{yourAuthorizationCode}","redirect_uri": "{yourRedirectUri}","audience": "{yourAudience}","scope": "create:me:authentication_methods","offline_access": ""}"
headers = { 'content-type': "application/json" }
conn.request("POST", "/{yourDomain}/oauth/token", payload, headers)
res = conn.getresponse()
data = res.read()
print(data.decode("utf-8"))
```
```ruby Ruby theme={null}
require 'uri'
require 'net/http'
require 'openssl'
url = URI("https://{yourDomain}/oauth/token")
http = Net::HTTP.new(url.host, url.port)
http.use_ssl = true
http.verify_mode = OpenSSL::SSL::VERIFY_NONE
request = Net::HTTP::Post.new(url)
request["content-type"] = 'application/json'
request.body = "{"grant_type": "authorization_code","client_id": "{yourClientId}","client_secret": "{yourClientId}","code": "{yourAuthorizationCode}","redirect_uri": "{yourRedirectUri}","audience": "{yourAudience}","scope": "create:me:authentication_methods","offline_access": ""}"
response = http.request(request)
puts response.read_body
```
#### ネイティブパスキーによる埋め込みログイン
##### ステップ 1: ログインチャレンジを要求する
```bash cURL theme={null}
curl --request POST \
--url 'https://{yourDomain}/passkey/challenge' \
--header 'content-type: application/json' \
--data '{"client_id": "{yourDomain}"}'
```
```csharp C# theme={null}
var client = new RestClient("https://{yourDomain}/passkey/challenge");
var request = new RestRequest(Method.POST);
request.AddHeader("content-type", "application/json");
request.AddParameter("application/json", "{"client_id": "{yourDomain}"}", ParameterType.RequestBody);
IRestResponse response = client.Execute(request);
```
```go Go theme={null}
package main
import (
"fmt"
"strings"
"net/http"
"io/ioutil"
)
func main() {
url := "https://{yourDomain}/passkey/challenge"
payload := strings.NewReader("{"client_id": "{yourDomain}"}")
req, _ := http.NewRequest("POST", url, payload)
req.Header.Add("content-type", "application/json")
res, _ := http.DefaultClient.Do(req)
defer res.Body.Close()
body, _ := ioutil.ReadAll(res.Body)
fmt.Println(res)
fmt.Println(string(body))
}
```
```java Java theme={null}
HttpResponse response = Unirest.post("https://{yourDomain}/passkey/challenge")
.header("content-type", "application/json")
.body("{"client_id": "{yourDomain}"}")
.asString();
```
```javascript Node.JS theme={null}
var axios = require("axios").default;
var options = {
method: 'POST',
url: 'https://{yourDomain}/passkey/challenge',
headers: {'content-type': 'application/json'},
data: {client_id: '{yourDomain}'}
};
axios.request(options).then(function (response) {
console.log(response.data);
}).catch(function (error) {
console.error(error);
});
```
```php PHP theme={null}
$curl = curl_init();
curl_setopt_array($curl, [
CURLOPT_URL => "https://{yourDomain}/passkey/challenge",
CURLOPT_RETURNTRANSFER => true,
CURLOPT_ENCODING => "",
CURLOPT_MAXREDIRS => 10,
CURLOPT_TIMEOUT => 30,
CURLOPT_HTTP_VERSION => CURL_HTTP_VERSION_1_1,
CURLOPT_CUSTOMREQUEST => "POST",
CURLOPT_POSTFIELDS => "{"client_id": "{yourDomain}"}",
CURLOPT_HTTPHEADER => [
"content-type: application/json"
],
]);
$response = curl_exec($curl);
$err = curl_error($curl);
curl_close($curl);
if ($err) {
echo "cURL Error #:" . $err;
} else {
echo $response;
}
```
```python Python theme={null}
import http.client
conn = http.client.HTTPSConnection("")
payload = "{"client_id": "{yourDomain}"}"
headers = { 'content-type': "application/json" }
conn.request("POST", "/{yourDomain}/passkey/challenge", payload, headers)
res = conn.getresponse()
data = res.read()
print(data.decode("utf-8"))
```
```ruby Ruby theme={null}
require 'uri'
require 'net/http'
require 'openssl'
url = URI("https://{yourDomain}/passkey/challenge")
http = Net::HTTP.new(url.host, url.port)
http.use_ssl = true
http.verify_mode = OpenSSL::SSL::VERIFY_NONE
request = Net::HTTP::Post.new(url)
request["content-type"] = 'application/json'
request.body = "{"client_id": "{yourDomain}"}"
response = http.request(request)
puts response.read_body
```
##### ステップ 2: 既存ユーザーを認証する
```bash cURL theme={null}
curl --request POST \
--url 'https://{yourDomain}/oauth/token' \
--header 'content-type: application/json' \
--data '{ "grant_type": "urn:okta:params:oauth:grant-type:webauthn", "client_id": "{yourClientId}", "scope": "create:me:authentication_methods offline_access", "audience": "https://{yourDomain}/me/" "auth_session": "{sessionIdFromTheFirstRequest}", "authn_response": "{authenticatorResponse}"}'
```
```csharp C# theme={null}
var client = new RestClient("https://{yourDomain}/oauth/token");
var request = new RestRequest(Method.POST);
request.AddHeader("content-type", "application/json");
request.AddParameter("application/json", "{ "grant_type": "urn:okta:params:oauth:grant-type:webauthn", "client_id": "{yourClientId}", "scope": "create:me:authentication_methods offline_access", "audience": "https://{yourDomain}/me/" "auth_session": "{sessionIdFromTheFirstRequest}", "authn_response": "{authenticatorResponse}"}", ParameterType.RequestBody);
IRestResponse response = client.Execute(request);
```
```go Go theme={null}
package main
import (
"fmt"
"strings"
"net/http"
"io/ioutil"
)
func main() {
url := "https://{yourDomain}/oauth/token"
payload := strings.NewReader("{ "grant_type": "urn:okta:params:oauth:grant-type:webauthn", "client_id": "{yourClientId}", "scope": "create:me:authentication_methods offline_access", "audience": "https://{yourDomain}/me/" "auth_session": "{sessionIdFromTheFirstRequest}", "authn_response": "{authenticatorResponse}"}")
req, _ := http.NewRequest("POST", url, payload)
req.Header.Add("content-type", "application/json")
res, _ := http.DefaultClient.Do(req)
defer res.Body.Close()
body, _ := ioutil.ReadAll(res.Body)
fmt.Println(res)
fmt.Println(string(body))
}
```
```java Java theme={null}
HttpResponse response = Unirest.post("https://{yourDomain}/oauth/token")
.header("content-type", "application/json")
.body("{ "grant_type": "urn:okta:params:oauth:grant-type:webauthn", "client_id": "{yourClientId}", "scope": "create:me:authentication_methods offline_access", "audience": "https://{yourDomain}/me/" "auth_session": "{sessionIdFromTheFirstRequest}", "authn_response": "{authenticatorResponse}"}")
.asString();
```
```javascript Node.JS theme={null}
var axios = require("axios").default;
var options = {
method: 'POST',
url: 'https://{yourDomain}/oauth/token',
headers: {'content-type': 'application/json'},
data: '{ "grant_type": "urn:okta:params:oauth:grant-type:webauthn", "client_id": "{yourClientId}", "scope": "create:me:authentication_methods offline_access", "audience": "https://{yourDomain}/me/" "auth_session": "{sessionIdFromTheFirstRequest}", "authn_response": "{authenticatorResponse}"}'
};
axios.request(options).then(function (response) {
console.log(response.data);
}).catch(function (error) {
console.error(error);
});
```
```php PHP theme={null}
$curl = curl_init();
curl_setopt_array($curl, [
CURLOPT_URL => "https://{yourDomain}/oauth/token",
CURLOPT_RETURNTRANSFER => true,
CURLOPT_ENCODING => "",
CURLOPT_MAXREDIRS => 10,
CURLOPT_TIMEOUT => 30,
CURLOPT_HTTP_VERSION => CURL_HTTP_VERSION_1_1,
CURLOPT_CUSTOMREQUEST => "POST",
CURLOPT_POSTFIELDS => "{ "grant_type": "urn:okta:params:oauth:grant-type:webauthn", "client_id": "{yourClientId}", "scope": "create:me:authentication_methods offline_access", "audience": "https://{yourDomain}/me/" "auth_session": "{sessionIdFromTheFirstRequest}", "authn_response": "{authenticatorResponse}"}",
CURLOPT_HTTPHEADER => [
"content-type: application/json"
],
]);
$response = curl_exec($curl);
$err = curl_error($curl);
curl_close($curl);
if ($err) {
echo "cURL Error #:" . $err;
} else {
echo $response;
}
```
```python Python theme={null}
import http.client
conn = http.client.HTTPSConnection("")
payload = "{ "grant_type": "urn:okta:params:oauth:grant-type:webauthn", "client_id": "{yourClientId}", "scope": "create:me:authentication_methods offline_access", "audience": "https://{yourDomain}/me/" "auth_session": "{sessionIdFromTheFirstRequest}", "authn_response": "{authenticatorResponse}"}"
headers = { 'content-type': "application/json" }
conn.request("POST", "/{yourDomain}/oauth/token", payload, headers)
res = conn.getresponse()
data = res.read()
print(data.decode("utf-8"))
```
```ruby Ruby theme={null}
rrequire 'uri'
require 'net/http'
require 'openssl'
url = URI("https://{yourDomain}/oauth/token")
http = Net::HTTP.new(url.host, url.port)
http.use_ssl = true
http.verify_mode = OpenSSL::SSL::VERIFY_NONE
request = Net::HTTP::Post.new(url)
request["content-type"] = 'application/json'
request.body = "{ "grant_type": "urn:okta:params:oauth:grant-type:webauthn", "client_id": "{yourClientId}", "scope": "create:me:authentication_methods offline_access", "audience": "https://{yourDomain}/me/" "auth_session": "{sessionIdFromTheFirstRequest}", "authn_response": "{authenticatorResponse}"}"
response = http.request(request)
puts response.read_body
```
## クロスオリジンリクエスト
Auth0 テナントとは異なるドメインで実行されるブラウザベースのアプリケーション (Single Page Application など) から My Account API を直接呼び出す場合、Cross-Origin Resource Sharing (CORS) と呼ばれるブラウザのセキュリティポリシーの制約を受けます。既定では、ブラウザはこのようなクロスオリジンリクエストをブロックします。
アプリケーションから API へのリクエストを正常に行えるようにするには、アプリケーションのドメイン (その「origin」) をクライアントの設定に追加する必要があります。
1. [Dashboard > Applications](https://manage.auth0.com/#/applications) に移動します。対象のアプリケーションを選択します。
2. Cross-Origin Authentication で、Allow Cross-Origin Authentication をオンにします。
3. **Allowed Origins (CORS)** を見つけて、アプリケーションの origin URL を入力します。
4. **Save** を選択します。
詳細については、[Configure Cross-Origin Resource Sharing](/ja/docs/get-started/applications/set-up-cors) を参照してください。
アプリケーションで CORS を使用する必要がない場合は、Allow Cross-Origin Authentication がオフになっていることを確認してください。アプリケーションの URL をこの一覧に追加すると、その origin からのリクエストを Auth0 が信頼し、クライアントサイドアプリケーションから API にアクセスできるようになります。