> ## Documentation Index
> Fetch the complete documentation index at: https://translations.mintlify.site/llms.txt
> Use this file to discover all available pages before exploring further.
> Dashboard を使用して Auth0 にユーザーデータを一括インポートおよびエクスポートする方法。
# ユーザーの一括インポート / エクスポート
この機能を使用するには、**Editor - Users** または **Admin** 権限が必要です。Dashboard のロールの詳細については、[ロール別の Dashboard アクセス](/ja/docs/get-started/manage-dashboard-access/feature-access-by-role)を参照してください。
Dashboard を使用して、Auth0 にユーザーデータを一括インポートおよびエクスポートできます。一括インポートとエクスポートは、既存のデータベースから Auth0 へ、または Auth0 から別のサービスへユーザーを移行する場合に便利です。Dashboard から開始したすべてのジョブは記録され、ジョブ ID で追跡されます。
インポートおよびエクスポート可能なユーザープロファイルのフィールド一覧については、[ユーザープロファイル](/ja/docs/manage-users/user-accounts/user-profiles)を参照してください。
### ユーザーのインポート
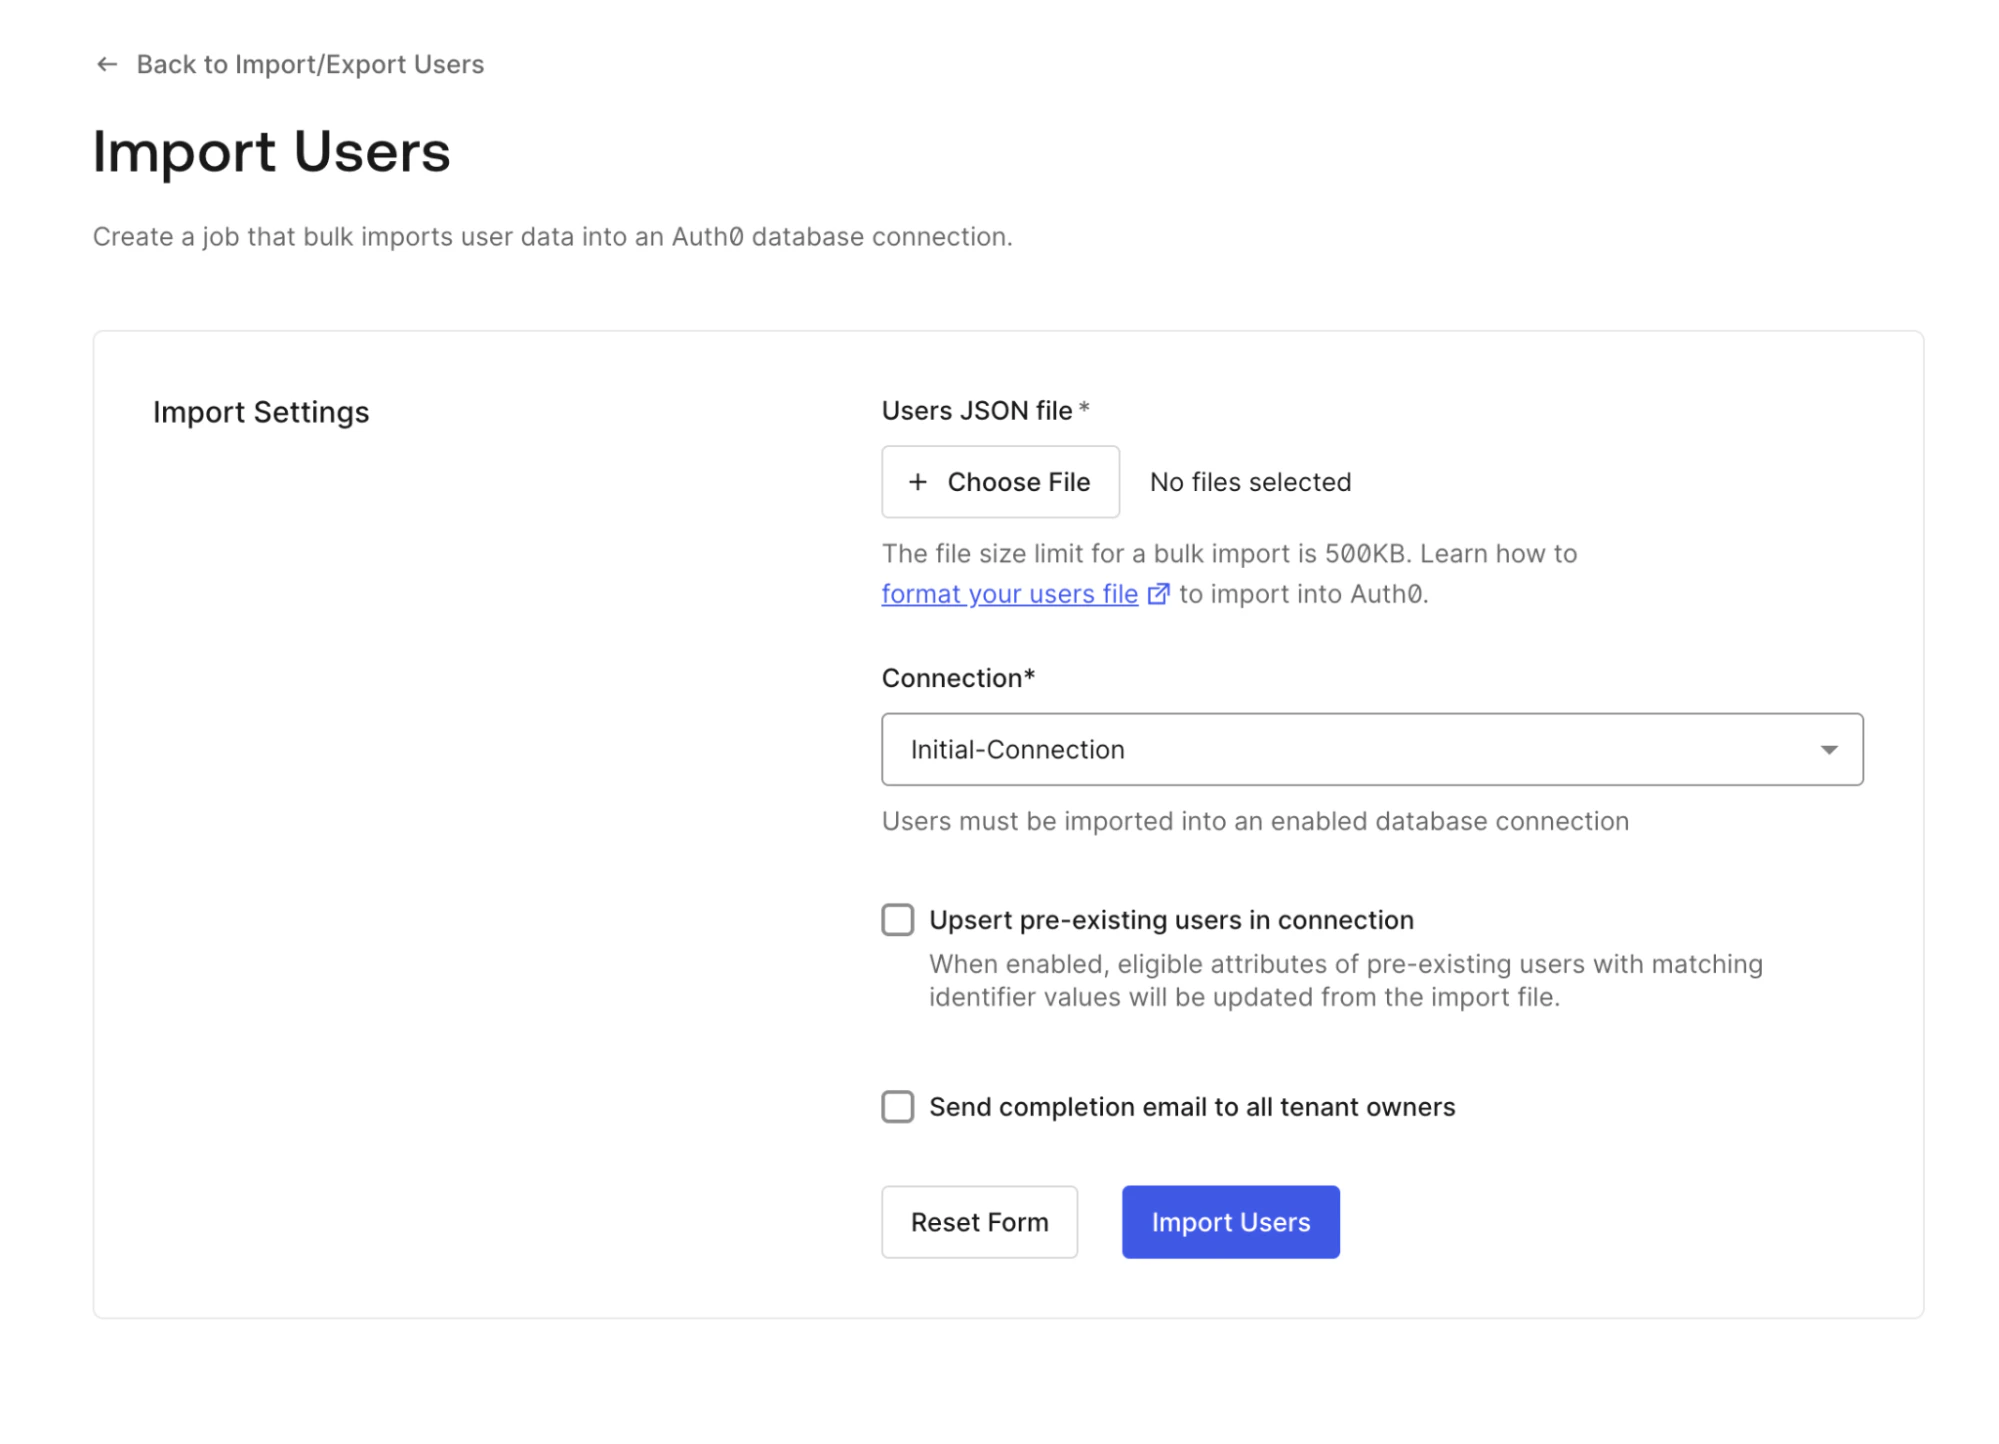
テナントにユーザーをインポートするには、次の手順を実行します。
1. Auth0 Dashboard で [**User Management > Users**](https://manage.auth0.com/#/users) に移動します。テナントにユーザーが存在しない場合は、**Import Users** を選択します。ユーザーが存在する場合は、**Import/Export Users > Import Users** を選択します。
2. [こちらの仕様](/ja/docs/manage-users/user-migration/bulk-user-import-database-schema-and-examples)に従った形式の JSON ファイル (最大ファイルサイズ 500 KB) をアップロードします。
3. ユーザーのインポート先のデータベース接続を選択します。サポートされているのはデータベース接続のみです。また、選択するカスタムデータベースでは、少なくとも 1 つのアプリケーションでインポートモードが有効になっている必要があります。
1. (任意) 一致する識別子を持つ既存のユーザーを更新するには、**Upsert pre-existing users in connection** を選択します
2. (任意) **Send completion email to all tenant owners** を選択します。
4. **Import Users** を選択してジョブを送信します。インポートの送信 1 回につき、送信するジョブは 1 つのみにしてください。
送信したジョブを確認するには、Import/Export Users 画面で **View Jobs** に移動し、任意のジョブの **More info** を選択します。ジョブのステータスには、**Job creation failed**、**Job created, user import failed**、**Job created, user import succeeded** があります。
### ユーザーをエクスポートする
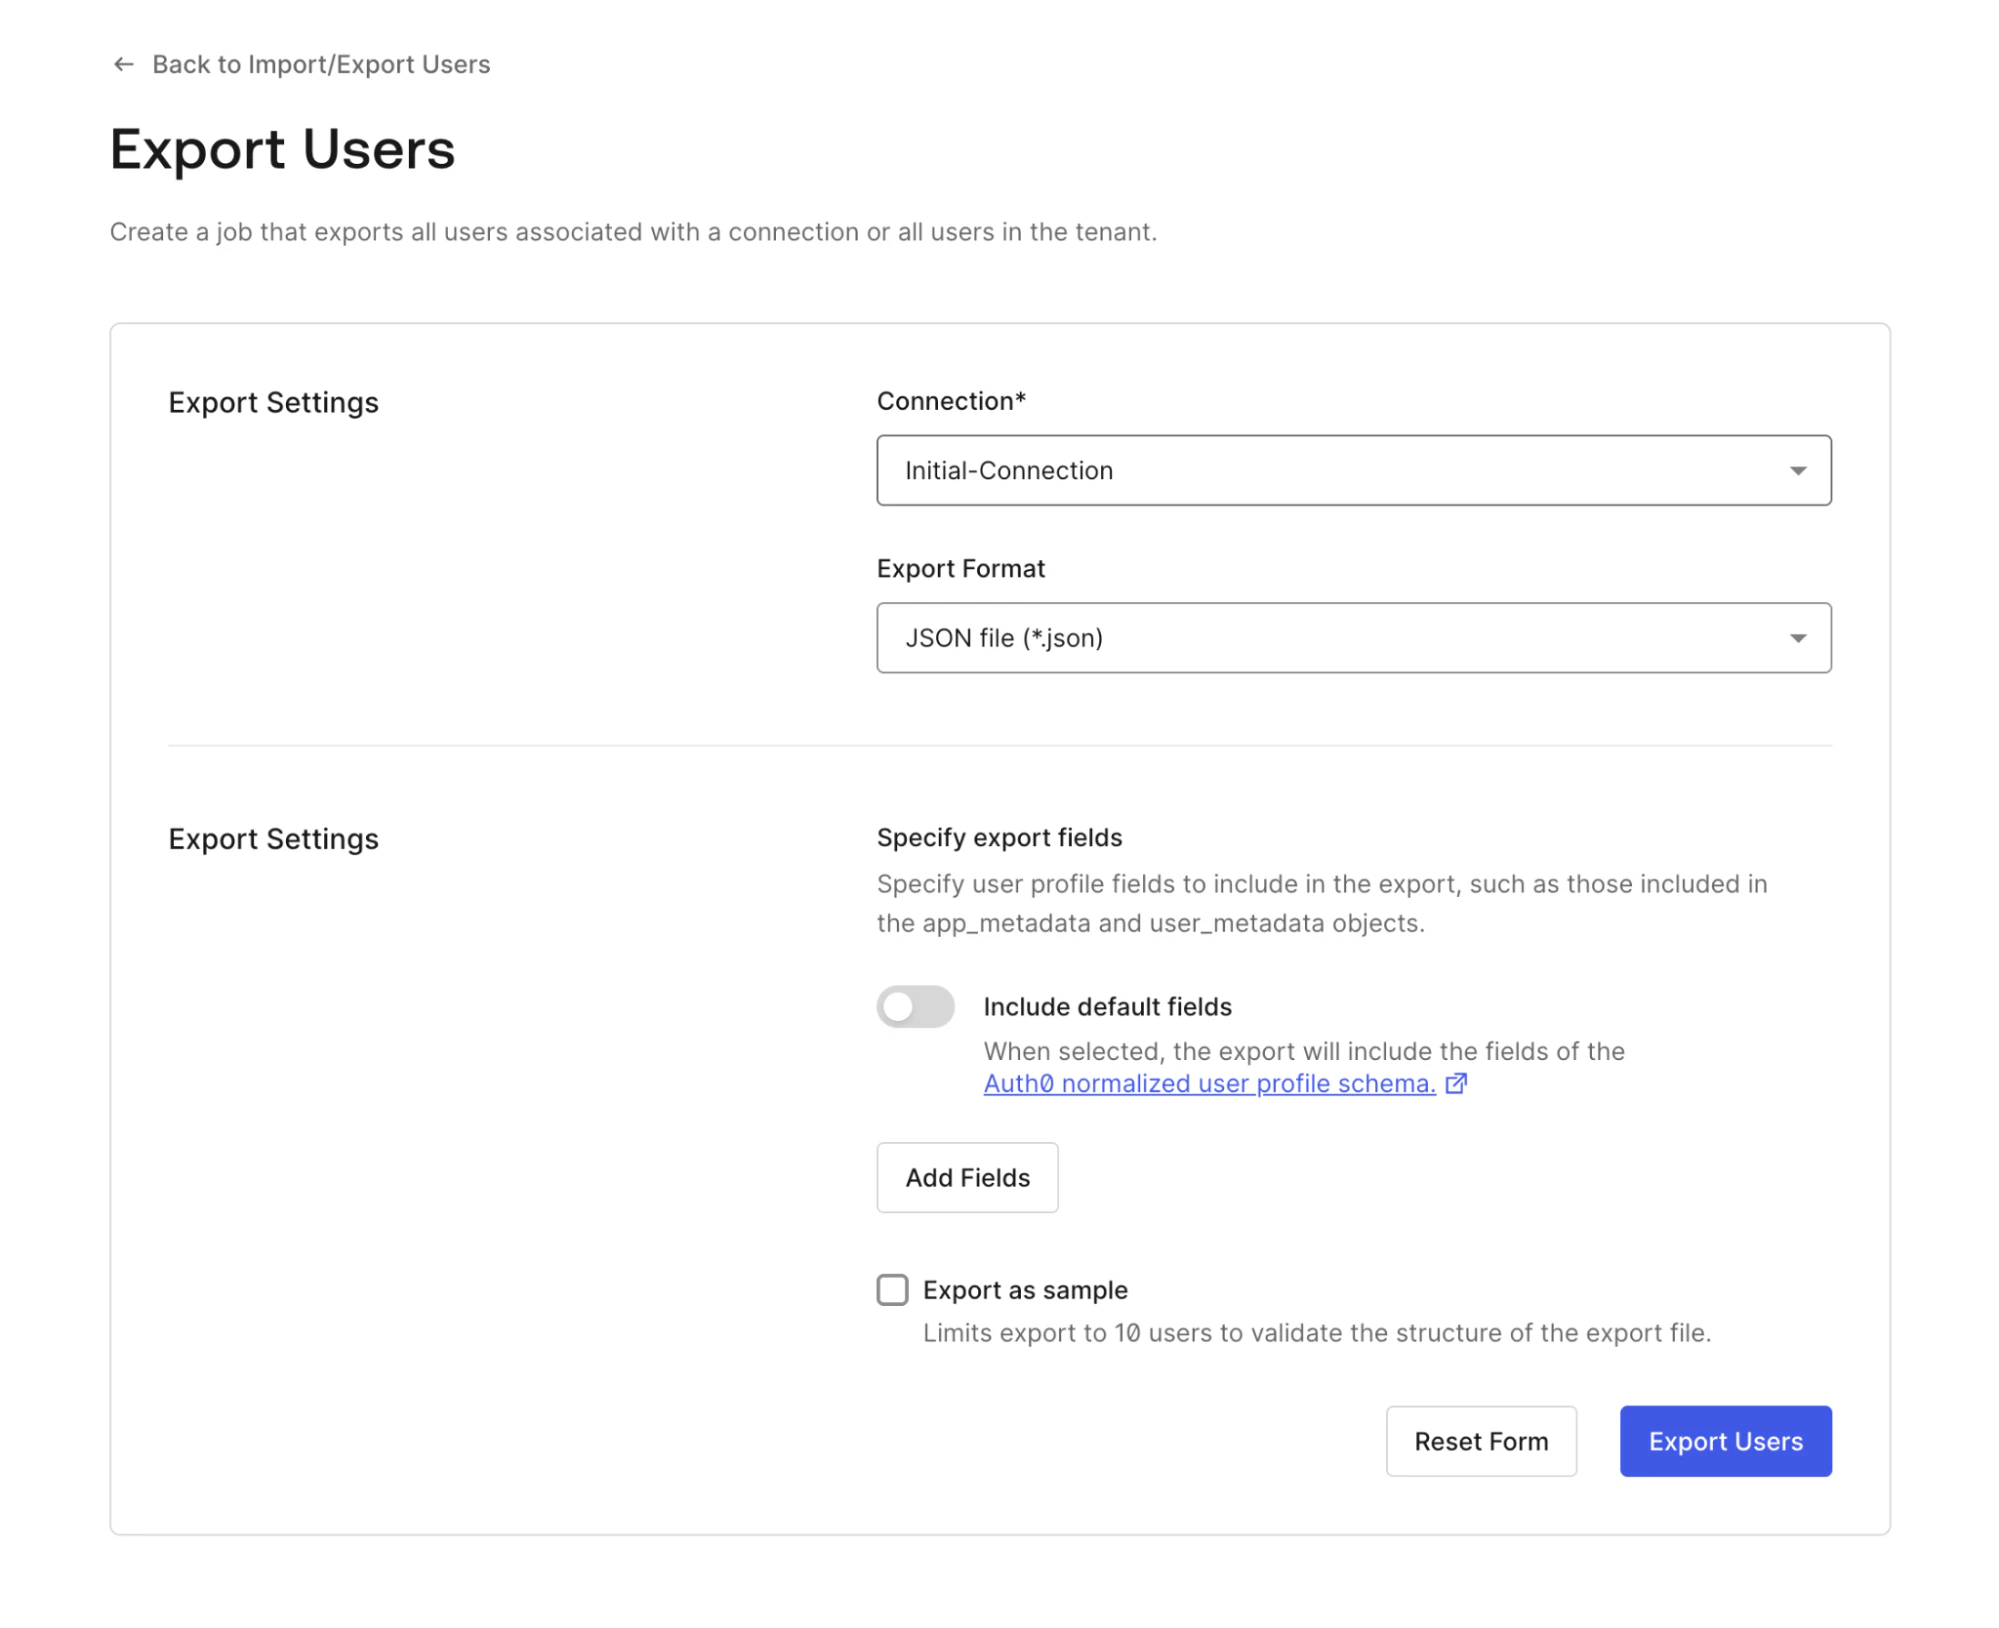 テナントからユーザーをエクスポートするには、次の手順に従います。
1. Dashboard で **User Management > Users,** に移動し、**Import/Export Users > Export Users** を選択します。
2. ユーザーのエクスポート元となるデータベース接続を選択し、エクスポート形式として JSON または CSV を選びます。
3. エクスポートするフィールドを指定します。
1. **Add default fields** を選択して、標準のユーザー属性を含めます。
2. 出力ファイルのフィールド名を変更します。
3. 必要に応じてカスタムのユーザー属性を追加します。
4. (任意) **Export as sample** を選択して、最大 10 人のユーザーで構造をプレビューします。
5. **Export Users** を選択してジョブを開始します。
エクスポートジョブの進行状況の確認やダウンロードを行うには、**Import/Export Users** 画面で **View jobs** に移動します。**Check Status** を選択してジョブの進行状況を確認し、**Download export** を選択して結果を取得するか、**More info** を選択してエラーやジョブのメタデータを確認します。
テナントからユーザーをエクスポートするには、次の手順に従います。
1. Dashboard で **User Management > Users,** に移動し、**Import/Export Users > Export Users** を選択します。
2. ユーザーのエクスポート元となるデータベース接続を選択し、エクスポート形式として JSON または CSV を選びます。
3. エクスポートするフィールドを指定します。
1. **Add default fields** を選択して、標準のユーザー属性を含めます。
2. 出力ファイルのフィールド名を変更します。
3. 必要に応じてカスタムのユーザー属性を追加します。
4. (任意) **Export as sample** を選択して、最大 10 人のユーザーで構造をプレビューします。
5. **Export Users** を選択してジョブを開始します。
エクスポートジョブの進行状況の確認やダウンロードを行うには、**Import/Export Users** 画面で **View jobs** に移動します。**Check Status** を選択してジョブの進行状況を確認し、**Download export** を選択して結果を取得するか、**More info** を選択してエラーやジョブのメタデータを確認します。
### ユーザープロファイルを更新する
[Auth0 Management API](https://auth0.com/docs/api/management/v2/users/patch-users-by-id) を使用すると、`user_metadata` と `app_metadata` のユーザープロファイルを一括更新できます。
このプロセスではデータが失われる可能性があるため、データ破損に備えて、必ずユーザーデータベースのバックアップを作成してください。また、このプロセスでは複数のユーザーを一度にブロックできないため、各ユーザーは Auth0 Dashboard または [Auth0 Management API](https://auth0.com/docs/api/management/v2/users/patch-users-by-id) を使用して個別にブロックする必要があります。
ユーザープロファイルを一括更新するには:
1. 上記のエクスポート手順を使用して、すべてのユーザー属性を含む完全なエクスポートファイルを作成します。
2. エクスポート形式として JSON を選択します。
3. エクスポートが完了したら、ユーザー情報を含むファイルをダウンロードします。
###
### 設定を更新する
データベースでユーザーを検索するキーとして使用されるため、ユーザーのメールアドレスは変更しないでください。
前の手順でダウンロードした JSON ファイルをコピーし、そのコピーをテキストエディターで開きます。ユーザースキーマは以下のようになります。
```json lines expandable theme={null}
[
{
"Id":"auth0|626737a9813c000069daf462",
"Nickname":"testuser1",
"Name":"testuser1@auth0.com",
"email":"testuser1@auth0.com",
"Connection":"Username-Password-Authentication",
"Created At":"2022-04-26T00:07:05.098Z",
"Updated At":"2022-07-06T14:54:19.214Z"
},
{
"Id":"auth0|62d1a1853bdcf11ff5dca672",
"Nickname":"testuser2",
"Name":"testuser2@auth0.com",
"email":"testuser2@auth0.com",
"Connection":"Username-Password-Authentication",
"Created At":"2022-07-15T17:19:01.531Z",
"Updated At":"2022-07-15T17:19:01.532Z"
},
{
"Id":"auth0|62d1a1a524f32a4185c9ce23",
"Nickname":"testuser3",
"Name":"testuser3@auth0.com",
"email":"testuser3@auth0.com",
"Connection":"Username-Password-Authentication",
"Created At":"2022-07-15T17:19:33.484Z",
"Updated At":"2022-07-15T17:19:33.484Z"
}
]
```
Id には一意の `connection|id` が必要です。同じユーザー Id が複数の接続に存在する場合、更新は失敗します。
属性を追加するには、各ユーザースキーマに新しいフィールドを作成し、その値を設定して更新します。以下の例では、**Family Name** 属性の値は **Smith** で、新しい属性値の後ろにカンマがあります。
`email_verified` 属性を複数のユーザーに追加し、値を `true` に設定することもできます。
```json lines theme={null}
{
"Id":"auth0|626737a9813c000069daf462",
"Nickname":"testuser1",
"Family Name":"Smith",
"Name":"testuser1@auth0.com",
"email":"testuser1@auth0.com",
"email_verified":true,
"Connection":"Username-Password-Authentication",
"Created At":"2022-04-26T00:07:05.098Z",
"Updated At":"2022-07-06T14:54:19.214Z"
}
```
変更内容をユーザーファイルに保存します。
この処理では複数のユーザーをブロックできません。ユーザーは Auth0 Dashboard または [Auth0 Management API](https://auth0.com/docs/api/management/v2#!/Users/patch_users_by_id) で 1 人ずつブロックする必要があります。
更新したユーザープロファイルデータをインポートするには、更新済みのユーザープロファイルファイルをアップロードして、1 つのジョブで複数のユーザーを更新します。既存のユーザーを更新するには、**Upsert pre-existing users in connection** を true にするか、選択しておく必要があります。