> ## Documentation Index
> Fetch the complete documentation index at: https://translations.mintlify.site/llms.txt
> Use this file to discover all available pages before exploring further.
# ASP.NET Web API (OWIN): 認可
> 標準の JWT ミドルウェアを使用して、保護されたエンドポイントを持つ ASP.NET OWIN API に Auth0 JWT 認可を追加する
export const HowToSchema = () => ;
export const AuthCodeGroup = ({children, dropdown}) => {
const [processedChildren, setProcessedChildren] = useState(children);
useEffect(() => {
let unsubscribe = null;
function init() {
unsubscribe = window.autorun(() => {
const processChildren = node => {
if (typeof node === "string") {
let processedNode = node;
for (const [key, value] of window.rootStore.variableStore.values.entries()) {
const escapedKey = key.replaceAll(/[.*+?^${}()|[\]\\]/g, (String.raw)`\$&`);
processedNode = processedNode.replaceAll(new RegExp(escapedKey, "g"), value);
}
return processedNode;
} else if (Array.isArray(node)) {
return node.map(processChildren);
} else if (node && node.props && node.props.children) {
return {
...node,
props: {
...node.props,
children: processChildren(node.props.children)
}
};
}
return node;
};
setProcessedChildren(processChildren(children));
});
}
if (window.rootStore) {
init();
} else {
window.addEventListener("adu:storeReady", init);
}
return () => {
window.removeEventListener("adu:storeReady", init);
unsubscribe?.();
};
}, [children]);
return {processedChildren};
};
**Auth0 は初めてですか?** [Auth0 の仕組み](/ja/docs/get-started/auth0-overview)をご確認のうえ、OAuth 2.0 フレームワークを使用した [API の認証と認可の実装](/ja/docs/get-started/authentication-and-authorization-flow)についてお読みください。
## はじめに
Auth0 を使用すると、あらゆる種類のアプリケーションに認可を追加できます。このガイドでは、`Microsoft.Owin.Security.Jwt` パッケージを使用して、Auth0 を新規または既存の ASP.NET OWIN Web API アプリケーションに統合する方法を説明します。Auth0 の各 API では API Identifier が使用されており、アプリケーションはアクセストークンを検証する際にこれを使用する必要があります。
この例では、次の内容を説明します。
* 受信した HTTP リクエストの `Authorization` ヘッダーに JSON Web Token (JWT) が含まれているかどうかを確認する方法。
* Auth0 アカウントの [JSON Web Key Set (JWKS) ](/ja/docs/secure/tokens/json-web-tokens/json-web-key-sets) を使用して、トークンが有効かどうかを確認する方法。アクセストークンの検証の詳細については、[アクセストークンを検証する](/ja/docs/secure/tokens/access-tokens/validate-access-tokens) を参照してください。
Auth0 Dashboard の [APIs](https://manage.auth0.com/#/apis) セクションで、**Create API** をクリックします。API の名前と識別子を指定します。たとえば、`https://quickstarts/api` です。後でアクセストークンの検証を設定する際に、この識別子を `audience` として使用します。**Signing Algorithm** は **RS256** のままにします。
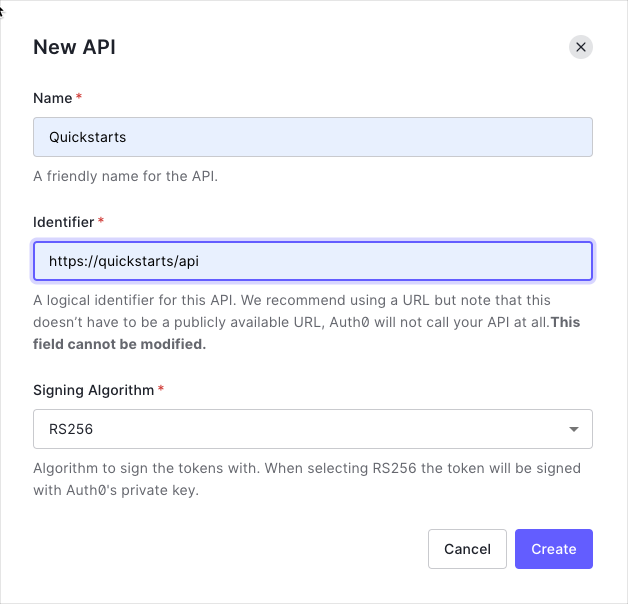
デフォルトでは、API はトークンの署名アルゴリズムとして RS256 を使用します。RS256 は秘密鍵と公開鍵のキーペアを使用するため、Auth0 アカウントの公開鍵を使用してトークンを検証します。公開鍵は [JSON Web Key Set (JWKS)](/ja/docs/secure/tokens/json-web-tokens/json-web-key-sets) 形式で提供されており、[こちら](https://\{yourDomain}/.well-known/jwks.json) からアクセスできます。
Permissions では、特定のアクセストークンを使用して、ユーザーに代わってリソースにどのようにアクセスできるかを定義できます。たとえば、ユーザーのアクセスレベルが manager の場合は `messages` リソースへの読み取りアクセスを付与し、administrator の場合はそのリソースへの書き込みアクセスを付与するように設定できます。
許可する権限は、Auth0 Dashboard の [APIs](https://manage.auth0.com/#/apis) セクションにある **Permissions** ビューで定義できます。
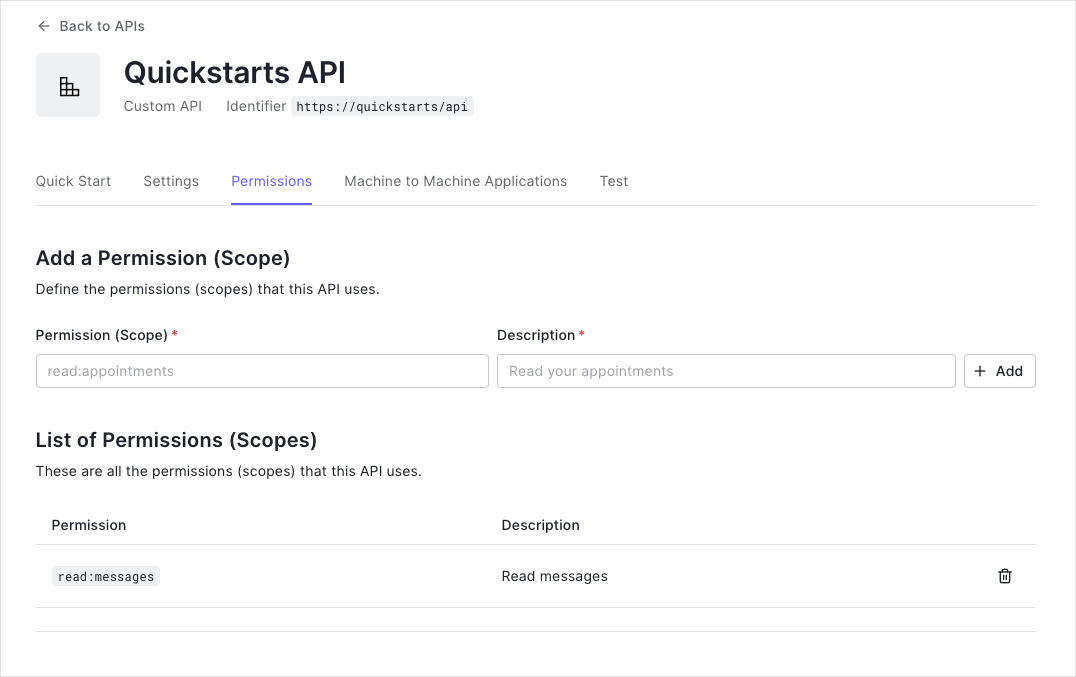
この例では、`read:messages` スコープを使用します。
サンプルコードの `Web.config` には `appsettings` セクションがあり、API で正しい Auth0 **ドメイン** と **API Identifier** を使用するよう設定されています。このページからコードをダウンロードした場合は、自動的に入力されます。GitHub の例を使用する場合は、自分で入力する必要があります。
```xml web.config lines theme={null}
```
ASP.NET で Auth0 アクセストークンを使用するには、`Microsoft.Owin.Security.Jwt` NuGet パッケージで提供される OWIN JWT Middleware を使用します。
```bash lines theme={null}
Install-Package Microsoft.Owin.Security.Jwt
```
OWIN JWT ミドルウェアはデフォルトで Open ID Connect Discovery を使用しないため、カスタムの `IssuerSigningKeyResolver` を指定する必要があります。これを行うには、`Support/OpenIdConnectSigningKeyResolver.cs` ファイルに次の内容を追加します。
この種のカスタム リゾルバーは、以前は NuGet 経由で `Auth0.OpenIdConnectSigningKeyResolver` パッケージの一部として提供されていました。[このパッケージは現在利用できない](https://github.com/auth0/auth0-aspnet-owin/blob/master/SECURITY-NOTICE.md)ため、ご自身で用意する必要があります。
```cs OpenIdConnectSigningKeyResolver.cs lines theme={null}
public class OpenIdConnectSigningKeyResolver
{
private readonly OpenIdConnectConfiguration openIdConfig;
public OpenIdConnectSigningKeyResolver(string authority)
{
var cm = new ConfigurationManager($"{authority.TrimEnd('/')}/.well-known/openid-configuration", new OpenIdConnectConfigurationRetriever());
openIdConfig = AsyncHelper.RunSync(async () => await cm.GetConfigurationAsync());
}
public SecurityKey[] GetSigningKey(string kid)
{
return new[] { openIdConfig.JsonWebKeySet.GetSigningKeys().FirstOrDefault(t => t.KeyId == kid) };
}
}
```
`OpenIdConnectSigningKeyResolver` は、OpenID Connect Configuration エンドポイント (`/.well-known/openid-configuration`) から、RS256 トークンの署名に使用される JSON Web Key Set を自動的にダウンロードします。続いて、以下の JWT 登録コードで示すように、これを使用して Issuer Signing Key を取得できます。
`Startup` クラスの `Configuration` メソッドに移動し、構成済みの `JwtBearerAuthenticationOptions` を渡す `UseJwtBearerAuthentication` の呼び出しを追加します。
`JwtBearerAuthenticationOptions` では、`ValidAudience` プロパティに Auth0 API Identifier を、`ValidIssuer` に Auth0 ドメインの完全なパスを指定する必要があります。また、署名キーを解決するために、`OpenIdConnectSigningKeyResolver` のインスタンスを使用するように `IssuerSigningKeyResolver` を構成する必要があります。
```cs Startup.cs lines theme={null}
public void Configuration(IAppBuilder app)
{
var domain = $"https://{ConfigurationManager.AppSettings["Auth0Domain"]}/";
var apiIdentifier = ConfigurationManager.AppSettings["Auth0ApiIdentifier"];
var keyResolver = new OpenIdConnectSigningKeyResolver(domain);
app.UseJwtBearerAuthentication(
new JwtBearerAuthenticationOptions
{
AuthenticationMode = AuthenticationMode.Active,
TokenValidationParameters = new TokenValidationParameters()
{
ValidAudience = apiIdentifier,
ValidIssuer = domain,
IssuerSigningKeyResolver = (token, securityToken, kid, parameters) => keyResolver.GetSigningKey(kid)
}
});
// Web API を構成する
WebApiConfig.Configure(app);
}
```
### 末尾のバックスラッシュを忘れないでください
`ValidIssuer` に指定する URL の末尾には、必ずバックスラッシュを含めてください。JWT の issuer クレームと完全に一致している必要があるためです。これはよくある設定ミスで、API 呼び出しが正しく認証されなくなる原因になります。
上記の JWT ミドルウェアは、リクエストに含まれるアクセストークンが有効であることを検証します。ただし、要求されたリソースにアクセスするために、そのトークンに十分な **スコープ** があるかどうかを確認する仕組みは、まだ含まれていません。
`System.Web.Http.AuthorizeAttribute` を継承する `ScopeAuthorizeAttribute` というクラスを作成します。この Authorization Attribute は、Auth0 テナントから発行された `scope` クレームが存在するかどうかを確認し、存在する場合は、その `scope` クレームに要求されたスコープが含まれていることを検証します。
```cs ScopeAuthorizeAttribute.cs lines theme={null}
public class ScopeAuthorizeAttribute : AuthorizeAttribute
{
private readonly string scope;
public ScopeAuthorizeAttribute(string scope)
{
this.scope = scope;
}
public override void OnAuthorization(HttpActionContext actionContext)
{
base.OnAuthorization(actionContext);
// 発行者を検証するために Auth0 ドメインを取得する
var domain = $"https://{ConfigurationManager.AppSettings["Auth0Domain"]}/";
// クレームプリンシパルを取得する
ClaimsPrincipal principal = actionContext.ControllerContext.RequestContext.Principal as ClaimsPrincipal;
// スコープクレームを取得する。発行者が正しい Auth0 ドメインであることを確認する
var scopeClaim = principal?.Claims.FirstOrDefault(c => c.Type == "scope" && c.Issuer == domain);
if (scopeClaim != null)
{
// スコープを分割する
var scopes = scopeClaim.Value.Split(' ');
// スコープ配列に必要なスコープが含まれている場合は成功とする
if (scopes.Any(s => s == scope))
return;
}
HandleUnauthorizedRequest(actionContext);
}
}
```
以下に示すルートは、次のリクエストで使用できます。
* `GET /api/public`: 未認証のリクエストで使用可能
* `GET /api/private`: 追加のスコープを必要としないアクセストークンを含む認証済みリクエストで使用可能
* `GET /api/private-scoped`: `read:messages` スコープが付与されたアクセストークンを含む認証済みリクエストで使用可能
JWT ミドルウェアは標準の ASP.NET の Authentication および Authorization の仕組みと統合されるため、エンドポイントを保護するには、コントローラー アクションに `[Authorize]` 属性を付与するだけで済みます。特定の API エンドポイントを呼び出す際に必要なスコープが含まれていることを確認するには、アクションに `ScopeAuthorize` 属性を付与し、`scope` パラメーターに必要な `scope` の名前を渡してください。
```cs ApiController.cs lines theme={null}
[RoutePrefix("api")]
public class ApiController : ApiController
{
[HttpGet]
[Route("public")]
public IHttpActionResult Public()
{
return Json(new
{
Message = "Hello from a public endpoint!"
});
}
[HttpGet]
[Route("private")]
[Authorize]
public IHttpActionResult Private()
{
return Json(new
{
Message = "Hello from a private endpoint! You need to be authenticated to see this."
});
}
[HttpGet]
[Route("private-scoped")]
[ScopeAuthorize("read:messages")]
public IHttpActionResult Scoped()
{
return Json(new
{
Message = "Hello from a private endpoint! You need to be authenticated and have a scope of read:messages to see this."
});
}
}
```
**チェックポイント**
アプリケーションの設定が完了したら、アプリケーションを実行して、次のことを確認します。
* `GET /api/public` が未認証のリクエストで利用できること。
* `GET /api/private` が認証済みのリクエストで利用できること。
* `GET /api/private-scoped` が、`read:messages` スコープを持つアクセストークンを含む認証済みのリクエストで利用できること。
## 追加リソース
このクイックスタートの完全なサンプルアプリケーション
他のIDプロバイダーを設定
多要素認証を有効化
攻撃対策について詳しく見る
カスタムロジックでAuth0を拡張
Auth0コミュニティでサポートを受ける