> ## Documentation Index
> Fetch the complete documentation index at: https://translations.mintlify.site/llms.txt
> Use this file to discover all available pages before exploring further.
> auth0.js ライブラリで構築したカスタムログインページを使用する際に、Bot Detection を有効にして設定する方法について説明します。
# カスタムログインページにBot Detectionを追加する
auth0.js ライブラリを使用してカスタムログインページを構築する場合は、Bot Detectionを有効にできます。これにより、Auth0 がリクエストを高リスクと判断した場合に、キャプチャ ステップが表示されます。
カスタムログインフォームのコードでは、ユーザーに キャプチャ ステップの通過が求められる場合に対応する必要があります。このケースを考慮していないと、アプリケーションでエラーが発生する可能性があります。
Bot Detection は、Auth0 でホストされるカスタムログインページでのみサポートされています。テナントでこの機能を有効にするには、アカウント担当者に連絡する必要がある場合があります。
## カスタムログインページテンプレートを使用する
Auth0 には、高リスクのログインに対応するコードと組み合わせて使用できるテンプレートが用意されています。
1. [Dashboard > Branding > Universal Login](https://manage.auth0.com/#/login_settings) に移動し、**Classic** を選択します。
2. **Login** タブをクリックし、まだ有効になっていない場合は **Customize Login Page** スイッチをオンにします。
3. **Default Templates** ドロップダウンメニューから **Custom Login Form** を選択します。
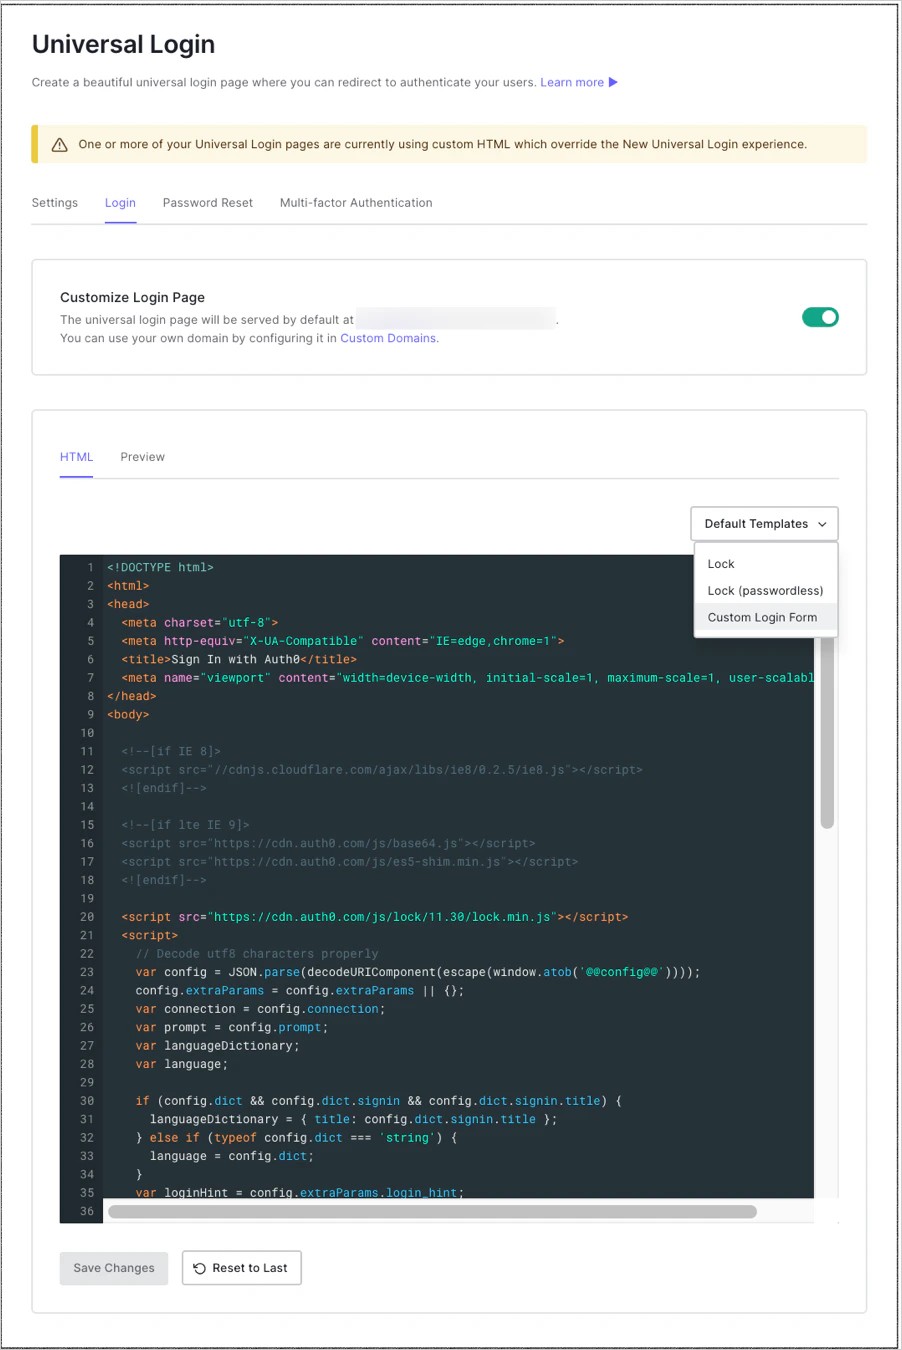 4. 用意されているテンプレートを使って、ログインページのカスタマイズを開始します。
Custom Login Pages のソースコードの管理には、バージョン管理ソフトウェアの使用をお勧めします。詳しくは、[Classic Login Page Version Control](/ja/docs/customize/login-pages/classic-login/version-control) を参照してください。
5. バージョン管理ソフトウェアを使用しない場合は、Dashboard でテンプレートをソースコードに直接置き換えることもできます。
6. **Preview** を選択して、新しいフォームを確認します。
7. **Save Changes** を選択します。
4. 用意されているテンプレートを使って、ログインページのカスタマイズを開始します。
Custom Login Pages のソースコードの管理には、バージョン管理ソフトウェアの使用をお勧めします。詳しくは、[Classic Login Page Version Control](/ja/docs/customize/login-pages/classic-login/version-control) を参照してください。
5. バージョン管理ソフトウェアを使用しない場合は、Dashboard でテンプレートをソースコードに直接置き換えることもできます。
6. **Preview** を選択して、新しいフォームを確認します。
7. **Save Changes** を選択します。
## ログインフォームをカスタマイズする
Bot Detection をサポートするには、`auth0.js` ライブラリのバージョン `9.28` 以降を使用する必要があります。
``
1. パスワード入力欄の下、かつサインアップボタンとログインボタンの上に、キャプチャをレンダリングする要素を追加します。例: ``
2. `WebAuth` コンストラクターの後で、`loginCaptcha` コンポーネントと `signupCaptcha` コンポーネントを初期化します。
```javascript lines theme={null}
var webAuth = new auth0.WebAuth(params);
var loginCaptcha = webAuth.renderCaptcha(
document.querySelector('.captcha-container'),
null,
(error, payload) => {
if (payload) {
triggerCaptcha = payload.triggerCaptcha;
}
}
);
var signupCaptcha = webAuth.renderSignupCaptcha(
document.querySelector('.captcha-container'),
null,
(error, payload) => {
if (payload) {
triggerCaptcha = payload.triggerCaptcha;
}
}
);
```
3. `login` メソッドを呼び出すときは、`captcha` プロパティに `loginCaptcha.getValue()` の値を設定します。
```text lines theme={null}
webAuth.login({
realm: connection,
username: username,
password: password,
captcha: loginCaptcha.getValue()
}, function(err) {
displayError(err);
//...
});
```
`login` メソッドのコールバック関数パラメーター (`cb`) の詳細については、[auth0.js ドキュメントの WebAuth](https://auth0.github.io/auth0.js/global.html#login)を参照してください。
4. `signupAndLogin` メソッドを呼び出すときは、`captcha` プロパティに `signupCaptcha.getValue()` の値を設定します。
```text lines theme={null}
webAuth.redirect.signupAndLogin({
connection: databaseConnection,
email: email,
password: password,
captcha: signupCaptcha.getValue()
}, function(err) {
displayError(err);
//...
});
```
`signupAndLogin` メソッドのコールバック関数パラメーター (`cb`) の詳細については、[auth0.js ドキュメントの WebAuth](https://auth0.github.io/auth0.js/global.html#login)を参照してください。
5. 汎用的なエラー処理ロジックで、`loginCaptcha` コンポーネントと `signupCaptcha` コンポーネントを再読み込みします。
```javascript lines theme={null}
function displayError(err) {
loginCaptcha.reload();
signupCaptcha.reload();
var errorMessage = document.getElementById('error-message');
errorMessage.innerHTML = err.description;
errorMessage.style.display = 'block';
}
```
### キャプチャテンプレートを設定する
`renderCaptcha` メソッドおよび `renderSignupCaptcha` メソッドを呼び出す際は、`options` パラメーターを使用して、各[サポートされている キャプチャ プロバイダー](/ja/docs/secure/attack-protection/bot-detection/configure-captcha)のテンプレートを設定できます。
`options` パラメーターの `templates` プロパティでは、次のプロパティをサポートしています。
| 名前 | 説明 |
| ---------------------- | --------------------------------------------------------------------- |
| `auth0` | challenge を受け取り、文字列を返すテンプレート関数。 |
| `recaptcha_v2` | challenge を受け取り、文字列を返すテンプレート関数。 |
| `recaptcha_enterprise` | challenge を受け取り、文字列を返すテンプレート関数。 |
| `hcaptcha` | challenge を受け取り、文字列を返すテンプレート関数。 |
| `friendly_captcha` | challenge を受け取り、文字列を返すテンプレート関数。 |
| `arkose` | challenge を受け取り、文字列を返すテンプレート関数。 |
| `auth0_v2` | challenge を受け取り、文字列を返すテンプレート関数。 |
| `error` | challenge を取得できなかった場合にカスタムエラーメッセージを返すテンプレート関数。最初の引数として error を受け取ります。 |
各プロバイダーのデフォルトのテンプレート関数の詳細については、[GitHub 上の auth0.js/src/web-auth/captcha.js](https://github.com/auth0/auth0.js/blob/a3ddc0905a5da33aa190a9098467576976b95ec8/src/web-auth/captcha.js#L28)を参照してください。
## パスワードレスフローに対応する
パスワードレスフローで Bot Detection をサポートするには、auth0.js ライブラリのバージョン `9.24` 以降を使用する必要があります。
``
1. 送信ボタンの上に キャプチャ をレンダリングするための要素を追加します。username/password ログインもサポートしている場合は、パスワードレス キャプチャ 用に別の要素を作成する必要があります。例:
``
2. WebAuth コンストラクターの後で、パスワードレスフロー用の キャプチャ コンポーネントを初期化します。
```javascript lines theme={null}
var passwordlessCaptcha = webAuth.renderPasswordlessCaptcha(
document.querySelector('.passwordless-captcha-container')
);
```
3. Passwordless の呼び出しに captcha プロパティを追加し、エラー時に キャプチャ コンポーネントをリロードします。
```text lines theme={null}
webAuth.passwordlessStart({
connection: 'email',
send: 'code',
email: 'foo@bar.com',
captcha: passwordlessCaptcha.getValue()
}, function (err,res) {
if (err) {
passwordlessCaptcha.reload();
// エラーを処理
}
// 続行
});
```
## 詳細
* [ネイティブアプリケーションに Bot Detection を追加する](/ja/docs/secure/attack-protection/bot-detection/bot-detection-native-apps)