> ## Documentation Index
> Fetch the complete documentation index at: https://translations.mintlify.site/llms.txt
> Use this file to discover all available pages before exploring further.

> Guardian.swift iOS SDK のインストール方法、使用方法、設定オプションについて説明します。

# Guardian.swift iOS SDK

[Guardian.swift](https://github.com/auth0/Guardian.swift) を使用すると、独自の iOS アプリに Auth0 の Guardian 多要素サービスを統合し、そのアプリ自体を第 2 要素として使用できるようになります。これにより、ユーザーはアプリからシームレスな <Tooltip tip="多要素認証（MFA）: SMS によるコードなど、ユーザー名とパスワードに加えて別の要素を使用するユーザー認証プロセス。" cta="用語集を表示" href="/ja/docs/glossary?term=multi-factor+authentication">多要素認証</Tooltip> の利点をすべて利用できます。詳しくは、[Getting Started with Apple Push Notification Service](/ja/docs/secure/multi-factor-authentication/multi-factor-authentication-factors/configure-push-notifications-for-mfa#configure-push-notifications-for-apple-using-apn-) を参照してください。

<div id="requirements">
  ## 要件
</div>

* Guardian を使用するには、iOS 10 以降と Swift 4.1 が必要です。
* この SDK を使用するには、テナントの Guardian サービスに独自のプッシュ通知用認証情報を設定する必要があります。設定しない場合、プッシュ通知を受信できません。詳細については、[MFA のプッシュ通知を設定する](/ja/docs/secure/multi-factor-authentication/multi-factor-authentication-factors/configure-push-notifications-for-mfa) を参照してください。

<div id="install-guardian-ios-sdk">
  ## Guardian iOS SDK をインストール
</div>

<div id="cocoapods">
  ### CocoaPods
</div>

Guardian.swift は [CocoaPods](http://cocoapods.org) 経由で利用できます。インストールするには、Podfile に次の行を追加します。

```bash lines theme={null}
pod 'Guardian', '~> 1.1.0'
```

<div id="carthage">
  ### Carthage
</div>

Cartfile に次の行を追加します:

```bash lines theme={null}
github "auth0/Guardian.swift" ~> 1.1.0
```

<div id="enable-guardian-push-notifications">
  ## Guardian プッシュ通知を有効にする
</div>

1. [Dashboard > Security > Multi-factor Auth](https://manage.auth0.com/#/guardian) に移動します。
2. **Push Notification** をオンにして有効にします。
3. [プッシュ通知を設定する](/ja/docs/secure/multi-factor-authentication/multi-factor-authentication-factors/configure-push-notifications-for-mfa#configure-push-notifications-for-apple-using-apn-)。

<div id="usage">
  ## 使用方法
</div>

`Guardian` は SDK の中核となるコンポーネントです。SDK を使用するには、ライブラリをインポートします。

```swift lines theme={null}
import Guardian
```

テナントのドメインを設定します。テナントに設定済みの場合は、<Tooltip tip="カスタムドメイン: 固有の名前、または独自の名前を持つサードパーティのドメイン。" cta="用語集を表示" href="/ja/docs/glossary?term=custom+domain">カスタムドメイン</Tooltip>を使用することもできます:

```swift lines theme={null}
let domain = "<tenant>.<region>.auth0.com"
```

<div id="enroll">
  ### 登録
</div>

登録とは、第2要素と Auth0 アカウントを関連付けることです。アカウントが登録されると、本人確認に必要な第2要素の提示が求められます。アプリでまだプッシュ通知を使用していない場合、またはプッシュ通知に不慣れな場合は、詳細について [Apple Push Notification Service Overview](https://developer.apple.com/go/?id=push-notifications) を参照してください。

登録には、テナントドメインに加えて、次の情報が必要です。

| 変数                 | 説明                                                                       |
| ------------------ | ------------------------------------------------------------------------ |
| **Enrollment URI** | Guardian Web Widget でスキャンした QR コード、またはメールや SMS で送信された登録チケットにエンコードされている値。 |
| **APNS Token**     | デバイスの Apple APNS トークン。64 バイトを含む文字列 (16 進数形式) である必要があります。                 |
| **Key Pair**       | Auth0 Guardian に対して自身の身元を証明するために使用する RSA (秘密鍵/公開鍵) のキーペア。                |

必要な情報を用意したら、デバイスを登録できます。

```swift lines theme={null}
Guardian
        .enroll(forDomain: "{yourTenantDomain}",
                usingUri: "{enrollmentUri}",
                notificationToken: "{apnsToken}",
                signingKey: signingKey,
                verificationKey: verificationKey
                )
        .start { result in
            switch result {
            case .success(let enrolledDevice):
                // 成功。登録済みデバイスのデータを利用できます
            case .failure(let cause):
                // 失敗しました。causeを確認して問題の原因を調べてください
            }
        }
```

成功すると、登録情報を取得できます。この情報は、アプリケーション内で安全に保管する必要があります。この情報には、登録識別子と、登録を更新または削除するためにデバイスに関連付けられた Guardian API のトークンが含まれます。

<div id="signing-and-verification-keys">
  #### 署名鍵と検証鍵
</div>

Guardian.swift には、署名鍵を生成するための便利なクラスが用意されています。

```swift lines theme={null}
let signingKey = try DataRSAPrivateKey.new()
```

このキーはメモリ上にしか存在しませんが、その`Data`表現を取得して、たとえば暗号化されたSQLiteDBに安全に保存できます：

```javascript lines theme={null}
// データを保存する
let data = signingKey.data
// 保存処理を実行する

// ストレージから読み込む
let loadedKey = try DataRSAPrivateKey(data: data)
```

ただ、iOS Keychain 内に保存するだけでよい場合は:

```swift wrap lines theme={null}
let signingKey = try KeychainRSAPrivateKey.new(with: "com.myapp.mytag")
```

上記の例ではキーが作成され、指定したタグの下に自動的に自動的に保存されます。取得するには、そのタグを使用できます。

```swift wrap lines theme={null}
let signingKey = try KeychainRSAPrivateKey(tag: "com.myapp.mytag")
```

検証キーは、任意の`SigningKey`から取得できます。たとえば、次のとおりです。

```swift lines theme={null}
let verificationKey = try signingKey.verificationKey()
```

<div id="allow-login-requests">
  ### ログインリクエストを承認する
</div>

登録が完了すると、ユーザーが MFA で本人確認を行う必要があるたびに、プッシュ通知を受信します。Guardian には、APNs から受信したデータを解析し、すぐに使用できる `Notification` インスタンスを返すメソッドが用意されています。

```swift lines theme={null}
if let notification = Guardian.notification(from: notificationPayload) {
    // Guardian プッシュ通知を受信しました
}
```

通知インスタンスを取得したら、`allow` メソッドを使って認証リクエストを簡単に許可できます。また、前の手順で取得した登録済みデバイスの情報も必要です。登録が複数ある場合は、通知と同じ `id` (`enrollmentId` プロパティ) を持つものを見つける必要があります。

情報がそろったら、`device` パラメータには `AuthenticatedDevice` プロトコルを実装する任意のオブジェクトを指定できます。

```swift lines theme={null}
struct Authenticator: Guardian.AuthenticationDevice {
    let signingKey: SigningKey
    let localIdentifier: String
}
```

ローカル識別子はデバイスのローカル id で、デフォルトでは登録時に `UIDevice.current.identifierForVendor` を使用します。あとは次を呼び出すだけです。

```swift lines theme={null}
Guardian
        .authentication(forDomain: "{yourTenantDomain}", device: device)
        .allow(notification: notification)
        .start { result in
            switch result {
            case .success:
                // 認証リクエストが正常に許可されました
            case .failure(let cause):
                // エラーが発生しました。causeを確認して原因を特定してください
            }
        }
```

<div id="reject-login-requests">
  ### ログインリクエストを拒否する
</div>

認証リクエストを拒否するには、代わりに `reject` を呼び出します。必要に応じて、拒否理由を指定することもできます。拒否理由は Guardian のログに表示されます。

```swift lines theme={null}
Guardian
        .authentication(forDomain: "{yourTenantDomain}", device: device)
        .reject(notification: notification)
        // または reject(notification: notification, withReason: "hacked")
        .start { result in
            switch result {
            case .success:
                // 認証リクエストが正常に拒否されました
            case .failure(let cause):
                // 失敗しました。cause を確認して原因を調べてください
            }
        }
```

<div id="unenroll">
  ### 登録解除
</div>

登録を解除する場合 (たとえば MFA を無効にする場合) は、次のリクエストを実行できます。

```swift lines theme={null}
Guardian
        .api(forDomain: "{yourTenantDomain}")
        .device(forEnrollmentId: "{userEnrollmentId}", token: "{enrollmentDeviceToken}")
        .delete()
        .start { result in
            switch result {
            case .success:
                // 成功、登録が削除されました
            case .failure(let cause):
                // 失敗しました。causeを確認して原因を調べてください
            }
        }
```

<div id="set-up-mobile-only-otp-enrollment">
  ### モバイル限定の OTP 登録を設定する
</div>

<Tooltip tip="Auth0 Dashboard: サービスを設定するための Auth0 の主要製品です。" cta="用語集を表示" href="/ja/docs/glossary?term=Auth0+Dashboard">Auth0 Dashboard</Tooltip> または <Tooltip tip="Management API: お客様が管理タスクを実行できるようにする製品です。" cta="用語集を表示" href="/ja/docs/glossary?term=Management+API">Management API</Tooltip> を使用して、MFA 要素としてワンタイムパスワード (OTP) を有効にできます。このオプションでは QR コードは不要で、ユーザーは手動で登録できます。

ユーザーに登録を案内するには、[Auth0 Dashboard > User Management > Users](https://manage.auth0.com/#/users) に移動して、対象のユーザーを選択します。次に、Details タブを開き、Multi-Factor Authentication セクションから登録への招待を送信します。

<div id="connect-a-resource">
  #### リソースを接続する
</div>

Auth0 Dashboard または Guardian SDK を使用して、リソースを接続できます。

<div id="use-auth0-dashboard">
  ##### Auth0 Dashboard を使用する
</div>

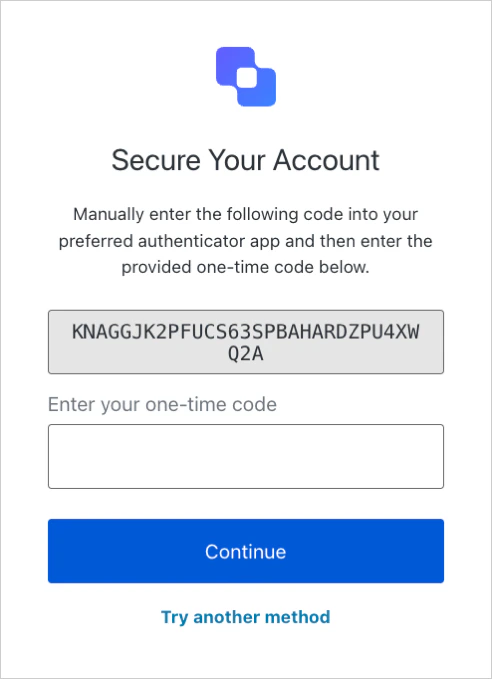
1. Auth0 のログインプロンプトにアクセスし、表示された code、または別のソースから取得した同様の base32 エンコードされたキーをコピーします。次の手順では、この code を認証アプリケーションに入力します。
   <Frame>
     <img src="https://mintcdn.com/translations/eVsQcTnbClN-oB7d/docs/images/cdy7uua7fh8z/1yoqiIuERVTwCU8yfx6IM8/047513dfe1d40a22ce811b131d5ea289/OTP_Challenge_2_-_English.png?fit=max&auto=format&n=eVsQcTnbClN-oB7d&q=85&s=128a02f4c7f65e7a1d82640b1b9842f6" alt="ワンタイム code が表示されたログインプロンプトの例" width="492" height="679" data-path="docs/images/cdy7uua7fh8z/1yoqiIuERVTwCU8yfx6IM8/047513dfe1d40a22ce811b131d5ea289/OTP_Challenge_2_-_English.png" />
   </Frame>
2. コピーした code を、Guardian などの認証アプリケーションに追加します。

<div id="use-the-sdk">
  ##### SDK を使用する
</div>

1. Guardian ライブラリをインポートします。

   ```swift lines theme={null}
   import Guardian
   ```

2. codeジェネレーターを作成します。

   ```swift lines theme={null}
   let codeGenerator = try Guardian.totp(

      base32Secret: enrollmentCode,  // ユーザーが入力した登録code

      algorithm: .sha1			// TOTP で使用されるアルゴリズム

   )
   ```

3. 生成されたcodeを取得します。

   ```swift lines theme={null}
   codeGenerator.code()
   ```

<div id="enter-one-time-code">
  #### ワンタイムcodeを入力
</div>

Auth0 のログインプロンプトで、前の手順で生成したcodeを入力します。

<Frame>
  <img src="https://mintcdn.com/translations/eVsQcTnbClN-oB7d/docs/images/cdy7uua7fh8z/1yoqiIuERVTwCU8yfx6IM8/047513dfe1d40a22ce811b131d5ea289/OTP_Challenge_2_-_English.png?fit=max&auto=format&n=eVsQcTnbClN-oB7d&q=85&s=128a02f4c7f65e7a1d82640b1b9842f6" alt="ワンタイムcodeが表示されたログインプロンプトの例" width="492" height="679" data-path="docs/images/cdy7uua7fh8z/1yoqiIuERVTwCU8yfx6IM8/047513dfe1d40a22ce811b131d5ea289/OTP_Challenge_2_-_English.png" />
</Frame>

［続行］を選択すると、アプリケーションがユーザーの認証要素として追加されたことを示すメッセージが表示されます。

<div id="log-in-with-your-app">
  #### アプリでログインする
</div>

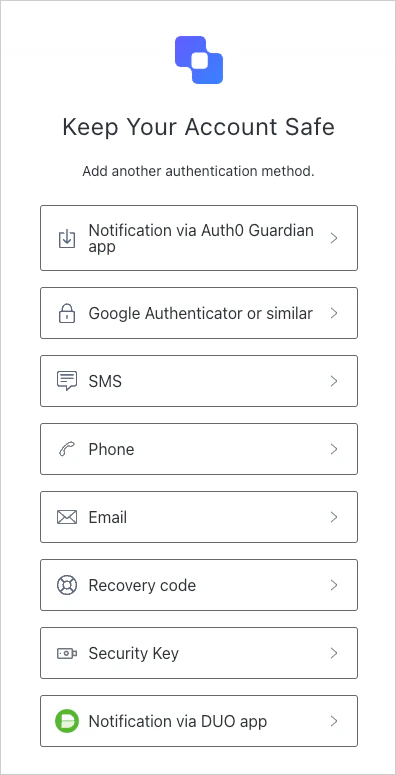
認証要素の登録が完了すると、ユーザーはアプリを使ってログインできます。まず、認証方法として Guardian アプリを選択します。
<Frame>
  <img src="https://mintcdn.com/translations/eVsQcTnbClN-oB7d/docs/images/cdy7uua7fh8z/1k7IsU9kfP5mrXU2jfGHuT/d61e0dcd09b633dbeb2cb54e1fd49018/2025-01-27_14-47-32.png?fit=max&auto=format&n=eVsQcTnbClN-oB7d&q=85&s=8688ecf3a0d42d92a6479adea541793d" alt="認証方法の選択画面" width="396" height="775" data-path="docs/images/cdy7uua7fh8z/1k7IsU9kfP5mrXU2jfGHuT/d61e0dcd09b633dbeb2cb54e1fd49018/2025-01-27_14-47-32.png" />
</Frame>

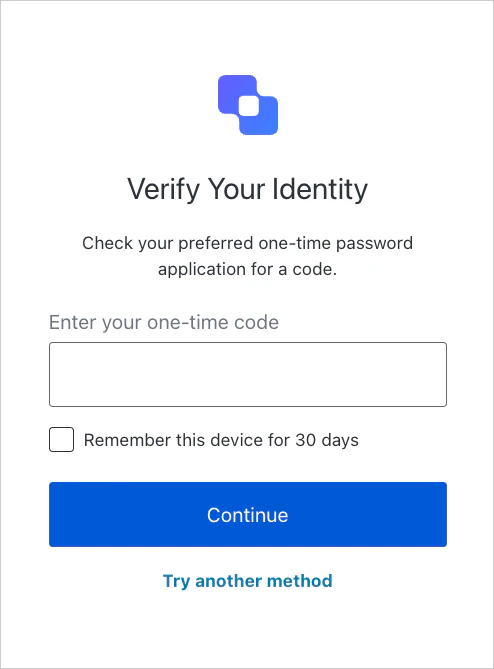
次に、本人確認のため、ログイン プロンプトにワンタイムcodeを入力します。
<Frame>
  <img src="https://mintcdn.com/translations/mMSz-RNYLuOm2GmQ/docs/images/cdy7uua7fh8z/S6uTieLjtuNUrQRMh8uch/21f1671d21ae9f61b63154ffaa21b5a2/OTP_Challenge_-_English.png?fit=max&auto=format&n=mMSz-RNYLuOm2GmQ&q=85&s=5db00906087d0b3d46e36cddc464d667" alt="ユーザーにワンタイムcodeの入力を求める「Verify Your Identity」画面" width="494" height="669" data-path="docs/images/cdy7uua7fh8z/S6uTieLjtuNUrQRMh8uch/21f1671d21ae9f61b63154ffaa21b5a2/OTP_Challenge_-_English.png" />
</Frame>
