> ## Documentation Index
> Fetch the complete documentation index at: https://translations.mintlify.site/llms.txt
> Use this file to discover all available pages before exploring further.
> Universal Login のブランディングオプションを使用して、ユーザーに表示される多要素認証(MFA)ページをカスタマイズする方法を説明します。
# 多要素認証ページをカスタマイズする
これらのカスタマイズは、独自のユーザーインターフェースを持つ Duo には適用されません。
MFA ページは、Universal Login のブランディングオプションを Auth0 ダッシュボード の [Universal Login Settings](https://manage.auth0.com/#/login_settings) セクションで調整することで、ユーザー向けにカスタマイズできます。
Universal Login エクスペリエンスを使用している場合は、そのフローのカスタマイズオプションを使ってページをカスタマイズできます。
また、組織固有のユーザーエクスペリエンス要件に合わせて、HTML コンテンツ全体をカスタマイズすることもできます。詳しくは、[MFA Widget Theme Options](/ja/docs/secure/multi-factor-authentication/customize-mfa/mfa-widget-theme-options) を参照してください。
Universal Login エクスペリエンス では、MFA はさらにシンプルな形でユーザーに提示されます。ログインのための認証情報を入力すると、MFA 画面が表示されます。MFA 要素がまだ登録されていない場合は登録を求められ、登録済みの場合は MFA 認証情報の入力を求められます。
## MFA API を使用する
Auth0 では、次のようなシナリオ向けに [MFA API](/ja/docs/secure/multi-factor-authentication/multi-factor-authentication-developer-resources/mfa-api) を提供しています。
* [Resource Owner Password Grant を使用してユーザーを認証する](/ja/docs/secure/multi-factor-authentication/authenticate-using-ropg-flow-with-mfa)。
* [ユーザーが自身の認証要素を管理できるようにする](/ja/docs/secure/multi-factor-authentication/manage-mfa-auth0-apis/manage-authenticator-factors-mfa-api) インターフェースを構築する。
* [登録チケット](/ja/docs/secure/multi-factor-authentication/multi-factor-authentication-developer-resources/create-custom-enrollment-tickets) を使用して、ユーザーを MFA への登録に招待する。
MFA API を使用するには、アプリケーションで MFA の grant type を有効にする必要があります。Auth0 ダッシュボードで MFA grant を有効にするには、次の手順に従います。
1. [Dashboard > Applications > Applications](https://manage.auth0.com/#/applications) に移動し、対象のアプリケーションを選択します。
2. **Settings** タブの下部にある **Advanced Settings** をクリックします。
3. **Grant Types** タブをクリックし、**MFA** を選択します。
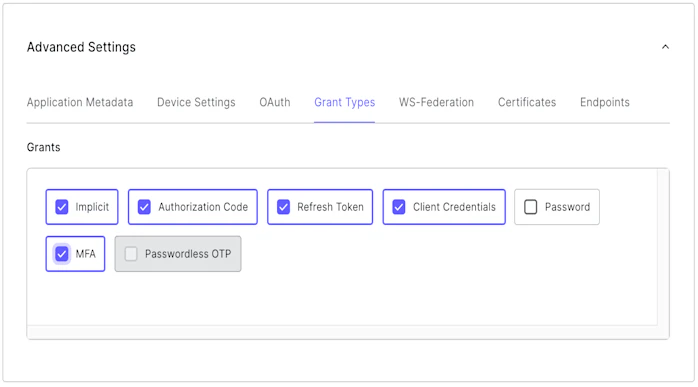 詳細については、[Enable Multi-Factor Authentication](/ja/docs/secure/multi-factor-authentication/enable-mfa) を参照してください。
4. **Save Changes** をクリックします。
詳細については、[Enable Multi-Factor Authentication](/ja/docs/secure/multi-factor-authentication/enable-mfa) を参照してください。
4. **Save Changes** をクリックします。
### 制限事項
MFA API は、SMS、Guardian アプリ内のプッシュ通知、メール、OTP 要素で利用できるように設計されています。Duo を使用した登録には対応していません。
## ActionsでMFAポリシーをカスタマイズする
Actions を使用すると、特定のアプリケーションのユーザーや、特定のユーザーメタデータまたは IP 範囲を持つユーザーに MFA を必須にするなど、テナントの MFA ポリシーをカスタマイズできます。
Actions の作成方法がわからない場合は、[Write Your First Action](/ja/docs/customize/actions/write-your-first-action) を参照してください。
Actions で定義した MFA 関連の動作は、Dashboard の **Multi-Factor Auth** セクションで設定した **Define policy** の内容より常に優先されます。
詳しくは、[Enable Multi-Factor Authentication](/ja/docs/secure/multi-factor-authentication/enable-mfa) を参照してください。
Actions を記述する際は、`provider` 設定を使って、MFA を強制するかどうかや、使用する要素を指定できます。動作は、Classic Login と Universal Login エクスペリエンスのどちらを使用しているかによって異なります。
| Provider | Classic Experience | New Experience |
| -------------------- | -------------------- | ------------------------------------------------------ |
| any | Push、SMS、または OTP | Push、SMS、Voice、OTP、Email、または WebAuthN セキュリティキー (有効な場合) |
| guardian | Push、SMS、または OTP | Push、SMS、OTP、または Email |
| google-authenticator | Google Authenticator | Push、SMS、OTP、または Email |
| duo | Duo | Duo |
Universal Login を使用している場合は、MFA ログインページのカスタマイズを有効にすることで、Classic Login と同じ動作にできます。
`guardian` と `google-authenticator` のオプションは、後方互換性のために残されているレガシー設定であり、今後は使用しないでください。代わりに `any` を使用することを推奨します。`google-authenticator` オプションでは、ユーザーはリカバリーコードを登録できません。
`provider` を特定のオプションに設定すると、Dashboard の有効 / 無効トグルの設定は手動で上書きされます。Dashboard で他の要素が有効になっている場合でも、次の Action を使用してユーザーに Duo への登録を求めることができます。
```js lines theme={null}
exports.onExecutePostLogin = async (event, api) => {
// プロバイダーをプログラムで Duo に強制する
api.multifactor.enable('duo')
}
```
## 一般的なユースケースの例
以下は、Actions で処理できる代表的なコンテキストベースの MFA シナリオです。
テナントで、Actions で明示的に要求した場合にのみ MFA がトリガーされるようにするには、テナントのデフォルトの MFA ポリシーを **Never** に設定してください。
詳しくは、[Multi-Factor Authentication Factors](/ja/docs/secure/multi-factor-authentication/multi-factor-authentication-factors#policies) の「Policies」セクションをご覧ください。
### 特定のアプリケーションで MFA を必須にする
ユーザーが特定のアプリケーションにログインする場合にのみ MFA が要求されるように設定できます。
```js lines theme={null}
exports.onExecutePostLogin = async (event, api) => {
const CLIENTS_WITH_MFA = [
'{yourClientId1}',
'{yourClientId2}',
'{yourClientId3}'
];
if (CLIENTS_WITH_MFA.includes(event.client.client_id)) {
api.multifactor.enable('duo', { allowRememberBrowser: false })
}
}
```
### 特定のユーザーに MFA を必須にする
MFA を使用するよう指定したユーザーに対してのみ MFA が求められるように、設定をカスタマイズできます。
```js lines theme={null}
exports.onExecutePostLogin = async (event, api) => {
if (event.user.user_metadata && event.user.user_metadata.use_mfa) {
api.multifactor.enable('duo', { allowRememberBrowser: false });
}
}
```
### MFA プロンプトの頻度を変更する
場合によっては、同じブラウザーからログインするたびにユーザーへ MFA を求めたくないこともあります。その場合は、`allowRememberBrowser` プロパティを使用してその動作を変更できます。
```js lines theme={null}
exports.onExecutePostLogin = async (event, api) => {
api.multifactor.enable('any', { allowRememberBrowser: false });
}
```
プロパティの値に応じて、動作は次のようになります。
| Value | Description |
| ------- | ----------------------------------------------------------------------------------------------------------------------------------------------------------------------------------------------------------------------------------------------------------------------------------------------------------------- |
| `true` | provider が `google-authenticator` または `duo` に設定されている場合、ユーザーには 30 日に 1 回 MFA が求められます。provider が `guardian` に設定されている場合、MFA プロンプトに登録用のチェックボックスが表示され、登録するかどうかをユーザーが選択できます。デフォルトは `false` です。詳しくは、[Customize Multi-Factor Authentication Pages ](/ja/docs/secure/multi-factor-authentication/customize-mfa) を参照してください。 |
| `false` | ユーザーが認証するたびに MFA が求められます。 |
これらの期間の値は、アクティブユーザーを前提としています。ユーザーが 7 日以上非アクティブな場合、その Cookie は期限切れとなり、次回ログイン時に MFA が求められます (`allowRememberBrowser` が `true` に設定されていて、前回 MFA を求められてから 30 日経過していない場合でも同様です) 。
ユーザーが MFA をスキップできるようにすると、Cookie がユーザーのブラウザーに保存されます。ユーザーに Cookie が設定されていても MFA を必須にしたい場合は、次の 2 つの方法があります。
* `allowRememberBrowser` を `false` に設定する
* `/authorize` エンドポイントの呼び出し時に、`acr_values` を `http://schemas.openid.net/pape/policies/2007/06/multi-factor` に設定する。
ユーザーが信頼済みデバイスを紛失した場合は、Auth0 の Management API [Invalidate Remember Browser](https://auth0.com/docs/api/management/v2#!/Users/post_invalidate_remember_browser) エンドポイントを呼び出すことで、その特定のユーザーに次回ログイン時の MFA を求めることができます。
### ネットワーク外のユーザーに MFA を要求する
指定した社内 IP アドレスのネットワークへのアクセスが適切に管理されていることを前提に、企業ネットワークの外部からリクエストしているユーザーに対してのみ、Auth0 で MFA を要求することもできます。
```js lines theme={null}
exports.onExecutePostLogin = async (event, api) => {
const ipaddr = require('ipaddr.js@1.9.0');
const corp_network = '192.168.1.134/26';
const current_ip = ipaddr.parse(event.request.ip);
if (!current_ip.match(ipaddr.parseCIDR(corp_network))) {
api.multifactor.enable('any', {allowRememberBrowser: false});
}
}
```
### リフレッシュトークンのリクエストでは MFA をバイパスする
ユーザーから頻繁にログアウトされるとの報告がある場合、MFA の利用時には リフレッシュトークン のリクエストをバイパスする必要があるかもしれません。デフォルトの動作は、`event.transaction.protocol` オブジェクトプロパティに対する filter Action を使用して変更できます。
```js lines theme={null}
exports.onExecutePostLogin = async (event, api) => {
if (event.transaction.protocol !== 'oauth2-refresh-token') {
// MFA関連のコマンドをここに記述
api.multifactor.enable('any');
}
};
```
Action `event` オブジェクトの詳細については、[Actions トリガー: post-login - Event Object](/ja/docs/customize/actions/explore-triggers/signup-and-login-triggers/login-trigger/post-login-event-object)をご覧ください。
## 詳細はこちら
* [クラシックログインのMFAをカスタマイズする](/ja/docs/secure/multi-factor-authentication/customize-mfa/customize-mfa-classic-login)
* [MFA を使用して Resource Owner Password Flow で認証する](/ja/docs/secure/multi-factor-authentication/authenticate-using-ropg-flow-with-mfa)
* [Auth0 MFA API](/ja/docs/secure/multi-factor-authentication/multi-factor-authentication-developer-resources/mfa-api)
* [Authentication API で認証要素を管理する](/ja/docs/secure/multi-factor-authentication/manage-mfa-auth0-apis/manage-authenticator-factors-mfa-api)
* [MFA Widget のテーマオプション](/ja/docs/secure/multi-factor-authentication/customize-mfa/mfa-widget-theme-options)
* [MFA テーマの言語辞書](/ja/docs/secure/multi-factor-authentication/customize-mfa/mfa-theme-language-dictionary)