> ## Documentation Index
> Fetch the complete documentation index at: https://translations.mintlify.site/llms.txt
> Use this file to discover all available pages before exploring further.
> MFA のプッシュ通知を設定する方法を説明します。
# MFA のプッシュ通知を設定する
[iOS](/ja/docs/secure/multi-factor-authentication/auth0-guardian/guardian-for-ios-sdk) および [Android](/ja/docs/secure/multi-factor-authentication/auth0-guardian/guardian-for-android-sdk) 向けの [Guardian](/ja/docs/secure/multi-factor-authentication/auth0-guardian) SDK では、ベンダー固有のプッシュ通知サービス向けに独自に開発したアプリを使用できます。プッシュ通知は、AWS Simple Notification Service (SNS) プラットフォーム向けに設定することも、Direct to Vendor サービスを使用して Firebase Cloud Messaging (FCM) と Apple Push Notification (APN) の認証情報を Auth0 に直接追加することもできます。
## AWS SNS の設定
プッシュ通知を設定する前に、以下の前提条件を満たしてください。
1. AWS マネジメントコンソールを使用して [SNS Platform Application を作成](https://console.aws.amazon.com/sns/v3/home?region=us-east-1#/mobile/push-notifications/platform-applications) し、その ARN を控えておきます。
2. Platform Application エンドポイントを作成する権限を持つ AWS Access Key ID を作成します。Guardian は、登録が正常に完了すると、その一環として適切なデバイストークンを使用して Platform Application エンドポイントを自動的に作成します。
### AWS SNS を使用してプッシュ通知を設定する
Guardian からプッシュ通知を受信するには、まず Guardian のデフォルトの SNS 設定を上書きする必要があります。その後、Android と iOS のプッシュ通知を設定できます。
1. Auth0 Dashboard で [Security > Multi-factor Auth](https://manage.auth0.com/#/security/mfa) に移動し、**Push via Auth0 Guardian** を選択します。この方法が無効になっている場合は、右上のトグルを選択して有効にします。
2. **Custom** を選択して追加設定を表示します。
3. Push Notification Service セクションで、**Amazon SNS** を選択します。
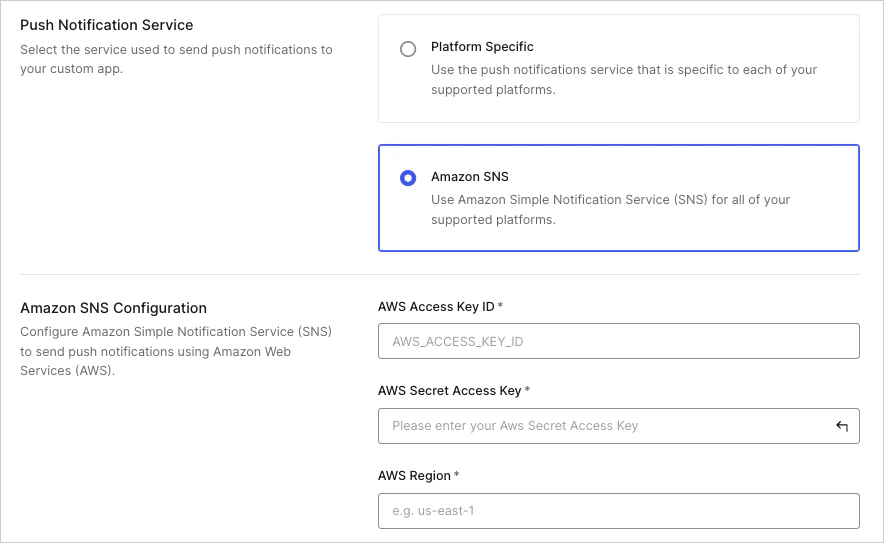 1. Amazon SNS Configuration セクションで、次のフィールドに入力します。
| フィールド | 説明 |
| --------------------- | --------------------- |
| AWS Access Key ID | AWS Access Key ID |
| AWS Secret Access Key | AWS Secret Access Key |
| AWS Region | AWS アプリケーションのリージョン |
2. **Save** を選択して変更を保存します。
1. Amazon SNS Configuration セクションで、次のフィールドに入力します。
| フィールド | 説明 |
| --------------------- | --------------------- |
| AWS Access Key ID | AWS Access Key ID |
| AWS Secret Access Key | AWS Secret Access Key |
| AWS Region | AWS アプリケーションのリージョン |
2. **Save** を選択して変更を保存します。
## FCM を使用して Android のプッシュ通知を設定する
Auth0 Dashboard で Android のプッシュ通知を設定するには、まず FCM サーバーの認証情報を取得します。詳しくは、Google の [Firebase ドキュメント](https://firebase.google.com/docs/admin/setup#initialize-sdk)を参照してください。
1. Firebase Console に移動し、対象のプロジェクトを選択します。
2. **Settings** メニューを開き、**Service Accounts** を選択します。
3. **Generate New Private Key** を選択して、認証情報ファイルをダウンロードします。
認証情報を取得したら、Auth0 Dashboard でプッシュ通知を設定できます。
認証情報を取得したら、Auth0 Dashboard から Android のプッシュ通知を設定できます。
1. [Security > Multi-factor Auth](https://manage.auth0.com/#/guardian) に移動し、**Push Notification using Auth0 Guardian** を選択します。
2. Push Notification App セクションで **Custom** を選択して、追加の設定を表示します。
3. Android App Configuration セクションで、以下を設定します。
| 設定 | 説明 |
| --------------------- | -------------------------------------------------------------------------------------- |
| Android アプリを有効にする | Auth0 がカスタムアプリケーションにプッシュ通知を送信できるようにします。このオプションが有効になっていない場合、プッシュ通知は送信されません。 |
| Google Play Store URL | ユーザーが MFA を設定するためにダウンロードする必要があるカスタムアプリケーションへのリンクを指定します。 |
| FCM サーバー認証情報 | [FCM サーバー認証情報](https://firebase.google.com/docs/admin/setup#initialize-sdk)をアップロードします。 |
4. **Save** を選択して変更を保存します。
## APNs を使用して iOS のプッシュ通知を設定する
Auth0 Dashboard で iOS のプッシュ通知を設定するには、まず APN 証明書を取得します。
1. Apple デベロッパーアカウントで [新しい APN 証明書](https://developer.apple.com/documentation/usernotifications/setting_up_a_remote_notification_server/establishing_a_certificate-based_connection_to_apns#2947597) を生成します。
2. 証明書をローカルにインストールします。
3. Keychain Access で **Apple Sandbox Push Services: {AppId}** 証明書を探します。
4. 証明書と対応する秘密鍵を、パスワードなしの P12 ファイル (デフォルト名: `Certificates.p12`) としてエクスポートします。
5. RC2 ではなく Triple DES を使用して P12 ファイルを生成するには、次のコマンドを実行します。
```bash lines theme={null}
openssl pkcs12 -in Certificates.p12 -legacy -nocerts -nodes -out pk.pem -passin pass:"" &&
openssl pkcs12 -in Certificates.p12 -legacy -nokeys -out cert.crt -passin pass:"" &&
openssl pkcs12 -export -inkey pk.pem -in cert.crt -descert -out Certificate_3des.p12 -passout pass:"" &&
rm pk.pem cert.crt
```
6. `Certificates.p12` を削除し、Auth0 Dashboard では `Certificate_3des.p12` を APN 証明書として使用します。
認証情報を取得したら、Auth0 Dashboard でプッシュ通知を設定できます。
認証情報を取得したら、Auth0 Dashboard から iOS のプッシュ通知を設定できます。
1. [Security > Multi-factor Auth](https://manage.auth0.com/#/guardian) に移動し、**Push Notification using Auth0 Guardian** を選択します。
2. Push Notification App セクションで **Custom** を選択して、追加設定を表示します。
3. iOS App Configuration セクションで、次の項目を設定します。
| フィールド | 説明 |
| ------------------- | ------------------------------------------------------------------------------------------------------------------------------------------------------------------------------ |
| Enable iOS App | Auth0 がカスタムアプリケーションにプッシュ通知を送信できるようにします。このオプションを有効にしないと、プッシュ通知は送信されません。 |
| Apple App Store URL | MFA を設定するためにユーザーがダウンロードするカスタムアプリケーションへのリンクを指定します。 |
| APNs Bundle ID | iOS Developer Console で確認できます。 |
| APNs Certificate | [P12 証明書](https://developer.apple.com/documentation/usernotifications/setting_up_a_remote_notification_server/establishing_a_certificate-based_connection_to_apns) をアップロードします。 |
| iOS App Environment | Apple デベロッパーアカウントの設定に基づいて指定します。 |
4. **Save** を選択して変更を保存します。
## 詳細はこちら
* [Auth0 Guardian](/ja/docs/secure/multi-factor-authentication/auth0-guardian)
* [Android 用 Guardian SDK](/ja/docs/secure/multi-factor-authentication/auth0-guardian/guardian-for-android-sdk)
* [Guardian.swift iOS SDK](/ja/docs/secure/multi-factor-authentication/auth0-guardian/guardian-for-ios-sdk)
* [カスタム登録チケットを作成する](/ja/docs/secure/multi-factor-authentication/multi-factor-authentication-developer-resources/create-custom-enrollment-tickets)
* [プッシュ認証器の登録とチャレンジ](/ja/docs/secure/multi-factor-authentication/authenticate-using-ropg-flow-with-mfa/enroll-and-challenge-push-authenticators)